Android Push Notifications
This generation of SDK is deprecated and is no longer supported. Information about the current version can be found here.
Push Notifications on Android are sent with the help of the FCM service. To work with it, two keys are required: a client and server key. If you have a project, move on to the second part of this article.
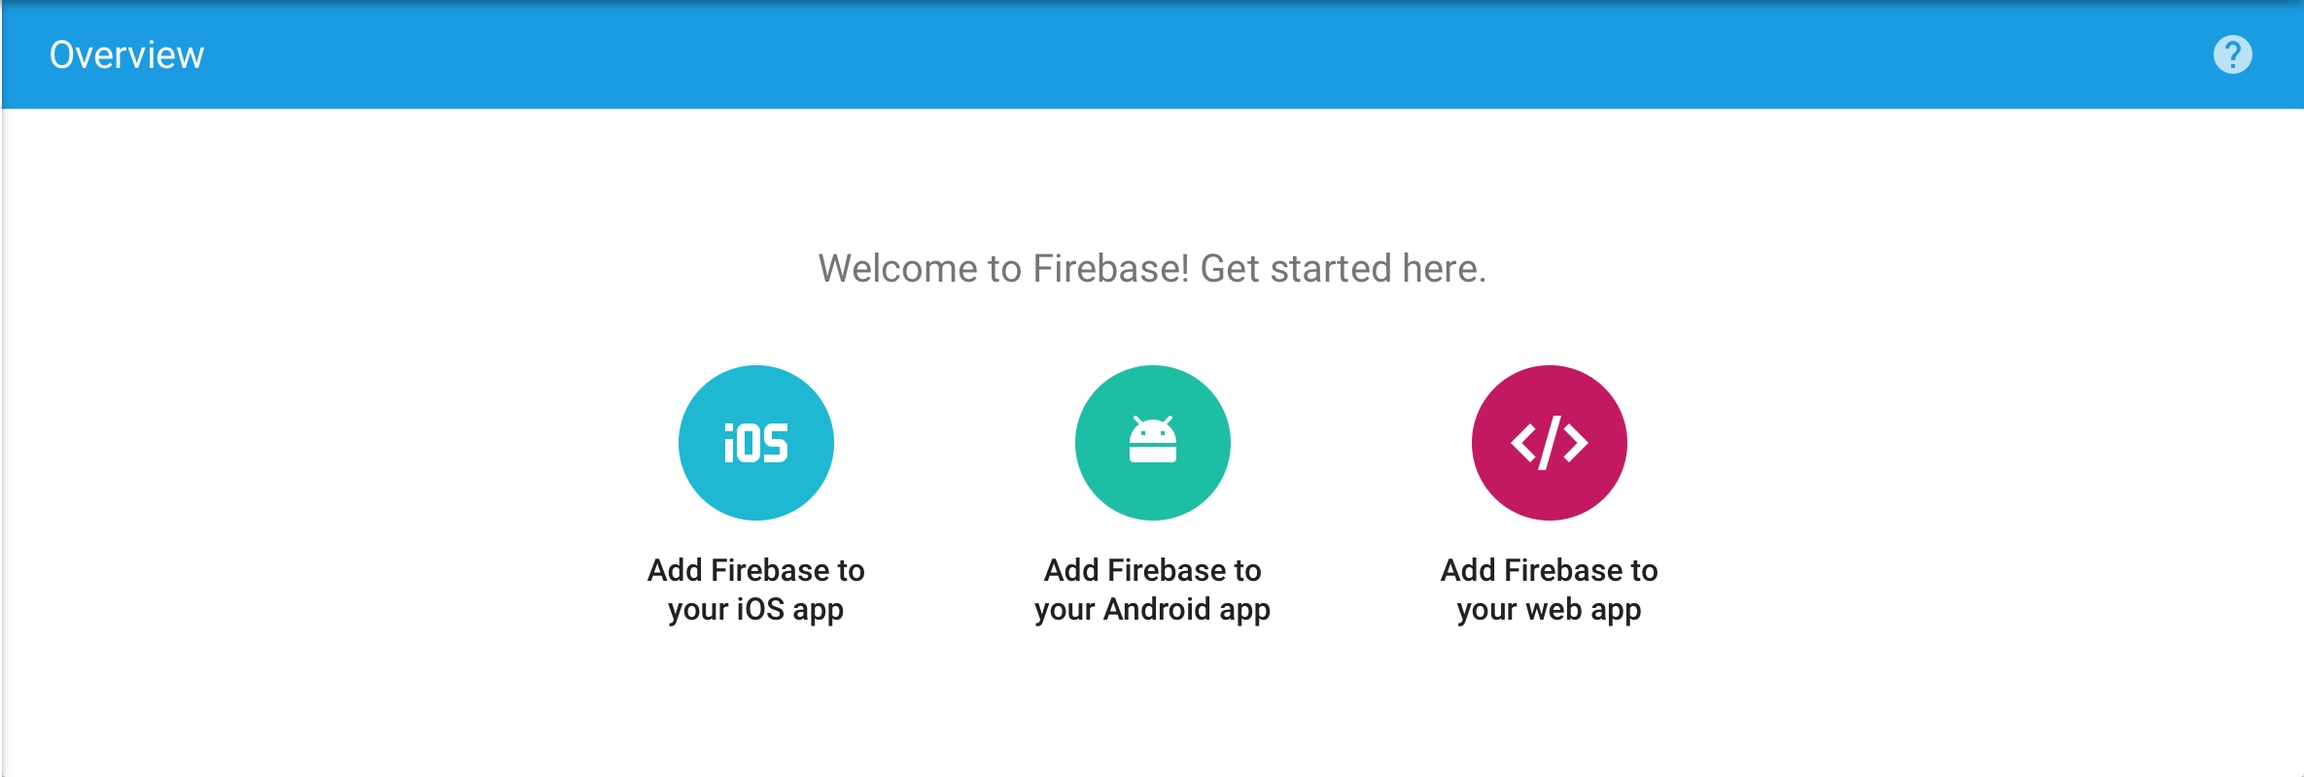
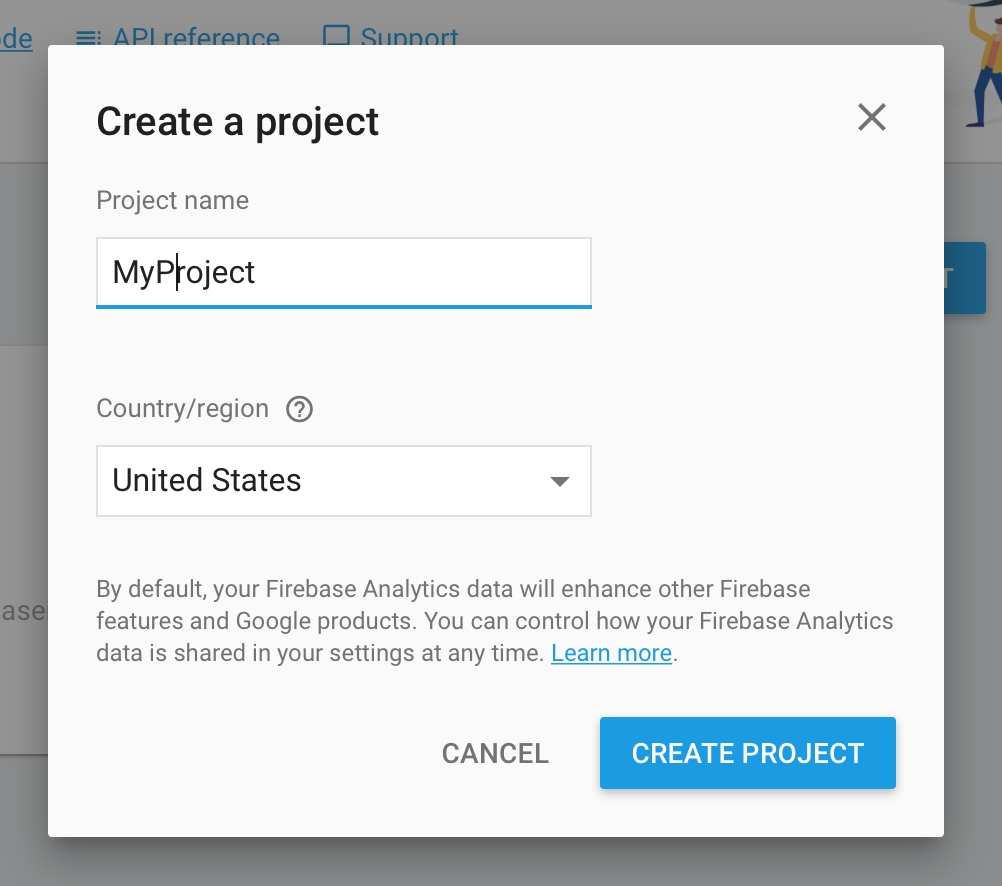
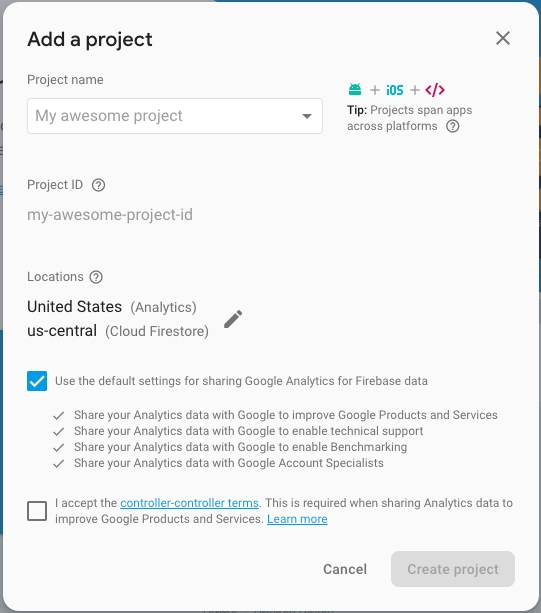
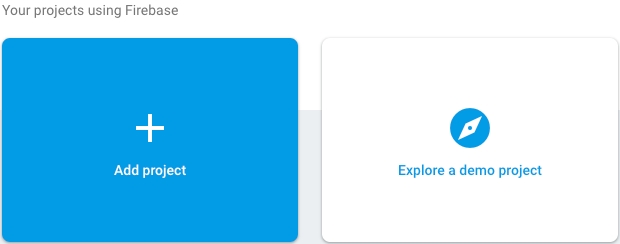
Add a new project to the .
Fill in the name and country of your project.
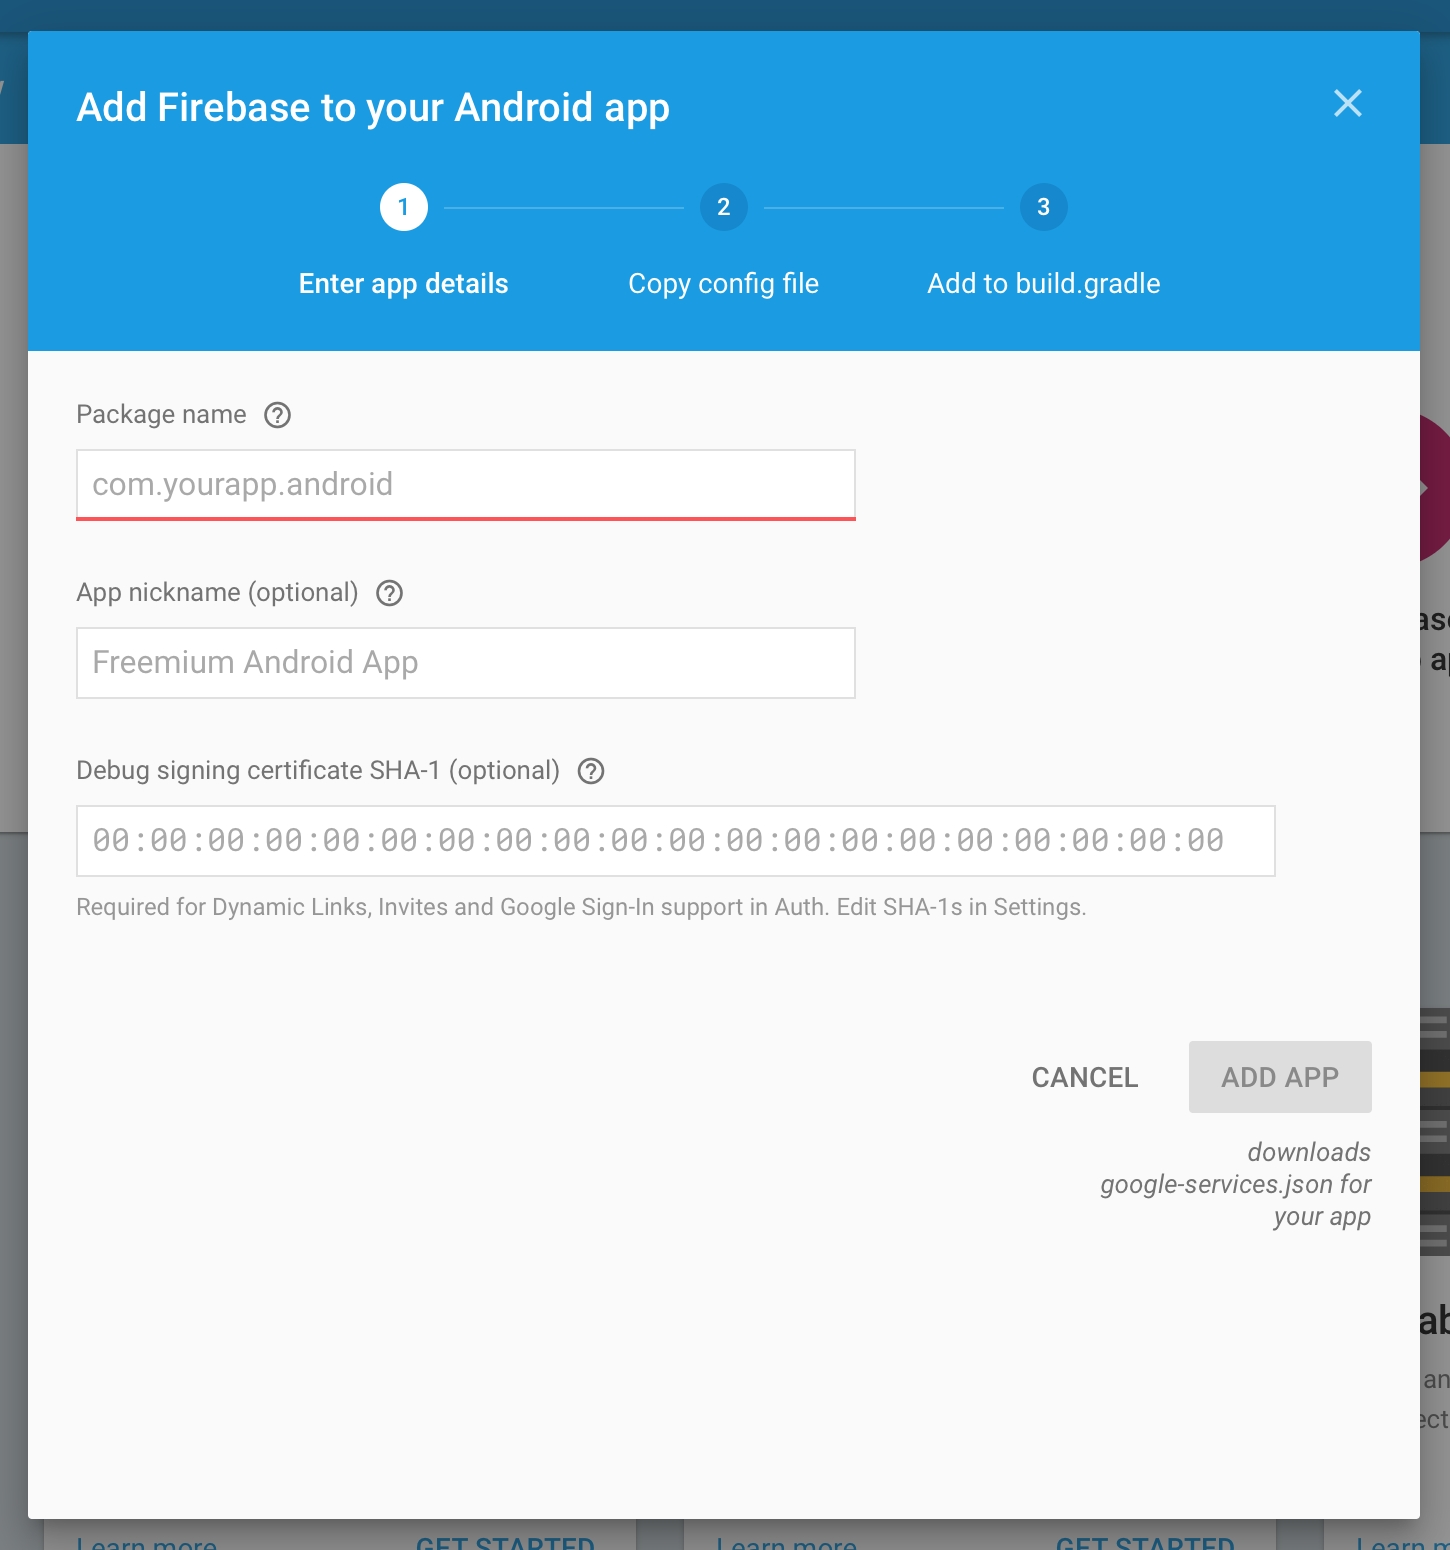
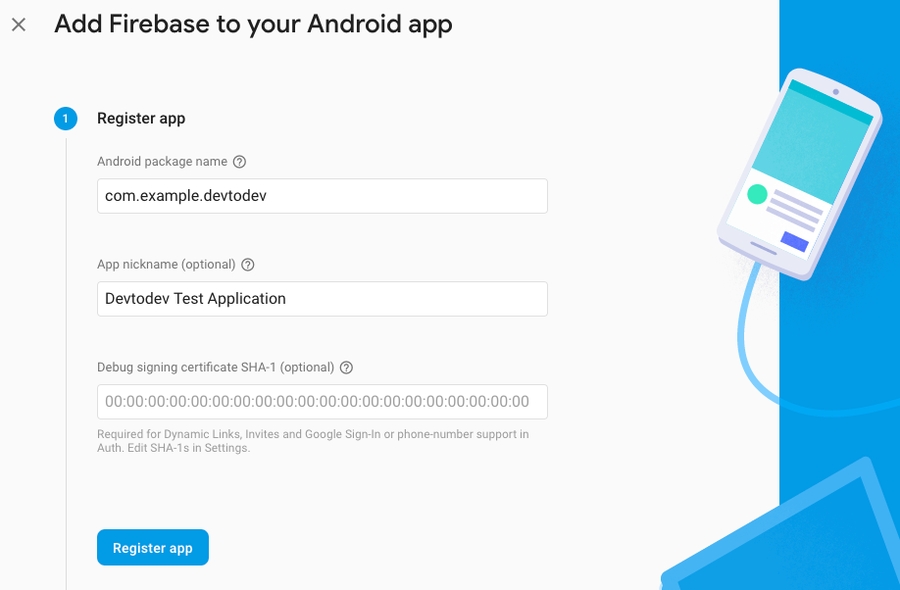
Congratulations, the project has been created! Now you need to indicate the package name of your Android app.
After a successful registration in Firebase, you can receive your keys that you will use in devtodev.
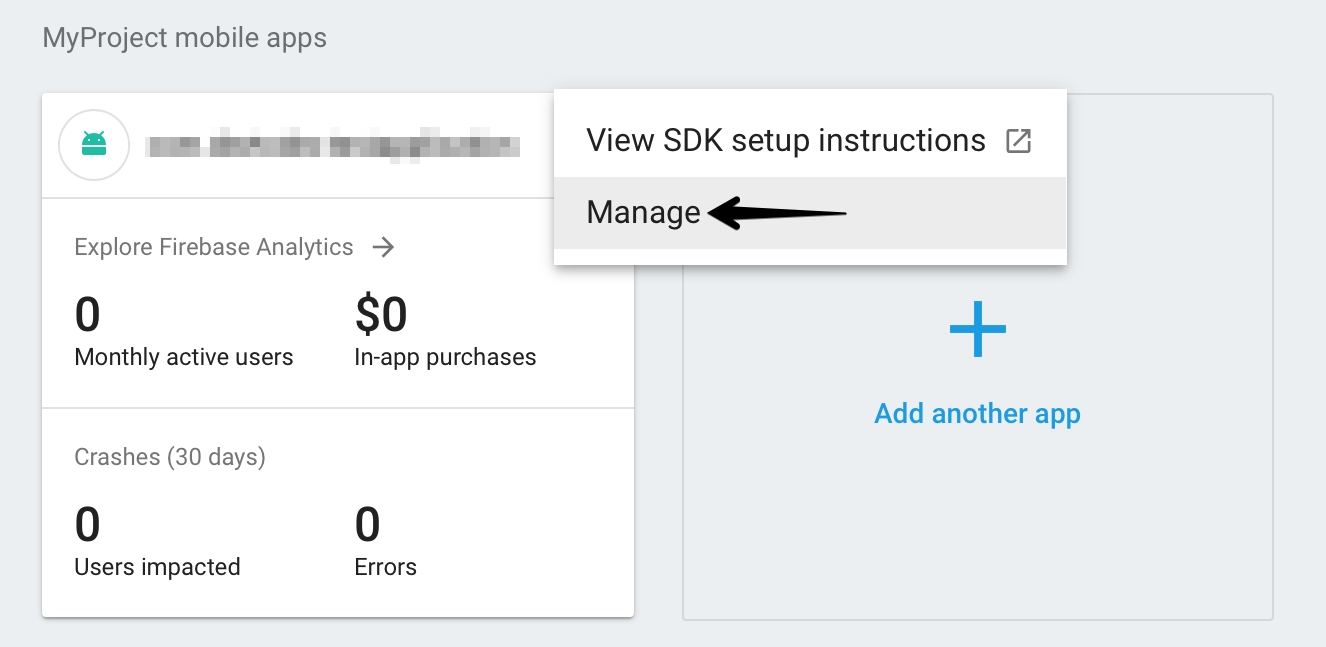
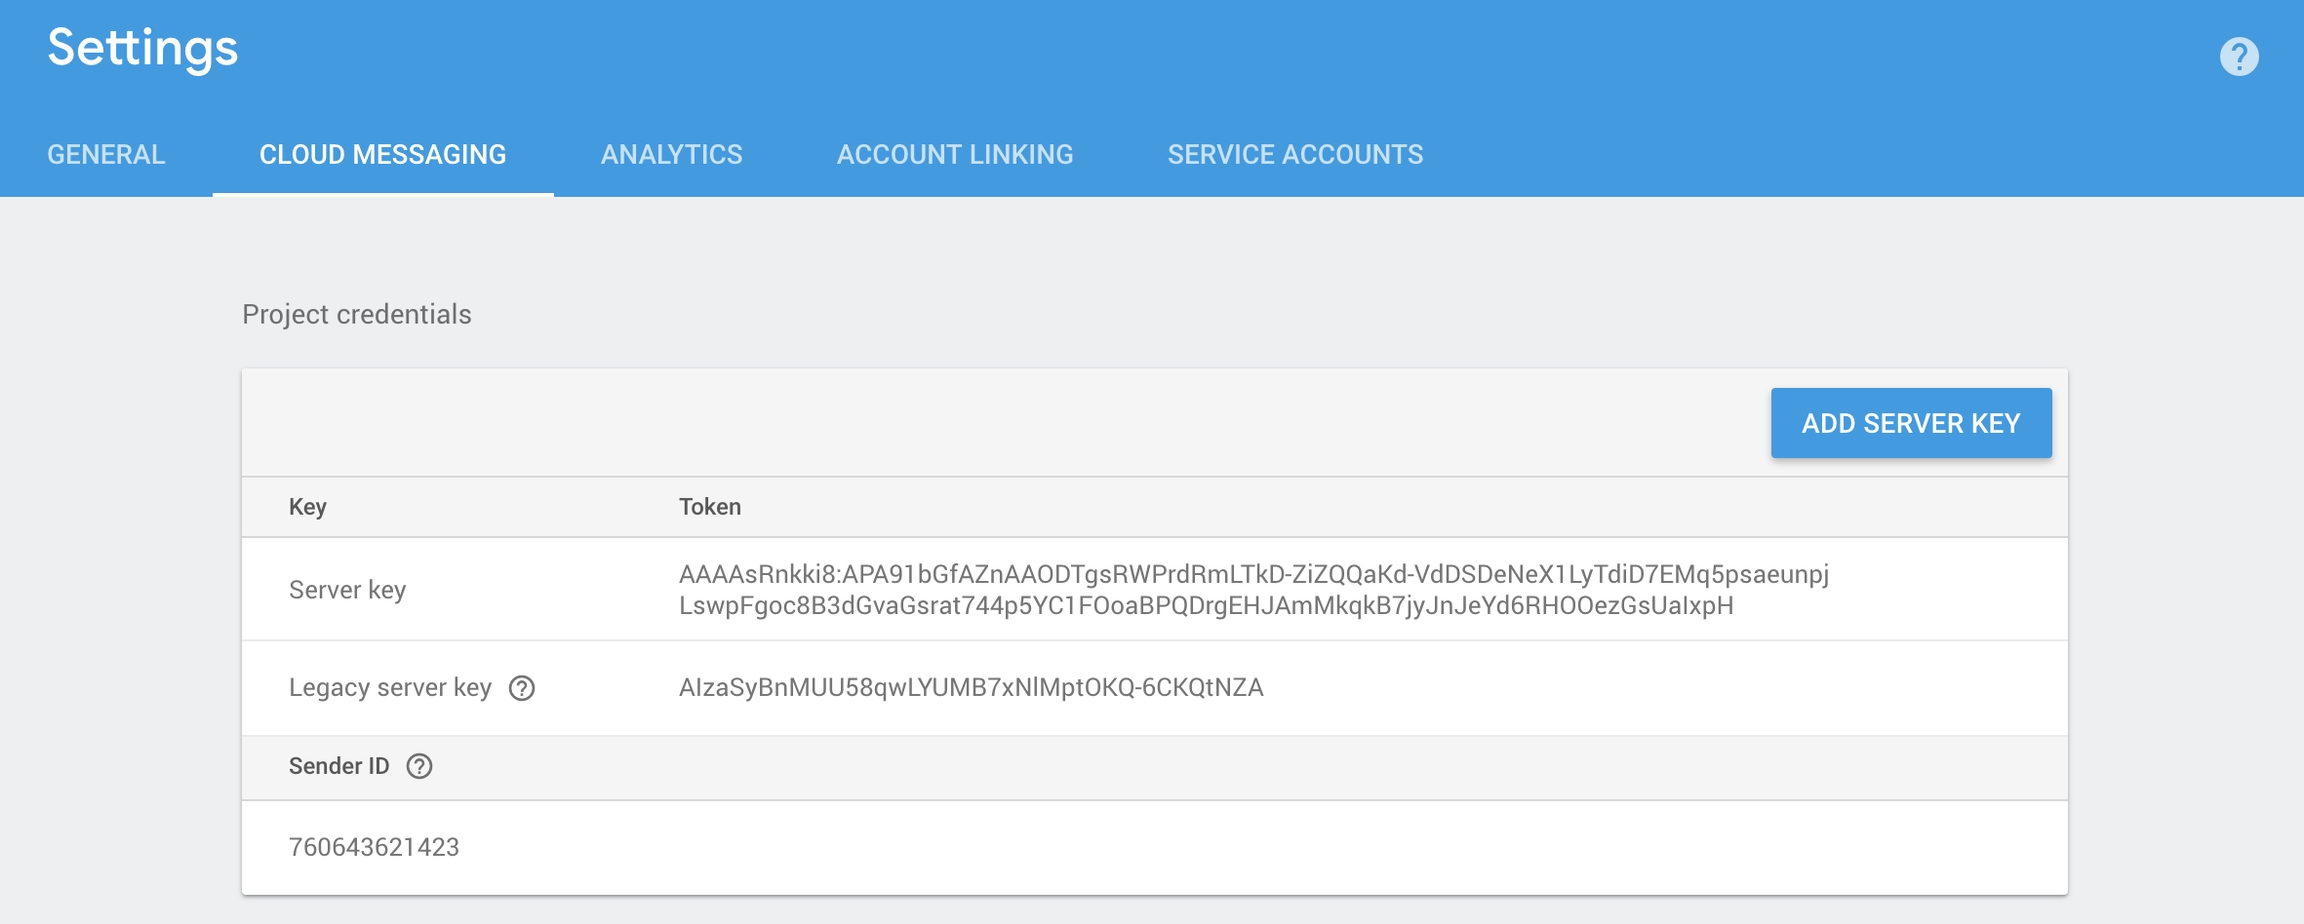
Go to the settings of your Android project.
Remember or copy Server key and Sender ID from the Cloud Messaging tab. You will need them to integrate push notifications and create push campaigns.
Download the generated by google-service.json file and add it to the project.
The Google services plugin for loads the google-services.json file that you just downloaded. Modify your build.gradle files to use the plugin.
Project-level build.gradle (<project>/build.gradle):
App-level build.gradle (<project>/<app-module>/build.gradle):
Finally, press "Sync now" in the bar that appears in the IDE:
In Activity (where the SDK initializes) add the push notifications initialization and the listener of push notifications processing.
In case you use several push notifications services or would like to use your own implementation of FirebaseMessagingService, please add the call of the method for displaying messages sent from the devtodev system:
For example:
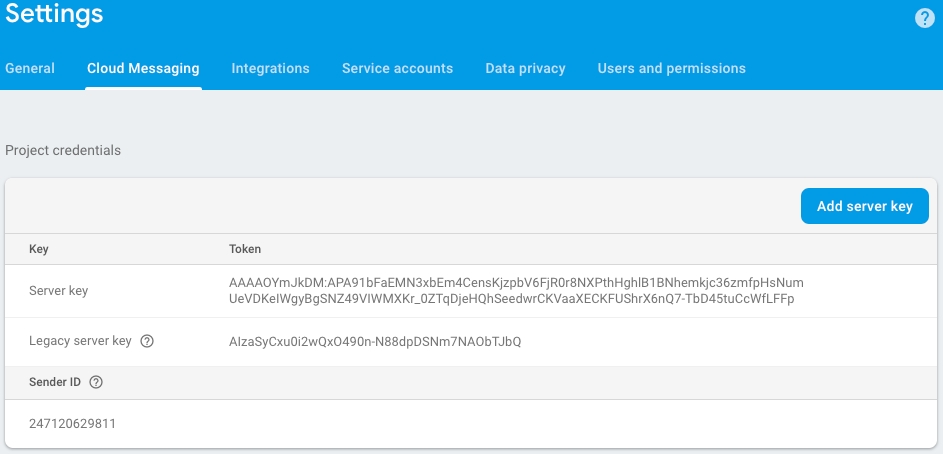
1. Go to and then to your project settings. On the Cloud messaging tab get the Firebase Cloud Messaging token of your project.
2. Proceed to Settings of your app in devtodev.
3. Go to Integration page and insert the previously received Firebase Cloud Messaging token to the FCM token field in Push notifications section.
4. If the Firebase Cloud Messaging token is correct, you will see the following result
Open PUSH NOTIFICATIONS section and click on 'Add new campaign" button
Fill in campaign name, select an app for delivery*
Choose user group to send a message. You can choose existing segment or create a new one
Enter notification details
You can create a campaign only after at least one push token comes from devtodev SDK integrated to your application. Otherwise the app will not be displayed in the list.
Optional. To set the custom icons to be shown in push-notification on the SDK part, use the following methods: To set the small icon:
To set the default color of the small icon:
To set the large icon:
Use resources of your app. For example, R.drawable.ic_launcherIcons which set in the push-notification wizard have priority over the icons which set in these methods.
Make some tests and correct the message if it's required
Schedule the delivery
That's it!
DevToDevPushManager.setCustomSmallIcon(int resourceId);DevToDevPushManager.setCustomSmallIconColor(int colorHexadecimal)DevToDevPushManager.setCustomLargeIcon(int resourceId);buildscript {
dependencies {
// Add this line
classpath 'com.google.gms:google-services:4.3.3'
}
}dependencies {
...
implementation 'com.devtodev:android:1.14.5'
implementation 'com.google.android.gms:play-services-base:17.1.0'
implementation 'com.google.firebase:firebase-core:17.2.3'
implementation 'com.google.firebase:firebase-messaging:20.1.0'
}
// Add to the bottom of the file
apply plugin: 'com.google.gms.google-services'DevToDevPushManager.displayPushNotification(Context context, RemoteMessage remoteMessage);public class MyFirebaseMessagingService extends FirebaseMessagingService {
@Override
public void onMessageReceived(RemoteMessage remoteMessage) {
Map<String, String> data = remoteMessage.getData();
if (data != null) {
if (data.containsKey("_k")) {
DevToDevPushManager.displayPushNotification(this, remoteMessage);
} else {
showNotification(remoteMessage);
}
}
}
}public class MainActivity extends AppCompatActivity implements PushListener {
@Override
protected void onCreate(Bundle savedInstanceState) {
super.onCreate(savedInstanceState);
setContentView(R.layout.activity_main);
DevToDevPushManager.setPushListener(this);
DevToDevPushManager.init(getIntent());
}
@Override
public void onRegisteredForPushNotifications(String s) {
// Insert the code for processing the received token
}
@Override
public void onFailedToRegisteredForPushNotifications(String s) {
// Insert the code for tracking integration errors
}
@Override
public void onPushNotificationsReceived(Map<String, String> map) {
// Insert the code to track received notifications
}
@Override
public void onPushNotificationOpened(PushMessage pushMessage, @Nullable ActionButton actionButton) {
// Insert the code to track opened notification
}
}Integration of push notification on UE4
This generation of SDK is deprecated and is no longer supported. Information about the current version can be found here.
Add the application to your space in devtodev system
Android. Get API key from Google APIs Console. It is nessesary to activate Google Cloud Messaging for Android before key generation. Detailed information on how to receive an API key you can find in native Android devtodev SDK documentation
iOS. Generate Developer or Production Certificate for the application and get Private key file (.p12) on its basis. Detailed information on how to receive a Private key file you can find in native iOS devtodev SDK documentation
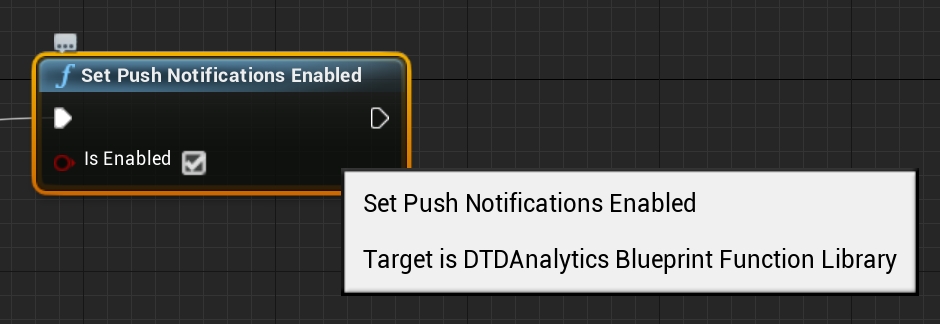
Set Push Notification Enabled in blueprint.
Open PUSH NOTIFICATIONS section and click on "Add new campaign" button
Fill in campaign name, select an app for delivery*
Choose user group to send a message. You can choose existing segment or create a new one
Enter notification details
You can create a campaign only after at least one push token comes from devtodev SDK integrated to your application. Otherwise the app will not be displayed in the list.
Submit the data to the application settings in devtodev system
Integrate devtodev SDK to the application (see the "SDK integration" division to learn more about integrating and initializing devtodev SDK)
Set Push Notification Enabled in blueprint.
Create a campaign for sending push notifications in "Push" section
Schedule the delivery
That's it!
Integration of push notifications on Windows 8.1 and Windows 10
This generation of SDK is deprecated and is no longer supported. Information about the current version can be found here.
To enable Push Notifications you will have to perform the following actions:
Add the application to your space in devtodev system
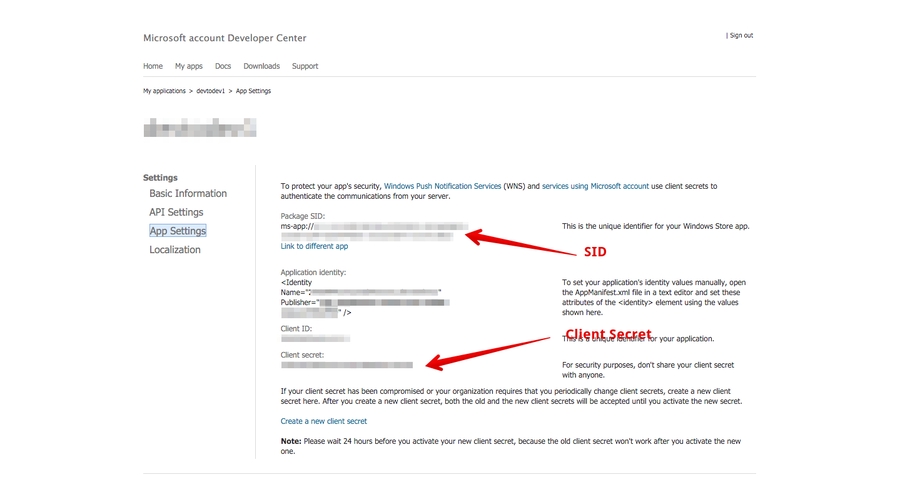
Activate Windows Messaging Service ang get SID and Client Secret values
Add SID and Client Secret to the application integration settings in devtodev system
Integrate devtodev SDK to the application (see the "SDK integration" section to learn more how to integrate and initialize devtodev SDK)
Go to the application settings in your Windows Store dashboard
Open Push Notifications submenu in Services menu
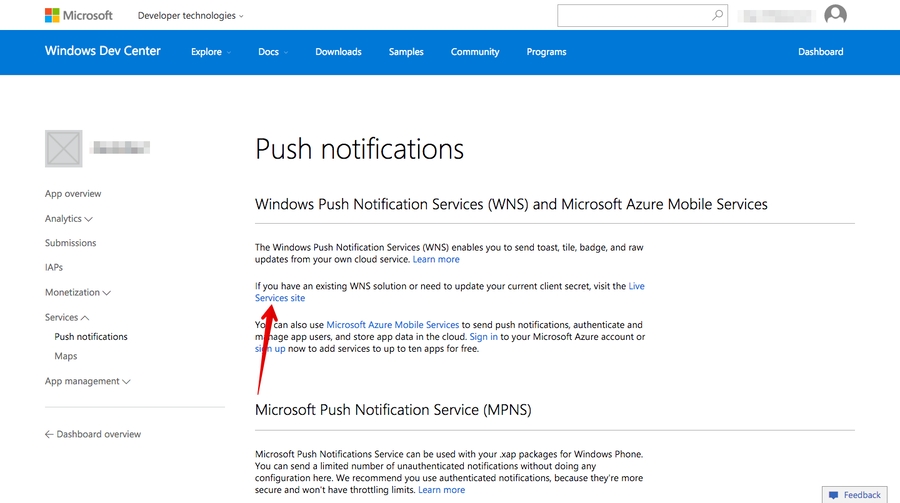
Go to Live Services site:
"Package SID" and "Client secret" will be your SID and Client Secret strings respectively
Integrate devtodev SDK to your project. Even if you don't need devtodev analytics in your app, you should call DevToDev.SDK.Initialize(string appKey, string appSecret).
Add the following source after DevToDev.SDK.Initialize(string appKey, string appSecret) is called:
The PushType can have one of the following values:
The control of the current value of a badge. When an app is launched the current value of a badge is reset to zero by default. In order to disable automatic resetting to zero and manually control the value of a badge use the following methods:
1. Proceed to Settings of your app.
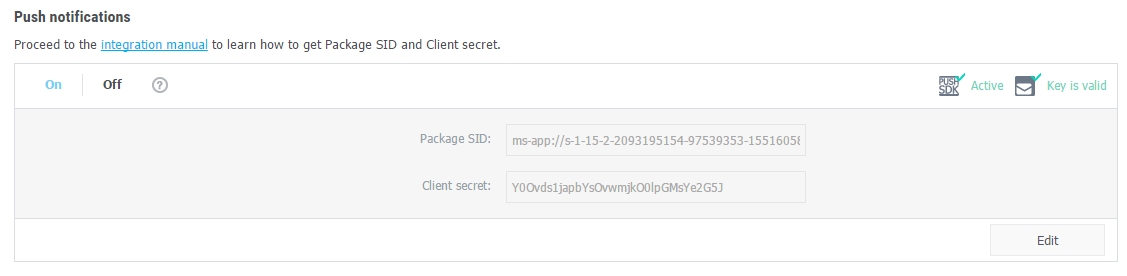
2. Go to PUSH NOTIFICATIONS page in Settings and insert the previously received Package SID and Client secret to appropriate fields in Push notifications section.
3. If the Package SID and Client secret are correct, you will see the following result:
Open PUSH NOTIFICATION section and click on "Add new campaign" button
Fill in campaign name, select an app for delivery*
Choose the user group to send a message. You can choose existing segment or create a new one
Enter toast or tile details
*Attention! You can create a campaign only after at least one push token comes from devtodev SDK integrated to your application. Otherwise the app will not be displayed in the list.
Add several lines of the code to switch on the push notification in the SDK
Create a campaign for sending push notifications in "Push" section
Attention! There is a difference in the implementation of the elements mentioned below for Windows 8.1+ and Windows 10+ projects.
Windows 8.1+: Put the following source in your Application class (usually it is App.xaml.cs file) at the end of the OnLaunched(LaunchActivatedEventArgs e) function. For Example:
Windows 10+: Put the following source in your Application class (usually it is App.xaml.cs file) at the end of the OnLaunched(LaunchActivatedEventArgs e) and OnActivated(IActivatedEventArgs args) functions. For Example:
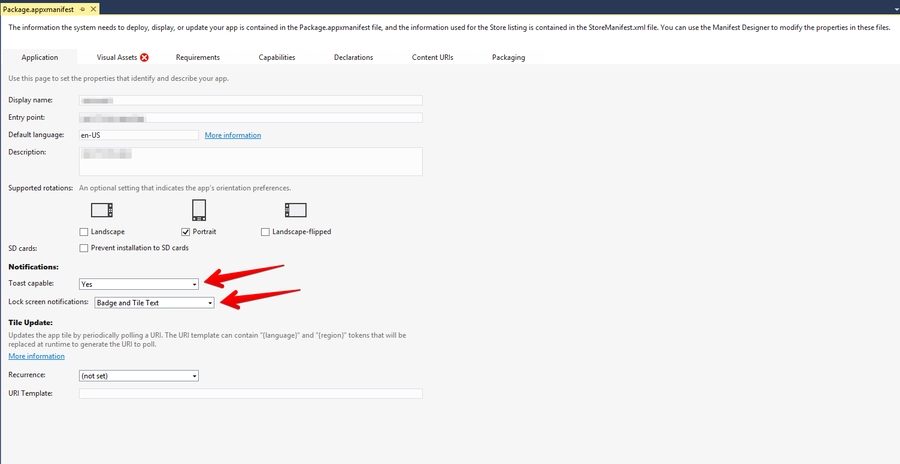
Make sure that these functions are enabled in Package.appmanifest of you project (the flag "Toast capable" is enabled by default for Windows 10+ projects, it is absent in the manifest).
Add the following two Background Tasks in Package.appmanifest:
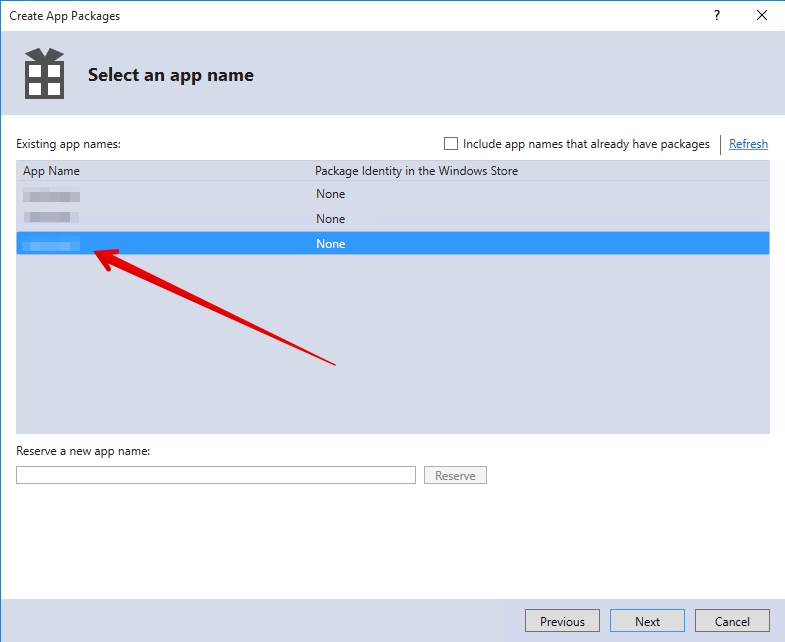
Keep in mind that your application must be built with the same Windows Store preferences you used in Chapter 3.2. In the "Create App Packages" window you have to log in with your Live ID and pick the appropriate application form the list. A file Package.StoreAssociation.xml will be added into the Project.
Schedule the delivery
That's it!
protected override void OnLaunched(LaunchActivatedEventArgs e) {
   //...other source
   DevToDev.PushManager.HandleToastNavigation(e.Arguments);
}protected override void OnLaunched(LaunchActivatedEventArgs e) {
//...other source
DevToDev.PushManager.HandleToastNavigation(e.Arguments);
}
protected override void OnActivated(IActivatedEventArgs args) {
//...other source
if (args.Kind == ActivationKind.ToastNotification) {
var toastArgs = args as ToastNotificationActivatedEventArgs;
DevToDev.PushManager.HandleToastNavigation(toastArgs.Argument);
}
}//It is called when push token is received successfully
PushManager.PushTokenReceived = (pushToken) => {
//pushToken - the string contains the push token
};
//It is called when there is an error in push token delivery.
PushManager.PushTokenFailed = (error) => {
//error - the error string. This function will be called when push token have not been obtained.
};
//It is called when push notification is received.
PushManager.PushReceived = (PushType type, IDictionary<string, string> pushAdditionalData) => {
//type - type of the push message
//params - IDictionary<string, string> with the custom user parameters form the push message
};
//It is called when push notification is opened.
PushManager.PushOpened = (PushMessage pushMessage, ActionButton actionButton) => {
//pushMessage - DevToDev.PushMessage. Represents toast notification message
//actionButton - DevToDev.ActionButton. Windows 10 only!
//Represents toast button that was clicked. Could be null if toast body was clicked
};
DevToDev.PushManager.Initialize();public enum PushType {
ToastNotification, //Notification that can be seen by a user.
SilentNotification //Raw-notification. A user can't see it.
}//Disables automatic clearing of a badge at start.
//Must be called before DevToDev.PushManager.Initialize();
DevToDev.PushManager.AutoClearBadgeOnStart = false;
//Decreases the current value of a badge on "number" units.
DevToDev.PushManager.DecreaseBadge(int number);
//Clears the current value of a badge.
DevToDev.PushManager.ClearBadgeCount();Integration with iOS push notification service
This generation of SDK is deprecated and is no longer supported. Information about the current version can be found here.
To enable Push Notifications, please perform the following actions:
Add the application to your space in devtodev system.
Generate Developer or Production Certificate for the application and get Private key file (.p12) on its basis.
Submit the data to the application settings in devtodev system.
Integrate devtodev SDK to the application (see the section to learn more about integrating and initializing devtodev SDK).
First enable push notifications in your Xcode project.
The library provides support for iOS 10 notification attachments, such as images, animated gifs, and video. In order to take advantage of this functionality, you will need to create a notification service extension alongside your main application.
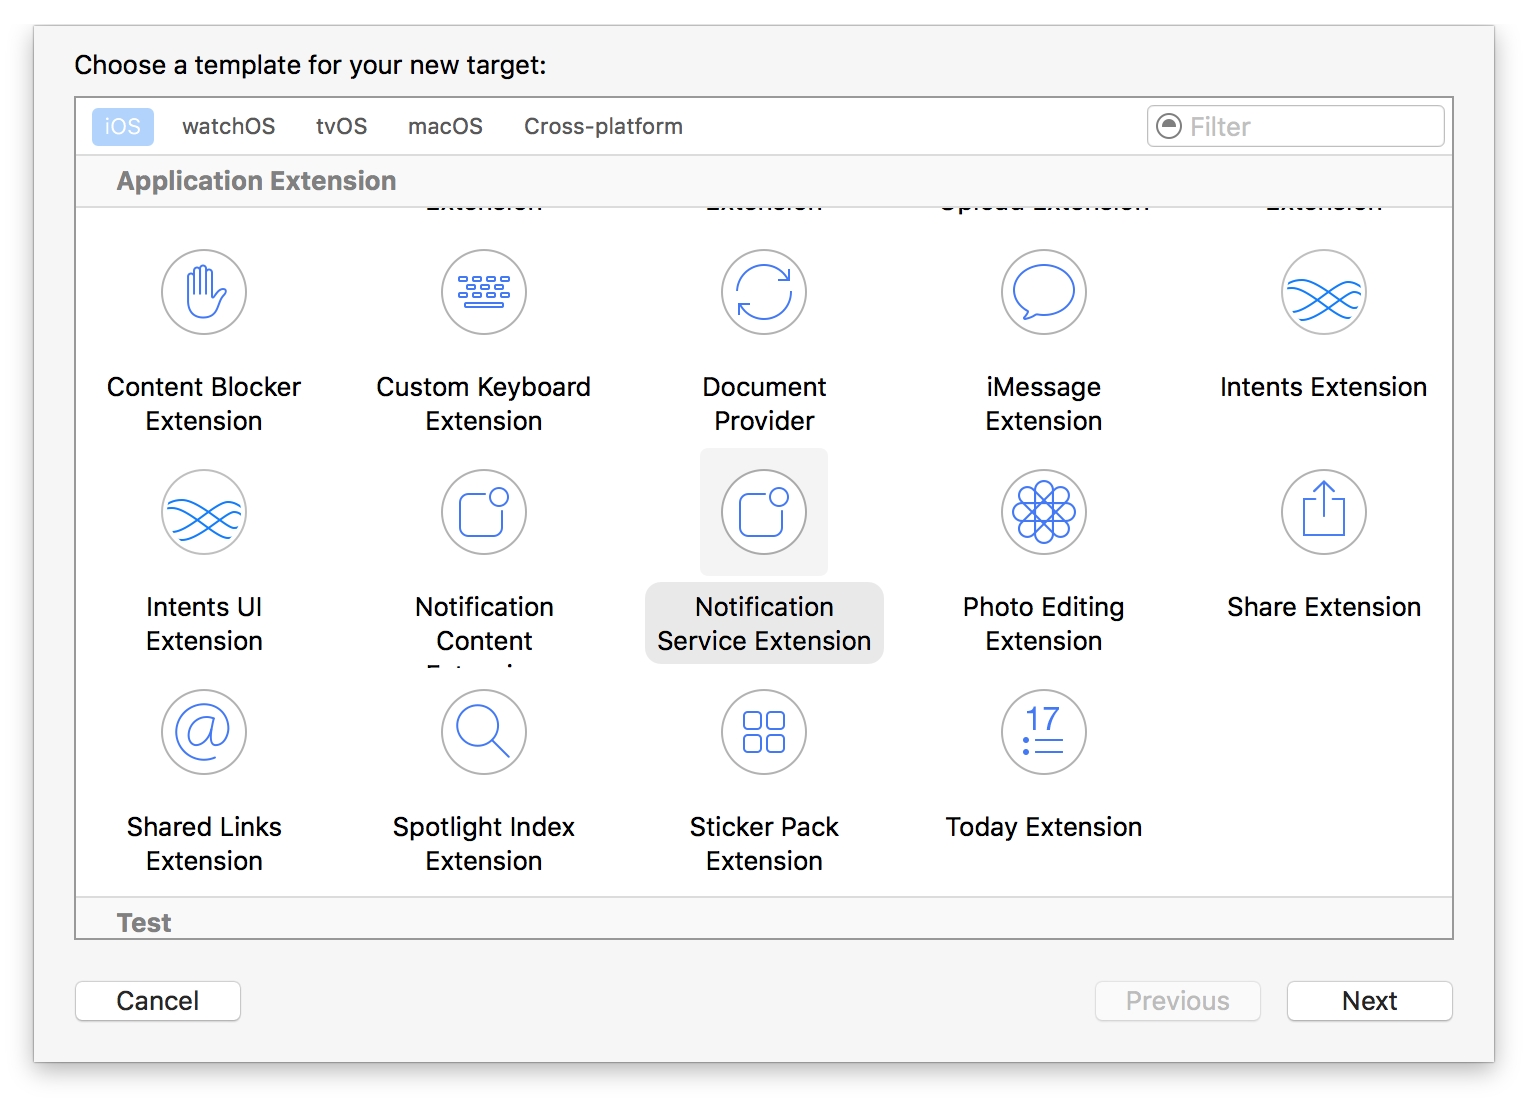
Create a new iOS target in Xcode (File -> New -> Target) and select the Notification Service Extension type.
In Member Center, the Push Notifications service will appear as Configurable (not Enabled) until you create a client SSL certificate.
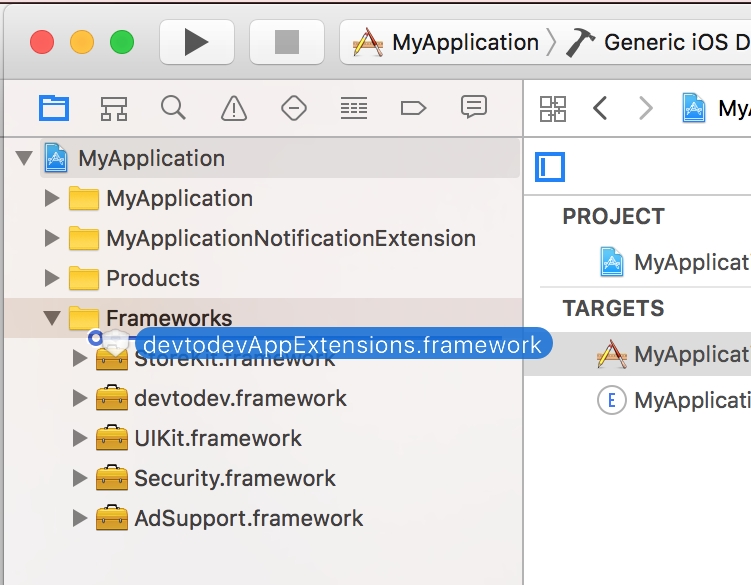
Drag the devtodevAppExtensions.framework into your app project.
Modify your extension.
Delete all dummy source code for your new extension
Inherit from DTDMediaAttachmentExtension in NotificationService
Use Xcode to enable push notifications in the target’s Capabilities pane:
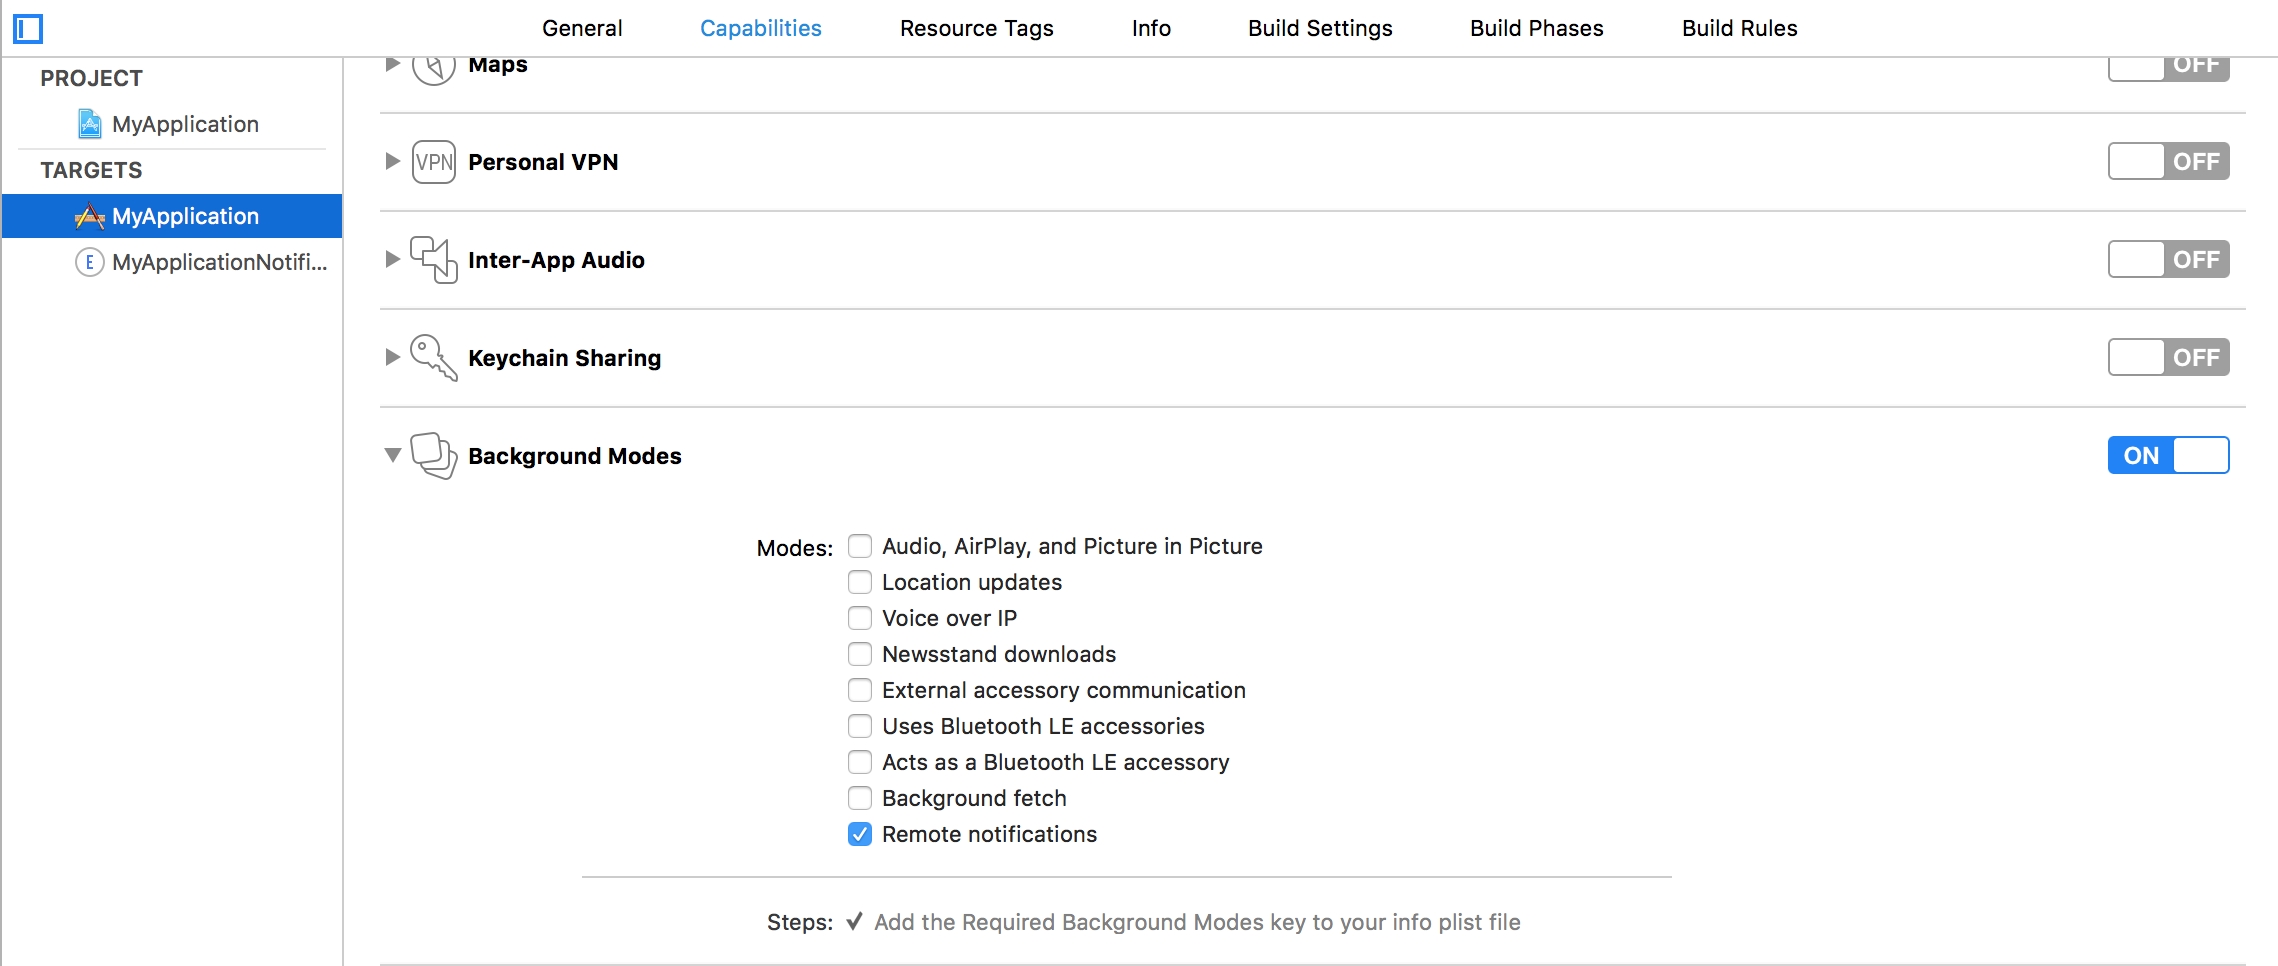
Enable Background Modes and Remote notifications under the target’s Capabilities section:
You use Member Center to generate a push notification client SSL certificate that allows your notification server to connect to the APNs. Each App ID is required to have its own client SSL certificate. The client SSL certificate Member Center generates is a universal certificate that allows your app to connect to both the development and production environments.
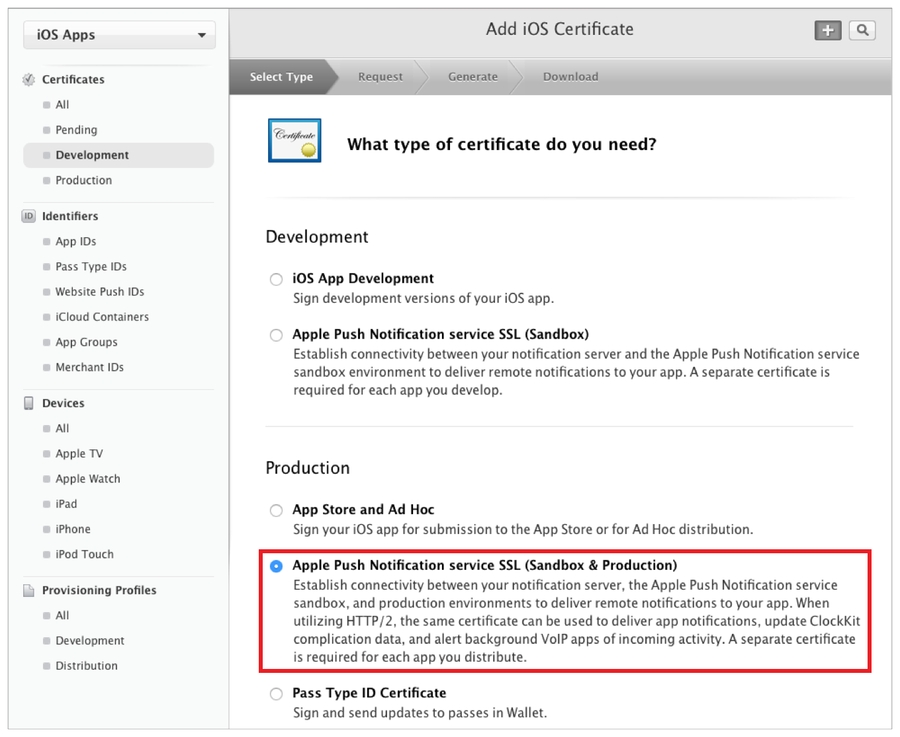
To generate a universal client SSL certificate
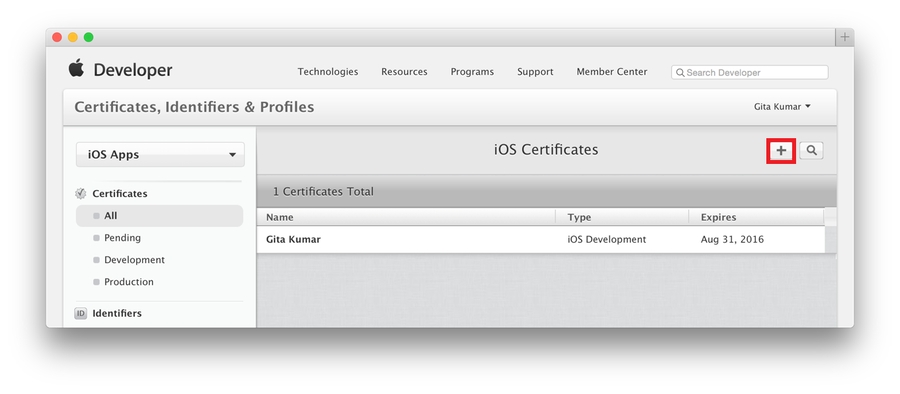
In , select Certificates.
Click the Add button (+) in the upper-right corner.
Under Production, select the “Apple Push Notification service SSL (Sandbox & Production)” checkbox, and click Continue.
Open "Keychain access" application
If the certificate hasn't been added to keychain access yet, choose "File" → "Import". Find the certificate file (CER-file) provided by Apple
Choose "Keys" section in "Keychain access" application
Choose a personal key associated with your iPhone developer certificate. Personal key is identified by open certificate associated with it "iPhone developer: ". Choose "File" → Export objects. Save key as .p12
Convert Apple certificate file to the PEM-file. Start following command-line operation from bin catalog OpenSSL.
Convert personal key from Mac OS keychain to the PEM-key:
Now you are able to create P12-file using PEM-key and iPhone developer certificate:
If you are using key from Mac OS keychain then choose PEM-version created in the previous step. Otherwise, you can use OpenSSL key for Windows OS.
Upload the .p12-file into Integration section of application settings panel (Settings -> Push Notifications):
After the certificate has been generated you can start to integrate Push SDK into your app.
1. Open the "Capabilities" tab in the XCode. Switch "Push Notifications" and "Background Modes" to ON. In "Background Modes" check "Remote notifications".
2. Add the following strings to the AppDelegate class:
If you are using iOS 12 or above, you can specify custom options for notification settings:
3. Open "Build Settings", find the parameter "Other Linker Flags", then add 2 flags: -ObjC and -lc++
4. Compile and run the app. You will need a device because the simulator does not support push notifications. Xcode will automatically choose a new provisioning profile. If an error occurred during the launch make sure that there is a correct profile set in the Code Signing Identity. You'll be asked to confirm push notifications. An app will request permission only once, if user confirms it - notifications will be accepted otherwise he won't get any push messages from your app. Users can change it in device settings.
1. Open PUSH NOTIFICATIONS section and click on the "Add new campaign" button
2. Fill in the campaign name
3. Choose a user group to send a message. You can choose an existing segment or create a new one
4. Enter notification details
5. Test push notification (or skip this step)
6. Confirm push gateway
7. Schedule the delivery
8. That's it!


Add several lines of the code to switch in the push notification to the SDK.
Create a campaign for sending push notifications in Push Notifications section.
Follow the instructions on the next webpage to create a certificate request on your Mac, and click Continue.
Click Choose File.
In the dialog that appears, select the certificate request file (with a .certSigningRequest extension), and click Choose.
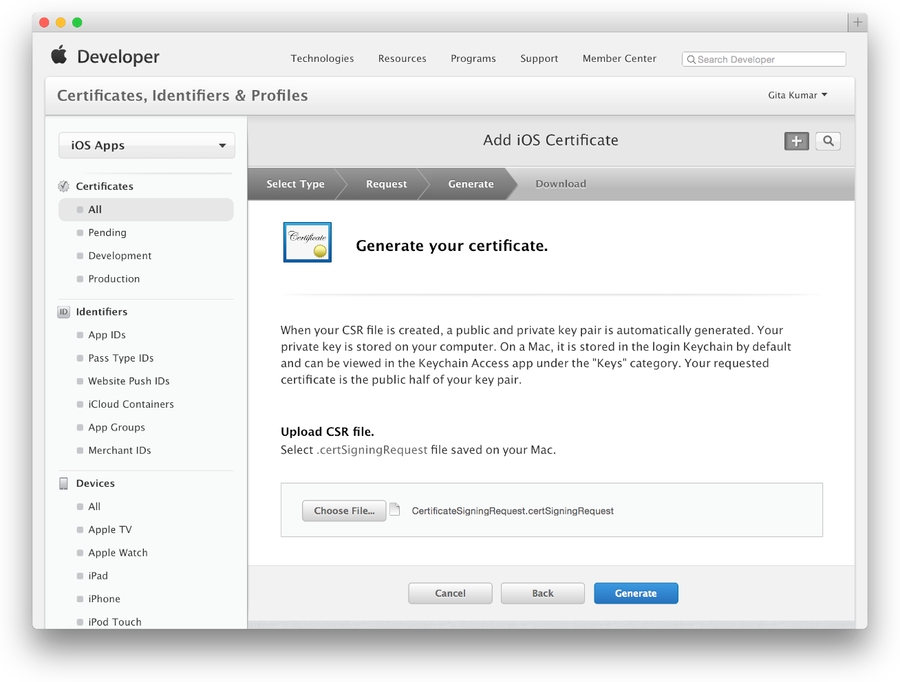
Click Generate.
Click Download.
You'll be suggested to create a password which is used when you need to import the key to another computer
//NotificationService.h
#import <devtodevAppExtensions/devtodevAppExtensions.h>

@interface NotificationService : DTDMediaAttachmentExtension

@end

//NotificationService.m
#import "NotificationService.h"

@implementation NotificationService
// NOTE: Keep this empty implementation to prevent class stripping.
@endopenssl x509 -in developer_identity.cer -inform DER -out developer_identity.pem -outform PEMopenssl pkcs12 -nocerts -in mykey.p12 -out mykey.pemopenssl pkcs12 -export -inkey mykey.key -in developer_identity.pem -out iphone_dev.p12#import "AppDelegate.h"
#import <devtodev/devtodev.h>
@implementation AppDelegate
- (BOOL)application:(UIApplication *)application didFinishLaunchingWithOptions:(NSDictionary
*)launchOptions {
[DevToDev initWithKey:@“APP_KEY” andSecretKey:@“SECRET_KEY”];
dispatch_async(dispatch_get_main_queue(), ^{
[DevToDev pushManager].delegate = self;
[DevToDev pushManager].pushNotificationsOptions = (DTDNotificationOptionAlert | DTDNotificationOptionBadge | DTDNotificationOptionSound);
[DevToDev pushManager].pushNotificationsEnabled = YES;
});
// Your code...
return YES;
}
/**
* @brief Device received a token and was successfully subscribed for notifications
* @param deviceToken device push token
**/
-(void) didRegisterForRemoteNotificationsWithDeviceToken: (NSString *) deviceToken {
}
/**
* @brief Error occured while registering for push notifications
* @param error text
**/
-(void) didFailToRegisterForRemoteNotificationsWithError: (NSError *) error {
}
/**
* @brief Push notification has been received by the device
* @param notification data
**/
-(void) didReceiveRemoteNotification: (NSDictionary *) notification {
}
/**
* @brief Push notification has been opened
* @param pushMessage body
* @param actionButton button that was clicked
**/
-(void) didOpenRemoteNotification: (DTDPushMessage *) pushMessage withAction: (DTDActionButton *) actionButton {
}
/**
* @brief Push notification receive response
* Note: This method is relevant only for iOS 10 and above.
* @param response notification
**/
-(void) didReceiveNotificationResponse: (DTDNotificationResponse *)response {
}typedef NS_OPTIONS(NSUInteger, DTDNotificationOptions) {
DTDNotificationOptionBadge = (1 << 0),
DTDNotificationOptionSound = (1 << 1),
DTDNotificationOptionAlert = (1 << 2),
DTDNotificationOptionCarPlay = (1 << 3),
DTDNotificationOptionCriticalAlert = (1 << 4),
DTDNotificationOptionProvidesAppNotificationSettings = (1 << 5),
DTDNotificationOptionProvisional = (1 << 6)
};

This generation of SDK is deprecated and is no longer supported. Information about the current version can be found here.
To enable Push Notifications you will have to perform the following actions:
Add the application to your space in devtodev system
Android. Get API key from Google APIs Console. It is necessary to activate Google Cloud Messaging for Android before key generation. Detailed information on how to receive an API key you can find in native
iOS. Generate Developer or Production Certificate for the application and get Private key file (.p12) on its basis. Detailed information on how to receive a Private key file you can find in native
Go to and then to your project or create a new one. complete guide on adding your project to Firebase console and enabling Cloud messaging.
Download google-services.json from your Firebase console. Add this file into your project’s Assets folder.
Please do the following to find google-services.json:
Choose your project in the Firebase console
Choose project settings in the Project overview
3. Scroll down to the SDK setup and configuration. Click on the google-services.json
If you want to use both devtodev and Firebase Messaging services at the same time, you need to disable Firebase listener.
Find androidmanifest.xml used in your app. If you don’t use Custom Manifest, you need to create it. Tick the Custom Main Manifest checkbox:
You can read more about the manifest .
Add the following line to the “Application” section:
You should get something like this:
Build a Windows Store App in Unity. After the app is built, Visual Studio project will be created. Proceed with the following changes.
.NET + D3D: Put the following source in your App class (usually it is an App.cs file) at the end of the ApplicationView_Activated(CoreApplicationView sender, IActivatedEventArgs args) function.
.NET + XAML: Put the following source in your App class (usually it is an App.xaml.cs file) at the end of the OnLaunched(LaunchActivatedEventArgs args) and OnActivated(IActivatedEventArgs args) functions.
IL2CPP + XAML: Put the following source in your App class (usually it is App.xaml.cpp file). Add several lines of code in a generated App.xaml.cpp class. After defining headers:
And at the end of of the App::OnLaunched(LaunchActivatedEventArgs^ e) and App::OnActivated(IActivatedEventArgs^ args) functions.
For Example:
IL2CPP + D3D: Put the following source in your App class (usually it is App.cpp file). Add several lines of code in a generated App.cpp class. After defining headers:
And at the end of of the App::OnActivated(CoreApplicationView^ sender, IActivatedEventArgs^ args) function.
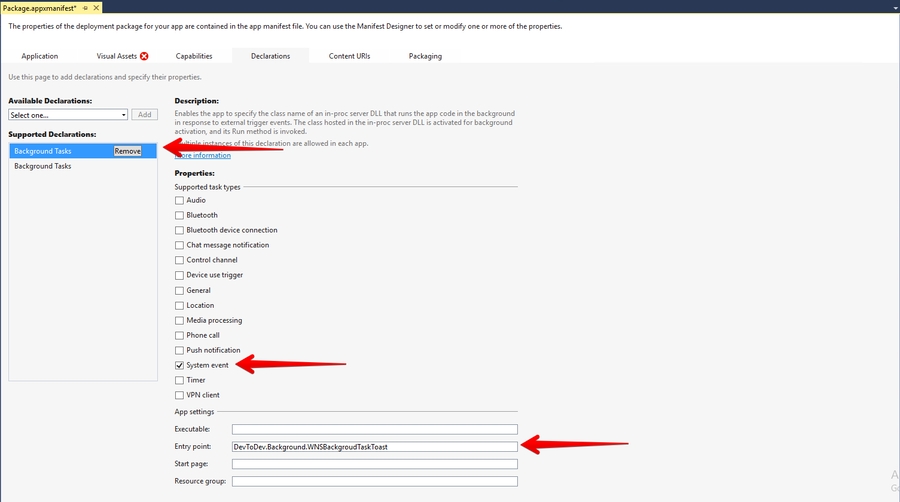
Make sure that these functions are enabled in Package.appmanifest of you project (the flag "Toast capable" is enabled by default for Windows 10+ projects, it is absent in the manifest).
Add the following three Background Tasks in Package.appmanifest:
Entry point for Push Notification tasks type:
Entry points for System Event tasks type:
You must also associate your application with the Windows Store app (otherwise push notifications will not be delivered). Open "Store->Associate App with the Store" menu, login with your Live ID and pick the appropriate application form the list. A file Package.StoreAssociation.xml will be added into the Project.
Build an iOS App in Unity. After the app is built, Xcode project will be created. Proceed with the following changes
Enable push notifications in your Xcode project
The library provides support for iOS 10 notification attachments, such as images, animated gifs, and video. In order to take advantage of this functionality, you will need to create a notification service extension alongside your main application
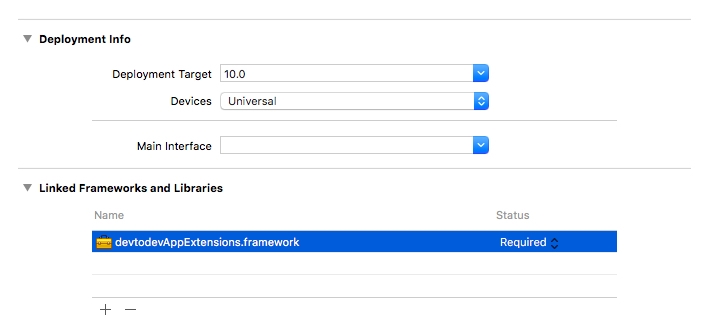
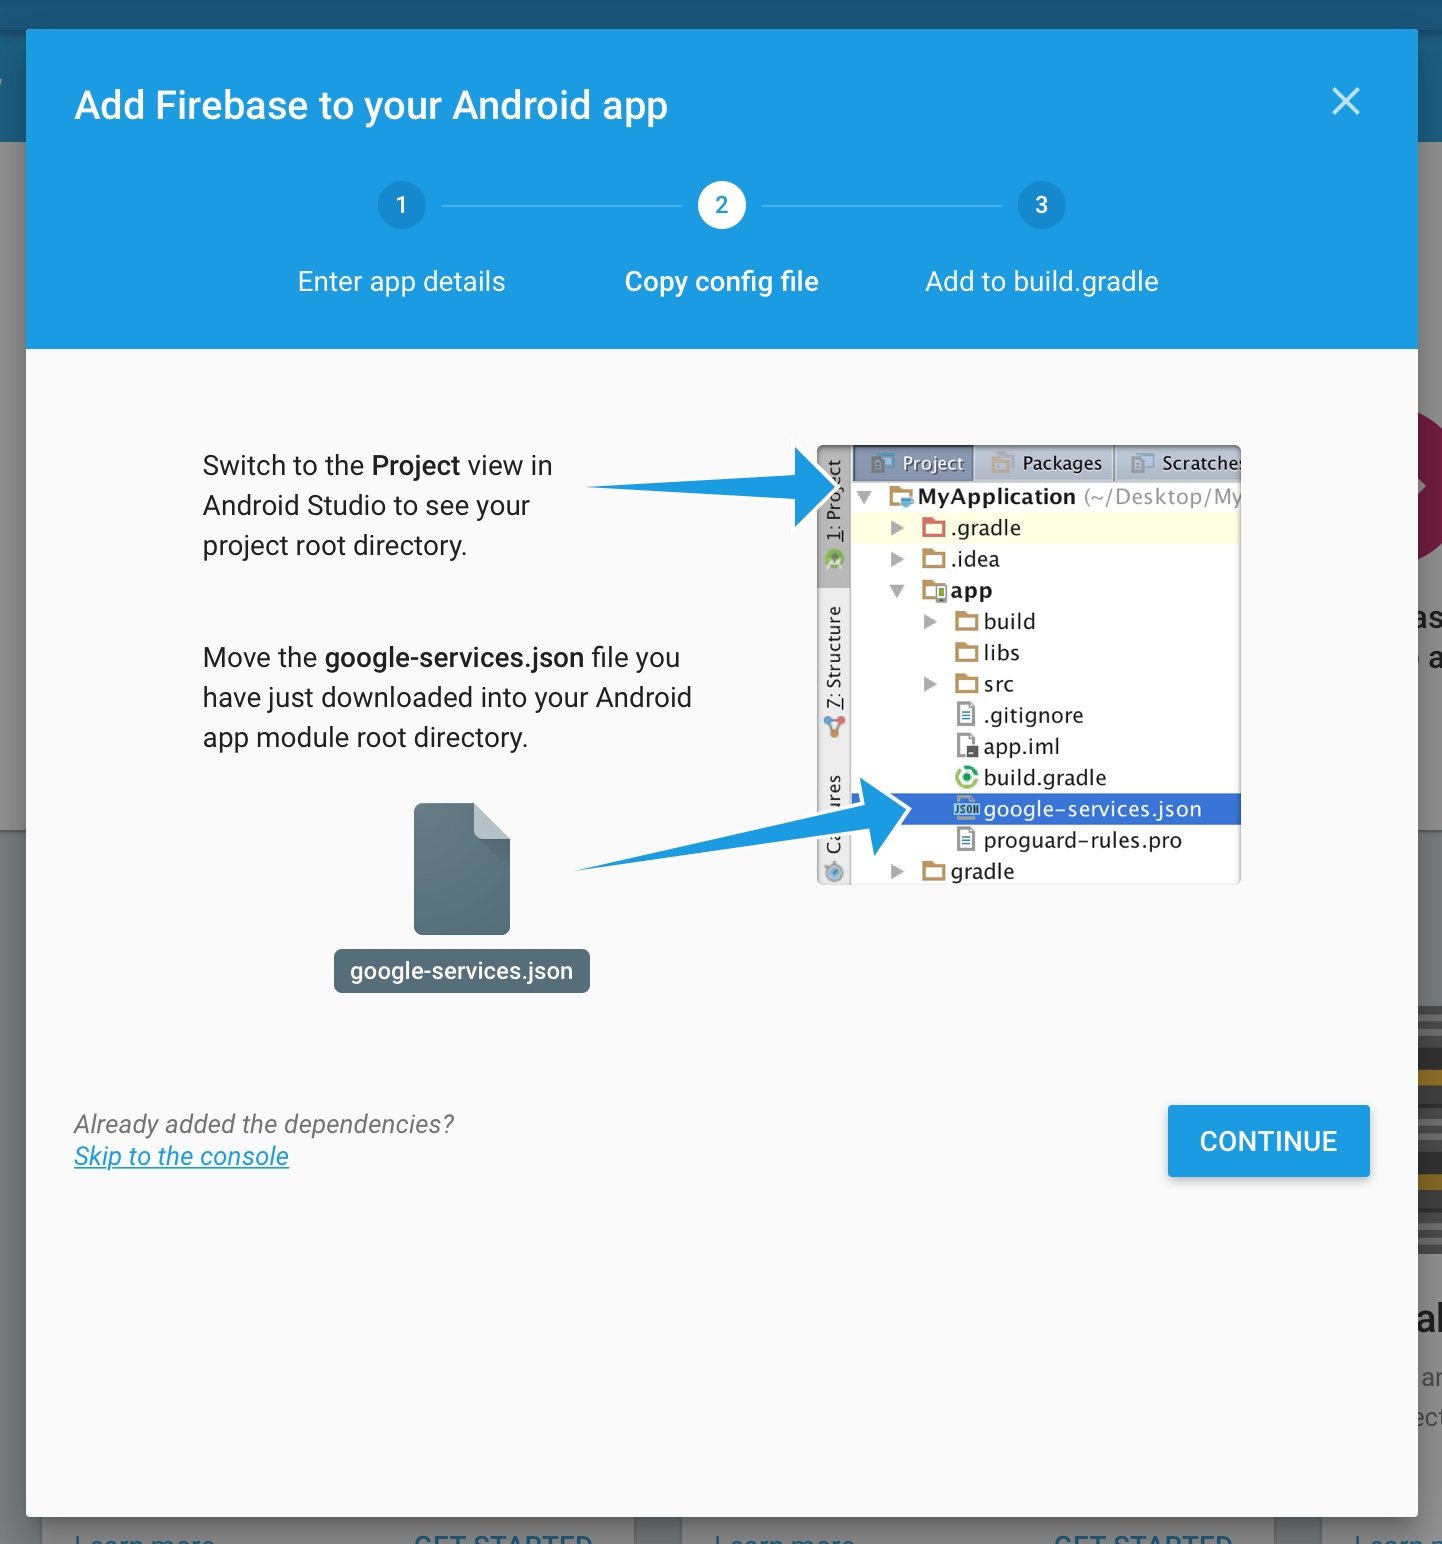
Add devtodevAppExtensions.framework to newly created extension. Make sure that Deployment Target is pointed as iOS 10.0 or higher:
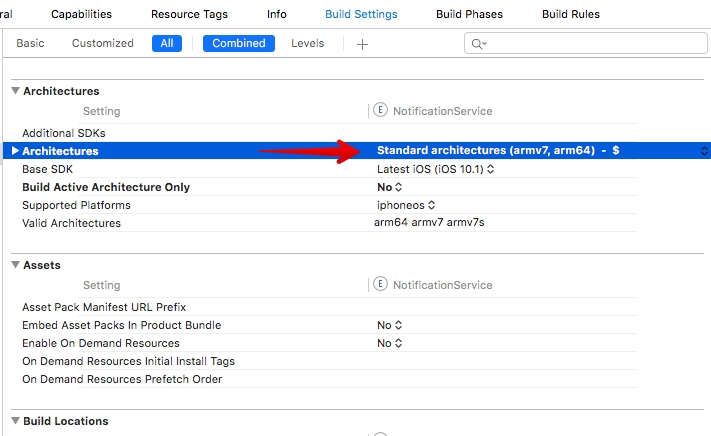
Make sure that field Architectures contains "Standard architectures armv7, arm64" setting both in the project and the extension build settings:
Modify your extension:
Delete all dummy source code for your new extension
Inherit from DTDMediaAttachmentExtension in NotificationService
Use Xcode to enable push notifications in the target’s Capabilities pane:
Enable Background Modes and Remote notifications under the target’s Capabilities section:
Using the graphic interface:
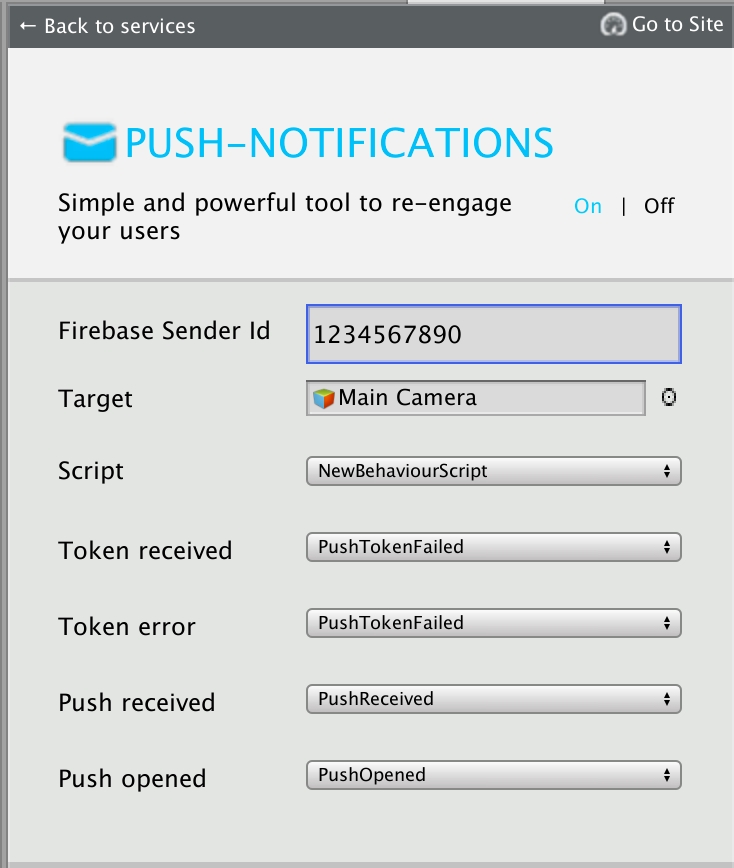
Open the Window/devtodev menu element
Switch Push Notifications tumbler on
If you need to use push token for some aims or to handle the getting of notifications by user, add the GameObject with the following function to the scene:
1. Open PUSH NOTIFICATIONS section and click on the "Add new campaign" button
2. Fill in the campaign name, select an app for delivery 3. Choose a user group to send a message. You can choose an existing segment or create a new one 4. Enter notification details 5. Schedule the delivery 6. That's it!
You can create a campaign only after at least one push token comes from devtodev SDK integrated into your application. Otherwise, the app will not be displayed in the list.
Integrate devtodev SDK to the application (see the "SDK integration" to learn more about integrating and initializing devtodev SDK)
Add several lines of the code to switch in the push notification to the SDK
Create a campaign for sending push-notifications in "Push" section
In Member Center, the Push Notifications service will appear as Configurable (not Enabled) until you create a client SSL certificate
Using code: Before calling Analytics.Initialize add the following strings:


Integration of push notifications on Android and iOS using devdodev SDK for Adobe Air
This generation of SDK is deprecated and is no longer supported.
Push Notifications are availible only for iOS and Android.
Go to and then to your project or create a new one.
Current project:
New project:
Save the google-services.json file and add it to your app so that it is placed inside the Assets folder in a ready .apk file. If you use Flash Builder IDE simply copy it in the root folder, Flash Builder will do the rest for you.
Update Adobe Air SDK. Pay attention that version of the Adobe Air SDK should be at least 22.0, otherwise FCM classes will not be imported into your project. However, you still can use Analytics, but application will not be able to accept Push Notifications.
Add dependencies to your project. These libraries are located in the same archive with com.devtodev.SDK.ane extension in the dependencies folder. These extensions contain firebase, gps и android-support libraries Java, that are used for sending Push Notifications. If you have already imported firebase-auth, firebase-common, firebase-iid, firebase-messaging, play-services-auth, play-services-base, play-services-basement, support-v4 or they are included in other extensions, you don't need to import them again. In any case, we recommend to use data from the library of a version not lower than 25. Add the following to the manifest file of your app:
Add the following to your application's manifest:
1. Proceed to Setting -> PUSH NOTIFICATIONS:
2. Insert the previously received Server API Key to the API Key field in Push notifications section.
3. If the Server API Key is correct, you will see the following result
Open PUSH NOTIFICATIONS section and click on 'Add new campaign' button
Fill in campaign name, select an app for delivery
Choose user group to send a message. You can choose existing segment or create a new one.
Enter notification details
You can create a campaign only after at least one push token comes from devtodev SDK integrated to your application. Otherwise the app will not be displayed in the list.
To enable Push Notifications, please perform the following actions:
Add the application to your space in devtodev system
Generate Developer or Production Certificate for the application and get Private key file (.p12) on its basis
Submit the data to the application settings in devtodev system
Integrate devtodev SDK to the application (see the “SDK integration” division to learn more about integrating and initializing devtodev SDK)
Open "Keychain access" utility (Launchpad → Other) and choose "Request a Certificate From a Certificate Authority" option.
Fill in all requied fields in Certificate Assistant window, set flag an "Saved on disk" item and click "Continue". Save the file.
Log in at iOS Provisioning Portal. Open "App IDs" section, choose your app and click "Edit".
Follow these steps to export the certificate from Apple web-site to the P12-file:
Open "Keychain access" application
If the certificate hasn't been added to keychain access yet, choose "File" → "Import". Find the certificate file (CER-file) provided by Apple
Choose "Keys" section in "Keychain access" application
Choose personal key associated with your iPhone developer certificate. Personal key is identified by open certificate associated with it "iPhone developer: ". Choose "File" → Export objects. Save key as .p12
Convert Apple certificate file to the PEM-file. Start the following command-line operation from bin catalog OpenSSL.
Convert personal key from Mac OS keychain to the PEM-key:
Now you are able to create P12-file using PEM-key and iPhone developer certificate:
If you are using key from Mac OS keychain than choose PEM-version created at previous step.
Otherwise you can use OpenSSL key for Windows OS.
Upload the .p12-file into Integration section of application settings panel (Settings -> PUSH NOTIFICATIONS):
After the certificates has been generated you can start to integrate Push SDK into you app.
Add the following to your application's manifest. Don't forget that the minimum supported version is iOS 7:
Attention! If you use Production Certificate for signing application package, don't forget to change "development" value to "production".
Add the following imports to your source:
Add the push notifications initialization before the DevToDev.init(appKey:String, appSecret:String) method was called:
Xcode will automatically choose new provisioning profile. If an error occurred during the launch make sure that there is a correct profile set in the Code Signing Identity. You'll be asked to confirm push notifications. An app will request permission only once, if user confirm it - notifications will be accepted otherwise he wont get any push messages from your app. User can change it in device settings.
1. Open PUSH NOTIFICATIONS section and click on "Add new campaign" button.
2. Fill in campaign name
3. Choose user group to send a message. You can choose existing segment or create a new one.
4. Enter notification details
5. Test push notification (or skip this step)
6. Confirm push gateway
7. Schedule the delivery
8. That's it!
<service android: name = "com.google.firebase.messaging.cpp.ListenerService"
android: exported = "true"
android: enabled = "false"
tools: node = "replace" /><?xml version="1.0" encoding="utf-8"?>
<manifest xmlns:android="http://schemas.android.com/apk/res/android" xmlns:tools="http://schemas.android.com/tools" package="com.devtodev.unitysdk2" android:versionCode="1" android:versionName="1.0">
<application android:label="@string/app_name" android:icon="@drawable/app_icon">
<service android:name="com.google.firebase.messaging.cpp.ListenerService" android:exported="true" android:enabled="false" tools:node="replace" />
<!-- The MessagingUnityPlayerActivity is a class that extends
UnityPlayerActivity to work around a known issue when receiving
notification data payloads in the background. -->
<activity android:name="com.google.firebase.MessagingUnityPlayerActivity" android:configChanges="fontScale|keyboard|keyboardHidden|locale|mnc|mcc|navigation|orientation|screenLayout|screenSize|smallestScreenSize|uiMode|touchscreen">
<intent-filter>
<action android:name="android.intent.action.MAIN" />
<category android:name="android.intent.category.LAUNCHER" />
</intent-filter>
<meta-data android:name="unityplayer.UnityActivity" android:value="true" />
</activity>
<service android:name="com.google.firebase.messaging.MessageForwardingService" android:exported="true" />
</application>
</manifest>private void ApplicationView_Activated(CoreApplicationView sender, IActivatedEventArgs args) {
//...other code
DevToDev.ActivatedEventHandler.Handle(args);
}protected override void OnLaunched(LaunchActivatedEventArgs e) {
//...other code
DevToDev.ActivatedEventHandler.Handle(e);
}
protected override void OnActivated(IActivatedEventArgs args) {
//...other source
DevToDev.ActivatedEventHandler.Handle(args);
}//...headers
extern "C" __declspec(dllimport) void __stdcall AddActivatedEventArgs(IInspectable* activatedEventArgs);void App::OnActivated(IActivatedEventArgs^ args) {
//...other code
AddActivatedEventArgs(reinterpret_cast<IInspectable*>(static_cast<Platform::Object^>(args)));
}
void App::OnLaunched(LaunchActivatedEventArgs^ e) {
//...other code
auto args = static_cast<IActivatedEventArgs^>(e);
AddActivatedEventArgs(reinterpret_cast<IInspectable*>(static_cast<Platform::Object^>(args)));
}//...headers
extern "C" __declspec(dllimport) void __stdcall AddActivatedEventArgs(IInspectable* activatedEventArgs);void App::OnActivated(CoreApplicationView^ sender, IActivatedEventArgs^ args) {
//...other code
AddActivatedEventArgs(reinterpret_cast<IInspectable*>(static_cast<Platform::Object^>(args)));
}devtodev.background.PushNotificationTriggerTaskdevtodev.background.ToastNotificationActionTriggerTask
devtodev.background.ToastNotificationHistoryChangedTriggerTask//NotificationService.h
#import <devtodevAppExtensions/devtodevAppExtensions.h>
@interface NotificationService : DTDMediaAttachmentExtension
@end
//NotificationService.m
#import "NotificationService.h"
@interface NotificationService ()
@endpublic void PushReceived(IDictionary<string, string> pushAdditionalData) {
//pushAdditionalData - push-notification data that you send to your app
}
public void PushOpened(DevToDev.PushMessage pushMessage, DevToDev.ActionButton actionButton) {
//pushMessage - DevToDev.PushMessage. Represents toast notification message
//actionButton - DevToDev.ActionButton. Represents toast button that was clicked.
// Could be null if toast body was clicked
}
public void PushTokenFailed(string error) {
//handle push-notifications error here
}
public void PushTokenReceived(string pushToken) {
//pushToken - your push token
}
DevToDev.PushManager.PushReceived = PushReceived;
DevToDev.PushManager.PushOpened = PushOpened;
DevToDev.PushManager.PushTokenFailed = PushTokenFailed;
DevToDev.PushManager.PushTokenReceived = PushTokenReceived;
DevToDev.PushManager.PushNotificationsOptions = (DTDNotificationOptions.Alert | DTDNotificationOptions.Badge | DTDNotificationOptions.Sound | DTDNotificationOptions.Provisional); //Notification options for iOS, optional property
DevToDev.PushManager.PushNotificationsEnabled = true;
// FOR ANDROID ONLY! Optional. Using custom push-notification icons on Android.
// <summary> To set the custom icons to be shown in push-notification on the SDK part,
// use the following methods.
// Attention! Icons which set in the push-notification wizard
// have priority over the icons which set in these methods.</summary>
// <param name="iconName">Icon file from resources of your app
// (from Assets/Plugins/Android/res folder)</param>
//FOR ANDROID ONLY! To set the small icon:
DevToDev.PushManager.CustomSmallIcon = iconName;
//FOR ANDROID ONLY! To set the large icon:
DevToDev.PushManager.CustomLargeIcon = iconName;public void PushReceived(IDictionary<string, string> pushAdditionalData) {
//pushAdditionalData - push-notification data that you send to your app
}
public void PushOpened(DevToDev.PushMessage pushMessage, DevToDev.ActionButton actionButton) {
//pushMessage - DevToDev.PushMessage. Represents toast notification message
//actionButton - DevToDev.ActionButton. Represents toast button that was clicked. Could be null if toast body was clicked
}
public void PushTokenFailed(string error) {
//handle push-notifications error here
}
public void PushTokenReceived(string pushToken) {
//pushToken - your push token
}Add the following imports to your source:
Add the push notifications initialization before the DevToDev.init(appKey:String, appSecret:String) method was called:
onPushToken, onPushTokenFailed, onPushReceived and onPushOpened are the functions that take following arguments:
Make some tests and correct the message if it's required
Schedule the delivery
That's it!
Add several lines of the code to switch in the push notification to the SDK
Create a campaign for sending push notifications in “Push” section
At first, you need to generate Certificate Signing Request. We have already done it, so you can just click "Continue".
At next step you need to upload the CSR to the Apple server. Choose the CSR-file and click "Generate".
Certificate generation takes just a few seconds. After generation is finished click "Download" and then "Done".
You'll need to repeat this process to generate the Production Certificate when your app will be ready for release. All steps are the same.
You'll be suggested to create a password which is used when you need to import the key to another computer.
Compile and run the app. You will need a device, because simulator does not support push notifications.


import com.devtodev.sdk.push.DevToDevPushManager;
import com.devtodev.sdk.push.logic.ActionButton;
import com.devtodev.sdk.push.logic.PushMessage;DevToDevPushManager.setOnFailedToRegisteredForPushNotifications(onPushTokenFailed);
DevToDevPushManager.setOnRegisteredForPushNotifications(onPushToken);
DevToDevPushManager.setOnPushNotificationsReceived(onPushReceived);
DevToDevPushManager.setOnPushNotificationOpened(onPushOpened);
DevToDevPushManager.setPushNotificationsEnabled(true);/**
* @param token - push token
*/
protected function onPushToken(param:String):void {
}
/**
* @param error - error message
*/
protected function onPushTokenFailed(param:String):void {
}
/**
* @param pushData - Dictionary with push message and custom push fields
*/
protected function onPushReceived(pushData:Dictionary):void {
}
/**
* @param message - PushMessage. Represents toast notification message
* @param button - ActionButton. Represents toast notification button that was clicked. Could be null if notification body was clicked
*/
protected function onPushOpened(message:PushMessage, button:ActionButton):void {
}<application>
<extensions>
<extensionID>com.devtodev.air.extensions.gps-auth</extensionID>
<extensionID>com.devtodev.air.extensions.gps-base</extensionID>
<extensionID>com.devtodev.air.extensions.gps-basement</extensionID>
<extensionID>com.devtodev.air.extensions.supportv4</extensionID>
<extensionID>com.devtodev.air.extensions.firebase-auth</extensionID>
<extensionID>com.devtodev.air.extensions.firebase-common</extensionID>
<extensionID>com.devtodev.air.extensions.firebase-iid</extensionID>
<extensionID>com.devtodev.air.extensions.firebase-messaging</extensionID>
<!-- this library should be already added for analytics -->
<extensionID>com.devtodev.SDK</extensionID>
...
</extensions>
</application>openssl x509 -in developer_identity.cer -inform DER -out developer_identity.pem -outform PEMopenssl pkcs12 -nocerts -in mykey.p12 -out mykey.pemopenssl pkcs12 -export -inkey mykey.key -in developer_identity.pem -out iphone_dev.p12<iPhone>
<InfoAdditions><![CDATA[
<key>MinimumOSVersion</key>
<string>7.0</string>
<key>UIDeviceFamily</key>
<array>
<string>1</string>
<string>2</string>
</array>
...
]]></InfoAdditions>
<Entitlements>
<![CDATA[
<key>aps-environment</key>
<string>development</string>
]]>
</Entitlements>
</iPhone>import com.devtodev.sdk.push.DevToDevPushManager;
import com.devtodev.sdk.push.logic.ActionButton;
import com.devtodev.sdk.push.logic.PushMessage;DevToDevPushManager.setOnFailedToRegisteredForPushNotifications(onPushTokenFailed);
DevToDevPushManager.setOnRegisteredForPushNotifications(onPushToken);
DevToDevPushManager.setOnPushNotificationsReceived(onPushReceived);
DevToDevPushManager.setOnPushNotificationOpened(onPushOpened);
DevToDevPushManager.setPushNotificationsEnabled(true);<!--Replace 'com.example.application' to your package -->
<manifest package="com.example.application" ...>
<uses-permission android:name="com.google.android.c2dm.permission.RECEIVE" />
<permission android:name="com.example.gcm.permission.C2D_MESSAGE" android:protectionLevel="signature" />
<uses-permission android:name="com.example.gcm.permission.C2D_MESSAGE" />
<application>
<meta-data android:name="com.google.android.gms.version" android:value="@integer/google_play_services_version" />
<receiver android:name="com.google.firebase.iid.FirebaseInstanceIdReceiver" android:exported="true" android:permission="com.google.android.c2dm.permission.SEND" >
<intent-filter>
<action android:name="com.google.android.c2dm.intent.RECEIVE" />
<action android:name="com.google.android.c2dm.intent.REGISTRATION" />
<category android:name="com.example.application" />
</intent-filter>
</receiver>
<service android:name="com.devtodev.push.logic.DTDFcmMessagingService" android:exported="false">
<intent-filter>
<action android:name="com.google.firebase.MESSAGING_EVENT"/>
</intent-filter>
</service>
<service android:name="com.devtodev.push.logic.DTDFcmInstanceIdService" android:exported="false">
<intent-filter>
<action android:name="com.google.firebase.INSTANCE_ID_EVENT"/>
</intent-filter>
</service>
<receiver android:name="com.devtodev.push.logic.PushClickReceiver" android:enabled="true" android:exported="true">
<intent-filter>
<action android:name="com.devtodev.android.push.CLICKED" />
</intent-filter>
</receiver>
<activity android:name="com.devtodev.push.logic.PushHandlerActivity"/>
</application>
</manifest>/**
* @param token - push token
*/
protected function onPushToken(param:String):void {
}
/**
* @param error - error message
*/
protected function onPushTokenFailed(param:String):void {
}
/**
* @param pushData - Dictionary with push message and custom push fields
*/
protected function onPushReceived(pushData:Dictionary):void {
}
/**
* @param message - PushMessage. Represents toast notification message
* @param button - ActionButton. Represents toast notification button that was clicked. Could be null if notification body was clicked
*/
protected function onPushOpened(message:PushMessage, button:ActionButton):void {
}