
Loading...
Loading...
Loading...
Loading...
Loading...
Loading...
Loading...
Loading...
Loading...
Loading...
Loading...
Loading...
Loading...
Loading...
Loading...
Loading...
Loading...
Loading...
Loading...
Loading...
Loading...
Loading...
This generation of SDK is deprecated and is no longer supported. Information about the current version can be found here.
Please perform the following actions to integrate your application with devtodev system:
add the application to the Space using the wizard for adding application
or install via CocoaPods
integrate SDK into your application. The integration may be whether partial or including all the possibilities.
is the easiest way to add devtodev into your iOS project.
Firstly, install CocoaPods using
Create a file in your Xcode project called Podfile and add the following:
Run
in your Xcode project directory. CocoaPods should download and install the devtodev library, and create a new Xcode workspace. Open this workspace in Xcode.
Download the latest version of devtodev SDK from the repository.
Include devtodev.framework dependency:
Link against the embedded framework:
Add devtodev.framework to the Linked Frameworks and Libraries section.
We recommend you set the user identifier before SDK initialization, otherwise the user identifier from the previous session will be used since the SDK initialization moment till the setUserID method call.
If your application allows user to re-login (changing the user during the working session of application), then the setUserID and setCurrentLevel methods should be called just after the authorization. You don't need to call the SDK initialization one more time.
To enable the debug mode and make SDK notifications displayed in the console use this method:
For the correct SDK functioning add the following frameworks:
Security.framework (Optional)
UIKit.framework (Optional)
UserNotifications (Optional)
StoreKit.framework
AdSupport.framework
Add init method into didFinishLaunchingWithOptions method of your AppDelegate.m
If the application you integrate SDK in is a part of a cross-platform project, then the user data initialization is required. Since the analytics of cross-platform projects is based on an unique user (unlike the usual projects where it is based on device identifiers), you have to:
Set the unique cross-platform user identifier (it will be used for cross-platform project data collection).
Actualize the user data. Mostly it is about game applications where the player has a game level as a characteristic. For such projects, you need to set the current player level.
/**
* devtodev App Id and Secret key can be found in the devtodev application
* settings page (“My apps” → App Name → “Settings” → “Integration”)
*/
[DevToDev initWithKey:applicationId andSecretKey:secretKey];gem install cocoapodspod 'devtodev'pod install/**
* Method allows to initialize the user. It applies when SDK initialization or user relogin.
* @param NSString activeUserId - unique cross-platform user identifier (max. 64 symbols)
*/
[DevToDev setUserId:@"activeUserId"];
/**
* Method sets the current user level. Using this method allows to actualize
* the SDK user data in game cross-platform applications.
* @param NSUInteger level - number of current game level of the user
*/
[DevToDev setCurrentLevel:level];
/**
* devtodev App Id and Secret key can be found in the devtodev application
* settings page ("Settings" → "SDK" → "Integration")
*/
[DevToDev initWithKey:applicationId andSecretKey:secretKey];/**
* @param BOOL isActive
*/
[DevToDev setActiveLog: (BOOL) isActive];This generation of SDK is deprecated and is no longer supported. Information about the current version can be found here.
Please do the following to integrate your application with devtodev:
Add the application to the Space using the wizard for adding application.
and add it to 'Linked Frameworks and Libraries' list in the general settings of the project.
Add init method into didFinishLaunchingWithOptions method of your AppDelegate.m
App ID and Secret key can be found in the application settings (Open "Settings" → "SDK" → "Integration").
If the application you integrate SDK in is a part of a cross-platform project, then the user data initialization is required.
Since the analytics of cross-platform projects is based on a unique user (unlike the usual projects where it is based on device identifiers), you have to:
Set the unique cross-platform user identifier (it will be used for a cross-platform project data collection).
Actualize the user data. Mostly it is about game applications where the player has a game level as a characteristic. For such projects, you need to set the current player level.
If your application allows user to re-login (changing the user during the working session of application), then the setUserID and setCurrentLevel methods should be called just after the authorization. You don't need to call the SDK initialization one more time.
To enable the debug mode and make SDK notifications displayed in the console, use this method:
Integration of push notification on UE4
This generation of SDK is deprecated and is no longer supported. Information about the current version can be found here.
Add the application to your space in devtodev system
Android. Get API key from Google APIs Console. It is nessesary to activate Google Cloud Messaging for Android before key generation. Detailed information on how to receive an API key you can find in native Android devtodev SDK documentation
iOS. Generate Developer or Production Certificate for the application and get Private key file (.p12) on its basis. Detailed information on how to receive a Private key file you can find in native iOS devtodev SDK documentation
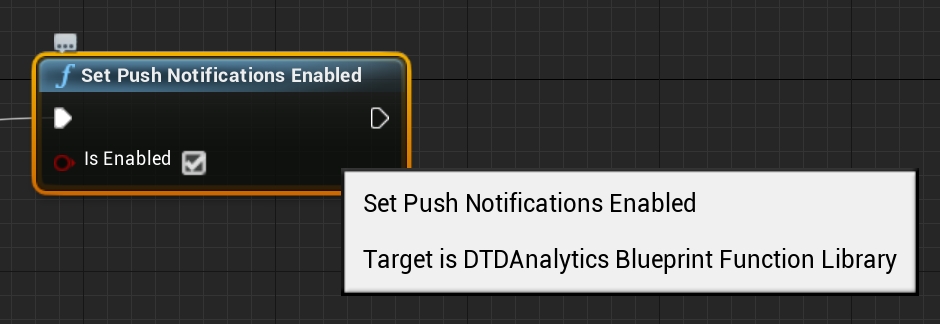
Set Push Notification Enabled in blueprint.
Open PUSH NOTIFICATIONS section and click on "Add new campaign" button
Fill in campaign name, select an app for delivery*
Choose user group to send a message. You can choose existing segment or create a new one
Enter notification details
You can create a campaign only after at least one push token comes from devtodev SDK integrated to your application. Otherwise the app will not be displayed in the list.
This generation of SDK is deprecated and is no longer supported. Information about the current version can be found here.
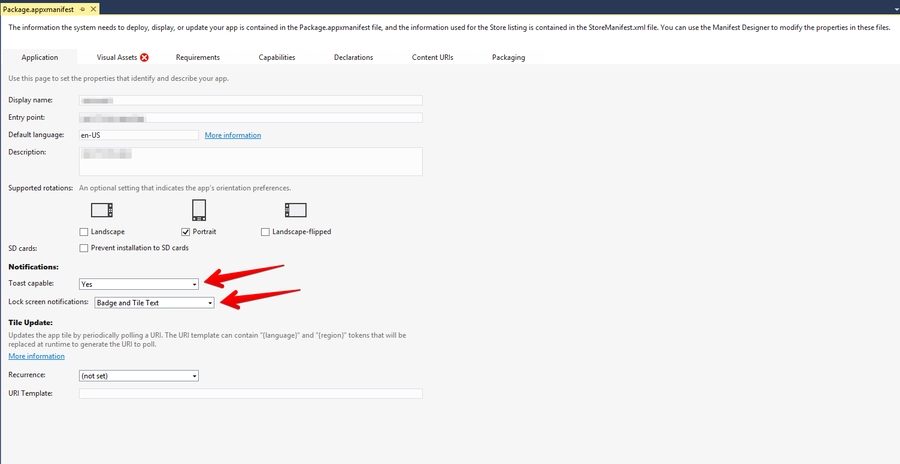
You have to enable Internet (enabled by default in Windows 10) and Location (if needed) in the Capabilities tab of Package.appxmanifest for correct work of the SDK.
To start working with the SDK, add the DevToDev.winmd and DevToDev.Background.winmd to the project references.
Initialize the library at Application Launching event.
App ID and Secret key can be found in the application settings (Open "Settings" → "SDK" → "Integration").
Example:
If the application you integrate SDK in is a part of cross-platform project, then the user data initialization is required.
Since the analytics of a cross-platform projects is based on a unique user (unlike the usual projects where it is based on device identifiers), you have to:
Set the unique cross-platform user identifier (it will be used for a cross-platform project data collection).
Actualize the user data. Mostly it is about game applications where the player has a game level as a characteristic. For such projects you need to set the current player level.
If your application allows user to re-login (changing the user during the working session of application), then the UserID field and SetCurrentLevel method should be called just after the authorization. You don't need to call the SDK initialization one more time.
To enable the debug mode and make SDK notifications displayed in the console use this method:
#import "AppDelegate.h"
#import <devtodev/DevToDev.h>
@interface AppDelegate ()
@end
@implementation AppDelegate
- (void)applicationDidFinishLaunching:(NSNotification *)aNotification {
[DevToDev initWithKey:@"appKey" andSecretKey:@"secretKey"];
}
@end/**
* Method allows to initialize the user. It applies when SDK initialization or user relogin.
* @param String activeUserId - unique cross-platform user identifier (max. 64 symbols)
*/
[DevToDev setUserID:@"activeUserId"];
/**
* Method sets the current user level. Using this method allows to actualize the SDK user data
* in game cross-platform applications.
* @param NSUInteger level - number of current game level of the user
*/
[DevToDev setCurrentLevel:level];
/**
* devtodev App Id and Secret key can be found in the devtodev application
* settings page ("Settings" → "SDK" → "Integration")
*/
[DevToDev initWithKey:applicationId andSecretKey:secretKey];/**
* @param BOOL isActive
*/
[DevToDev setActiveLog: (BOOL) isActive];/**
* <param name="appKey">App ID</param>
* <param name="appSecret">Application secret key</param>
*/
DevToDev.SDK.Initialize(string appKey, string appSecret);DevToDev.SDK.Initialize("3f2504e0-4f89-11d3-9a0c-0305e82c3301", "a8f5f167f44f4964e6c998dee827110c");DevToDev.SDK.UserID = "activeUserId"; //cross-platform user identifier (64 symbols max.)
/**
* <param name="appKey">App ID</param>
* <param name="appSecret">Application secret key</param>
*/
DevToDev.SDK.Initialize(string appKey, string appSecret);
/**
* <param name="level">Current level</param>
*/
DevToDev.SDK.SetCurrentLevel(int level);//to enable logging
DevToDev.SDK.LogEnabled = true;
//to disable loging
DevToDev.SDK.LogEnabled = false;Submit the data to the application settings in devtodev system
Integrate devtodev SDK to the application (see the "SDK integration" division to learn more about integrating and initializing devtodev SDK)
Set Push Notification Enabled in blueprint.
Create a campaign for sending push notifications in "Push" section
Schedule the delivery
That's it!
This generation of SDK is deprecated and is no longer supported. Information about the current version can be found here.
Please do the following to integrate your web application with devtodev:
Add the application to the Space using the wizard for adding application.
To integrate SDK, add the following line to the tag of your page:
In order for SDK for WEB to start working, it is necessary to perform initialization right after the page is loaded and you have a basic user identifier at your disposal.
In case User ID is changed after SDK was initiated, the method should be called repeatedly with indication of a new User ID. For example, when user signs into another account in a launched messenger application.
Unique API key can be found in the application settings: "Settings" → "SDK" → "Integration".
In cross-platform applications, the additional user identifier can be used. It is a user cross-platform ID which is unique for all of the platforms. And if a cross-platform ID differs from the ID that is main for the platform, you need to set the cross-platform ID. The cross-platform ID combines the user data for a cross-platform project.
We recommend you apply this method before the SDK initialization, otherwise, the user identifier from the previous session will be used since the SDK initialization moment till the setCrossplatformUserId method call.
If it is difficult to do, set a cross-platform ID as soon as it is available in the application after SDK initialization.
If your application allows user to re-login (changing the user during the working session of application), then the setCrossplatformUserId method should be called just after the authorization. You don't need to call the SDK initialization one more time.
For the most precise data collection, we strongly recommend specifying some information about the user right after SDK is initiated.
In the first place, this additional initialization is required for gaming applications where the player has a game level as a characteristic.
It is not obligatory, but if you want to have the ability to build reports with regard to the version of your application, use this method before initialization.
To enable the debug mode and make SDK notifications displayed in the console, use this method:
This generation of SDK is deprecated and is no longer supported. Information about the current version can be found here.
Please do the following to integrate your application with devtodev:
Add the application to the Space using the wizard for adding application.
Go to your project directory and place the plugin content here: ProjectName/Plugins
Restart Unreal Editor and open the plugin menu (Window > Plugins). In the "Analytics" plugin group of your project select DevToDev (and "Blueprint Analytics Framework" in case if you use blueprints). You will be offered to restart Unreal Editor again.
Finally, add the following strings into the DefaultEngine.ini configuration file (the file is in "Config" folder of your project):
To get an access to the DevToDev settings, go to Project Settings > DevToDev
Get the keys (they can be found in the application settings: Settings -> SDK -> Integration) and insert the keys in this window. Then choose the Enable Push Notifications option in case if you want to send push notifications through devtodev service.
All the events are available in the Analytics block of your Blueprint.
To initialize SDK in a blueprint, first call the "Start Session" event from the Analytics Blueprint Library.
or from the following code
This generation of SDK is deprecated and is no longer supported. Information about the .
SDK is available as a library in AAR (recommended) and JAR. The library is available in Maven Central repository and on repository.
Step 1. If you use Gradle for the applications build, add mavenCentral() into gradle.build file of your application and specify the following relationship in dependencies block:
In case you don't use Gradle, you can and add the library into the project.
Step 2. Initialize the library in the first Activity method onCreate() in the following way:
App ID and Secret key can be found in the application settings: "Settings" → "SDK" → "Integration".
The devtodev analytics library contains an implementation of FirebaseMessagingService for working with push notifications. If you want to use your own or a third-party push notification service instead of implementing “devtodev push notification”, then you need to disable the built-in service in the manifest file.
Example:
If you want to use our SDK to work with push notifications, see this doc.
Step 3. Add the following lines at the bottom of proguard.config
If the application you integrate SDK in is a part of a cross-platform project, then the user data initialization is required.
Since the analytics of cross-platform projects is based on a unique user (unlike the usual projects where it is based on device identifiers), you have to:
Set the unique cross-platform user identifier (it will be used for cross-platform project data collection).
Actualize the user data. Mostly it is about game applications where the player has a game level as a characteristic. For such projects you need to set the current player level.
If your application allows user to re-login (changing the user during the working session of application), then the setUserID and setCurrentLevel methods should be called just after the authorization. You don't need to call the SDK initialization one more time.
To enable the debug mode and make SDK notifications displayed in the console use this method:
<script type="text/javascript" src="https://cdn.devtodev.com/sdk/web/v1/devtodevsdk.js">
</script>/**
* @param {string} apiKey - devtodev API key, unique API key can be found in the application
* settings ("Settings" → "SDK" → "Integration")
* @param {string} userId - Unique user identifier.
* For example, user’s ID in a social network, or a unique account name used
* for user identification on your server.
* @param {string} previousUserId - Previous unique user identifier. Optional.
* It is used in case of change of the user identifier.
*/
devtodev.init(apiKey, userId, previousUserId);/**
* Initializes the user with the specified cross-platform identifier
* @param {string} сrossplatformUserId - unique cross-platform user ID used
* for user identification on your server.
*/
devtodev.setCrossplatformUserId(сrossplatformUserId);/**
* Initializes the current user level. Required if level feature used in the app.
* @param {number} currentUserLevel- Сurrent game level of the player.
*/
devtodev.setCurrentLevel(currentUserLevel);/**
* @param {Object} appData - App data object.
* @param {string} appData.appVersion - Current app version. Required.
* @param {number} appData.codeVersion - Current code version. Optional.
*/
devtodev.setAppData(appData);/**
* Activates console log
* @param {boolean} status
*/
devtodev.setDebugLog(status);<service
android:name="com.devtodev.push.logic.DTDFcmMessagingService"
android:enabled="false">
</service>dependencies {
implementation 'com.devtodev:android:1.14.10'
implementation 'com.android.installreferrer:installreferrer:2.2'
implementation 'com.google.android.gms:play-services-base:17.6.0'
implementation 'com.google.firebase:firebase-core:19.0.0'
implementation 'androidx.preference:preference:1.1.1' //or higher, required for SDK version 1.14.8 and higher
}public class MyActivity extends Activity {
@Override
public void onCreate(Bundle savedInstanceState) {
super.onCreate(savedInstanceState);
// Initialization devtodev SDK
DevToDev.init(this, APP_ID, SECRET_KEY);
}
}-keep class com.devtodev.** { *; }
-dontwarn com.devtodev.**/**
* Method allows to initialize the user. It applies when SDK initialization or user relogin.
* @param String activeUserId - unique cross-platform user identifier (max. 64 symbols)
*/
DevToDev.setUserId(activeUserId);
/**
* Method sets the current user level. Using this method allows to actualize the SDK user data
* in game cross-platform applications.
* @param int level - number of current game level of the user
*/
DevToDev.setCurrentLevel(currentLevel);
/**
* devtodev SDK initialization
* @param String appId - devtodev App Id
* @param String secretKey - Secret key
* devtodev App Id and Secret key can be found in the devtodev application
* settings page ("Settings" → "SDK" → "Integration")
*/
DevToDev.init(getBaseContext(), appId, secretKey);/**
* @param logLevel
*/
DevToDev.setLogLevel(LogLevel logLevel);This generation of SDK is deprecated and is no longer supported. Information about the current version can be found here.
To be protected from fraudulent transactions, we recommend you to use devtodev Anticheat service.
Use this method, and devtodev will check the transaction's validity with the payment platform, and the response will be returned to the application.
The result can take one of the following values:
In case of a successful check call the following main SDK method:
If the transaction hasn’t passed verification, do not perform the Payment event.
We do not recommend to use the result of devtodev anti-cheat verification as a condition for giving or not giving in-game currency or item purchased by a user!
To check for time cheats call checkTime method every time when the app is being launched
The result can take one of the following values:
To be protected from fraudulent transactions, we recommend you to use devtodev Anticheat service
Use this method, and devtodev will check the transaction validity with the payment platform, and the response will be returned to the application.
Call following method when GooglePlay returns the transaction to your onActivityResult:
You can get sharedSecret key here:
Go to the Google Play Developer Console and sign in. Make sure that you sign in to the account from which the application you are licensing is published (or will be published).
In the application details page, locate the Services & APIs link and click it.
In the Services & APIs page, locate the Licensing & In-App Billing section.
Your public key for licensing is given in the Your License Key For This Application field.
The result can take one of the following values:
In case of a successful check call following the main SDK method:
If the transaction hasn’t passed verification, do not perform the Payment event.
We do not recommend to use the result of devtodev anti-cheat verification as a condition for giving or not giving in-game currency or item purchased by a user!
To check for time cheats call checkTime method every time when the app is being launched
The result can take one of the following values:
To be protected from fraudulent transactions, we recommend you to use devtodev Anticheat service.
Use this method, and devtodev will check the transaction validity with the payment platform, and the response will be returned to the application.
1. Call the method for payment verification:
or if you are using Unity IAP plugin:
where OnReceiptVerifyCallback is the function like this:
Here's how to find your application's public key for licensing (for Google Play platform only, for other platforms the publicKey is not used):
Go to the and sign in. Make sure that you sign in to the account from which the application you are licensing is published (or will be published).
In the application details page, locate the Services & APIs link and click it.
In the Services & APIs page, locate the Licensing & In-App Billing section. Your public key for licensing is given in the Your License Key For This Application field.
ReceiptVerificationStatus can take one of the following values:
Сore SDK should be initialized prior to the call of VerifyPayment function.
2. In case of an unsuccessful check (ReceiptNotValid result) do not call SDK method RealPayment. In other cases:
To check for time cheats call VerifyTime method.
1. Call the method to time verification:
where OnTimeVerifyCallback is the function like this:
DevToDevTimeVerificationStatus can take one of the following values:
Сore SDK should be initialized prior to the call of VerifyTime function.

[Analytics]
ProviderModuleName=DevToDevFAnalytics::Get().GetDefaultConfiguredProvider()->StartSession();
[DevToDevCheat verifyPaymentWithCompletion:(void (^)(ReceiptStatus))completionBlock];typedef enum {
ReceiptValid,
ReceiptNotValid,
ReceiptServerError,
ReceiptInternalError,
ReceiptSandbox
} ReceiptStatus;[DevToDev realPayment: (NSString *) transactionId withInAppPrice:(float) inAppPrice
andInAppName: (NSString *) inAppName andInAppCurrencyISOCode: (NSString *) inAppCurrencyISOCode];[DevToDevCheat checkTime: (void (^)(TimeStatus status)) completionBlock];typedef enum {
Valid,
Forward,
Rewind
} TimeStatus;DevToDevCheat.verifyPayment(String receipt, String signature, String publicKey,
OnVerifyListener onVerifyListener);public enum VerifyStatus {
Valid,
Invalid,
InternalError,
ServerError
};DevToDev.realPayment(String pPaymentId, float pInAppPrice, String pInAppName, String pInAppCurrencyISOCode);DevToDevCheat.verifyTime(OnTimeVerifyListener onTimeVerifyListener);public enum TimeStatus {
Valid,
Forward,
Rewind
};DevToDev.AntiCheat.VerifyReceipt(string receipt, string signature, string publicKey,
OnReceiptVerifyCallback callback);DevToDev.AntiCheat.VerifyReceipt(string purchasedProduct, string publicKey, OnReceiptVerifyCallback callback)public void onReceiptVerifyCallback (DevToDev.ReceiptVerificationStatus status) {
Debug.Log ("Verification status" + status);
//TODO put your source here
}public enum ReceiptVerificationStatus {
ReceiptValid,
ReceiptNotValid,
ReceiptServerError,
ReceiptSandbox,
ReceiptInternalError
};DevToDev.Anatylics.RealPayment(string pPaymentId, float pInAppPrice, string pInAppName,
string pInAppCurrencyISOCode);DevToDev.AntiCheat.VerifyTime(OnTimeVerifyCallback callback);public void onTimeVerifyFinished (DevToDev.TimeVerificationStatus status) {
Debug.Log ("Verification status" + status);
//TODO put your source here
};public enum TimeVerificationStatus {
TimeValid,
TimeForward,
TimeRewind
};This generation of SDK is deprecated and is no longer supported. Information about the current version can be found here.
Only Unity 5.4 and above is supported.
Please do the following to integrate your application with devtodev:
Add the application to the Space using the wizard for adding an application.
Attention! If your Unity project can be used for compilations for different platforms, you need to add the applications in devtodev for each platform. As a result, the statistics will be gained for each platform separately.
Attention! If you install SDK versions (1.*) 2.0, 2.0.1 or 2.0.2, you have to delete them before integrating the latest version.
Switch on "Analytics" by pressing "On" button
Add AppKey and SecretKey for all the using platforms (you can select the platform by clicking on it). If you need to debug, switch logging on.
App ID and Secret key can be found in the application settings (Open "Settings" → "SDK" → "Integration").
Script with all needed parameters if SDK initialization and tracking the user session will be automatically created and added to the scene.
Using code. Add the following strings to the GameObject which will be on the scene during the whole cycle of application work:
The appId and appSecret values are unique for each app on each platform and can be found in the settings of appropriate app ("Settings" → "SDK" → "Integration").
Add following lines at the bottom of proguard config
If you are planning to build an app for iOS, you need to add libz.tbd to the XCode project settings. This library is used by devtodev Unity SDK to compress data sent to devtodev servers. Also, you have to add UserNotifications.framework as an optional library.
Please add AdSupport.framework into the project for your SDK to function correctly with iOS and also add AppTrackingTransparency.framework for iOS 14.
Here’s how you can add them.
Option 1
1. Create Editor folder in the Assets folder.
2. In the Assets folder create DevToDevPostBuild.cs script. The script is below:
3. Uncomment proj.AddFrameworkToProject(projectGuid, "AppTrackingTransparency.framework", true); if necessary.
Option 2.
1. Add AdSupport.framework into the Frameworks section of the generated Unity xcodeproj project.
2. For iOS 14, also add AppTrackingTransparency.framework.
If the application you integrate SDK in is a part of a cross-platform project, then the user data initialization is required.
Since the analytics of cross-platform projects is based on a unique user (unlike the usual projects where it is based on device identifiers), you have to:
Set a unique cross-platform user identifier (it will be used for cross-platform project data collection).
Actualize the user data. Mostly it is about game applications where the player has a game level as a characteristic. For such projects, you need to set the current player level.
If your application allows user to re-login (changing the user during the working session of application), then the UserID property and CurrentLevel method should be called just after the authorization. You don't need to call the SDK initialization one more time.
To enable the debug mode and make SDK notifications displayed in the console use this method:
The data about the amount of sessions and their length is collected automatically by default.
In case you want to control the beginning and the end of a session manually, use the methods below:
For the start of the session use the StartSession method:
For the end of the session use the EndSession method:
Read an and make sure you follow all the recommendations.
Delete a meta file from DevToDevOSX.bundle:
Rename CFBundleIdentifier in Info.plist inside the devtodev plugin, for example:
Sign the DevToDevOSX.bundle with the .entitlements you created earlier. To do this, type the following into the macOS Terminal:
Integration of push notifications on Windows 8.1 and Windows 10
This generation of SDK is deprecated and is no longer supported. Information about the current version can be found here.
To enable Push Notifications you will have to perform the following actions:
Add the application to your space in devtodev system
Activate Windows Messaging Service ang get SID and Client Secret values
Add SID and Client Secret to the application integration settings in devtodev system
Integrate devtodev SDK to the application (see the "SDK integration" section to learn more how to integrate and initialize devtodev SDK)
Go to the application settings in your Windows Store dashboard
Open Push Notifications submenu in Services menu
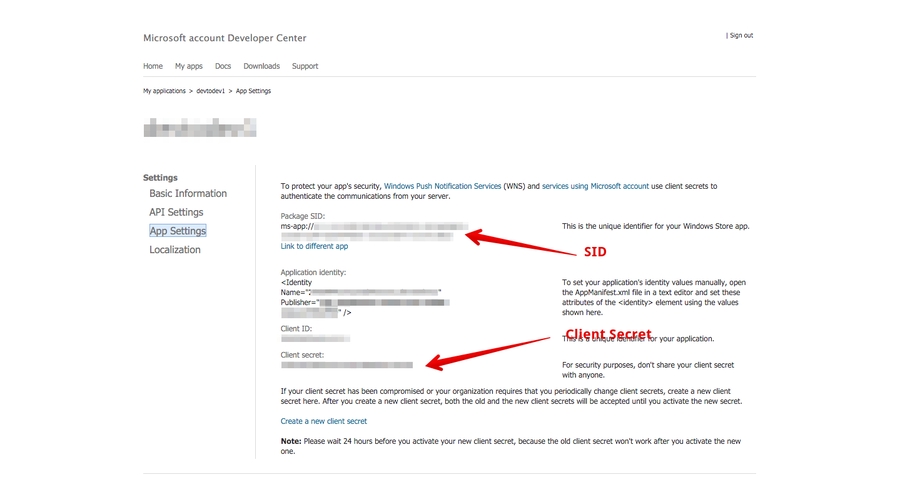
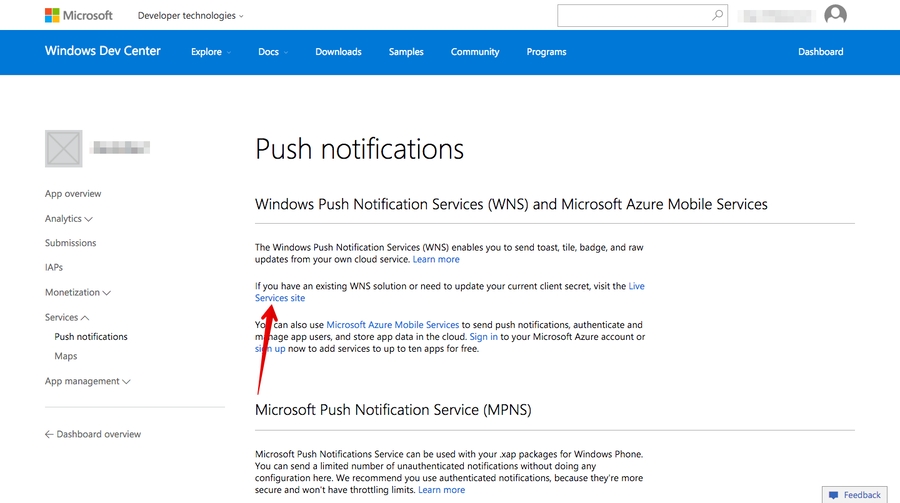
Go to Live Services site:
"Package SID" and "Client secret" will be your SID and Client Secret strings respectively
Integrate devtodev SDK to your project. Even if you don't need devtodev analytics in your app, you should call DevToDev.SDK.Initialize(string appKey, string appSecret).
Add the following source after DevToDev.SDK.Initialize(string appKey, string appSecret) is called:
The PushType can have one of the following values:
The control of the current value of a badge. When an app is launched the current value of a badge is reset to zero by default. In order to disable automatic resetting to zero and manually control the value of a badge use the following methods:
1. Proceed to Settings of your app.
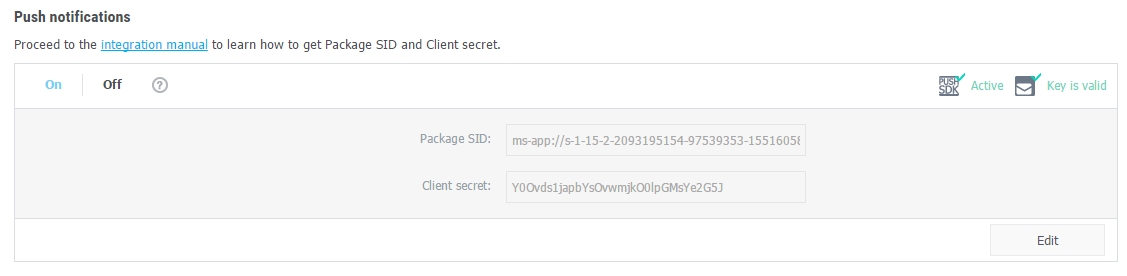
2. Go to PUSH NOTIFICATIONS page in Settings and insert the previously received Package SID and Client secret to appropriate fields in Push notifications section.
3. If the Package SID and Client secret are correct, you will see the following result:
Open PUSH NOTIFICATION section and click on "Add new campaign" button
Fill in campaign name, select an app for delivery*
Choose the user group to send a message. You can choose existing segment or create a new one
Enter toast or tile details
*Attention! You can create a campaign only after at least one push token comes from devtodev SDK integrated to your application. Otherwise the app will not be displayed in the list.
Android Push Notifications
This generation of SDK is deprecated and is no longer supported. Information about the current version can be found here.
Push Notifications on Android are sent with the help of the FCM service. To work with it, two keys are required: a client and server key. If you have a project, move on to the second part of this article.
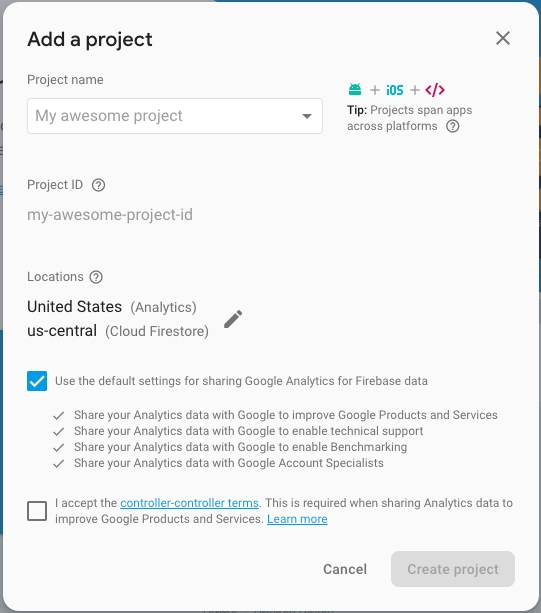
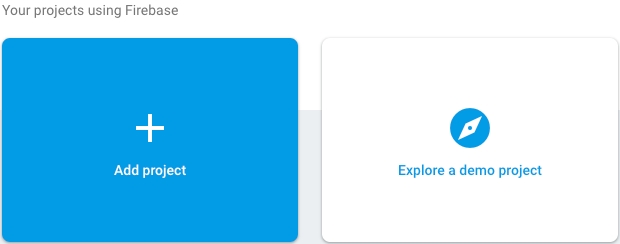
Add a new project to the .
Fill in the name and country of your project.
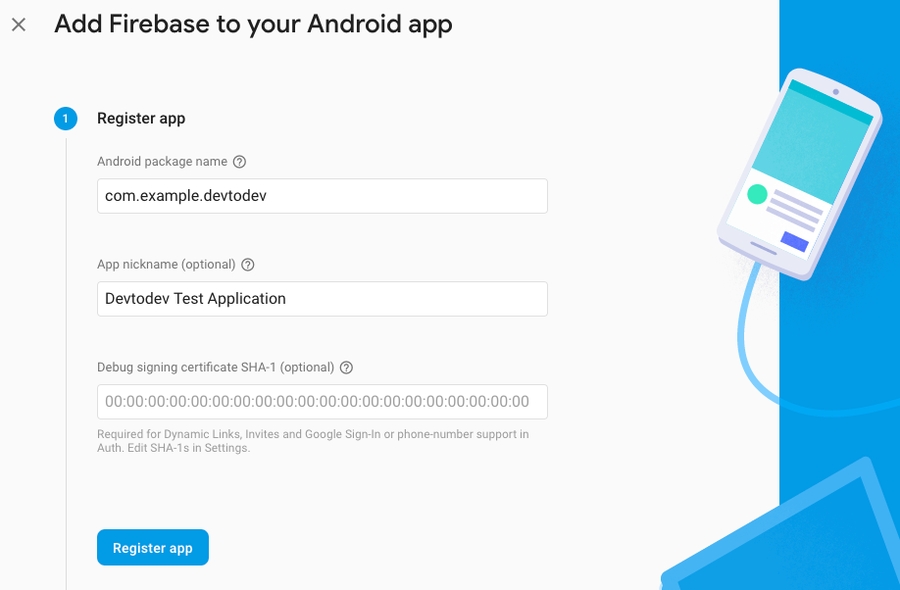
Congratulations, the project has been created! Now you need to indicate the package name of your Android app.
After a successful registration in Firebase, you can receive your keys that you will use in devtodev.
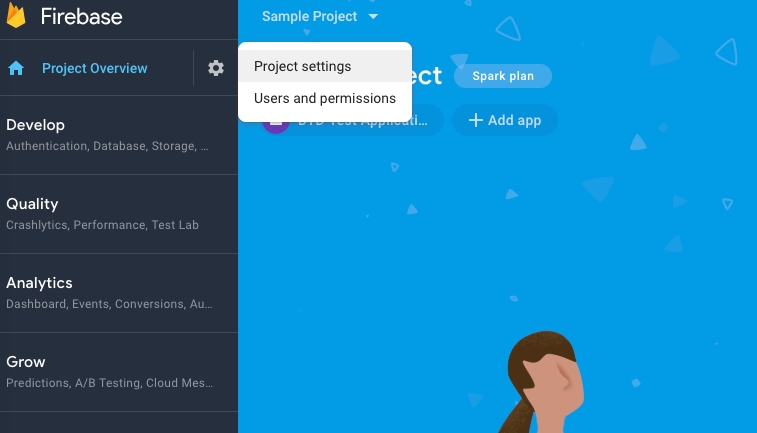
Go to the settings of your Android project.
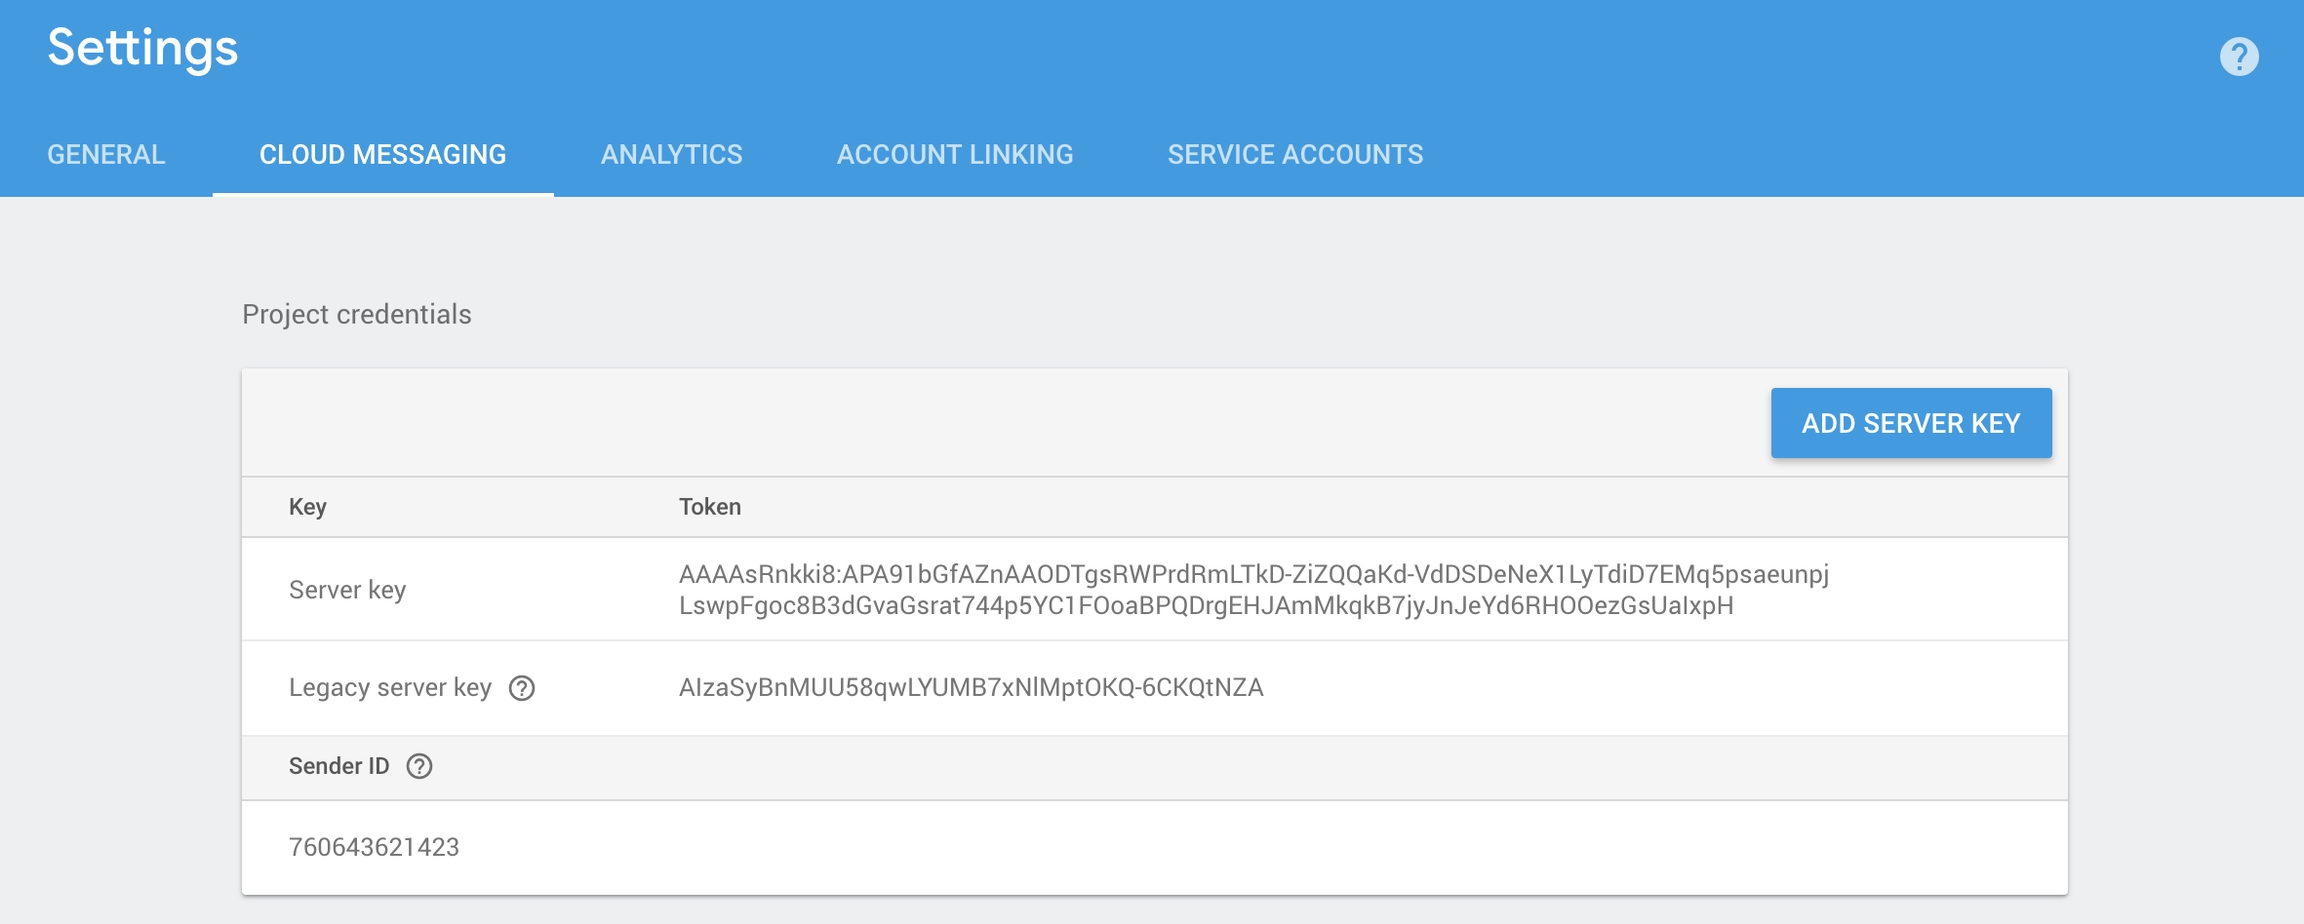
Remember or copy Server key and Sender ID from the Cloud Messaging tab. You will need them to integrate push notifications and create push campaigns.
Download the generated by google-service.json file and add it to the project.
The Google services plugin for loads the google-services.json file that you just downloaded. Modify your build.gradle files to use the plugin.
Project-level build.gradle (<project>/build.gradle):
App-level build.gradle (<project>/<app-module>/build.gradle):
Finally, press "Sync now" in the bar that appears in the IDE:
In Activity (where the SDK initializes) add the push notifications initialization and the listener of push notifications processing.
In case you use several push notifications services or would like to use your own implementation of FirebaseMessagingService, please add the call of the method for displaying messages sent from the devtodev system:
For example:
1. Go to and then to your project settings. On the Cloud messaging tab get the Firebase Cloud Messaging token of your project.
2. Proceed to Settings of your app in devtodev.
3. Go to Integration page and insert the previously received Firebase Cloud Messaging token to the FCM token field in Push notifications section.
4. If the Firebase Cloud Messaging token is correct, you will see the following result
Open PUSH NOTIFICATIONS section and click on 'Add new campaign" button
Fill in campaign name, select an app for delivery*
Choose user group to send a message. You can choose existing segment or create a new one
Enter notification details
You can create a campaign only after at least one push token comes from devtodev SDK integrated to your application. Otherwise the app will not be displayed in the list.
This generation of SDK is deprecated and is no longer supported.
Please do the following to integrate your application with devtodev:
Add the application to the Space using the wizard for adding application. Attention! If your Adobe Air can be used for compilations for different platforms, you need to add the applications in devtodev for each platform. As a result, the statistics will be gained for each platform separately.
Add com.devtodev.sdk.ane library to your application
For Android add the following permissions to the MyApplication.xml file:
To automatically gather the referrals data on Android, add the following strings into tag
For other platforms no changes are needed.
5. Add the following imports to your source
6. Add following source into initialize event in MyApplication.mxml file:
The appKey and appSecret values are unique for each app on each platform and can be found in the settings of appropriate app ("Settings" → "SDK" → "Integration").
For example: file MyApplication.mxml:
file MyApplication.xml:
If the application you integrate SDK in is a part of cross-platform project, then the user data initialization is required.
Since the analytics of cross-platform projects is based on a unique user (unlike the usual projects where it is based on device identifiers), you have to:
Set the unique cross-platform user identifier (it will be used for cross-platform project data collection).
Actualize the user data. Mostly it is about game applications where the player has a game level as a characteristic. For such projects, you need to set the current player level.
If your application allows user to re-login (changing the user during the working session of application), then the setUserID and setCurrentLevel methods should be called just after the authorization. You don't need to call the SDK initialization one more time.
To enable the debug mode and make SDK notifications displayed in the console, use this method:
<uses-permission android:name="android.permission.INTERNET"/>
<!-- Necessary(Required for sending analytics data to our server) -->
<uses-permission android:name="android.permission.ACCESS_WIFI_STATE" />
<!-- Additional (Required for devices' MAC addresses collection) -->
<uses-permission android:name="android.permission.READ_PHONE_STATE" />
<!-- Additional (Required for cellular operator data collection) --> <receiver android:name="com.devtodev.InstallReceiver" android:enabled="true" android:exported="true">
<intent-filter>
<action android:name="com.android.vending.INSTALL_REFERRER" />
</intent-filter>
</receiver> import com.devtodev.sdk.core.DevToDev;
import com.devtodev.sdk.core.data.consts.AccrualType;
import com.devtodev.sdk.core.data.consts.Gender;
import com.devtodev.sdk.core.data.consts.SocialNetwork;
import com.devtodev.sdk.core.data.consts.TutorialState;
import com.devtodev.sdk.cheat.data.consts.VerifyStatus;
import com.devtodev.sdk.cheat.data.consts.TimeStatus;
import com.devtodev.sdk.core.data.metrics.aggregated.events.CustomEventParams; DevToDev.init(AppId:String, SecretKey:String);<?xml version="1.0" encoding="utf-8"?>
<s:Application initialize="application1_activateHandler(event)"
deactivate="application1_deactivateHandler(event)"
xmlns:fx="http://ns.adobe.com/mxml/2009"
xmlns:s="library://ns.adobe.com/flex/spark" applicationDPI="160">
<fx:Script>
<![CDATA[
import com.devtodev.sdk.core.DevToDev;
import com.devtodev.sdk.core.data.consts.AccrualType;
import com.devtodev.sdk.core.data.consts.Gender;
import com.devtodev.sdk.core.data.consts.SocialNetwork;
import com.devtodev.sdk.core.data.consts.TutorialState;
import com.devtodev.sdk.cheat.data.consts.VerifyStatus;
import com.devtodev.sdk.cheat.data.consts.TimeStatus;
import com.devtodev.sdk.core.data.metrics.aggregated.events.CustomEventParams;
protected function application1_activateHandler(event:Event):void {
DevToDev.init(AppId, SecretKey);
DevToDev.startSession();
}
protected function application1_deactivateHandler(event:Event):void {
DevToDev.endSession();
}
]]>
</fx:Script>
<fx:Declarations>
</fx:Declarations>
<s:VGroup>
</s:VGroup>
</s:Application><?xml version="1.0" encoding="utf-8" standalone="no"?>
<application xmlns="http://ns.adobe.com/air/application/17.0">
<id>com.my.application</id>
<filename>myapplication</filename>
<name>myapplication</name>
<versionNumber>1.0.0</versionNumber>
<initialWindow>
<autoOrients>true</autoOrients>
<fullScreen>false</fullScreen>
<visible>true</visible>
<softKeyboardBehavior>none</softKeyboardBehavior>
</initialWindow>
<android>
<colorDepth>16bit</colorDepth>
<manifestAdditions><![CDATA[
<manifest android:installLocation="auto">
<uses-permission android:name="android.permission.INTERNET"/>
<uses-permission android:name="android.permission.WAKE_LOCK"/>
<uses-permission android:name="android.permission.READ_PHONE_STATE"/>
<application>
<receiver android:name="com.devtodev.InstallReceiver" android:enabled="true"
android:exported="true">
<intent-filter>
<action android:name="com.android.vending.INSTALL_REFERRER" />
</intent-filter>
</receiver>
</application>
</manifest>
]]></manifestAdditions>
</android>
<iPhone>
<InfoAdditions><![CDATA[
<key>UIDeviceFamily</key>
<array>
<string>1</string>
<string>2</string>
</array>
]]></InfoAdditions>
<requestedDisplayResolution>high</requestedDisplayResolution>
</iPhone>
<extensions>
<extensionID>com.devtodev.SDK</extensionID>
</extensions>
</application>/**
* Method allows to initialize the user. It applies when SDK initialization or user relogin.
* @param activeUserId - unique cross-platform user identifier (max. 64 symbols)
*/
DevToDev.setUserId(activeUserId:String);
/**
* Method sets the current user level. Using this method allows to actualize the SDK user data
* in game cross-platform applications.
* @param level - number of current game level of the user
*/
DevToDev.setCurrentLevel(level:int);
/**
* devtodev App Id and Secret key can be found in the devtodev application
* settings page ("Settings" → "SDK" → "Integration")
* @param appKey - application key
* @param appSecret - application secret
*/
DevToDev.init(appKey:String, appSecret:String);/**
* @param logLevel (set logLevel=1 to enable log, 0 to disable)
*/
DevToDev.setLogLevel(logLevel:int);For 1.*
Assets/DevToDev/ (the folder)
Assets/Plugins/Android/ (files android-suport-v4.jar, AndroidManifest.xml, devtodev.jar, devtodev_android_wrapper.jar, google-play-services.jar)
Assets/Plugins/iOS/ (files AccrualType.h, CustomEventParams.h, all DevToDev*.h, Gender.h, libdevtodev.a, ReceiptStatus.h, SocialNetwork.h, TimeStatus.h, TutorialState.h)
Assets/Plugins/Metro/devtodev.dll
For 2.0
Assets/devtodev (the folder)
Assets/Plugins/DevToDevOSX.bundle
After deleting, unpack devtodev.unitypackage version 2.1 and replace all the files. If you used an interface integration, you have to re-integrate SDK.
Unpack the devtodev.unitypackage into the project
There are 2 types of integration available:
In the interface.
Open the main screen of the app.
Open Window/devtodev menu, then you'll see the following window:
Add several lines of the code to switch on the push notification in the SDK
Create a campaign for sending push notifications in "Push" section
Attention! There is a difference in the implementation of the elements mentioned below for Windows 8.1+ and Windows 10+ projects.
Windows 8.1+: Put the following source in your Application class (usually it is App.xaml.cs file) at the end of the OnLaunched(LaunchActivatedEventArgs e) function. For Example:
Windows 10+: Put the following source in your Application class (usually it is App.xaml.cs file) at the end of the OnLaunched(LaunchActivatedEventArgs e) and OnActivated(IActivatedEventArgs args) functions. For Example:
Make sure that these functions are enabled in Package.appmanifest of you project (the flag "Toast capable" is enabled by default for Windows 10+ projects, it is absent in the manifest).
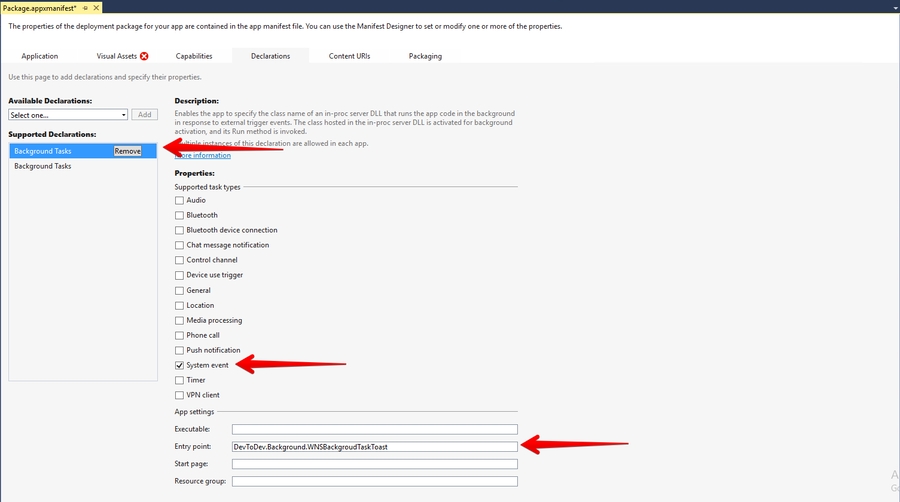
Add the following two Background Tasks in Package.appmanifest:
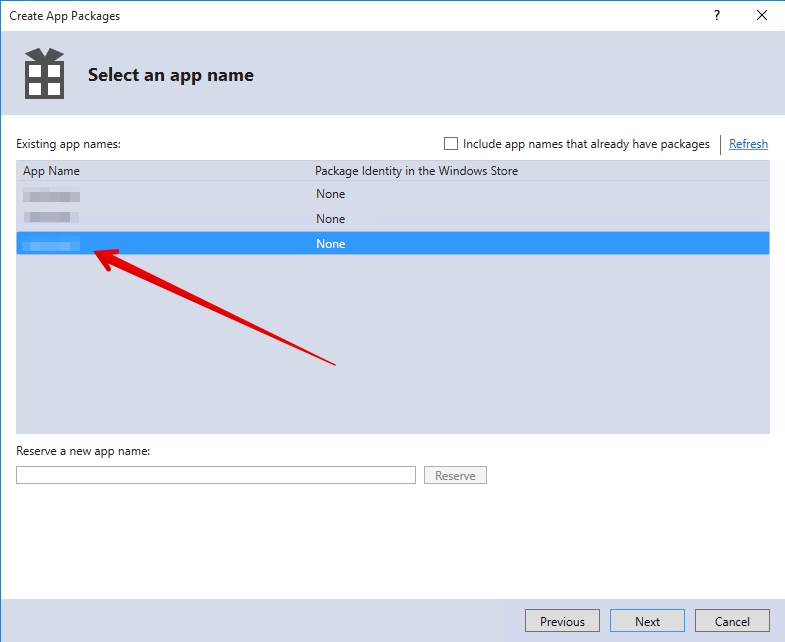
Keep in mind that your application must be built with the same Windows Store preferences you used in Chapter 3.2. In the "Create App Packages" window you have to log in with your Live ID and pick the appropriate application form the list. A file Package.StoreAssociation.xml will be added into the Project.
Schedule the delivery
That's it!
Optional. To set the custom icons to be shown in push-notification on the SDK part, use the following methods: To set the small icon:
To set the default color of the small icon:
To set the large icon:
Use resources of your app. For example, R.drawable.ic_launcherIcons which set in the push-notification wizard have priority over the icons which set in these methods.
Make some tests and correct the message if it's required
Schedule the delivery
That's it!


public class YourBehaviourScript : MonoBehaviour
{
void Start()
{
#if UNITY_ANDROID
// <param name="androidAppId"> devtodev App ID for Google Play version of application </param>
// <param name="androidAppSecret"> devtodev Secret key for Google Play version of application </param>
DevToDev.Analytics.Initialize(string androidAppId, string androidAppSecret);
#elif UNITY_IOS
// <param name="iosAppId"> devtodev App ID for App Store version of application </param>
// <param name="iosAppSecret"> devtodev Secret key for App Store version of application </param>
DevToDev.Analytics.Initialize(string iosAppId, string iosAppSecret);
#elif UNITY_WEBGL
// <param name="webglAppId"> devtodev App ID for Web version of application </param>
// <param name="webglAppKey"> devtodev Secret key Web version of application </param>
DevToDev.Analytics.Initialize(string webglAppId, string webglAppSecret);
#elif UNITY_STANDALONE_WIN
// <param name="winAppId"> devtodev App ID for Windows Store version of application </param>
// <param name="winAppSecret"> devtodev Secret key for Windows Store version of application </param>
DevToDev.Analytics.Initialize(string winAppId, string winAppSecret);
#endif
}
};-keep class com.devtodev.** { *; }
-dontwarn com.devtodev.**#if UNITY_IOS
using System.IO;
using UnityEditor;
using UnityEditor.Callbacks;
using UnityEditor.iOS.Xcode;
namespace DevToDev
{
public class DevToDevPostBuild
{
const string APP_TARGET_NAME = "Unity-iPhone";
[PostProcessBuildAttribute(1)]
public static void OnPostprocessBuild(BuildTarget target, string pathToBuiltProject)
{
if (target != BuildTarget.iOS)
{
return;
}
iOSPostBuild(pathToBuiltProject);
}
private static void iOSPostBuild(string projPath)
{
string pbxprojPath = projPath + "/Unity-iPhone.xcodeproj/project.pbxproj";
PBXProject proj = new PBXProject();
proj.ReadFromString(File.ReadAllText(pbxprojPath));
string projectGuid = proj.TargetGuidByName(APP_TARGET_NAME);
proj.AddFrameworkToProject(projectGuid, "AdSupport.framework", true);
// IOS 14. Xcode 12 required.
//proj.AddFrameworkToProject(projectGuid, "AppTrackingTransparency.framework", true);
File.WriteAllText(pbxprojPath, proj.WriteToString());
}
}
}
#endif
/// <summary> Property allows to initialize the user.
/// It applies when SDK initialization or user relogin.</summary>
/// <param name="activeUserId">unique cross-platform user identifier (max. 64 symbols)</param>
DevToDev.Analytics.UserId = activeUserID;
/// <summary> Method sets the current user level.
/// Using this method allows to actualize the SDK user data in game cross-platform applications.</summary>
/// <param name="level">number of current game level of the user</param>
DevToDev.Analytics.CurrentLevel(level);
/// <summary> Property allows to set current application version.
/// Attention! This property is necessary for WEB and Windows Standalone apps only.
/// It will be ignored on other platforms.</summary>
/// <param name="version"> current version of your application</param>
DevToDev.Analytics.ApplicationVersion = version;
/// <summary> devtodev App Id and Secret key can be found in the devtodev application
/// settings page ("Settings" → "SDK" → "Integration") </summary>
DevToDev.Analytics.Initialize(string appId, string appSecret);/// <summary> Enable/Disable log</summary>
/// <param name="isEnabled">Enabled/Disabled log</param>
DevToDev.Analytics.SetActiveLog(bool isEnabled);//Call this when the session starts or is resumed
DevToDev.Analytics.StartSession();//Call this when the session is completed
DevToDev.Analytics.EndSession();File.Delete (projPath + "/Contents/Plugins/DevToDevOSX.bundle/Contents.meta");string plistPath = appPath + "/Contents/Plugins/DevToDevOSX.bundle/Contents/Info.plist";
PlistDocument plist = new PlistDocument ();
plist.ReadFromString (File.ReadAllText (plistPath));
plist.root.SetString ("CFBundleIdentifier", PlayerSettings.applicationIdentifier + ".devtodev");
File.WriteAllText (plistPath, plist.WriteToString ());codesign -f --deep -s 'Mac Developer: Developer Name' --entitlements "yourapp.entitlements" "path/to/your.app/Contents/Plugins/DevToDevOSX.bundle"protected override void OnLaunched(LaunchActivatedEventArgs e) {
//...other source
DevToDev.PushManager.HandleToastNavigation(e.Arguments);
}protected override void OnLaunched(LaunchActivatedEventArgs e) {
//...other source
DevToDev.PushManager.HandleToastNavigation(e.Arguments);
}
protected override void OnActivated(IActivatedEventArgs args) {
//...other source
if (args.Kind == ActivationKind.ToastNotification) {
var toastArgs = args as ToastNotificationActivatedEventArgs;
DevToDev.PushManager.HandleToastNavigation(toastArgs.Argument);
}
}//It is called when push token is received successfully
PushManager.PushTokenReceived = (pushToken) => {
//pushToken - the string contains the push token
};
//It is called when there is an error in push token delivery.
PushManager.PushTokenFailed = (error) => {
//error - the error string. This function will be called when push token have not been obtained.
};
//It is called when push notification is received.
PushManager.PushReceived = (PushType type, IDictionary<string, string> pushAdditionalData) => {
//type - type of the push message
//params - IDictionary<string, string> with the custom user parameters form the push message
};
//It is called when push notification is opened.
PushManager.PushOpened = (PushMessage pushMessage, ActionButton actionButton) => {
//pushMessage - DevToDev.PushMessage. Represents toast notification message
//actionButton - DevToDev.ActionButton. Windows 10 only!
//Represents toast button that was clicked. Could be null if toast body was clicked
};
DevToDev.PushManager.Initialize();public enum PushType {
ToastNotification, //Notification that can be seen by a user.
SilentNotification //Raw-notification. A user can't see it.
}//Disables automatic clearing of a badge at start.
//Must be called before DevToDev.PushManager.Initialize();
DevToDev.PushManager.AutoClearBadgeOnStart = false;
//Decreases the current value of a badge on "number" units.
DevToDev.PushManager.DecreaseBadge(int number);
//Clears the current value of a badge.
DevToDev.PushManager.ClearBadgeCount();DevToDevPushManager.setCustomSmallIcon(int resourceId);DevToDevPushManager.setCustomSmallIconColor(int colorHexadecimal)DevToDevPushManager.setCustomLargeIcon(int resourceId);buildscript {
dependencies {
// Add this line
classpath 'com.google.gms:google-services:4.3.3'
}
}dependencies {
...
implementation 'com.devtodev:android:1.14.5'
implementation 'com.google.android.gms:play-services-base:17.1.0'
implementation 'com.google.firebase:firebase-core:17.2.3'
implementation 'com.google.firebase:firebase-messaging:20.1.0'
}
// Add to the bottom of the file
apply plugin: 'com.google.gms.google-services'DevToDevPushManager.displayPushNotification(Context context, RemoteMessage remoteMessage);public class MyFirebaseMessagingService extends FirebaseMessagingService {
@Override
public void onMessageReceived(RemoteMessage remoteMessage) {
Map<String, String> data = remoteMessage.getData();
if (data != null) {
if (data.containsKey("_k")) {
DevToDevPushManager.displayPushNotification(this, remoteMessage);
} else {
showNotification(remoteMessage);
}
}
}
}public class MainActivity extends AppCompatActivity implements PushListener {
@Override
protected void onCreate(Bundle savedInstanceState) {
super.onCreate(savedInstanceState);
setContentView(R.layout.activity_main);
DevToDevPushManager.setPushListener(this);
DevToDevPushManager.init(getIntent());
}
@Override
public void onRegisteredForPushNotifications(String s) {
// Insert the code for processing the received token
}
@Override
public void onFailedToRegisteredForPushNotifications(String s) {
// Insert the code for tracking integration errors
}
@Override
public void onPushNotificationsReceived(Map<String, String> map) {
// Insert the code to track received notifications
}
@Override
public void onPushNotificationOpened(PushMessage pushMessage, @Nullable ActionButton actionButton) {
// Insert the code to track opened notification
}
}


Integration with iOS push notification service
This generation of SDK is deprecated and is no longer supported. Information about the current version can be found here.
To enable Push Notifications, please perform the following actions:
Add the application to your space in devtodev system.
Generate Developer or Production Certificate for the application and get Private key file (.p12) on its basis.
Submit the data to the application settings in devtodev system.
Integrate devtodev SDK to the application (see the section to learn more about integrating and initializing devtodev SDK).
First enable push notifications in your Xcode project.
The library provides support for iOS 10 notification attachments, such as images, animated gifs, and video. In order to take advantage of this functionality, you will need to create a notification service extension alongside your main application.
Create a new iOS target in Xcode (File -> New -> Target) and select the Notification Service Extension type.
In Member Center, the Push Notifications service will appear as Configurable (not Enabled) until you create a client SSL certificate.
Drag the devtodevAppExtensions.framework into your app project.
Modify your extension.
Delete all dummy source code for your new extension
Inherit from DTDMediaAttachmentExtension in NotificationService
Use Xcode to enable push notifications in the target’s Capabilities pane:
Enable Background Modes and Remote notifications under the target’s Capabilities section:
You use Member Center to generate a push notification client SSL certificate that allows your notification server to connect to the APNs. Each App ID is required to have its own client SSL certificate. The client SSL certificate Member Center generates is a universal certificate that allows your app to connect to both the development and production environments.
To generate a universal client SSL certificate
In , select Certificates.
Click the Add button (+) in the upper-right corner.
Under Production, select the “Apple Push Notification service SSL (Sandbox & Production)” checkbox, and click Continue.
Open "Keychain access" application
If the certificate hasn't been added to keychain access yet, choose "File" → "Import". Find the certificate file (CER-file) provided by Apple
Choose "Keys" section in "Keychain access" application
Choose a personal key associated with your iPhone developer certificate. Personal key is identified by open certificate associated with it "iPhone developer: ". Choose "File" → Export objects. Save key as .p12
Convert Apple certificate file to the PEM-file. Start following command-line operation from bin catalog OpenSSL.
Convert personal key from Mac OS keychain to the PEM-key:
Now you are able to create P12-file using PEM-key and iPhone developer certificate:
If you are using key from Mac OS keychain then choose PEM-version created in the previous step. Otherwise, you can use OpenSSL key for Windows OS.
Upload the .p12-file into Integration section of application settings panel (Settings -> Push Notifications):
After the certificate has been generated you can start to integrate Push SDK into your app.
1. Open the "Capabilities" tab in the XCode. Switch "Push Notifications" and "Background Modes" to ON. In "Background Modes" check "Remote notifications".
2. Add the following strings to the AppDelegate class:
If you are using iOS 12 or above, you can specify custom options for notification settings:
3. Open "Build Settings", find the parameter "Other Linker Flags", then add 2 flags: -ObjC and -lc++
4. Compile and run the app. You will need a device because the simulator does not support push notifications. Xcode will automatically choose a new provisioning profile. If an error occurred during the launch make sure that there is a correct profile set in the Code Signing Identity. You'll be asked to confirm push notifications. An app will request permission only once, if user confirms it - notifications will be accepted otherwise he won't get any push messages from your app. Users can change it in device settings.
1. Open PUSH NOTIFICATIONS section and click on the "Add new campaign" button
2. Fill in the campaign name
3. Choose a user group to send a message. You can choose an existing segment or create a new one
4. Enter notification details
5. Test push notification (or skip this step)
6. Confirm push gateway
7. Schedule the delivery
8. That's it!
This generation of SDK is deprecated and is no longer supported. Information about the .
To enable Push Notifications you will have to perform the following actions:

Add several lines of the code to switch in the push notification to the SDK.
Create a campaign for sending push notifications in Push Notifications section.
Follow the instructions on the next webpage to create a certificate request on your Mac, and click Continue.
Click Choose File.
In the dialog that appears, select the certificate request file (with a .certSigningRequest extension), and click Choose.
Click Generate.
Click Download.
You'll be suggested to create a password which is used when you need to import the key to another computer
Add the application to your space in devtodev system
Android. Get API key from Google APIs Console. It is necessary to activate Google Cloud Messaging for Android before key generation. Detailed information on how to receive an API key you can find in native Android devtodev SDK documentation
iOS. Generate Developer or Production Certificate for the application and get Private key file (.p12) on its basis. Detailed information on how to receive a Private key file you can find in native iOS devtodev SDK documentation
Submit the data to the application settings in devtodev system
Integrate devtodev SDK to the application (see the "" to learn more about integrating and initializing devtodev SDK)
Add several lines of the code to switch in the push notification to the SDK
Create a campaign for sending push-notifications in "Push" section
Go to Firebase console and then to your project or create a new one. Here is complete guide on adding your project to Firebase console and enabling Cloud messaging.
Download google-services.json from your Firebase console. Add this file into your project’s Assets folder.
Please do the following to find google-services.json:
Choose your project in the Firebase console
Choose project settings in the Project overview
3. Scroll down to the SDK setup and configuration. Click on the google-services.json
If you want to use both devtodev and Firebase Messaging services at the same time, you need to disable Firebase listener.
Find androidmanifest.xml used in your app. If you don’t use Custom Manifest, you need to create it. Tick the Custom Main Manifest checkbox:
You can read more about the manifest here.
Add the following line to the “Application” section:
You should get something like this:
Build a Windows Store App in Unity. After the app is built, Visual Studio project will be created. Proceed with the following changes.
.NET + D3D: Put the following source in your App class (usually it is an App.cs file) at the end of the ApplicationView_Activated(CoreApplicationView sender, IActivatedEventArgs args) function.
.NET + XAML: Put the following source in your App class (usually it is an App.xaml.cs file) at the end of the OnLaunched(LaunchActivatedEventArgs args) and OnActivated(IActivatedEventArgs args) functions.
IL2CPP + XAML: Put the following source in your App class (usually it is App.xaml.cpp file). Add several lines of code in a generated App.xaml.cpp class. After defining headers:
And at the end of of the App::OnLaunched(LaunchActivatedEventArgs^ e) and App::OnActivated(IActivatedEventArgs^ args) functions.
For Example:
IL2CPP + D3D: Put the following source in your App class (usually it is App.cpp file). Add several lines of code in a generated App.cpp class. After defining headers:
And at the end of of the App::OnActivated(CoreApplicationView^ sender, IActivatedEventArgs^ args) function.
Make sure that these functions are enabled in Package.appmanifest of you project (the flag "Toast capable" is enabled by default for Windows 10+ projects, it is absent in the manifest).
Add the following three Background Tasks in Package.appmanifest:
Entry point for Push Notification tasks type:
Entry points for System Event tasks type:
You must also associate your application with the Windows Store app (otherwise push notifications will not be delivered). Open "Store->Associate App with the Store" menu, login with your Live ID and pick the appropriate application form the list. A file Package.StoreAssociation.xml will be added into the Project.
Build an iOS App in Unity. After the app is built, Xcode project will be created. Proceed with the following changes
Enable push notifications in your Xcode project
The library provides support for iOS 10 notification attachments, such as images, animated gifs, and video. In order to take advantage of this functionality, you will need to create a notification service extension alongside your main application
Create a new iOS target in Xcode (File -> New -> Target) and select the Notification Service Extension type
In Member Center, the Push Notifications service will appear as Configurable (not Enabled) until you create a client SSL certificate
Add devtodevAppExtensions.framework to newly created extension. Make sure that Deployment Target is pointed as iOS 10.0 or higher:
Make sure that field Architectures contains "Standard architectures armv7, arm64" setting both in the project and the extension build settings:
Modify your extension:
Delete all dummy source code for your new extension
Inherit from DTDMediaAttachmentExtension in NotificationService
Use Xcode to enable push notifications in the target’s Capabilities pane:
Enable Background Modes and Remote notifications under the target’s Capabilities section:
Using the graphic interface:
Open the Window/devtodev menu element
Switch Push Notifications tumbler on
If you need to use push token for some aims or to handle the getting of notifications by user, add the GameObject with the following function to the scene:
Set the target game object, needed script and functions in the interface:
Using code: Before calling Analytics.Initialize add the following strings:
1. Open PUSH NOTIFICATIONS section and click on the "Add new campaign" button
2. Fill in the campaign name, select an app for delivery 3. Choose a user group to send a message. You can choose an existing segment or create a new one 4. Enter notification details 5. Schedule the delivery 6. That's it!
You can create a campaign only after at least one push token comes from devtodev SDK integrated into your application. Otherwise, the app will not be displayed in the list.

//NotificationService.h
#import <devtodevAppExtensions/devtodevAppExtensions.h>
@interface NotificationService : DTDMediaAttachmentExtension
@end
//NotificationService.m
#import "NotificationService.h"
@implementation NotificationService
// NOTE: Keep this empty implementation to prevent class stripping.
@endopenssl x509 -in developer_identity.cer -inform DER -out developer_identity.pem -outform PEMopenssl pkcs12 -nocerts -in mykey.p12 -out mykey.pemopenssl pkcs12 -export -inkey mykey.key -in developer_identity.pem -out iphone_dev.p12#import "AppDelegate.h"
#import <devtodev/devtodev.h>
@implementation AppDelegate
- (BOOL)application:(UIApplication *)application didFinishLaunchingWithOptions:(NSDictionary
*)launchOptions {
[DevToDev initWithKey:@“APP_KEY” andSecretKey:@“SECRET_KEY”];
dispatch_async(dispatch_get_main_queue(), ^{
[DevToDev pushManager].delegate = self;
[DevToDev pushManager].pushNotificationsOptions = (DTDNotificationOptionAlert | DTDNotificationOptionBadge | DTDNotificationOptionSound);
[DevToDev pushManager].pushNotificationsEnabled = YES;
});
// Your code...
return YES;
}
/**
* @brief Device received a token and was successfully subscribed for notifications
* @param deviceToken device push token
**/
-(void) didRegisterForRemoteNotificationsWithDeviceToken: (NSString *) deviceToken {
}
/**
* @brief Error occured while registering for push notifications
* @param error text
**/
-(void) didFailToRegisterForRemoteNotificationsWithError: (NSError *) error {
}
/**
* @brief Push notification has been received by the device
* @param notification data
**/
-(void) didReceiveRemoteNotification: (NSDictionary *) notification {
}
/**
* @brief Push notification has been opened
* @param pushMessage body
* @param actionButton button that was clicked
**/
-(void) didOpenRemoteNotification: (DTDPushMessage *) pushMessage withAction: (DTDActionButton *) actionButton {
}
/**
* @brief Push notification receive response
* Note: This method is relevant only for iOS 10 and above.
* @param response notification
**/
-(void) didReceiveNotificationResponse: (DTDNotificationResponse *)response {
}typedef NS_OPTIONS(NSUInteger, DTDNotificationOptions) {
DTDNotificationOptionBadge = (1 << 0),
DTDNotificationOptionSound = (1 << 1),
DTDNotificationOptionAlert = (1 << 2),
DTDNotificationOptionCarPlay = (1 << 3),
DTDNotificationOptionCriticalAlert = (1 << 4),
DTDNotificationOptionProvidesAppNotificationSettings = (1 << 5),
DTDNotificationOptionProvisional = (1 << 6)
};<service android: name = "com.google.firebase.messaging.cpp.ListenerService"
android: exported = "true"
android: enabled = "false"
tools: node = "replace" /><?xml version="1.0" encoding="utf-8"?>
<manifest xmlns:android="http://schemas.android.com/apk/res/android" xmlns:tools="http://schemas.android.com/tools" package="com.devtodev.unitysdk2" android:versionCode="1" android:versionName="1.0">
<application android:label="@string/app_name" android:icon="@drawable/app_icon">
<service android:name="com.google.firebase.messaging.cpp.ListenerService" android:exported="true" android:enabled="false" tools:node="replace" />
<!-- The MessagingUnityPlayerActivity is a class that extends
UnityPlayerActivity to work around a known issue when receiving
notification data payloads in the background. -->
<activity android:name="com.google.firebase.MessagingUnityPlayerActivity" android:configChanges="fontScale|keyboard|keyboardHidden|locale|mnc|mcc|navigation|orientation|screenLayout|screenSize|smallestScreenSize|uiMode|touchscreen">
<intent-filter>
<action android:name="android.intent.action.MAIN" />
<category android:name="android.intent.category.LAUNCHER" />
</intent-filter>
<meta-data android:name="unityplayer.UnityActivity" android:value="true" />
</activity>
<service android:name="com.google.firebase.messaging.MessageForwardingService" android:exported="true" />
</application>
</manifest>private void ApplicationView_Activated(CoreApplicationView sender, IActivatedEventArgs args) {
//...other code
DevToDev.ActivatedEventHandler.Handle(args);
}protected override void OnLaunched(LaunchActivatedEventArgs e) {
//...other code
DevToDev.ActivatedEventHandler.Handle(e);
}
protected override void OnActivated(IActivatedEventArgs args) {
//...other source
DevToDev.ActivatedEventHandler.Handle(args);
}//...headers
extern "C" __declspec(dllimport) void __stdcall AddActivatedEventArgs(IInspectable* activatedEventArgs);void App::OnActivated(IActivatedEventArgs^ args) {
//...other code
AddActivatedEventArgs(reinterpret_cast<IInspectable*>(static_cast<Platform::Object^>(args)));
}
void App::OnLaunched(LaunchActivatedEventArgs^ e) {
//...other code
auto args = static_cast<IActivatedEventArgs^>(e);
AddActivatedEventArgs(reinterpret_cast<IInspectable*>(static_cast<Platform::Object^>(args)));
}//...headers
extern "C" __declspec(dllimport) void __stdcall AddActivatedEventArgs(IInspectable* activatedEventArgs);void App::OnActivated(CoreApplicationView^ sender, IActivatedEventArgs^ args) {
//...other code
AddActivatedEventArgs(reinterpret_cast<IInspectable*>(static_cast<Platform::Object^>(args)));
}devtodev.background.PushNotificationTriggerTaskdevtodev.background.ToastNotificationActionTriggerTask
devtodev.background.ToastNotificationHistoryChangedTriggerTask//NotificationService.h
#import <devtodevAppExtensions/devtodevAppExtensions.h>
@interface NotificationService : DTDMediaAttachmentExtension
@end
//NotificationService.m
#import "NotificationService.h"
@interface NotificationService ()
@endpublic void PushReceived(IDictionary<string, string> pushAdditionalData) {
//pushAdditionalData - push-notification data that you send to your app
}
public void PushOpened(DevToDev.PushMessage pushMessage, DevToDev.ActionButton actionButton) {
//pushMessage - DevToDev.PushMessage. Represents toast notification message
//actionButton - DevToDev.ActionButton. Represents toast button that was clicked.
// Could be null if toast body was clicked
}
public void PushTokenFailed(string error) {
//handle push-notifications error here
}
public void PushTokenReceived(string pushToken) {
//pushToken - your push token
}
DevToDev.PushManager.PushReceived = PushReceived;
DevToDev.PushManager.PushOpened = PushOpened;
DevToDev.PushManager.PushTokenFailed = PushTokenFailed;
DevToDev.PushManager.PushTokenReceived = PushTokenReceived;
DevToDev.PushManager.PushNotificationsOptions = (DTDNotificationOptions.Alert | DTDNotificationOptions.Badge | DTDNotificationOptions.Sound | DTDNotificationOptions.Provisional); //Notification options for iOS, optional property
DevToDev.PushManager.PushNotificationsEnabled = true;
// FOR ANDROID ONLY! Optional. Using custom push-notification icons on Android.
// <summary> To set the custom icons to be shown in push-notification on the SDK part,
// use the following methods.
// Attention! Icons which set in the push-notification wizard
// have priority over the icons which set in these methods.</summary>
// <param name="iconName">Icon file from resources of your app
// (from Assets/Plugins/Android/res folder)</param>
//FOR ANDROID ONLY! To set the small icon:
DevToDev.PushManager.CustomSmallIcon = iconName;
//FOR ANDROID ONLY! To set the large icon:
DevToDev.PushManager.CustomLargeIcon = iconName;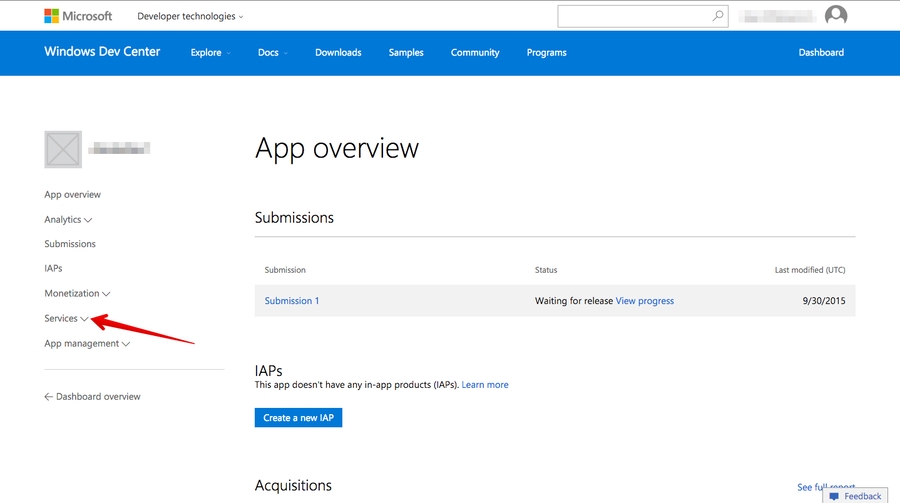


Integration of push notifications on Android and iOS using devdodev SDK for Adobe Air
This generation of SDK is deprecated and is no longer supported.
Push Notifications are availible only for iOS and Android.
Go to and then to your project or create a new one.
Current project:
New project:
Save the google-services.json file and add it to your app so that it is placed inside the Assets folder in a ready .apk file. If you use Flash Builder IDE simply copy it in the root folder, Flash Builder will do the rest for you.
Update Adobe Air SDK. Pay attention that version of the Adobe Air SDK should be at least 22.0, otherwise FCM classes will not be imported into your project. However, you still can use Analytics, but application will not be able to accept Push Notifications.
Add dependencies to your project. These libraries are located in the same archive with com.devtodev.SDK.ane extension in the dependencies folder. These extensions contain firebase, gps и android-support libraries Java, that are used for sending Push Notifications. If you have already imported firebase-auth, firebase-common, firebase-iid, firebase-messaging, play-services-auth, play-services-base, play-services-basement, support-v4 or they are included in other extensions, you don't need to import them again. In any case, we recommend to use data from the library of a version not lower than 25. Add the following to the manifest file of your app:
Add the following to your application's manifest:
1. Proceed to Setting -> PUSH NOTIFICATIONS:
2. Insert the previously received Server API Key to the API Key field in Push notifications section.
3. If the Server API Key is correct, you will see the following result
Open PUSH NOTIFICATIONS section and click on 'Add new campaign' button
Fill in campaign name, select an app for delivery
Choose user group to send a message. You can choose existing segment or create a new one.
Enter notification details
You can create a campaign only after at least one push token comes from devtodev SDK integrated to your application. Otherwise the app will not be displayed in the list.
To enable Push Notifications, please perform the following actions:
Add the application to your space in devtodev system
Generate Developer or Production Certificate for the application and get Private key file (.p12) on its basis
Submit the data to the application settings in devtodev system
Integrate devtodev SDK to the application (see the “SDK integration” division to learn more about integrating and initializing devtodev SDK)
Open "Keychain access" utility (Launchpad → Other) and choose "Request a Certificate From a Certificate Authority" option.
Fill in all requied fields in Certificate Assistant window, set flag an "Saved on disk" item and click "Continue". Save the file.
Log in at iOS Provisioning Portal. Open "App IDs" section, choose your app and click "Edit".
Follow these steps to export the certificate from Apple web-site to the P12-file:
Open "Keychain access" application
If the certificate hasn't been added to keychain access yet, choose "File" → "Import". Find the certificate file (CER-file) provided by Apple
Choose "Keys" section in "Keychain access" application
Choose personal key associated with your iPhone developer certificate. Personal key is identified by open certificate associated with it "iPhone developer: ". Choose "File" → Export objects. Save key as .p12
Convert Apple certificate file to the PEM-file. Start the following command-line operation from bin catalog OpenSSL.
Convert personal key from Mac OS keychain to the PEM-key:
Now you are able to create P12-file using PEM-key and iPhone developer certificate:
If you are using key from Mac OS keychain than choose PEM-version created at previous step.
Otherwise you can use OpenSSL key for Windows OS.
Upload the .p12-file into Integration section of application settings panel (Settings -> PUSH NOTIFICATIONS):
After the certificates has been generated you can start to integrate Push SDK into you app.
Add the following to your application's manifest. Don't forget that the minimum supported version is iOS 7:
Attention! If you use Production Certificate for signing application package, don't forget to change "development" value to "production".
Add the following imports to your source:
Add the push notifications initialization before the DevToDev.init(appKey:String, appSecret:String) method was called:
Xcode will automatically choose new provisioning profile. If an error occurred during the launch make sure that there is a correct profile set in the Code Signing Identity. You'll be asked to confirm push notifications. An app will request permission only once, if user confirm it - notifications will be accepted otherwise he wont get any push messages from your app. User can change it in device settings.
1. Open PUSH NOTIFICATIONS section and click on "Add new campaign" button.
2. Fill in campaign name
3. Choose user group to send a message. You can choose existing segment or create a new one.
4. Enter notification details
5. Test push notification (or skip this step)
6. Confirm push gateway
7. Schedule the delivery
8. That's it!
public void PushReceived(IDictionary<string, string> pushAdditionalData) {
//pushAdditionalData - push-notification data that you send to your app
}
public void PushOpened(DevToDev.PushMessage pushMessage, DevToDev.ActionButton actionButton) {
//pushMessage - DevToDev.PushMessage. Represents toast notification message
//actionButton - DevToDev.ActionButton. Represents toast button that was clicked. Could be null if toast body was clicked
}
public void PushTokenFailed(string error) {
//handle push-notifications error here
}
public void PushTokenReceived(string pushToken) {
//pushToken - your push token
}Add the following imports to your source:
Add the push notifications initialization before the DevToDev.init(appKey:String, appSecret:String) method was called:
onPushToken, onPushTokenFailed, onPushReceived and onPushOpened are the functions that take following arguments:
Make some tests and correct the message if it's required
Schedule the delivery
That's it!
Add several lines of the code to switch in the push notification to the SDK
Create a campaign for sending push notifications in “Push” section
At first, you need to generate Certificate Signing Request. We have already done it, so you can just click "Continue".
At next step you need to upload the CSR to the Apple server. Choose the CSR-file and click "Generate".
Certificate generation takes just a few seconds. After generation is finished click "Download" and then "Done".
You'll need to repeat this process to generate the Production Certificate when your app will be ready for release. All steps are the same.
You'll be suggested to create a password which is used when you need to import the key to another computer.
Compile and run the app. You will need a device, because simulator does not support push notifications.
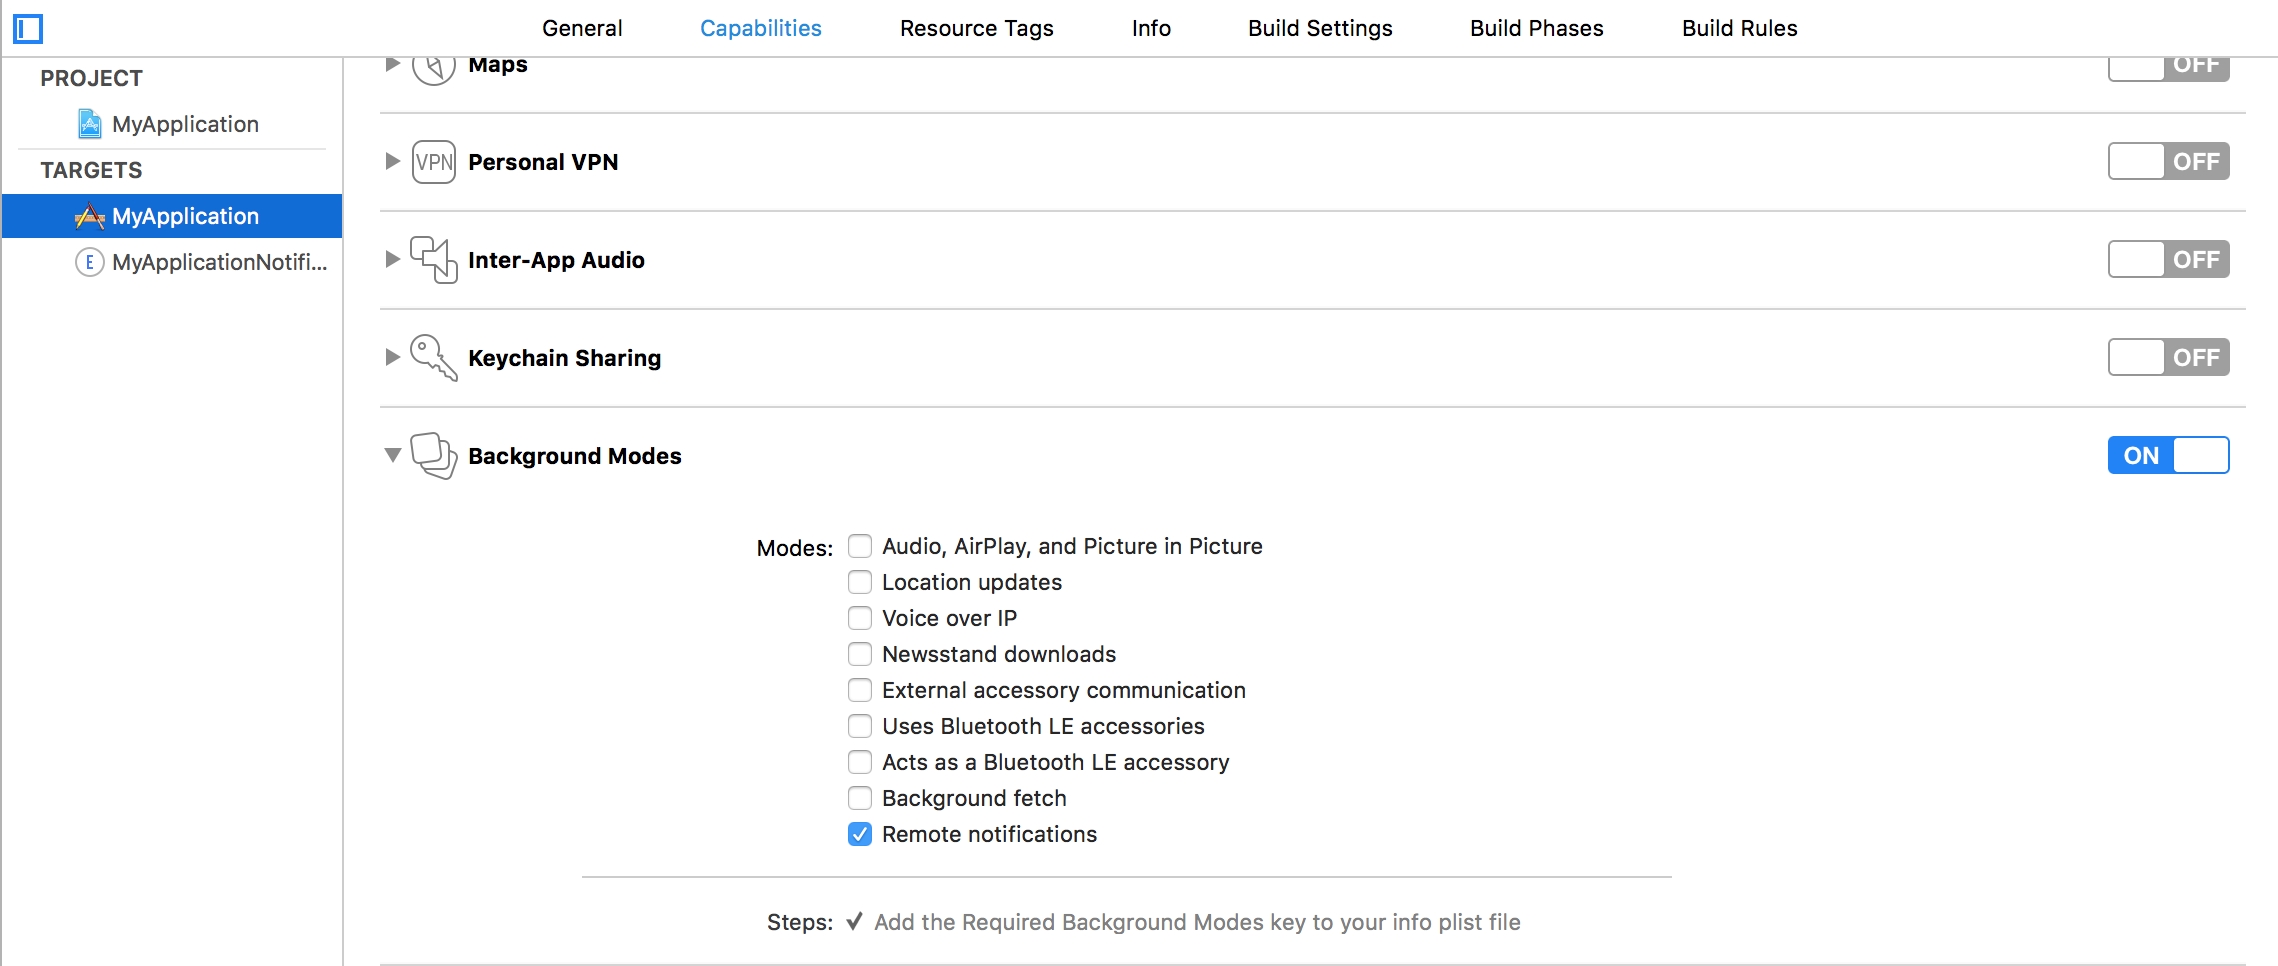


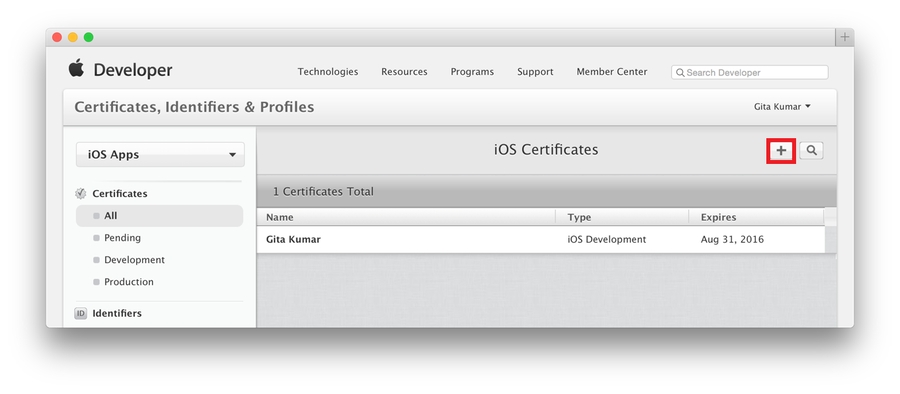
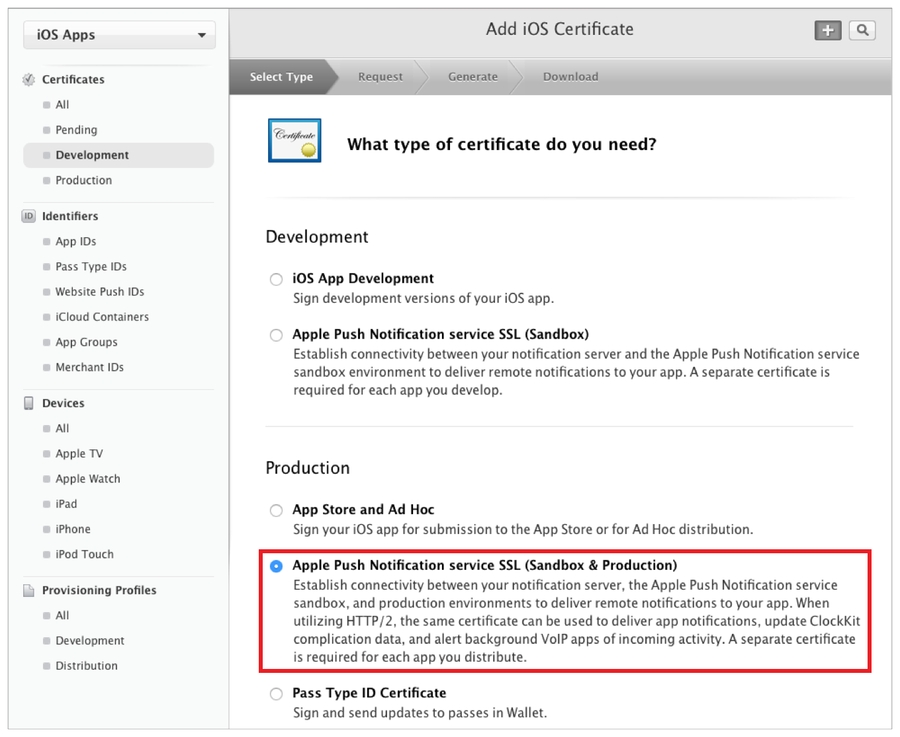


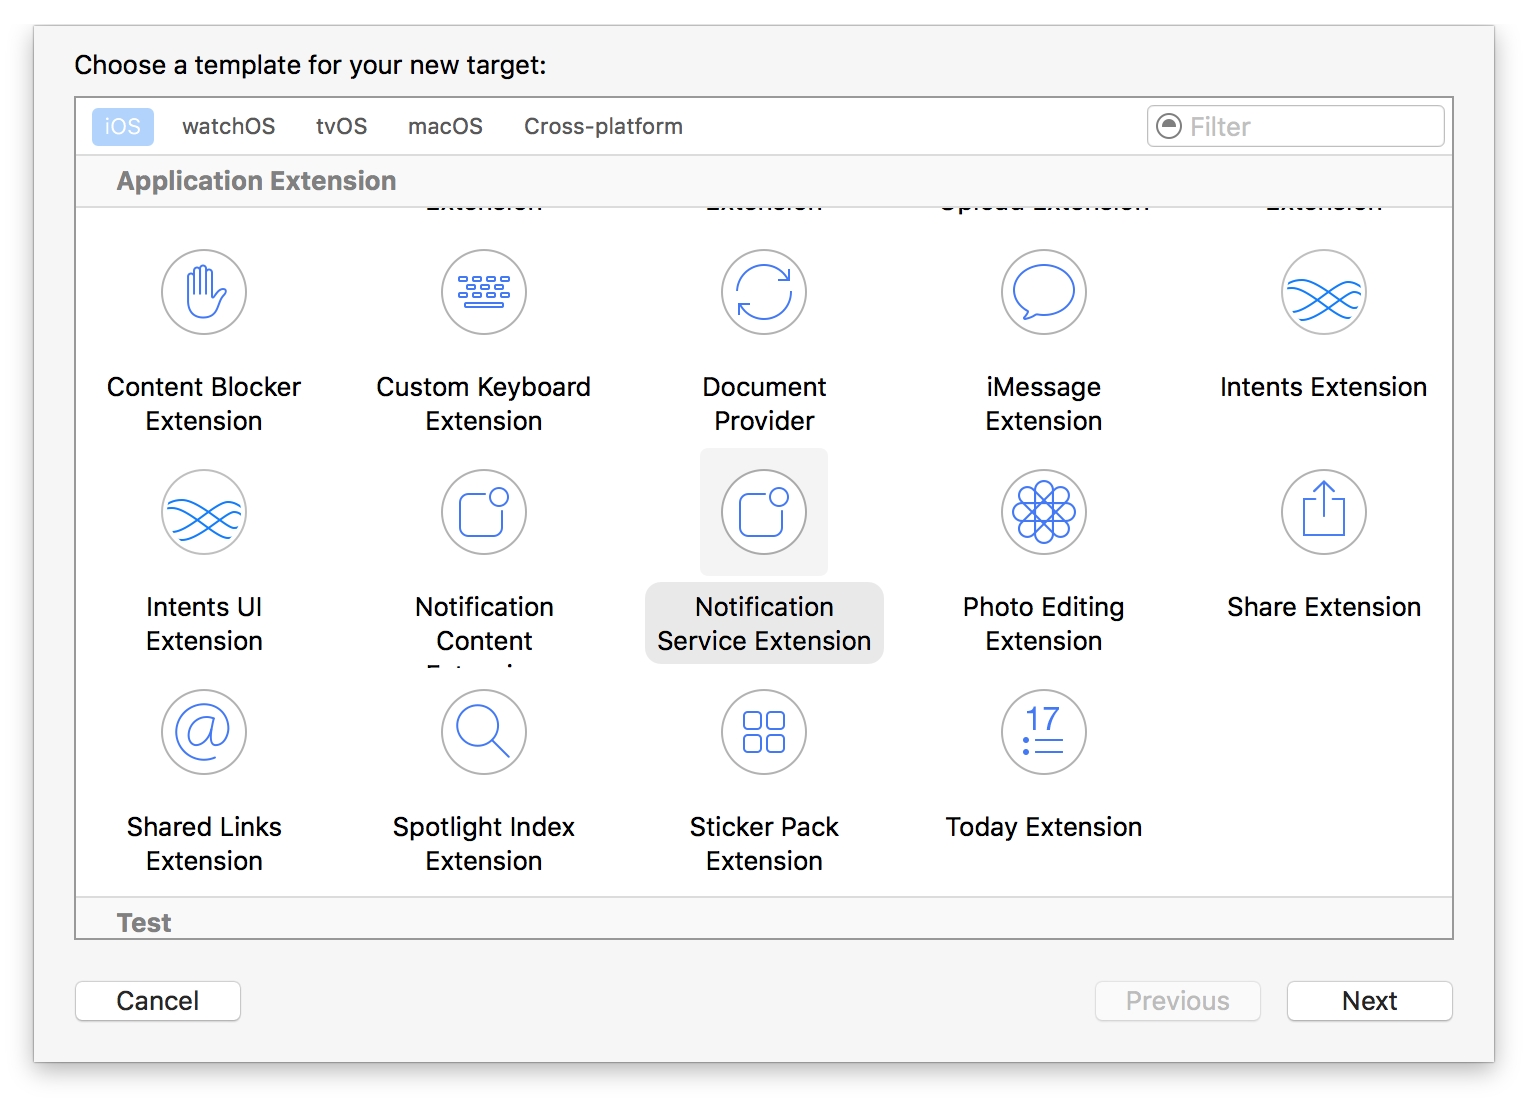

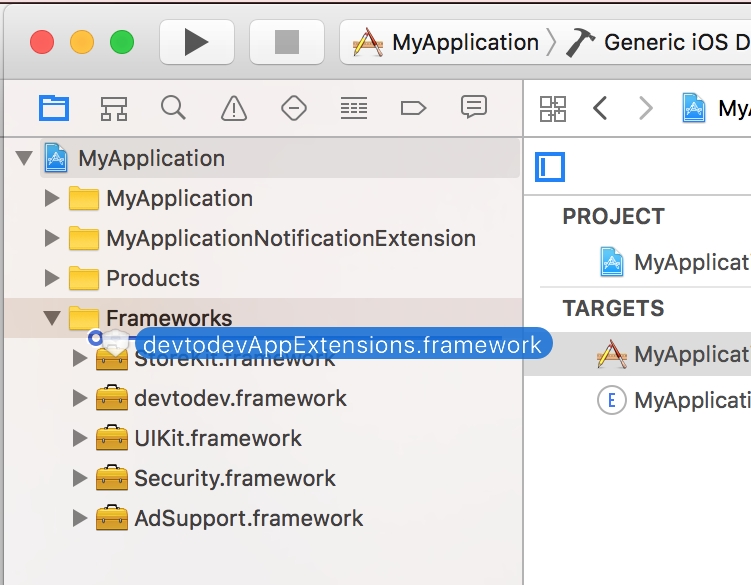


import com.devtodev.sdk.push.DevToDevPushManager;
import com.devtodev.sdk.push.logic.ActionButton;
import com.devtodev.sdk.push.logic.PushMessage;DevToDevPushManager.setOnFailedToRegisteredForPushNotifications(onPushTokenFailed);
DevToDevPushManager.setOnRegisteredForPushNotifications(onPushToken);
DevToDevPushManager.setOnPushNotificationsReceived(onPushReceived);
DevToDevPushManager.setOnPushNotificationOpened(onPushOpened);
DevToDevPushManager.setPushNotificationsEnabled(true);/**
* @param token - push token
*/
protected function onPushToken(param:String):void {
}
/**
* @param error - error message
*/
protected function onPushTokenFailed(param:String):void {
}
/**
* @param pushData - Dictionary with push message and custom push fields
*/
protected function onPushReceived(pushData:Dictionary):void {
}
/**
* @param message - PushMessage. Represents toast notification message
* @param button - ActionButton. Represents toast notification button that was clicked. Could be null if notification body was clicked
*/
protected function onPushOpened(message:PushMessage, button:ActionButton):void {
}<application>
<extensions>
<extensionID>com.devtodev.air.extensions.gps-auth</extensionID>
<extensionID>com.devtodev.air.extensions.gps-base</extensionID>
<extensionID>com.devtodev.air.extensions.gps-basement</extensionID>
<extensionID>com.devtodev.air.extensions.supportv4</extensionID>
<extensionID>com.devtodev.air.extensions.firebase-auth</extensionID>
<extensionID>com.devtodev.air.extensions.firebase-common</extensionID>
<extensionID>com.devtodev.air.extensions.firebase-iid</extensionID>
<extensionID>com.devtodev.air.extensions.firebase-messaging</extensionID>
<!-- this library should be already added for analytics -->
<extensionID>com.devtodev.SDK</extensionID>
...
</extensions>
</application>openssl x509 -in developer_identity.cer -inform DER -out developer_identity.pem -outform PEMopenssl pkcs12 -nocerts -in mykey.p12 -out mykey.pemopenssl pkcs12 -export -inkey mykey.key -in developer_identity.pem -out iphone_dev.p12<iPhone>
<InfoAdditions><![CDATA[
<key>MinimumOSVersion</key>
<string>7.0</string>
<key>UIDeviceFamily</key>
<array>
<string>1</string>
<string>2</string>
</array>
...
]]></InfoAdditions>
<Entitlements>
<![CDATA[
<key>aps-environment</key>
<string>development</string>
]]>
</Entitlements>
</iPhone>import com.devtodev.sdk.push.DevToDevPushManager;
import com.devtodev.sdk.push.logic.ActionButton;
import com.devtodev.sdk.push.logic.PushMessage;DevToDevPushManager.setOnFailedToRegisteredForPushNotifications(onPushTokenFailed);
DevToDevPushManager.setOnRegisteredForPushNotifications(onPushToken);
DevToDevPushManager.setOnPushNotificationsReceived(onPushReceived);
DevToDevPushManager.setOnPushNotificationOpened(onPushOpened);
DevToDevPushManager.setPushNotificationsEnabled(true);<!--Replace 'com.example.application' to your package -->
<manifest package="com.example.application" ...>
<uses-permission android:name="com.google.android.c2dm.permission.RECEIVE" />
<permission android:name="com.example.gcm.permission.C2D_MESSAGE" android:protectionLevel="signature" />
<uses-permission android:name="com.example.gcm.permission.C2D_MESSAGE" />
<application>
<meta-data android:name="com.google.android.gms.version" android:value="@integer/google_play_services_version" />
<receiver android:name="com.google.firebase.iid.FirebaseInstanceIdReceiver" android:exported="true" android:permission="com.google.android.c2dm.permission.SEND" >
<intent-filter>
<action android:name="com.google.android.c2dm.intent.RECEIVE" />
<action android:name="com.google.android.c2dm.intent.REGISTRATION" />
<category android:name="com.example.application" />
</intent-filter>
</receiver>
<service android:name="com.devtodev.push.logic.DTDFcmMessagingService" android:exported="false">
<intent-filter>
<action android:name="com.google.firebase.MESSAGING_EVENT"/>
</intent-filter>
</service>
<service android:name="com.devtodev.push.logic.DTDFcmInstanceIdService" android:exported="false">
<intent-filter>
<action android:name="com.google.firebase.INSTANCE_ID_EVENT"/>
</intent-filter>
</service>
<receiver android:name="com.devtodev.push.logic.PushClickReceiver" android:enabled="true" android:exported="true">
<intent-filter>
<action android:name="com.devtodev.android.push.CLICKED" />
</intent-filter>
</receiver>
<activity android:name="com.devtodev.push.logic.PushHandlerActivity"/>
</application>
</manifest>/**
* @param token - push token
*/
protected function onPushToken(param:String):void {
}
/**
* @param error - error message
*/
protected function onPushTokenFailed(param:String):void {
}
/**
* @param pushData - Dictionary with push message and custom push fields
*/
protected function onPushReceived(pushData:Dictionary):void {
}
/**
* @param message - PushMessage. Represents toast notification message
* @param button - ActionButton. Represents toast notification button that was clicked. Could be null if notification body was clicked
*/
protected function onPushOpened(message:PushMessage, button:ActionButton):void {
}

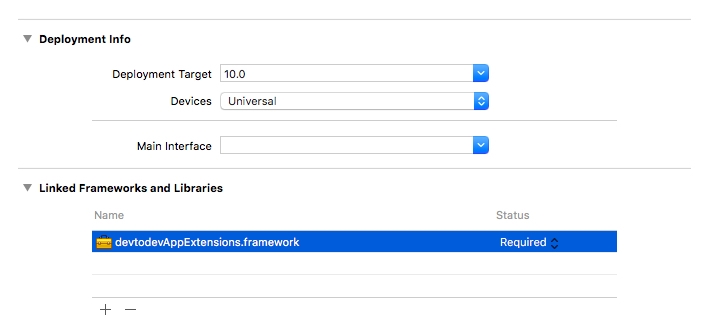


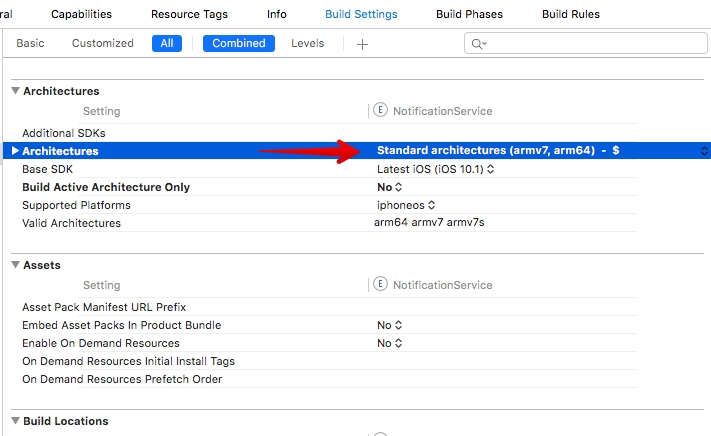

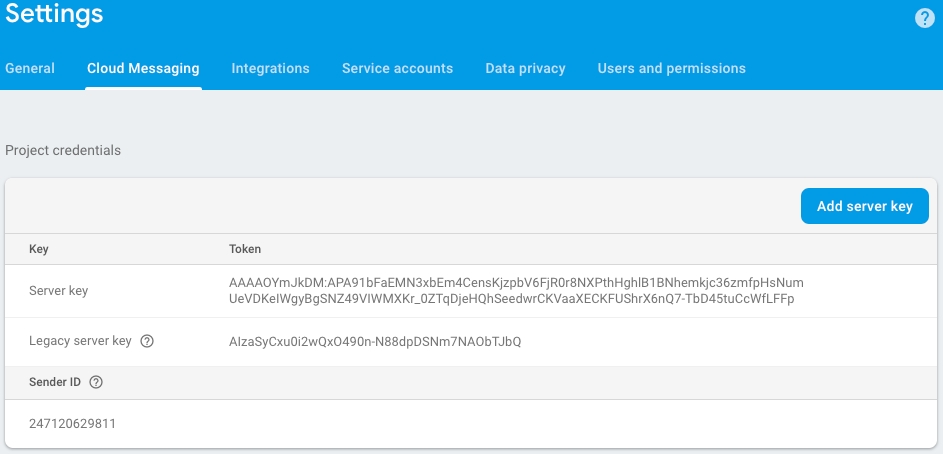
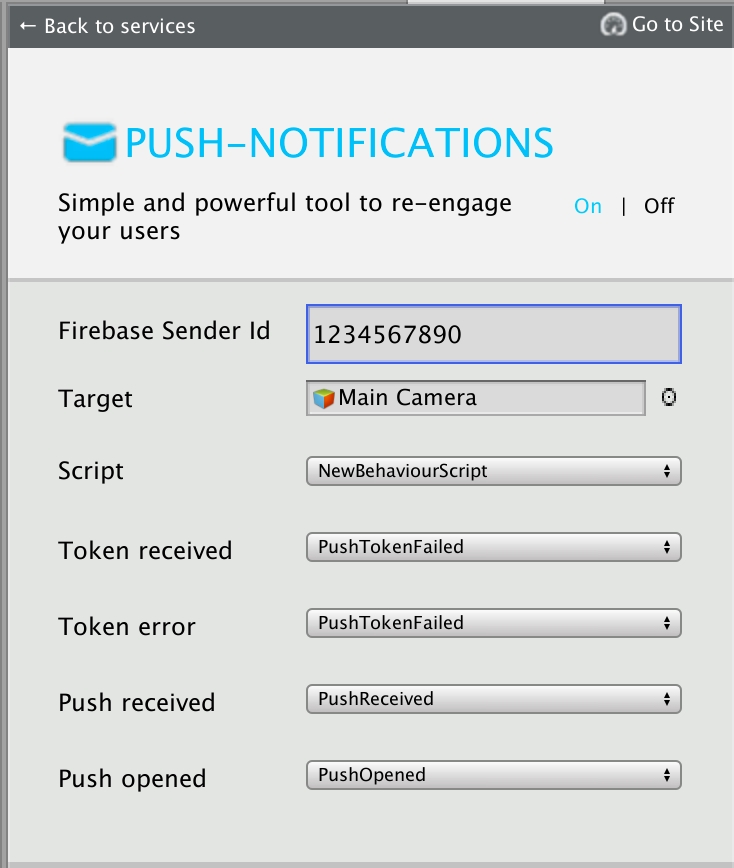


This generation of SDK is deprecated and is no longer supported. Information about the current version can be found here.
Unfortunately, Apple does not provide any capability to pass a referrer string through to your app from a link to the App Store. But if you have a referral info, you can set it using the method below:
The list of predefined keys:
Unfortunately, Windows Store does not provide any capability to pass a referrer string through to your app from a link to the store. But if you have a referral info, you can set it using the method below:
The list of predefined keys:
Automated referral parameters are available on Android platform. Unfortunately, other platforms do not provide any capability to pass a referrer string through to your app from a link to the store. But if you have a referral info, you can set it using the method below:
The list of predefined keys:
Unfortunately, Apple does not provide any capability to pass a referrer string through to your app from a link to the app store. But if you have a referral info, you can set it using the method below:
The list of predefined keys:
Automated referral parameters is available on Android platform. Unfortunately, other platforms do not provide any capability to pass a referrer string through to your app from a link to the store. But if you have a referral info, you can set it using the method below:
Unfortunately, Apple does not provide any capability to pass a referrer string through to your app from a link to the app store. But if you have a referral info, you can set it using the method below:
Blueprint
Use the current constants to specify a social network:
Otherwise, create an object with the social network name you need.
Use the current constants to specify a social network:
SocialNetwork.Facebook
SocialNetwork.Twitter
SocialNetwork.GooglePlus
Track publications in social networks and analyze the effectiveness of viral messages. The event is sent after a social network confirms the publication.
As a 'reason' parameter we recommend you indicate actions which encourage users to make a publication.
Otherwise, create an object with the social network name you need.
As a «reason» parameter we recommend that you indicate actions which encourage users to make a publication.
For example:
Start playing
Property allows to get UDID:
Property allows to get ODIN:
Property allows to get UUID:
To enable the debug mode and make SDK notifications displayed in the console use this method:
To send events pack before it is filled or before its formation period, you can use immediate dispatch:
Code
To identify a specific product promotion or strategic campaign. (for example 'Snow Boots')
To get the version of integrated SDK, use the following method:
To set set current application version in WEB and Windows Standalone apps use this property:
The method of limiting the processing of user data. The right to be forgotten.
This method is implemented in accordance with the GDPR requirements.
In case a user doesn’t want their data to be sent and processed in the devtodev system, a developer must send a ’false’ value to this method.
When calling the method setTrackingAvailability with a ‘false’ value, SDK sends a command to the server to delete all user’s personal data that has been collected by devtodev from this app and a command to block the collection of any data of this user in future, and then stops sending any messages to the devtodev system.
The user will remain listed as an impersonal unit in previously aggregated metrics.
When sending a ‘true’ value, the permission to block data collection is removed.
In the case of using TrackingAvailability property with a ‘false’ value, SDK sends a command to the server to delete all user’s personal data that has been collected by devtodev from this app and a command to block the collection of any data of this user in future, and then stops sending any messages to the devtodev system.
Campaign
FString
To identify a specific product promotion or strategic campaign. (for example 'Snow Boots')
Content
FString
To differentiate ads or links that point to the same URL. (for example some ads might advertise 'Warm Snow Boots' and others might advertise 'Durable Snow Boots')
Term
FString
To note the keywords for this ad. for example 'shoes+boots')
Code
SocialNetwork.Vk
and so on...
Otherwise, create your own social network object.
Example:
Use the current constants to specify social network:
SocialNetwork.Facebook SocialNetwork.Twitter SocialNetwork.GooglePlus SocialNetwork.Vk and so on...
Otherwise, create social network the object of your own:
We recommend using the following values for the most popular social networks:
Value
Social Network
Value
Social Network
en
Evernote
rt
fb
rr
Renren
Use the current constants to specify social network:
Otherwise, create your own social network object.
Use the current constants to specify social network:
Otherwise, create social network the object of your own.
Use the current constants to specify social network:
Otherwise, create your own social network object:
New level reached
New building
New ability
Quest completed
New item
Collection completed
Invitation
Asking for help
New Record
Acheivement
URL sharing
Recommendation
Review
and so on...
Use the current constants to specify a social network:
SocialNetwork.Facebook
SocialNetwork.Twitter
SocialNetwork.GooglePlus
SocialNetwork.Vk
and so on...
Otherwise, create your own social network object.
The social network ID is the same as with DevToDev.SDK.SocialNetworkConnect(). It is possible to use pre-defined or custom values as the reason (pReason parameter) .
Example:
As a «reason» parameter we recommend that you indicate actions which encourage users to make publication.
For example:
Start playing
New level reached
New building
New ability
Quest completed
New item
Collection completed
Invitation
Asking for help
New Record
Acheivement
URL sharing
Recommendation
Review
and so on...
Use the current constants to specify social network:
SocialNetwork.Facebook SocialNetwork.Twitter SocialNetwork.GooglePlus SocialNetwork.Vk and so on...
Otherwise, create social network the object of your own:
As a «reason» parameter we recommend that you indicate actions which encourage users to make publication.
For example:
Start playing
New level reached
New building
New ability
Asking for help
New Record
Achiеvement
URL sharing
Value
Social Network
Value
Social Network
en
Evernote
rt
As a «reason» parameter we recommend that you indicate actions which encourage users to make publication.
For example:
Start playing
New level reached
New building
New ability
Quest completed
New item
Collection completed
Invitation
Asking for help
New Record
Acheivement
URL sharing
Recommendation
Review
and so on...
Use the current constants to specify social network:
Otherwise, create your own social network object.
As a «reason» parameter we recommend that you indicate actions which encourage users to make publication.
For example:
Start playing
New level reached
New building
New ability
Quest completed
New item
Collection completed
Invitation
Asking for help
New Record
Achievement
URL sharing
Recommendation
Review
and so on...
Use the current constants to specify social network:
Otherwise, create social network the object of your own.
As a «reason» parameter we recommend that you indicate actions which encourage users to make publication.
For example:
Start playing
New level reached
New building
New ability
Quest completed
New item
Collection completed
Invitation
Asking for help
New Record
Acheivement
URL sharing
Recommendation
Review
and so on...
Use the current constants to specify social network:
Otherwise, create your own social network object:
Blueprint
Field
Type
Description
Social Name
FString
Social network Id
Reason
FString
The reason of posting (max. 32 symbols)
Code
As a «reason» parameter we recommend that you indicate actions which encourage users to make publication.
The user will remain listed as an impersonal unit in previously aggregated metrics.
In the case of using TrackingAvailability property with a ‘true’ value, the permission to block data collection is removed.
When calling the method setTrackingAvailability with a ‘false’ value, SDK sends a command to the server to delete all user’s personal data that has been collected by devtodev from this app and a command to block the collection of any data of this user in future, and then stops sending any messages to the devtodev system.
The user will remain listed as an impersonal unit in previously aggregated metrics.
When sending a ‘true’ value, the permission to block data collection is removed.
In the case of using TrackingAvailability property with a ‘false’ value, SDK sends a command to the server to delete all user’s personal data that has been collected by devtodev from this app and a command to block the collection of any data of this user in future, and then stops sending any messages to the devtodev system.
The user will remain listed as an impersonal unit in previously aggregated metrics.
In the case of using TrackingAvailability property with a ‘true’ value, the permission to block data collection is removed.
When calling the method setTrackingAvailability with a ‘false’ value, SDK sends a command to the server to delete all user’s personal data that has been collected by devtodev from this app and a command to block the collection of any data of this user in future, and then stops sending any messages to the devtodev system.
The user will remain listed as an impersonal unit in previously aggregated metrics.
When sending a ‘true’ value, the permission to block data collection is removed.
Field
Type
Description
Source
FString
To identify a search engine, newsletter name, or other source. (for example 'AdWords', 'Bing', 'E-Mail Newsletter')
Medium
FString
To identify a medium such as email or cost-per-install. (for example 'CPI')
For example:
Start playing
New level reached
New building
New ability
Quest completed
New item
Collection completed
Invitation
Asking for help
New Record
Achievement
URL sharing
Recommendation
Review
and so on...
/**
* Tracks user's referral data
* ### Usage:
* [DevToDev referrer:@{
* RFSource: @"adwords",
* RFMedium: @"cpi",
* RFContent: @"Snow Boots",
* RFCampaign: @"Warm Snow Boots",
* RFTerm: @"snow boots"
* }];
*
* @param NSDictionary<ReferralProperty*, NSString*> utm - Dictionary with referrer values
*/
[DevToDev referrer: (NSDictionary<ReferralProperty*, NSString*> *) utm];//To identify a search engine, newsletter name, or other source.
// (for example 'AdWords', 'Bing', 'E-Mail Newsletter')
ReferralProperty * RFSource;
//To identify a medium such as email or cost-per-install.
// (for example 'CPI')
ReferralProperty * RFMedium;
//To identify a specific product promotion or strategic campaign.
//(for example 'Snow Boots')
ReferralProperty * RFCampaign;
//To differentiate ads or links that point to the same URL.
//(for example some ads might advertise 'Warm Snow Boots' and others might advertise 'Durable Snow Boots')
ReferralProperty * RFContent;
//To note the keywords for this ad.
// for example 'shoes+boots')
ReferralProperty * RFTerm;
//To add a custom key
[ReferralProperty Custom:@"your_key_name"];/**
* Tracks the existence of a connection with a social network.
* Use pre-defined or custom values as an identifier.
* <param name="socialNetwork"> Social network ID </param>
*/
DevToDev.SDK.SocialNetworkConnect(SocialNetwork socialNetwork);DevToDev.SDK.SocialNetworkConnect(SocialNetwork.Facebook);SocialNetwork socialNetwork = SocialNetwork.Custom(string networkName); //(max. 24 symbols)/**
* Tracks the existence of a connection with a social network.
* Use pre-defined or custom values as an identifier.
* @param {string} socialNetwork - social network id (max. 24 symbols)
**/
devtodev.socialNetworkConnect(socialNetwork);/// <summary> Track the existence of a connection with a social network.
/// Use pre-defined or custom values as an identifier.</summary>
/// <param name="socialNetwork"> Social network ID </param>
DevToDev.Analytics.SocialNetworkConnect(DevToDev.SocialNetwork socialNetwork);DevToDev.SocialNetwork.Facebook
DevToDev.SocialNetwork.Twitter
DevToDev.SocialNetwork.GooglePlus
DevToDev.SocialNetwork.Vk
// and so on...DevToDev.SocialNetwork socialNetwork = DevToDev.SocialNetwork.Custom(string networkName); //(max. 24 symbols)/**
* Tracks the existence of a connection with a social network. Use pre-defined or custom values as an identifier.
* @param SocialNetwork socialNetwork - social network id
*/
[DevToDev socialNetworkConnect: (SocialNetwork *) socialNetwork];Facebook
Twitter
GooglePlus
VK
//and so on...SocialNetwork socialNetwork = [SocialNetwork Custom: (NSString *) networkName]; //max. 24 symbols/**
* Tracks the existence of a connection with a social network.
* Use pre-defined or custom values as an identifier.
* @param socialNetwork - social network id
*/
DevToDev.socialNetworkConnect(socialNetwork:SocialNetwork);SocialNetwork.VK;
SocialNetwork.TWITTER;
SocialNetwork.FACEBOOK;
SocialNetwork.GOOGLE_PLUS;
SocialNetwork.WHATS_APP;
SocialNetwork.VIBER;
SocialNetwork.EVERNOTE;
SocialNetwork.GOOGLE_MAIL;
SocialNetwork.LINKED_IN;
SocialNetwork.PINTEREST;
SocialNetwork.QZONE;
SocialNetwork.REDDIT;
SocialNetwork.RENREN;
SocialNetwork.TUMBLR;/**
* Custom social network object
* @param networkName - social network name (max. 24 symbols)
*/
var socialNetwork:SocialNetwork = SocialNetwork.Custom(networkName:String);/**
* <param name="networkName"> Social network ID </param>
* <param name="reason"> The reason of posting. (max. 32 symbols)</param>
*/
DevToDev.SDK.SocialNetworkPost(SocialNetwork socialNetwork, String reason)DevToDev.SDK.SocialNetworkPost(SocialNetwork.Facebook, "newLevelReached");/**
* Tracks the existence of posts to a social network.
* @param {string} socialNetwork - social network Id (max. 24 symbols)
* @param {string} reason - the reason of posting (max. 32 symbols)
*/
devtodev.socialNetworkPost(socialNetwork, reason);/// <summary> Track the existence of posts to a social network. </summary>
/// <param name="networkName"> Social network ID </param>
/// <param name="reason"> The reason of posting. (max. 32 symbols)</param>
DevToDev.Analytics.SocialNetworkPost(DevToDev.SocialNetwork networkName, string reason);/**
* Tracks the existence of posts to a social network.
* @param socialNetwork - social network Id
* @param reason - the reason of posting (max. 32 symbols)
*/
[DevToDev socialNetworkPost: (SocialNetwork *) socialNetwork withReason: (NSString *) reason];/**
* Tracks the existence of posts to a social network.
* @param socialNetwork - social network Id
* @param reason - the reason of posting (max. 32 symbols)
*/
DevToDev.socialNetworkPost(socialNetwork:SocialNetwork, reason:String);// Tracks the existence of posts to a social network.
// FString socialNetwork - social network Id
// FString reason - the reason of posting (max. 32 symbols)
UDevToDevBlueprintFunctionLibrary::SocialNetworkPost(const FString& socialNetwork, const FString& reason);/**
* The method of limiting the processing of user data. The right to be forgotten.
* @param {boolean} status - send 'false' to erase user's personal data and stop collecting data of this user.
* Send 'true' if you want to resume data collection.
*/
devtodev.setTrackingAvailability(status);/**
* The property of limiting the processing of user data. The right to be forgotten.
* Use 'false' to erase user's personal data and stop collecting data of this user or 'true'
* if you want to resume data collection.</summary>
*/
DevToDev.Analytics.TrackingAvailability = false/true;/**
* The method of limiting the processing of user data. The right to be forgotten.
* @param BOOL trackingAvailable - use 'false' to erase user's personal data and stop collecting data of this user.
* 'true' if you want to resume data collection.
*/
[DevToDev setTrackingAvailability: (BOOL) trackingAvailable];/**
* The method of limiting the processing of user data. The right to be forgotten.
* @param isTrackingAvailable - send 'false' to erase user's personal data and stop collecting data of this user.
* Send 'true' if you want to resume data collection.
*/
DevToDev.setTrackingAvailability(isTrackingAvailable:Boolean)/**
* ### Usage:
* Dictionary<ReferralProperty, string> referralData = new Dictionary<ReferralProperty, string>();
* referralData.Add(ReferralProperty.Source, "source");
* referralData.Add(ReferralProperty.Medium, "medium");
* referralData.Add(ReferralProperty.Content, "content");
* referralData.Add(ReferralProperty.Campaign, "campaign");
* referralData.Add(ReferralProperty.Term, "term");
* referralData.Add(ReferralProperty.Custom("site"), "site");
* DevToDev.SDK.Referral(referralData);
*
* <param name="referralData">Dictionary with referrer values</param>
*/
DevToDev.SDK.Referral(Dictionary<ReferralProperty, string> referralData);//To identify a search engine, newsletter name, or other source.
// (for example 'AdWords', 'Bing', 'E-Mail Newsletter')
ReferralProperty.Source;
//To identify a medium such as email or cost-per-install.
// (for example 'CPI')
ReferralProperty.Medium;
//To identify a specific product promotion or strategic campaign.
//(for example 'Snow Boots')
ReferralProperty.Campaign;
//To differentiate ads or links that point to the same URL.
//(for example some ads might advertise 'Warm Snow Boots' and others might advertise 'Durable Snow Boots')
ReferralProperty.Content;
//To note the keywords for this ad.
// for example 'shoes+boots')
ReferralProperty.Term;
//To add a custom key
ReferralProperty.Custom("your_key_name");/// <summary> Initial referrer tracking <summary>
/// <example> Usage:
///
/// Dictionary<ReferralProperty, string> referralData = new Dictionary<ReferralProperty, string>();
/// referralData.Add(ReferralProperty.Source, "source");
/// referralData.Add(ReferralProperty.Medium, "medium");
/// referralData.Add(ReferralProperty.Content, "content");
/// referralData.Add(ReferralProperty.Campaign, "campaign");
/// referralData.Add(ReferralProperty.Term, "term");
/// referralData.Add(ReferralProperty.Custom("site"), "site");
/// DevToDev.Analytics.Referral(referralData);
///
/// </example>
/// <param name="referralData"> Dictionary with referrer values </param>
DevToDev.Analytics.Referral(Dictionary<ReferralProperty, string> referralData);// To identify a search engine, newsletter name, or other source.
// (for example 'AdWords', 'Bing', 'E-Mail Newsletter')
ReferralProperty.Source;
// To identify a medium such as email or cost-per-install.
// (for example 'CPI')
ReferralProperty.Medium;
// To identify a specific product promotion or strategic campaign.
// (for example 'Snow Boots')
ReferralProperty.Campaign;
// To differentiate ads or links that point to the same URL.
//(for example some ads might advertise 'Warm Snow Boots' and others might advertise 'Durable Snow Boots')
ReferralProperty.Content;
// To note the keywords for this ad.
// (for example 'shoes+boots')
ReferralProperty.Term;
// To add a custom key
ReferralProperty.Custom("your_key_name");/**
* Tracks user's referral data
* ### Usage:
* [DevToDev referrer:@{
* RFSource: @"adwords",
* RFMedium: @"cpi",
* RFContent: @"Snow Boots",
* RFCampaign: @"Warm Snow Boots",
* RFTerm: @"snow boots"
* }];
*
* @param NSDictionary<ReferralProperty*, NSString*> utm - Dictionary with referrer values
*/
[DevToDev referrer: (NSDictionary<ReferralProperty*, NSString*> *) utm];//To identify a search engine, newsletter name, or other source.
// (for example 'AdWords', 'Bing', 'E-Mail Newsletter')
ReferralProperty * RFSource;
//To identify a medium such as email or cost-per-install.
// (for example 'CPI')
ReferralProperty * RFMedium;
//To identify a specific product promotion or strategic campaign.
//(for example 'Snow Boots')
ReferralProperty * RFCampaign;
//To differentiate ads or links that point to the same URL.
//(for example some ads might advertise 'Warm Snow Boots' and others might advertise 'Durable Snow Boots')
ReferralProperty * RFContent;
//To note the keywords for this ad.
// for example 'shoes+boots')
ReferralProperty * RFTerm;
//To add a custom key
[ReferralProperty Custom:@"your_key_name"];/**
* ### Usage:
* var referralData:Dictionary = new Dictionary();
* referralData[ReferralProperty.Source] = "source";
* referralData[ReferralProperty.Medium] = "medium";
* referralData[ReferralProperty.Content] = "content";
* referralData[ReferralProperty.Campaign] = "campaign";
* referralData[ReferralProperty.Term] = "term";
* referralData[ReferralProperty.Custom("site")] = "site";
* DevToDev.referral(referralData);
*
* @ param referralData - dictionary with referrer values
*/
DevToDev.referral(referralData:Dictionary);The list of predefined keys:// To identify a search engine, newsletter name, or other source.
// (for example 'AdWords', 'Bing', 'E-Mail Newsletter')
ReferralProperty.Source;
// To identify a medium such as email or cost-per-install.
// (for example 'CPI')
ReferralProperty.Medium;
// To identify a specific product promotion or strategic campaign.
// (for example 'Snow Boots')
ReferralProperty.Campaign;
// To differentiate ads or links that point to the same URL.
// (for example some ads might advertise 'Warm Snow Boots' and others might advertise 'Durable Snow Boots')
ReferralProperty.Content;
// To note the keywords for this ad.
// (for example 'shoes+boots')
ReferralProperty.Term;
// To add a custom key
ReferralProperty.Custom("your_key_name");/**
* Tracks the existence of a connection with a social network.
* Use pre-defined or custom values as an identifier.
* @param SocialNetwork socialNetwork - social network id
*/
[DevToDev socialNetworkConnect: (SocialNetwork *) socialNetwork];javascript:void(0)Facebook
Twitter
GooglePlus
VK
//and so on...SocialNetwork socialNetwork = [SocialNetwork Custom: (NSString *) networkName]; (max. 24 symbols)/**
* Tracks the existence of a connection with a social network.
* Use pre-defined or custom values as an identifier.
* @param SocialNetwork socialNetwork - social network id
*/
DevToDev.socialNetworkConnect(SocialNetwork socialNetwork);/**
* Tracks the existence of posts to a social network.
* @param socialNetwork - social network Id
* @param NSString reason - the reason of posting (max. 32 symbols)
*/
[DevToDev socialNetworkPost: (SocialNetwork *) socialNetwork withReason: (NSString *) reason];Facebook
Twitter
GooglePlus
VK
//and so on...SocialNetwork socialNetwork = [SocialNetwork Custom: (NSString *) networkName];
// networkName (max. 24 symbols)/**
* Tracks the existence of posts to a social network.
* @param socialNetwork - social network Id
* @param reason - the reason of posting (max. 32 symbols)
*/
DevToDev.socialNetworkPost(SocialNetwork socialNetwork, String reason);/**
* @return OpenUdid
*/
[DevToDev getOpenUdid];/**
* @return Open Udid
*/
DevToDev.getOpenUdid();DevToDev.SDK.OpenUdidDevToDev.Analytics.OpenUdid/**
* @return Open Udid
*/
[DevToDev getOpenUdid];/**
* @return ODIN1
*/
[DevToDev getOdin1];/**
* @return ODIN1
*/
DevToDev.getOdin1();DevToDev.SDK.ODINDevToDev.Analytics.Odin1/**
* @return ODIN1
*/
[DevToDev getOdin1];/**
* @return ODIN1
*/
DevToDev.getOdin1();/**
* @return UUID
*/
[DevToDev getUUID];/**
* @return UUID
*/
DevToDev.getUUID();/**
* @return UUID
*/
[DevToDev getUUID];/**
* @param BOOL isActive
*/
[DevToDev setActiveLog: (BOOL) isActive];/**
* @param logLevel
*/
DevToDev.setLogLevel(LogLevel logLevel);//to enable logging
DevToDev.SDK.LogEnabled = true;
//to disable loging
DevToDev.SDK.LogEnabled = false;/**
* Activates console log
* @param {boolean} status
*/
devtodev.setDebugLog(status);/// <summary> Enable/Disable log</summary>
/// <param name="isEnabled">Enabled/Disabled log</param>
DevToDev.Analytics.SetActiveLog(bool isEnabled);/**
* @param BOOL isActive
*/
[DevToDev setActiveLog: (BOOL) isActive];/**
* @param logLevel (set logLevel=1 to enable log, 0 to disable)
*/
DevToDev.setLogLevel(logLevel:int);[DevToDev sendBufferedEvents];DevToDev.sendBufferedEvents();DevToDev.SDK.sendBufferedEvents();/**
* Sends event packet immediately
*/
devtodev.sendBufferedEvents();DevToDev.Analytics.SendBufferedEvents();[DevToDev sendBufferedEvents];DevToDev.sendBufferedEvents();// Sends events pack before it is filled or before its formation period
FAnalytics::Get().GetDefaultConfiguredProvider()->FlushEvents();/**
* @return SDKVersion
*/
[DevToDev sdkVersion];/**
* @return SDKVersion
*/
DevToDev.getSdkVersion();DevToDev.SDK.GetSdkVersion();/**
* Returns SDK version
*/
devtodev.getSdkVersion();/**
* @return SDKVersion
*/
[DevToDev sdkVersion];/**
* @return SDKVersion
*/
DevToDev.getSdkVersion();/// <summary> Property allows to set current application version.
/// Attention! This property is necessary for WEB and Windows Standalone apps only.
/// It will be ignored on other platforms.
/// </summary>
/// <param name="version"> Current version of your application </param>
DevToDev.Analytics.ApplicationVersion = version;/**
* The method of limiting the processing of user data. The right to be forgotten.
* @param BOOL trackingAvailable - use 'false' to erase user's personal data and stop collecting data of this user.
* 'true' if you want to resume data collection.
*/
[DevToDev setTrackingAvailability: (BOOL) trackingAvailable];/**
* The method of limiting the processing of user data. The right to be forgotten.
* @param isAvailable - send 'false' to erase user's personal data and stop collecting data of this user.
* Send 'true' if you want to resume data collection.
*/
DevToDev.setTrackingAvailability(boolean isAvailable);UDevToDevBlueprintFunctionLibrary::Referrer(const TArray<FAnalyticsEventAttr>& Attributes);/**
* Custom social network object
* @param networkName - social network name (max. 24 symbols)
*/
SocialNetwork socialNetwork = SocialNetwork.Custom(String networkName);/**
* Custom social network object
* @param networkName - social network name (max. 24 symbols)
*/
SocialNetwork socialNetwork = SocialNetwork.Custom(String networkName);/// <summary> The Property of limiting the processing of user data. The right to be forgotten.
/// Use 'false' to erase user's personal data and stop collecting data of this user or 'true'
/// if you want to resume data collection.</summary>
DevToDev.SDK.TrackingAvailability = false/true;tb
Tumblr
gp
Google+
tw
in
vk
VK
ok
Odnoklassniki
vb
Viber
pi
wp
Qzone
tb
Tumblr
gp
Google+
tw
in
vk
VK
ok
Odnoklassniki
vb
Viber
pi
wp
Qzone
Quest completed
New item
Collection completed
Invitation
Review
and so on...
gm
Google Mail
tb
Tumblr
gp
Google+
tw
in
vk
VK
ok
Odnoklassniki
vb
Viber
pi
wp
Qzone
Value
Social Network
Value
Social Network
en
Evernote
rt
fb
rr
Renren
gm
fb
rr
Renren
gm
Google Mail
tb
Tumblr
gp
Google+
tw
in
vk
VK
ok
Odnoklassniki
vb
Viber
pi
wp
Qzone
For example:
Start playing
New level reached
New building
New ability
Quest completed
New item
Collection completed
Invitation
Asking for help
New Record
Achievement
URL sharing
Recommendation
Review
and so on...
Value
Social Network
Value
Social Network
en
Evernote
rt
fb
rr
Renren
gm
Google Mail
Google Mail
// Tracks the existence of a connection with a social network.
// Use pre-defined or custom values as an identifier.
// FString socialNetwork - social network id (max. 24 symbols)
UDevToDevBlueprintFunctionLibrary::SocialNetworkConnect(const FString& socialNetwork);SocialNetwork socialNetwork = SocialNetwork.Custom(string networkName); //(max. 24 symbols)DevToDev.SocialNetwork.Facebook
DevToDev.SocialNetwork.Twitter
DevToDev.SocialNetwork.GooglePlus
DevToDev.SocialNetwork.Vk
// and so on...DevToDev.SocialNetwork socialNetwork = DevToDev.SocialNetwork.Custom(string networkName); //(max. 24 symbols)Facebook
Twitter
GooglePlus
VK
//and so on...SocialNetwork socialNetwork = [SocialNetwork Custom: (NSString *) networkName]; //max. 24 symbolsSocialNetwork.VK;
SocialNetwork.TWITTER;
SocialNetwork.FACEBOOK;
SocialNetwork.GOOGLE_PLUS;
SocialNetwork.WHATS_APP;
SocialNetwork.VIBER;
SocialNetwork.EVERNOTE;
SocialNetwork.GOOGLE_MAIL;
SocialNetwork.LINKED_IN;
SocialNetwork.PINTEREST;
SocialNetwork.QZONE;
SocialNetwork.REDDIT;
SocialNetwork.RENREN;
SocialNetwork.TUMBLR;/**
* Custom social network object
* @param networkName - social network name (max. 24 symbols)
*/
var socialNetwork:SocialNetwork = SocialNetwork.Custom(networkName:String);


This generation of SDK is deprecated and is no longer supported. Information about the current version can be found here.
In addition to basic methods, you can observe and change the user profiles data. A user profile is the set of properties describing the user, which can be divided into 4 groups:
Cross-platform or custom user identifier. If this identifier is not set by a developer, then the device identifier is used.
Automatically collected properties, including data about user's device, geography, app version, SDK, and some other data which can be received from SDK.
The default set of user properties, which can be set by a developer. The set of this parameters works with separate methods. This set includes the data of the user's name, sex, age, e-mail, phone number and URL of user picture. Also, this set includes the mark of a user as a cheater.
Custom set of user properties. In this case, a developer sets any user data he/she needs to know. The data is set in key-value format and can be numeric, string, array, or boolean. Each project can have up to 30 custom user properties.
Cross-platform or custom user identifier. If this identifier is not set by a developer, then the device identifier is used.
Automatically collected properties, including data about user's device, geography, app version, SDK, and some other data which can be received from SDK.
The default set of user properties, which can be set by a developer. The set of this parameters works with separate methods. This set includes the data of the user's name, sex, age, e-mail, phone number, and URL of user picture. Also, this set includes the mark of a user as a cheater.
Custom set of user properties. In this case, a developer sets any user data he/she needs to know. The data is set in key-value format and can be numeric, string, array, or boolean. Each project can have up to 30 custom user properties.
Cross-platform or custom user identifier. If this identifier is not set by developer, then the device identifier is used.
Automatically collected properties, including data about user's device, geography, app version, SDK, and some other data which can be received from SDK.
Default set of user properties, which can be set by developer. The set of this parameters works with separate methods. This set includes the data of user's name, sex, age, e-mail, phone-number and url of user picture. Also this set includes the mark of user as cheater.
Custom set of user properties. In this case developer sets any user data he/she needs to know. The data is set in key-value format and can be numeric, string, array or boolean. Each project can have up to 30 custom user properties.
Cross-platform or custom user identifier. If this identifier is not set by developer, then the identifier which was set during the initialization is used.
Automatically collected properties, including data about user's device, geography, app version, SDK, and some other data which can be received from SDK.
Basic set of user properties, which can be set by developer. The set of this parameters works with separate methods. This set includes the data of user's name, sex, age, e-mail, phone-number and url of user picture. Also this set includes the mark of user as cheater.
Custom set of user properties. In this case developer sets any user data he/she needs to know. The data is set in key-value format and can be numeric, string, array or boolean. Each project can have up to 30 custom user properties.
Cross-platform or custom user identifier. If this identifier is not set by developer, then the device identifier is used.
Automatically collected properties, including data about user's device, geography, app version, SDK, and some other data which can be received from SDK.
Default set of user properties, which can be set by developer. The set of this parameters works with separate methods. This set includes the data of user's name, sex, age, e-mail, phone-number and url of user picture. Also this set includes the mark of user as cheater.
Custom set of user properties. In this case developer sets any user data he/she needs to know. The data is set in key-value format and can be numeric, string, array or boolean. Each project can have up to 30 custom user properties.
You can segment users by all the properties in My Apps section of an application.
This method is used for user initialization in the applications that are the parts of cross-platform project.
We recommend you to apply this method before the SDK initialization, otherwise the user identifier from the previous session will be used since the SDK initialization moment till the setUserID method call.
If your cross-platform application is supposed to be used without cross-platform authorization, don't use the setUserID method or use the empty string ("") as the user identifier. SDK will assign the unique identifier to user. This identifier will be used until the real cross-platform identifier is assigned to the user.
If your application allows user to re-login (changing the user during the working session of the application), then the setUserID method should be called just after the authorization. You don't need to call the SDK initialization one more time.
To see which identifier is used at the moment:
If it is possible to replace the user identifier in your application (for example, to make changes in the login/user id for a particular user), use this method at the moment of replacing the identifier.
Don't use this method if you're going to perform the user's re-login.
If it is possible to replace the user identifier in your application (say, to make changes in the login/user id for particular user), use this method at the moment of replacing the identifier.
This method is used in cross-platform applications and applications with data synchronization.
This method is required for user's level data initialization. We recommend you to use the setCurrentLevel method just after the user initialization (using the setUserID method).
Don't use the setCurrentLevel method at the moment of user's level up. We recommend you to use the levelUp method in this case.
This method is used in cross-platform applications and applications with data synchronization.
This method is required for user's level data initialization. We recommend you to use the setCurrentLevel method just after the user initialization (using the
In case you have your own methods of determining cheaters in the application, you can have such users marked. Payments made by them will not be taken into account in the statistics.
Blueprint
User's name. Default user profile property.
We strongly recommend not to use this property because it refers to .
Blueprint
--
User's age in years. Default user profile property.
We strongly recommend not to use this property because it refers to .
Blueprint
User's gender. Default user profile property.
We strongly recommend not to use this property because it refers to .
Blueprint
User's e-mail. Default user profile property.
We strongly recommend not to use this property because it refers to .
Blueprint
User's phone. Default user profile property.
We strongly recommend not to use this property because it refers to .
Blueprint
User's photo URL. Default user profile property.
We strongly recommend not to use this property because it refers to .
Blueprint
Each project in devtodev can have up to 30 custom user properties.Here is how you can set properties on the current user profile:
Attention! We strongly recommend that you do not use these properties to transfer and store data that fits the definition of !
Blueprint
Increments the given numeric properties by the given values.
Blueprint
Adds values to a list-valued property. If the property does not currently exist, it will be created with the given list as it's value. If the property exists and is not list-valued, the append will be ignored.
Adds values to a list-valued property only if they are not already present in the list. If the property does not currently exist, it will be created with the given list as it's value. If the property exists and is not list-valued, the union will be ignored.
Removes a property or a list of properties and their values from the current user's profile.
Blueprint
Blueprint
Code
This method is used for user initialization in the applications which are the parts of cross-platform project.
We recommend you to apply this method before the SDK initialization, otherwise the user identifier from the previous session will be used since the SDK initialization moment till the setUserID method call.
If your cross-platform application supposes to be used without cross-platform authorization, don't use the setUserID method or use the empty string ("") as the user identifier. SDK will assign the unique identifier to user. This identifier will we used until the real cross-platform identifier assigns to the user.
If your application allows user to re-login (changing the user during the working session of application), then the setUserID method should be called just after the authorization. You don't need to call the SDK initialization one more time.
/**
* Initializes the user with the specified cross-platform identifier
* @param String userId - unique cross-platform user ID used
* for user identification on your server.
*/
DevToDev.setUserId(String userId);To see which identifier is used at the moment:
/**
* Returns current cross-platform user id
* @return userId - current cross-platform user id (or null, if sdk not initialized)
*/
DevToDev.getUserId();This method is used for user initialization in the applications which are the parts of cross-platform project.
We recommend you to apply this method before the SDK initialization, otherwise the user identiticator from the previous session will be used since the SDK initialization moment till the UserID property call.
If your cross-platform application supposes to be used without cross-platform authorization, don't use the UserID property or use the empty string ("") as the user identifier. SDK will assign the unique identifier to user. This identifier will we used until the real cross-platform identifier assigns to the user.
If your application allows user to re-login (changing the user during the working session of application), then the UserID property should be called just after the authorization. You don't need to call the SDK initialization one more time.
This property also allows you to see which identifier is used at the moment.
This method is used for user initialization in the applications which are the parts of cross-platform project. You also can use this identifier in non-crossplatform projects, but in your app the own unique user identifier is used.
We recommend you to apply this method before the SDK initialization, otherwise the user identifier from the previous session will be used since the SDK initialization moment till the setCrossplatformUserId method call.
If your cross-platform application supposes to be used without cross-platform authorization, don't use the setCrossplatformUserId method or use the empty string ("") as the user identifier. SDK will assign the unique identifier to user. This identifier will be used until the real cross-platform identifier assigns to the user.
If your application allows user to re-login (changing the user during the working session of application), then the setCrossplatformUserId method should be called just after the authorization. You don't need to call the SDK initialization one more time.
To see which identifier is used at the moment:
This method is used for user initialization in the applications which are the parts of cross-platform project.
We recommend you to apply this method before the SDK initialization, otherwise the user identifier from the previous session will be used since the SDK initialization moment till the UserID property call.
If your cross-platform application supposes to be used without cross-platform authorization, don't use the UserID property or use the empty string ("") as the user identifier. SDK will assign the unique identifier to user. This identifier will we used until the real cross-platform identifier assigns to the user.
If your application allows user to re-login (changing the user during the working session of application), then the UserID property should be called just after the authorization. You don't need to call the SDK initialization one more time.
This property also allows you to see which identifier is used at the moment.
This method is used for user initialization in the applications which are the parts of cross-platform project.
We recommend you to apply this method before the SDK initialization, otherwise the user identifier from the previous session will be used since the SDK initialization moment till the setUserID method call.
If your cross-platform application supposes to be used without cross-platform authorization, don't use the setUserID method or use the empty string ("") as the user identifier. SDK will assign the unique identifier to user. This identifier will we used until the real cross-platform identifier assigns to the user.
If your application allows user to re-login (changing the user during the working session of application), then the setUserID method should be called just after the authorization. You don't need to call the SDK initialization one more time.
To see which identifier is used at the moment:
This method is used for user initialization in the applications which are the parts of cross-platform project.
We recommend you to apply this method before the SDK initialization, otherwise the user identifier from the previous session will be used since the SDK initialization moment till the setUserID method call.
If your cross-platform application supposes to be used without cross-platform authorization, don't use the setUserID method or use the empty string ("") as the user identifier. SDK will assign the unique identifier to user. This identifier will we used until the real cross-platform identifier assigns to the user.
If your application allows user to re-login (changing the user during the working session of application), then the setUserID method should be called just after the authorization. You don't need to call the SDK initialization one more time.
Blueprint
Code
To see which identifier is used at the moment:
Blueprint
Code
If it is possible to replace the user identifier in your application (say, to make changes in the login/user id for particular user), use this method at the moment of replacing the identifier.
Don't use this method if you're going to perform the user's re-login.
If it is possible to replace the cross-platform user identifier in your application (say, to make changes in the login/user id for particular user), use this method at the moment of replacing the identifier.
Don't use this method if you're going to perform the user's re-login.
If it is possible to replace the user identifier in your application (say, to make changes in the login/user id for particular user), use this method at the moment of replacing the identifier.
Don't use this method if you're going to perform the user's re-login.
If it is possible to replace the user identifier in your application (say, to make changes in the login/user id for particular user), use this method at the moment of replacing the identifier.
Don't use this method if you're going to perform the user's re-login.
If it is possible to replace the user identifier in your application (say, to make changes in the login/user id for particular user), use this method at the moment of replacing the identifier.
Don't use this method if you're going to perform the user's re-login.
If it is possible to replace the user identifier in your application (say, to make changes in the login/user id for particular user), use this method at the moment of replacing the identifier.
Don't use this method if you're going to perform the user's re-login.
Blueprint
Field
Type
Code
Don't use the setCurrentLevel method at the moment of user's level up. We recommend you to use the levelUp method in this case.
This method is used in cross-platform applications and applications with data synchronization.
This method is required for user's level data initialization. We recommend you to use the SetCurrentLevel method just after the user initialization (using the UserID method).
Don't use the SetCurrentLevel method at the moment of user's level up. We recommend you to use the levelUp method in this case.
If your app uses the user's level mark, we recommend to use this method after every SDK initialization, as soon as data of user's level is available to the application.
This method is used in cross-platform applications and applications with data synchronization.
This method is required for user's level data initialization. We recommend you to use the SetCurrentLevel method just after the user initialization (using the UserID method).
Don't use the SetCurrentLevel method at the moment of user's level up. We recommend you to use the levelUp method in this case.
This method is used in cross-platform applications and applications with data synchronization.
This method is required for user's level data initialization. We recommend you to use the setCurrentLevel method just after the user initialization (using the setUserID method).
Don't use the setCurrentLevel method at the moment of user's level up. We recommend you to use the levelUp method in this case.
This method is used in cross-platform applications and applications with data synchronization.
This method is required for user's level data initialization. We recommend you to use the setCurrentLevel method just after the user initialization (using the setUserID method).
Don't use the setCurrentLevel method at the moment of user's level up. We recommend you to use the levelUp method in this case.
Blueprint
Code
isCheater
bool
True if user is a cheater
Code
FString
User's name
Code
Age
int32
User's age in years
Code
Gender
FString
User's gender ('male', 'female', 'unknown')
Code
FString
User's e-mail
Code
Phone
FString
User's phone
Code
Photo
FString
User's photo URL.
Code
Attributes
TArray<FAnalyticsEventAttr>
Key-value array to set custom property, where key is a user property name, value is a property value
Code
Attributes
TArray<FAnalyticsEventAttr>
Key-value array, where key is a user property name, value is increment step
Code
Attributes
TArray<FString>
An array of property names to be removed.
Code
Field
Type
Description
Field
Type
Description
Field
Type
Description
Field
Type
Description
Field
Type
Description
Field
Type
Description
Field
Type
Description
Field
Type
Description
Field
Type
Description
Field
Type
Description
/**
* Initializes the user with the specified cross-platform identifier
* @param NSString userId - unique cross-platform user ID used
* for user identification on your server.
*/
[DevToDev setUserId: (NSString *) userId];/**
* Returns current cross-platform user id
* @return userId - current cross-platform user id
*/
[DevToDev getUserId];Name
/**
* Initializes the user with the specified cross-platform identifier
* property allows to get and to set unique cross-platform user ID used
* for user identification on your server.
*/
DevToDev.SDK.UserId = userId;/**
* Initializes the user with the specified cross-platform identifier
* @param {string} crossplatformUserId - unique cross-platform user ID used
* for user identification on your server.
*/
devtodev.setCrossplatformUserId(crossplatformUserId);/**
* Returns current cross-platform user id
* @return crossPlatformUserId - current cross-platform user id
*/
devtodev.getCrossplatformUserId();/// <summary>
/// Initializes the user with the specified cross-platform identifier
/// property allows to get and to set unique cross-platform user ID used
/// for user identification on your server.</summary>
DevToDev.Analytics.UserId = userId;/**
* Initializes the user with the specified cross-platform identifier
* @param NSString userId - unique cross-platform user ID used
* for user identification on your server.
*/
[DevToDev setUserId: (NSString *) userId];/**
* Returns current cross-platform user id
* @return userId - current cross-platform user id
*/
[DevToDev getUserId];/**
* Initializes the user with the specified cross-platform identifier
* @param userId - unique cross-platform user ID used for user identification on your server.
*/
DevToDev.setUserId(userId:String);/**
* Returns current cross-platform user id
* @return userId - current cross-platform user id (string or null, if sdk not initialized)
*/
DevToDev.getUserId();/**
* Replaces current cross-platform user id
* Attention! Don't use this method if you're going to perform the user's relogin.
* <param name="prevUserId">Old user identifier</param>
* <param name="userId">New user identifier</param>
*/
DevToDev.SDK.ReplaceUserId(string prevUserId, string userId);/**
* Replaces current cross-platform user id
* Attention! Don't use this method if you're going to perform the user's relogin.
* @param {string} newCrossPlatformID - new cross-platform user ID
*/
devtodev.replaceCrossplatformUserId(newCrossPlatformID);/// <summary> Replaces current cross-platform user id.
/// Attention! Don't use this method if you're going to perform the user's relogin.</summary>
/// <param name="prevUserId"> Old user identifier </param>
/// <param name="userId"> New user identifier </param>
DevToDev.Analytics.ReplaceUserId(string prevUserId, string userId);/**
* Replaces current cross-platform user id
* Attention! Don't use this method if you're going to perform the user's relogin.
* @param NSString prevUserId - previous cross-platform user ID
* @param NSString userId - new cross-platform user ID
*/
[DevToDev replaceUserId: (NSString *) prevUserId to: (NSString *) userId];/**
* Replaces current cross-platform user id
* Attention! Don't use this method if you're going to perform the user's relogin.
* @param prevUserId - previous cross-platform user ID
* @param userId - new cross-platform user ID
*/
DevToDev.replaceUserId(prevUserId:String, userId:String);/**
* Initializes the current user level. Required if level feature used in the app.
* <param name="level">Current game level of the player</param>
*/
DevToDev.SDK.SetCurrentLevel(int level);/**
* Initializes the current user level. Required if level feature used in the app.
* @param {number} currentUserLevel - current game level of the player.
*/
devtodev.setCurrentLevel(currentUserLevel);/// <summary> Initializes the current user level. Required if level feature used in the app. </summary>
/// <param name="level"> current game level of the player </param>
DevToDev.Analytics.SetCurrentLevel(int level);/**
* Initializes the current user level. Required if level feature used in the app.
* @param NSUInteger level - current game level of the player.
*/
[DevToDev setCurrentLevel: (NSUInteger) level];/**
* Initializes the current user level. Required if level feature used in the app.
* @param level - current game level of the player.
*/
DevToDev.setCurrentLevel(level:int);/**
* Replaces current cross-platform user id
* Attention! Don't use this method if you're going to perform the user's relogin.
* @param NSString prevUserId - previous cross-platform user ID
* @param NSString userId - new cross-platform user ID
*/
[DevToDev replaceUserId: (NSString *) prevUserId to: (NSString *) userId];/**
* Initializes the current user level. Required if level feature used in the app.
* @param NSUInteger level - current game level of the player.
*/
[DevToDev setCurrentLevel: (NSUInteger) level];/**
* Mark user if it's cheater.
* @param BOOL isCheater - true if user is a cheater
*/
DevToDev.activeUser.cheater = isCheater;/**
* Mark user if it's cheater.
* @param boolean isCheater - true if user is a cheater
*/
DevToDev.getActivePlayer().setCheater(boolean isCheater);/**
* Mark user if it's cheater.
* <param name="isCheater">true if user is a cheater</param>
*/
DevToDev.SDK.ActiveUser.SetCheater(boolean isCheater);/**
* Mark user if it's cheater.
* @param {boolean} isCheater - true if user is a cheater
*/
devtodev.user.cheater(isCheater);/// <summary> Mark user if it's cheater. </summary>
/// <param name="isCheater"> true if user is a cheater </param>
DevToDev.Analytics.ActiveUser.Cheater = isCheater;/**
* Mark user if it's cheater.
* @param BOOL isCheater - true if user is a cheater
*/
DevToDev.activeUser.cheater = isCheater;/**
* Mark user if it's cheater.
* @param isCheater - true if user is a cheater
*/
DevToDev.getActiveUser().SetCheater(isCheater:Boolean);/**
* Track user's name
* @param NSString name - User's name.
*/
DevToDev.activeUser.name = name;/**
* Track user's name
* @param String name - User's name
*/
DevToDev.getActivePlayer().setName(String name);/**
* Track user's name
* <param name="name">User's name</param>
*/
DevToDev.SDK.ActiveUser.SetName(string name);/**
* Track user's name
* @param {string} name - User's name.
*/
devtodev.user.name(name);/// <summary> Track user's name </summary>
/// <param name="name"> User's name </param>
DevToDev.Analytics.ActiveUser.Name = name;/**
* Track user's name
* @param NSString name - User's name.
*/
DevToDev.activeUser.name = name;/**
* Track user's name
* @param name - User's name.
*/
DevToDev.getActiveUser().SetName(name:String);/**
* Track user's age
* @param NSNumber age - User's age
*/
DevToDev.activeUser.age = age;/**
* Track user's age
* @param int age - User's age
*/
DevToDev.getActivePlayer().setAge(int age);/**
* Track user's age
* <param name="age">User's age</param>
*/
DevToDev.SDK.ActiveUser.SetAge(int age);/**
* Track user's age
* @param {number} age - User's age.
*/
devtodev.user.age(age);/// <summary> Track user's age </summary>
/// <param name="age"> User's age </param>
DevToDev.Analytics.ActiveUser.Age = age;/**
* Track user's age
* @param NSNumber age - User's age
*/
DevToDev.activeUser.age = age;/**
* Track user's age
* @param age - User's age in years
*/
DevToDev.getActiveUser().SetAge(age:int);/**
* Track user's
* @param DTDGender gender - User's gender. (Unknown, Male, Female).
*/
DevToDev.activeUser.gender = gender;/**
* Track user's gender
* @param Gender gender - User's gender. (Unknown, Male, Female).
*/
DevToDev.getActivePlayer().setGender(Gender gender);/**
* Track user's gender.
* <param name="gender">User's gender. (Unknown, Male, Female)</param>
*/
DevToDev.SDK.ActiveUser.SetGender(DevToDev.Gender gender);/**
* Track user's gender
* @param {number} gender - User's gender. (0 - Unknown, 1 - Male, 2 - Female).
*/
devtodev.user.gender(gender);/// <summary> Track user's gender </summary>
/// <param name="gender"> User's gender. (Unknown, Male, Female) </param>
DevToDev.Analytics.ActiveUser.Gender = gender;/**
* Track user's
* @param DTDGender gender - User's gender. (Unknown, Male, Female).
*/
DevToDev.activeUser.gender = gender;/**
* Track user's
* @param gender - User's gender. (Unknown == 0, Male == 1, Female == 2).
*/
DevToDev.getActiveUser().SetGender(gender:int);/**
* Track user's e-mail
* @param NSString email - User's e-mail.
*/
DevToDev.activeUser.email = email;/**
* Track user's e-mail
* @param String email - User's e-mail.
*/
DevToDev.getActivePlayer().setEmail(String email);/**
* Track user's e-mail
* <param name="email">User's e-mail</param>
*/
DevToDev.SDK.ActiveUser.SetEmail(string email);/**
* Track user's e-mail
* @param {string} email - User's e-mail.
*/
devtodev.user.email(email);/// <summary> Track user's e-mail </summary>
/// <param name="email"> User's e-mail </param>
DevToDev.Analytics.ActiveUser.Email = email;/**
* Track user's e-mail
* @param NSString email - User's e-mail.
*/
DevToDev.activeUser.email = email;/**
* Track user's e-mail
* @param email - User's e-mail.
*/
DevToDev.getActiveUser().SetEmail(email:String);/**
* Track user's phone number
* @param NSString phoneNumber - User's phone number.
*/
DevToDev.activeUser.phone = phoneNumber;/**
* Track user's phone number
* @param String phoneNumber - User's phone number.
*/
DevToDev.getActivePlayer().setPhone(String phoneNumber);/**
* Track user's phone number
* <param name="phoneNumber">User's phone number</param>
*/
DevToDev.SDK.ActiveUser.SetPhone(string phoneNumber);/**
* Track user's phone number
* @param {string} phone_number - User's phone number.
*/
devtodev.user.phone(phone_number);/// <summary> Track user's phone number </summary>
/// <param name="phoneNumber"> User's phone number </param>
DevToDev.Analytics.ActiveUser.Phone = phoneNumber;/**
* Track user's phone number
* @param NSString phoneNumber - User's phone number.
*/
DevToDev.activeUser.phone = phoneNumber;/**
* Track user's phone number
* @param phoneNumber - User's phone number.
*/
DevToDev.getActiveUser().SetPhone(phoneNumber:String);/**
* Track user's photo URL
* @param NSString photoUrl - User's photo URL.
*/
DevToDev.activeUser.photo = photoUrl;/**
* Track user's photo URL
* @param String photoUrl - User's photo url.
*/
DevToDev.getActivePlayer().setPhoto(String photoUrl);/**
* Track user's photo URL
* <param name="photoUrl">User's photo url</param>
*/
DevToDev.SDK.ActiveUser.SetPhoto(string photoUrl);/**
* Track user's photo URL
* @param {string} photo_url - User's phone number.
*/
devtodev.user.photo(photo_url);/// <summary> Track user's photo URL </summary>
/// <param name="photoUrl"> User's photo url </param>
DevToDev.Analytics.ActiveUser.Photo = photoUrl;/**
* Track user's photo URL
* @param NSString photoUrl - User's photo URL.
*/
DevToDev.activeUser.photo = photoUrl;/**
* Track user's photo URL
* @param photoUrl - User's photo url.
*/
DevToDev.getActiveUser().SetPhoto(photoUrl:String);/**
* Set properties on a user data.
*
* ### Usage:
* [DevToDev.activeUser setUserDataWithKey:@"Hair color" andValue: @"copper red"];
* properties can have string, integer, date or list type
*
* @param NSString key - the name of the property
* @param {*} value - a value to set on the given property
*/
[DevToDev.activeUser setUserDataWithKey: (NSString *) key andValue: (id) value];
/**
* Set multiple properties at once
*
* ### Usage:
* [DevToDev.activeUser setUserData:@{
* @"Hair color" : @"blonde",
* @"Last payment" : 100,
* @"Last order" : @[
* @"Coloring",
* @"Hair Straightening"
* ],
* @"Order date" : [NSDate date]
* }];
* properties can have string, integer, date or list type
*
* @param NSDictionary userData - an associative array of names and values.
*/
[DevToDev.activeUser setUserData: (NSDictionary *) userData];/**
* Set properties on a user data.
*
* ### Usage:
* DevToDev.getActivePlayer().setUserData("Hair color", "copper red");
* properties can have String, Number or Collection type
*
* @param String key - the name of the property
* @param {*} value - a value to set on the given property
*/
DevToDev.getActivePlayer().setUserData(String key, Object value);
/**
* Set multiple properties at once
*
* ### Usage:
* final Map<String, Object> userData = new HashMap<String, Object>();
* userData.put("Hair color", "blonde");
* userData.put("Last payment", 100);
* final List<Object> lastOrder = new ArrayList<Object>();
* lastOrder.add("Coloring");
* lastOrder.add("Hair Straightening");
* userData.put("Last order", lastOrder);
* DevToDev.getActivePlayer().setUserData(userData);
* properties can have String, Number or Collection type
*
* @param Map<String, Object> userData - an associative array of names and values.
*/
DevToDev.getActivePlayer().setUserData(final Map<String, Object> userData);/**
* Set properties on a user data.
*
* ### Usage:
* DevToDev.SDK.ActiveUser.SetUserData("Hair color", "copper red");
* properties can have string, int, double or List<object> type
*
* <param name="key">property name</param>
* <param name="value">a value to set on the given property</param>
*/
DevToDev.SDK.ActiveUser.SetUserData(string key, object value);
/**
* Set multiple properties at once
*
* ### Usage:
* Dictionary<string, object> userData = new Dictionary<string, object>();
* userData.Add("Hair color", "blonde");
* userData.Add("Last payment", 100);
* List<object> lastOrder = List<object>();
* lastOrder.Add("Coloring");
* lastOrder.Add("Hair Straightening");
* userData.Add("Last order", lastOrder);
* DevToDev.SDK.ActiveUser.SetUserData(userData);
* properties can have string, int, double or List<object> type
*
* <param name="userData">an associative array of names and values</param>
*/
DevToDev.SDK.ActiveUser.SetUserData(Dictionary<string, object> userData);/*
* Set properties on a user data.
*
* ### Usage:
* devtodev.user.set('Hair color', 'copper red');
*
* // to set multiple properties at once
* devtodev.user.set({
* 'Hair color': 'blonde',
* 'Last payment': 100,
* 'Last order': ['Coloring','Hair Straightening'],
* 'Order date': new Date()
* });
* // properties can be strings, integers, dates, or lists
*
* @param {Object|String} prop If a string, this is the name of the property. If an object, this is an associative array of names and values.
* @param {*} [val] A value to set on the given property
*/
devtodev.user.set(prop, val);/// <summary> Set properties on a user data. </summary>
/// <example> Usage:
///
/// DevToDev.Analytics.ActiveUser.SetUserData("Hair color", "copper red");
/// //properties can have string, int, double or List<object> type
///
/// </example>
/// <param name="key">property name</param>
/// <param name="value">a value to set on the given property</param>
DevToDev.Analytics.ActiveUser.SetUserData(string key, object value);
/// <summary> Set multiple properties at once. </summary>
/// <example> Usage:
///
/// Dictionary<string, object> userData = new Dictionary<string, object>();
/// userData.Add("Hair color", "blonde");
/// userData.Add("Last payment", 100);
/// List<object> lastOrder = List<object>();
/// lastOrder.Add("Coloring");
/// lastOrder.Add("Hair Straightening");
/// userData.Add("Last order", lastOrder);
/// DevToDev.Analytics.ActiveUser.SetUserData(userData);
/// //properties can have string, int, double or List<object> type
///
/// </example>
/// <param name="userData">an associative array of names and values</param>
DevToDev.Analytics.ActiveUser.SetUserData(Dictionary<string, object> userData);/**
* Set properties on a user data.
*
* ### Usage:
* [DevToDev.activeUser setUserDataWithKey:@"Hair color" andValue: @"copper red"];
* properties can have string, integer, date or list type
*
* @param NSString key - the name of the property
* @param {*} value - a value to set on the given property
*/
[DevToDev.activeUser setUserDataWithKey: (NSString *) key andValue: (id) value];
/**
* Set multiple properties at once
*
* ### Usage:
* [DevToDev.activeUser setUserData:@{
* @"Hair color" : @"blonde",
* @"Last payment" : 100,
* @"Last order" : @[
* @"Coloring",
* @"Hair Straightening"
* ],
* @"Order date" : [NSDate date]
* }];
* properties can have string, integer, date or list type
*
* @param NSDictionary userData - an associative array of names and values.
*/
[DevToDev.activeUser setUserData: (NSDictionary *) userData];/**
* Set properties on a user data.
* ### Usage:
* DevToDev.getActiveUser().SetUserData("Hair color", "copper red");
* properties can have String, Number or Array type
*
* @param key - the name of the property
* @param value - a value to set on the given property
*/
DevToDev.getActiveUser().SetUserData(key:String, value:Object);
/**
* Set multiple properties at once
*
* ### Usage:
* var userData:Dictionary = new Dictionary();
* userData["Hair color"] = "blonde";
* userData["Last payment"] = 100;
* var lastOrder:Array = new Array();
* lastOrder.push("Coloring");
* lastOrder.push("Hair Straightening");
* userData["Last order"] = lastOrder;
* DevToDev.getActiveUser().SetUserDataMany(userData);
* properties can have String, Number or Collection type
*
* @param userData - an associative array of names and values.
*/
DevToDev.getActiveUser().SetUserDataMany(userData:Dictionary);/**
* Increments or decrements numeric user's properties.
* ### Usage:
* [DevToDev.activeUser incrementWithKey: @"Rounds played" andValue: 1];
*
* // to decrement a counter, pass a negative number
* [DevToDev.activeUser incrementWithKey: @"Rounds played" andValue: -1];
*
* @param NSString key - the name of the property
* @param NSNumber value - an amount to increment the given property
*/
[DevToDev.activeUser incrementWithKey: (NSString *) key andValue: (id) value];
/**
* Increments or decrements multiple numeric user's properties at once.
* ### Usage:
* [DevToDev.activeUser increment: @{
* @"Rounds played" : 1,
* @"Enemies killed" : 6
* }];
*
* @param NSDictionary values - an associative array of property names and numeric values.
*/
[DevToDev.activeUser increment: (NSDictionary *) values];/**
* Increments or decrements numeric user's properties.
* ### Usage:
* DevToDev.getActivePlayer().increment("Rounds played", 1);
*
* // to decrement a counter, pass a negative number
* DevToDev.getActivePlayer().increment("Rounds played", -1);
*
* @param String key - the name of the property
* @param Number value - an amount to increment the given property
*/
DevToDev.getActivePlayer().increment(String key, Number value);
/**
* Increments or decrements multiple numeric user's properties at once.
* ### Usage:
* final Map<String, Number> data = new HashMap<String, Number>();
* data.put("Rounds played", 1);
* data.put("Enemies killed", 6);
* DevToDev.getActivePlayer().increment(data);
*
* @param Map<String, Number> values - an associative array of property names and numeric values.
*/
DevToDev.getActivePlayer().increment(final Map<String, Number> data);/**
* Increments or decrements numeric user's properties.
* ### Usage:
* DevToDev.SDK.ActiveUser.Increment("Rounds played", 1);
*
* // to decrement a counter, pass a negative number
* DevToDev.SDK.ActiveUser.Increment("Rounds played", -1);
*
* <param name="key">property name</param>
* <param name="value">an amount to increment the given property(int or double)</param>
*/
DevToDev.SDK.ActiveUser.Increment(string key, object value);
/**
* Increments or decrements multiple numeric user's properties at once.
* ### Usage:
* Dictionary<string, object> data = new Dictionary<string, object>();
* data.Add("Rounds played", 1);
* data.Add("Enemies killed", 6);
* DevToDev.SDK.ActiveUser.Increment(data);
*
* <param name="values">an associative array of property names and numeric(int, double) values</param>
*/
DevToDev.SDK.ActiveUser.Increment(Dictionary<string, object> values);/*
* Increments or decrements numeric user's properties.
* ### Usage:
* devtodev.user.increment('Rounds played', 1);
* // or if you're just incrementing a counter by 1, you can simply do
* devtodev.user.increment('Rounds played');
*
* // to decrement a counter, pass a negative number
* devtodev.user.increment('Rounds played', -1);
*
* // you can increment multiple properties at once:
* devtodev.user.increment({
* 'Rounds played': 1,
* 'Enemies killed': 6
* });
* @param {Object|String} prop If a string, this is the name of the property. If an object, this is an associative array of names and numeric values.
* @param {Number} [val] An amount to increment the given property
*/
devtodev.user.increment(prop, val);/// <summary> Increments or decrements numeric user's properties.</summary>
/// <example> Usage:
///
/// DevToDev.Analytics.ActiveUser.Increment("Rounds played", 1);
/// //to decrement a counter, pass a negative number
/// DevToDev.Analytics.ActiveUser.Increment("Rounds played", -1);
///
/// </example>
/// <param name="key">property name</param>
/// <param name="value">an amount to increment the given property(int or double)</param>
DevToDev.Analytics.ActiveUser.Increment(string key, object value);
/// <summary> Increments or decrements multiple numeric user's properties at once.</summary>
/// <example> Usage:
///
/// Dictionary<string, object> data = new Dictionary<string, object>();
/// data.Add("Rounds played", 1);
/// data.Add("Enemies killed", 6);
/// DevToDev.Analytics.ActiveUser.Increment(data);
///
/// </example>
/// <param name="values">an associative array of property names and numeric(int, double) values</param>
DevToDev.Analytics.ActiveUser.Increment(Dictionary<string, object> values);/**
* Increments or decrements numeric user's properties.
* ### Usage:
* [DevToDev.activeUser incrementWithKey: @"Rounds played" andValue: 1];
*
* // to decrement a counter, pass a negative number
* [DevToDev.activeUser incrementWithKey: @"Rounds played" andValue: -1];
*
* @param NSString key - the name of the property
* @param NSNumber value - an amount to increment the given property
*/
[DevToDev.activeUser incrementWithKey: (NSString *) key andValue: (id) value];
/**
* Increments or decrements multiple numeric user's properties at once.
* ### Usage:
* [DevToDev.activeUser increment: @{
* @"Rounds played" : 1,
* @"Enemies killed" : 6
* }];
*
* @param NSDictionary values - an associative array of property names and numeric values.
*/
[DevToDev.activeUser increment: (NSDictionary *) values];/**
* Increments or decrements numeric user's properties.
* ### Usage:
* DevToDev.getActiveUser().Increment("Rounds played", 1);
*
* // to decrement a counter, pass a negative number
* DevToDev.getActiveUser().Increment("Rounds played", -1);
*
* @param key - the name of the property
* @param value - an amount to increment the given property
*/
DevToDev.getActiveUser().Increment(key:String, value:Number);
/**
* Increments or decrements multiple numeric user's properties at once.
* ### Usage:
* var data:Dictionary = new Dictionary();
* data["Rounds played"] = 1;
* data["Enemies killed"] 6;
* DevToDev.getActivePlayer().IncrementMany(data);
*
* @param values - an associative array of property names and numeric values.
*/
DevToDev.getActiveUser().IncrementMany(data:Dictionary);/**
* Append values to list properties.
* @param NSString key - property name
* @param {NSString|NSNumber|NSNull|NSDictionary|NSDate|NSURL} value - appending value
*/
[DevToDev.activeUser appendWithKey: (NSString *) key andValue: (id) value];
/**
* Multiple append list-valued properties at once
* @param NSDictionary values - an associative array of property names and values.
*/
[DevToDev.activeUser append: (NSDictionary *) values];/**
* Append values to list properties.
* @param String key - property name
* @param {String|Number|null|Collection|Map|Date|Url} value - appending value
*/
DevToDev.getActivePlayer().append(String key, Object value);
/**
* Multiple append list-valued properties at once
* @param Map<String, Object> values - an associative array of property names and values.
*/
DevToDev.getActivePlayer().append(final Map<String, Object> data);/**
* Append values to list properties.
* <param name="key">property name</param>
* <param name="value">appending value of type {string|int|double|List}</param>
*/
DevToDev.SDK.ActiveUser.Append(string key, object value);
/**
* Multiple append list-valued properties at once
* <param name="values">an associative array of property names and values</param>
*/
DevToDev.SDK.ActiveUser.Append(Dictionary<string, object> values);/// <summary> Append values to list properties. </summary>
/// <param name="key"> Property name </param>
/// <param name="value"> Appending value of type {string|int|double|List} </param>
DevToDev.Analytics.ActiveUser.AppendUserData(string key, object value);
/// <summary> Multiple append list-valued properties at once </summary>
/// <param name="values"> An associative array of property names and values </param>
DevToDev.Analytics.ActiveUser.AppendUserData(Dictionary<string, object> values);/**
* Append values to list properties.
* @param NSString key - property name
* @param {NSString|NSNumber|NSNull|NSArray|NSDictionary|NSDate|NSURL} value - appending value
*/
[DevToDev.activeUser appendWithKey: (NSString *) key andValue: (id) value];
/**
* Multiple append list-valued properties at once
* @param NSDictionary values - an associative array of property names and values.
*/
[DevToDev.activeUser append: (NSDictionary *) values];/**
* Append values to list properties.
* @param key - property name
* @param value - appending value (String|Number|Array)
*/
DevToDev.getActiveUser().AppendUserData(key:String, value:Object);
/**
* Multiple append list-valued properties at once
* @param values - an associative array of property names and values.
*/
DevToDev.getActiveUser().AppendUserDataMany(data:Dictionary);/**
* Union a given list with a list-valued property, excluding duplicate values.
* @param NSString key - property name
* @param {NSString|NSNumber|NSNull|NSDictionary|NSDate|NSURL} value - appending value
*/
[DevToDev.activeUser unionWithKey: (NSString *) key andValue: (id) value];
/**
* Multiple union of a given lists with a list-valued properties at once
* @param NSDictionary values - an associative array of property names and values.
*/
[DevToDev.activeUser unionWithData: (NSDictionary *) values];/**
* Union a given list with a list-valued property, excluding duplicate values.
* @param String key - property name
* @param {String|Number|null|Collection|Map|Date|Url} value - appending value
*/
DevToDev.getActivePlayer().union(String key, Object value);
/**
* Multiple union of a given lists with a list-valued properties at once
* @param Map values - an associative array of property names and values.
*//**
* Union a given list with a list-valued property, excluding duplicate values.
* <param name="key">property name</param>
* <param name="value">appending value of type {string|int|double|List}</param>
*/
DevToDev.SDK.ActiveUser.Union(string key, object value);
/**
* Multiple union of a given lists with a list-valued properties at once
* <param name="values">an associative array of property names and values</param>
*/
DevToDev.SDK.ActiveUser.Union(Dictionary<string, object> values);/// <summary> Union a given list with a list-valued property, excluding duplicate values. </summary>
/// <param name="key"> Property name </param>
/// <param name="value"> Appending value of type {string|int|double|List} </param>
DevToDev.Analytics.ActiveUser.AppendUserData(string key, object value);
/// <summary> Multiple union of a given lists with a list-valued properties at once </summary>
/// <param name="values"> An associative array of property names and values </param>
DevToDev.Analytics.ActiveUser.AppendUserData(Dictionary<string, object> values);/**
* Union a given list with a list-valued property, excluding duplicate values.
* @param NSString key - property name
* @param {NSString|NSNumber|NSNull|NSArray|NSDictionary|NSDate|NSURL} value - appending value
*/
[DevToDev.activeUser unionWithKey: (NSString *) key andValue: (id) value];
/**
* Multiple union of a given lists with a list-valued properties at once
* @param NSDictionary values - an associative array of property names and values.
*/
[DevToDev.activeUser unionWithData: (NSDictionary *) values];/**
* Union a given list with a list-valued property, excluding duplicate values.
* @param key - property name
* @param value - appending value (String|Number|Array)
*/
DevToDev.getActiveUser().UnionUserData(key:String, value:Object);
/**
* Multiple union of a given lists with a list-valued properties at once
* @param values - an associative array of property names and values.
*/
DevToDev.getActiveUser().UnionUserDataMany(data:Dictionary);/**
* Removes property from user data.
*
* ### Usage:
* [DevToDev.activeUser unsetUserDataWithKey: @"Hair color"];
*
* @param NSString key - the name of the property
*/
[DevToDev.activeUser unsetUserDataWithKey: (NSString *) key];
/**
* Removes multiple properties from user data at once.
*
* ### Usage:
* [DevToDev.activeUser unsetUserData: @[ @"Hair color", @"blonde", @"Last payment" ]];
*
* @param NSArray keys - an array of property names.
*/
[DevToDev.activeUser unsetUserData: (NSArray *) keys];/**
* Removes property from user data.
*
* ### Usage:
* DevToDev.getActivePlayer().unsetUserData("Hair color");
*
* @param String key - the name of the property
*/
DevToDev.getActivePlayer().unsetUserData(String key);
/**
* Removes multiple properties from user data at once.
*
* ### Usage:
* final List<String> unsetData = new ArrayList<String>();
* unsetData.add("Hair color");
* unsetData.add("Last payment");
* DevToDev.getActivePlayer().unsetUserData(unsetData);
*
* @param List keys - an array of property names.
*/
DevToDev.getActivePlayer().unsetUserData(final List<String> keys);/**
* Removes property from user data.
*
* ### Usage:
* DevToDev.SDK.ActiveUser.UnsetUserData("Hair color");
*
* <param name="key">the name of the property</param>
*/
DevToDev.SDK.ActiveUser.UnsetUserData(string key);
/**
* Removes multiple properties from user data at once.
*
* ### Usage:
* List<string> unsetData = new List<string>();
* unsetData.add("Hair color");
* unsetData.add("Last payment");
* DevToDev.SDK.ActiveUser.UnsetUserData(unsetData);
*
* <param name="keys">an array of property names</param>
*/
DevToDev.SDK.ActiveUser.UnsetUserData(List<string> keys);/*
* Removes properties from a user data.
*
* ### Usage:
* devtodev.user.remove('Hair color');
*
* // to set multiple properties at once
* devtodev.user.remove(['Hair color', 'blonde', 'Last payment']);
*
* @param {Array|String} prop If a string, this is the name of the property. If an array, this is an array of names.
*/
devtodev.user.remove(prop);/// <summary> Removes property from user data. </summary>
/// <example> Usage:
///
/// DevToDev.Analytics.ActiveUser.UnsetUserData("Hair color");
///
/// </example>
/// <param name="key"> The name of the property </param>
DevToDev.Analytics.ActiveUser.UnsetUserData(string key);
/// <summary> Removes multiple properties from user data at once. </summary>
/// <example> Usage:
///
/// List<string> unsetData = new List<string>();
/// unsetData.add("Hair color");
/// unsetData.add("Last payment");
/// DevToDev.Analytics.ActiveUser.UnsetUserData(unsetData);
///
/// </example>
/// <param name="keys"> An array of property names </param>
DevToDev.Analytics.ActiveUser.UnsetUserData(List<string> keys);/**
* Removes property from user data.
*
* ### Usage:
* [DevToDev.activeUser unsetUserDataWithKey: @"Hair color"];
*
* @param NSString key - the name of the property
*/
[DevToDev.activeUser unsetUserDataWithKey: (NSString *) key];
/**
* Removes multiple properties from user data at once.
*
* ### Usage:
* [DevToDev.activeUser unsetUserData: @[ @"Hair color", @"blonde", @"Last payment" ]];
*
* @param NSArray keys - an array of property names.
*/
[DevToDev.activeUser unsetUserData: (NSArray *) keys];/**
* Removes property from user data.
* ### Usage:
* DevToDev.getActiveUser().UnsetUserData("Hair color");
*
* @param key - the name of the property
*/
DevToDev.getActiveUser().UnsetUserData(key:String);
/**
* Removes multiple properties from user data at once.
* ### Usage:
* var unsetData:Array = new Array();
* unsetData.push("Hair color");
* unsetData.push("Last payment");
* DevToDev.getActiveUser().UnsetUserDataMany(unsetData);
*
* @param keys - an array of property names.
*/
DevToDev.getActiveUser().UnsetUserDataMany(keys:Array);/**
* Removes all user's custom personal data from devtodev data base.
*/
[DevToDev.activeUser clearUserData];/**
* Removes all user's custom personal data from devtodev data base.
*/
DevToDev.getActivePlayer().clearUserData();/**
* Removes all user's custom personal data from devtodev data base.
*/
DevToDev.SDK.ActiveUser.ClearUserData();/*
* Removes all user's custom personal data from devtodev data base.
*/
devtodev.user.clearUser();/// <summary> Removes all user's custom personal data from devtodev data base.</summary>
DevToDev.Analytics.ActiveUser.ClearUserData();/**
* Removes all user's custom personal data from devtodev data base.
*/
[DevToDev.activeUser clearUserData];/**
* Removes all user's custom personal data from devtodev data base.
*/
DevToDev.getActiveUser().ClearUserData();UPeopleLibrary::ClearUserData();/**
* Replaces current cross-platform user id
* Attention! Don't use this method if you're going to perform the user's relogin.
* @param String prevUserId - previous cross-platform user ID
* @param String userId - new cross-platform user ID
*/
DevToDev.replaceUserId(String prevUserId, String userId);/**
* Initializes the current user level. Required if level feature used in the app.
* @param int level - current game level of the player.
*/
DevToDev.setCurrentLevel(int level);UPeopleLibrary::Cheater(bool cheater);UPeopleLibrary::Name(const FString& name);UPeopleLibrary::Age(int32 age);UPeopleLibrary::Gender(const FString& InGender);UPeopleLibrary::Email(const FString& email);UPeopleLibrary::Phone(const FString& phone);UPeopleLibrary::Photo(const FString& photo);UPeopleLibrary::SetUserData(const TArray<FAnalyticsEventAttr>& Attributes);UPeopleLibrary::IncrementUserData(const TArray<FAnalyticsEventAttr>& Attributes);UPeopleLibrary::UnsetUserData(const TArray<FString>& Attributes);Field
Type
Description
User Id
FString
Unique cross-platform user id
Description
From
FString
Current user Id
To
FString
New user Id
Field
Type
Description
Level
int32
Current user level
// Initializes the user with the specified cross-platform identifier
// FString activeUserId - unique cross-platform user id
FAnalytics::Get().GetDefaultConfiguredProvider()->SetUserID(FString activeUserId);// Returns current cross-platform user id
FAnalytics::Get().GetDefaultConfiguredProvider()->GetUserID();// Replaces cross-platform user id
// FString from - current user id
// FString to - new user id
UDevToDevBlueprintFunctionLibrary::ReplaceUserId(const FString& from, const FString& to);// Initializes the current user level
// int32 level - current user level
UDevToDevBlueprintFunctionLibrary::SetCurrentLevel(int32 level)This generation of SDK is deprecated and is no longer supported. Information about the current version can be found here.
Expert tips before integrating the events.
The Tutorial steps event allows you to evaluate the effectiveness of the tutorial steps system. The event should be sent at the end of each tutorial step indicating the number of every passed step as a parameter.
Use the following constants to specify basic events of tutorial steps:
Start or -1 - at the beginning, before the first step is completed;
Finish or -2 - instead of the final step number;
Skipped or 0 - in case а user skipped the tutorial.
In other cases use step numbers. Make sure you use numbers above 0 to enumerate the steps.
The logic of the use of the Skipped constant in the Tutorial steps event is provided only in case a user has completely refused to pass the tutorial. After Skipped is used, no other values of the Tutorial steps event must be received.
Blueprint
This event is for games only.
You can analyze the distribution of the players over the levels. The event should be sent right after the player reached the next level. You can find more information on what is the right moment to use LevelUp event .
To track the average account balance of in-game currency by the end of each level, please provide the list of currency names and amounts.
Blueprint
To track the average amount of in-game currency earned during a level, it is necessary to send a special event after each time an in-game account is replenished.
AccrualType can take one of the following values:
To track payments, add this event right after the platform confirms that a payment went through.
A unique order identifier is a value of a transactionIdentifier property in SKPaymentTransaction object inside the receipt of completed transaction.
devtodev server does not process transactions with previously used transaction IDs. Also, the server validates identifiers in appearance to avoid evident cheat transactions. To avoid adding cheat payments into reports completely, use devtodev anti-cheat service before creating a realPayment event.
How to find the transaction ID in GooglePlay transaction?
Find the INAPP_PURCHASE_DATA object In the JSON fields that are returned in the response data for a purchase order. A unique transaction identifier is the value of orderId property in INAPP_PURCHASE_DATA object. If the order is a test purchase made via the In-app Billing Sandbox,
This event is for games only.
To track expenditures of in-game currency and popularity of products, add this event right after the purchase.
In case a product is bought for several game currencies at once, it is necessary to make a dictionary that includes the names and amounts of the paid currencies.
In case a product was bought for several game currencies at once, it is necessary to make a hashmap that includes the names and amounts of the paid currencies.
…and so on…
Example:
In case a product was bought for several game currencies at once, it is necessary to make a hashmap including the names and amounts of the paid currencies.
Example:
In case a product was bought for several game currencies at once, it is necessary to make a dictionary including the names and amounts of the paid currencies.
Please keep in mind that there is a limit for the number of unique values of the "purchaseCurrency" parameter - 30 currencies per project. Currencies cannot be deleted or renamed.
If you want to count the events that are not among basic, use custom events.
Attention! We strongly recommend that you do not use custom event properties to transfer and store data that fits the definition of !
The event must have a unique name and can include up to 20 parameters. The maximum length of the event name is 72 symbols.
Every parameter inside one event must have a unique name. The maximum length of the parameter name is 32 symbols.
The values of parameters can be string or number type (int, long, float, double). The maximum length of the parameter value is 255 symbols.
No more than 300 variants of custom event names can be used for one project. Try to enlarge events in meaning by using event parameters. Events that didn't get into the limit of unique event names will be discarded.
For a string parameter, it is acceptable to use not more than 50,000 unique values for the whole event history. In case the limit of unique values is exceeded, the parameter is ignored.
Therefore, we recommend not to set user IDs and Unix time as parameter values of custom events. Try to integrate parameter values if they have a very large variability. Otherwise, it will be very difficult to analyze the data or after some time it may be even ignored.
We strongly recommend not to change the type of data transferred in the parameter over time. In case you change the data type in parameter, it will be duplicated with the same name and different data types in devtodev database which will result in more complicated report building.
20 parameter names may be associated with any event:
Then use method:
20 parameter names may be associated with any event:
Then use method:
Example:
20 parameter names may be associated with any event:
Example:
20 parameter names may be associated with any event:
Then use method:
Example:
This event is for games only.
First of all, a Progression event is used for games with short (within one game session) locations/game levels. The event allows you to gather data on passing the locations and get statistics on parameters that vary during the location passing.
Developer must use the following two methods:
Method startProgressionEvent when entering the location:
Method endProgressionEvent when exiting (no matter if completed or not) the location:
LocationEventParams class methods:
The user can be only in one location at the same time. When moving to another location (including embedded), the previous location must be completed. Information on locations, the passing of which was not completed by calling endProgressionEvent method during the game session (the call of endProgressionEvent method is not integrated; user unloaded the application from the device memory; there was an application crash), do not fall in the statistics.


DevToDev.TutorialState.Start or -1 - at the beginning, before the first step is completed;
DevToDev.TutorialState.Finish or -2 - instead of the last step number;
DevToDev.TutorialState.Skipped or 0 - if a user skipped the tutorial.
DevToDev.TutorialState.Start or -1 - at the beginning, before the first step is completed;
DevToDev.TutorialState.Finish or -2 - instead of the last step number;
DevToDev.TutorialState.Skipped or 0 - if a user skipped the tutorial.
-1 - Start the tutorial (at the beginning, before the first step is completed)
-2 - Tutorial finished (instead of the last step number)
0 - Tutorial skipped (if a user skipped the tutorial).
DevToDev.TutorialState.Start or -1 - at the beginning, before the first step is completed;
DevToDev.TutorialState.Finish or -2 - instead of the last step number;
DevToDev.TutorialState.Skipped or 0 - if a user skipped the tutorial.
Start or -1 - at the beginning, before the first step is completed;
Finish or -2 - instead of the final step number;
Skipped or 0 - in case a user skipped the tutorial.
TutorialState.START or -1 - at the beginning, before the first step is completed;
TutorialState.FINISH or -2 - instead of the last step number;
TutorialState.SKIPPED or 0 - if a user skipped the tutorial.
-1 (Start) - at the beginning, before the first step is completed;
-2 (Finish) - instead of the number of the last step;
0 (Skipped) - in case a user skipped the tutorial.
Step
int32
The latest successfully completed tutorial step
Code
Field
Type
Description
Level
int32
level reached by the player
Code
Level
int32
level reached by the player
Field
Type
Description
Game Currency Type
FString
Currency name (max. 24 symbols)
Game Currency Amount
int32
The amount an account has been credited with.
accrualType
Enum
Can take one of following values: "Earned" or "Purchased"
Code
devtodev server does not process transactions with previously used transaction IDs. Also, the server validates the identifiers in appearance to avoid evident cheat transactions. To avoid completely the entering of cheat payments from GooglePlay in reports, use devtodev anticheat service before creating realPayment event.
Example:
Example:
How to find the transaction ID in iTunes transaction?
Unique order identifier is a value of "transactionIdentifier" property in SKPaymentTransaction object inside the receipt of completed transaction.
How to find the transaction ID in GooglePlay transaction?
Find the INAPP_PURCHASE_DATA object In the JSON fields that are returned in the response data for a purchase order. A unique transaction identifier is the value of orderId property in INAPP_PURCHASE_DATA object. If the order is a test purchase made via the In-app Billing Sandbox, orderId property will be empty.
devtodev server does not process transactions with previously used transaction IDs. Also the server validates the identifiers in appearance, to avoid evident cheat transactions. To avoid the entering of cheat payments in reports completely, use devtodev anticheat service before creating realPayment event.
Blueprint
Field
type
Description
Transaction Id
FString
Unique transaction ID
In AppPrice
float
Product price (in user's currency)
In App Name
Code
In case a product was bought for several game currencies at once, it is necessary to make a dictionary including the names and amounts of the paid currencies.
In case a product was bought for several game currencies at once, it is necessary to make a hashmap including the names and amounts of the paid currencies.
Blueprint
Notice! If the purchase is done by more than one currency, then the method should be called as many times as many currencies were used, but the amount of purchase should be set only in one of the times.
Use the method “Record Simple Item Purchase with Attributes” from Analytics Blueprint Library.
Field
Type
Description
Item Id
FString
Unique purchase Id or name (max. 32 symbols)
Item Quantity
Item Id field is the identifier of purchased item, Item Quantity is the amount of purchased item. Attributes array should contain the following obligatory information:
Code
20 parameter names may be associated with any event:
Then use method:
20 parameter names may be associated with any event:
Then use method:
20 parameter names may be associated with any event:
Then use method:
Field
Type
Description
Event Name
FString
Custom event name
20 parameter names may be associated with any event. Use "Record Event With Attributes".
Code
Let’s look at the example of event integration for a match3 game with a location map:
Method startProgressionEvent when enetring the location
Method endProgressionEvent when exiting (no matter if completed or not) the location
LocationEventParams class methods:
The user can be only in one location at the same time. When moving to another location (including embedded), the previous location must be completed. Information on locations, the passing of which was not completed by calling endProgressionEvent method during the game session (the call of endProgressionEvent method is not integrated; user unloaded the application from the device memory; there was an application crash) do not fall in the statistics.
Let’s analyse the example of event integration on match3 game with location map:
Method StartProgressionEvent when enetring the location
Method EndProgressionEvent when exiting (no matter if completed or not) the location
LocationEventParams class methods:
The user can be only in one location at the same time. When moving to another location (including embedded), the previous location must be completed. Information on locations, the passing of which was not completed by calling EndProgressionEvent method during the game session (the call of EndProgressionEvent method is not integrated; user unloaded the application from the device memory; there was an application crash) do not fall in the statistics.
Let’s analyse the example of event integration on match3 game with location map:
Method startProgressionEvent when enetring the location
Method endProgressionEvent when exiting (no matter if completed or not) the location
Location parameters object contains:
The user can be only in one location at the same time. When moving to another location (including embedded), the previous location must be completed. Information on locations, the passing of which was not completed by calling endProgressionEvent method during the game session (the call of endProgressionEvent method is not integrated; user unloaded the application from the device memory; there was an application crash) do not fall in the statistics.
Let’s analyse the example of event integration on match3 game with location map:
Method StartProgressionEvent when enetring the location
Method EndProgressionEvent when exiting (no matter if completed or not) the location
ProgressionEventParams class methods:
The user can be only in one location at the same time. When moving to another location (including embedded), the previous location must be completed. Information on locations, the passing of which was not completed by calling EndProgressionEvent method during the game session (the call of EndProgressionEvent method is not integrated; user unloaded the application from the device memory; there was an application crash) do not fall in the statistics.
Let’s analyse the example of event integration on match3 game with location map:
Method startProgressionEvent when enetring the location
Method endProgressionEvent when exiting (no matter if completed or not) the location
LocationEventParams class methods:
The user can be only in one location at the same time. When moving to another location (including embedded), the previous location must be completed. Information on locations, the passing of which was not completed by calling endProgressionEvent method during the game session (the call of endProgressionEvent method is not integrated; user unloaded the application from the device memory; there was an application crash) do not fall in the statistics.
Let’s analyse the example of event integration on match3 game with location map:
Method StartProgressionEvent when enetring the location
Method EndProgressionEvent when exiting (no matter if completed or not) the location
LocationEventParams class methods:
The user can be only in one location at the same time. When moving to another location (including embedded), the previous location must be completed. Information on locations, the passing of which was not completed by calling EndProgressionEvent method during the game session (the call of EndProgressionEvent method is not integrated; user unloaded the application from the device memory; there was an application crash) do not fall in the statistics.
Let’s analyse the example of event integration on match3 game with location map:
Method StartProgressionEvent when enetring the location
Blueprint
Field
Type
Description
locationName
FString
The name of location user entered
Attributes
Code
Method EndProgressionEvent when exiting (no matter if completed or not) the locationBlueprint
The user can be only in one location at the same time. When moving to another location (including embedded), the previous location must be completed. Information on locations, the passing of which was not completed by calling endProgressionEvent method during the game session (the call of endProgressionEvent method is not integrated; user unloaded the application from the device memory; there was an application crash) do not fall in the statistics.
Let’s analyse the example of event integration on match3 game with location map:
Player comes to the third location on the map “Village” while following the game map. Passing on the first level of difficulty. Before entering this location gamer passed the third location on the map “City”. .. Player passing the location. Player finishes passing of the third location on the map “Village”. The location is passed successfully. The passing took 389 seconds. Gamer finished the passing with 3 stars and gained 70 coins. While the passing gamer used boost and bought extra 5 turns.
Field
Type
Description
Field
Type
Description
/**
* The event allowing to track the stage of tutorial a player is on.
* @param NSUInteger tutorialStep - the latest successfully completed tutorial step.
*/
[DevToDev tutorialCompleted: (NSUInteger) tutorialStep];/**
* The event allowing to track the stage of tutorial a player is on.
* @param int tutorialStep - the latest successfully completed tutorial step.
*/
DevToDev.tutorialCompleted(int tutorialStep);/**
* <param name="state"> The latest successfully completed tutorial step </param>
*/
DevToDev.SDK.Tutorial(int state)/**
* The event allowing to track the stage of tutorial a player is on.
* @param {number} tutorialStep - the latest successfully completed tutorial step.
*/
devtodev.tutorialCompleted(tutorialStep);/// <summary> The event allowing to track the stage of tutorial a player is on. </summary>
/// <param name="tutorialStep"> The latest successfully completed tutorial step </param>
DevToDev.Analytics.Tutorial(int tutorialStep);


/**
* Register transactions made through the platform's payment system.
* <param name="orderId"> Transaction id </param>
* <param name="price"> Product price (in user's currency) </param>
* <param name="productId"> Product id (product name) </param>
* <param name="currencyCode"> Transaction currency (ISO 4217 format)</param>
*/
DevToDev.SDK.RealPayment(string orderId, float price, string productId, string currencyCode)DevToDev.SDK.RealPayment("1836535032137741465" , 2.99f , "productId" , "USD" );/**
* Register transactions made through the platform's payment system.
*
* @param {string} transactionId - transaction ID
* @param {number} productPrice - product price (in user's currency)
* @param {string} productName - product name
* @param {string} transactionCurrencyISOCode - transaction currency (ISO 4217 format)
*/
devtodev.realPayment(transactionId, productPrice, productName, transactionCurrencyISOCode);devtodev.realPayment("12345", 9.99, "Currency pack 2", "USD");/// <summary> Register transactions made through the platform's payment system. </summary>
/// <param name="paymentId"> Transaction id </param>
/// <param name="inAppPrice"> Product price (in user's currency) </param>
/// <param name="inAppName"> Product id (product name) </param>
/// <param name="inAppCurrencyISOCode"> Transaction currency (ISO 4217 format)</param>
DevToDev.Analytics.RealPayment(string paymentId, float inAppPrice, string inAppName,
string inAppCurrencyISOCode);/**
* Register transactions made through the platform's payment system.
*
* @param NSString * paymentId - transaction ID
* @param float inAppPrice - product price (in user's currency)
* @param NSString * inAppName - product name
* @param NSString * inAppCurrencyISOCode - transaction currency (ISO 4217 format)
*/
[DevToDev realPayment: (NSString *) transactionId withInAppPrice:(float) inAppPrice
andInAppName: (NSString *) inAppName andInAppCurrencyISOCode: (NSString *) inAppCurrencyISOCode];/**
* Register transactions made through the platform's payment system.
* @param paymentId - transaction ID
* @param inAppPrice - product price (in user's currency)
* @param inAppName - product name
* @param inAppCurrencyISOCode - transaction currency (ISO 4217 format)
*/
DevToDev.realPayment(paymentId:String, inAppPrice:Number, inAppName:String,
inAppCurrencyISOCode:String);/**
* In-app purchase with a definite article ID.
*
* @param purchaseId - unique purchase Id or name (max. 32 symbols)
* @param purchaseType - purchase type or group (max. 96 symbols)
* @param purchaseAmount - count of purchased goods
* @param purchasePrice - cost of purchased goods (total cost -if several goods were purchased)
* @param purchaseCurrency - currency name (max. 24 symbols)
*/
[DevToDev inAppPurchase: (NSString *) purchaseId withPurchaseType: (NSString *) purchaseType
andPurchaseAmount: (NSInteger) purchase Amount andPurchasePrice: (NSInteger) purchaseprice
andPurchaseCurrency: (NSString *) purchaseCurrency];NSMutableDictionary * resources = [[NSMutableDictionary alloc] init];
[resources setObject:@100 forKey:@"currency1"];
[resources setObject:@10 forKey:@"currency2"];
//...and so on...
[DevToDev inAppPurchase:(NSString )purchaseId withPurchaseType:(NSString )purchaseType
andPurchaseAmount:(NSInteger)purchaseAmount andResources: (NSDictionary *) resources];/**
* In-app purchase with a definite article ID.
* @param purchaseId - unique purchase Id or name (max. 32 symbols)
* @param purchaseType - purchase type or group (max. 96 symbols)
* @param purchaseAmount - count of purchased goods
* @param purchasePrice - cost of purchased goods (total cost - if several goods were purchased)
* @param purchaseCurrency - currency name (max. 24 symbols)
*/
DevToDev.inAppPurchase(purchaseId:String, purchaseType:String, purchaseAmount:int, purchasePrice:int,
purchaseCurrency:String);var resources: Dictionary = new Dictionary();
resources["currency_1"] = 120;
resources["currency_2"] = 29;
//...and so on...
DevToDev.inAppPurchaseWithResources(purchaseId:String, purchaseType:String, purchaseAmount:int,
resources:Dictionary);/// <param name="eventName"> Event name </param>
DevToDev.Analytics.CustomEvent(string eventName);DevToDev.CustomEventParams customEventParams = new DevToDev.CustomEventParams();
customEventParams.AddParam("double", 1.12);
customEventParams.AddParam("int", 145);
customEventParams.AddParam("long", 123L);
customEventParams.AddParam("string","start");/// <param name="eventName">Event name</param>
/// <param name="eventParams">Event parameters</param>
DevToDev.Analytics.CustomEvent(string eventName, DevToDev.CustomEventParams eventParams);/**
* @param String eventName - event name
*/
[DevToDev customEvent: (NSString *) eventName];CustomEventParams * params_1 = [[CustomEventParams alloc] init];
[params_1 putParam:@"date" withDate:[NSDate date]];
[params_1 putParam:@"double" withDouble:123.1231231231231];
[params_1 putParam:@"float" withFloat:123.123123f];
[params_1 putParam:@"int" withInt:123];
[params_1 putParam:@"long" withLong:6152437L];
[param_1 putParam:@"string" withString:@"string"];/**
* @param String eventName - event name
* @param CustomEventParams params - event parameters
*/
[DevToDev customEvent: (NSString *) eventName withParams: (CustomEventParams *) params];/**
* Simple custom event
* @param String eventName - event name
*/
DevToDev.customEvent(eventName:String);var params:CustomEventParams = new CustomEventParams();
/**
* String type custom event parameter
* @param paramName - parameter name
* @param value - parameter value
*/
params.putString(paramName:String , value:String);
//Integer type custom event parameter
params.putInt(paramName:String, 145:int);
//Number type custom event parameter
params.putFloat(paramName:String, 9.99:Number);/**
* Custom event with params
* @param eventName - event name
* @param params - event parameters
*/
DevToDev.customEventsWithParams(eventName:String, params:CustomEventParams);FAnalytics::Get().GetDefaultConfiguredProvider()->RecordEvent(const FString& EventName,
const TArray<FAnalyticsEventAttribute>& Attributes);/**
* The method have to be used when entering the location.
* @param String locationName - the name of location user entered.
* @param LocationEventParams params - instance of location parameters class
*/
DevToDev.startProgressionEvent(locationName, params);/**
* The method have to be used when the location passing is over.
* @param String locationName - the name of location user left.
* @param LocationEventParams params - instance of location parameters class
*/
DevToDev.endProgressionEvent(locationName, params);/**
* Location level of difficulty (optional).
* @param int difficultyLevel - level of difficulty
*/
setDifficulty(difficultyLevel);
/**
* Previously visited location (optional).
* @param String locationName - previously visited location name
*/
setSource(locationName);
/**
* State/result of the location passing (required).
* @param boolean isCompleted - true if location is successfuly passed
*/
setSuccessfulCompletion(isCompleted);
/**
* Time spent in the location (optional).
* In case the parameter is not specified by the developer, it will be automatically calculated
* as the date difference between startProgressionEvent and endProgressionEvent method calls.
* @param int duration - time in seconds
*/
setDuration(duration);
/**
* User spendings within the location passing (optional).
* @ param HashMap<String, Number> spent - user spendings. Key length max. 24 symbols.
*/
setSpent(spent);
/**
* User earnings within the location passing (optional).
* @param HashMap<String, Number> earned - user earnings. Key length max. 24 symbols.
*/
setEarned(earned);/**
* <param name="locationName">The name of location user entered</param>
* <param name="locationParams">Instance of location parameters class</param>
*/
DevToDev.SDK.StartProgressionEvent(string locationName, LocationEventParams locationParams);/**
* <param name="locationName">The name of location user entered</param>
* <param name="locationParams">Instance of location parameters class</param>
*/
DevToDev.SDK.EndProgressionEvent(string locationName, LocationEventParams locationParams); /**
* Location level of difficulty (optional).
* <param name="difficultyLevel">Level of difficulty</param>
*/
SetDifficulty(int difficultyLevel);
/**
* Previously visited location (optional).
* <param name="locationName">Previously visited location name</param>
*/
SetSource(string locationName);
/**
* State/result of the location passing (required).
* <param name="isCompleted">True if location is successfuly passed</param>
*/
SetSuccessfulCompletion(bool isCompleted);
/**
* Time spent in the location (optional).
* In case the parameter is not specified by the developer, it will be automatically calculated
* as the date difference between StartProgressionEvent and EndProgressionEvent method calls.
* <param name="duration">Time in seconds</param>
*/
SetDuration(long duration);
/**
* User spendings within the location passing (optional). Key (currency name) length max. 24 symbols.
* <param name="spent">User spendings</param>
*/
SetSpent(Dictionary<string, int> spent);
/**
* User earnings within the location passing (optional). Key (currency name) length max. 24 symbols.
* <param name="earned">User earnings</param>
*/
SetEarned(Dictionary<string, int> earned);/**
* The method have to be used when entering the location.
* @param {string} locationName - the name of location user entered.
* @param {Object} startParams - location parameters object
*/
devtodev.startProgressionEvent(locationName, startParams);/**
* The method have to be used when the location passing is over.
* @param {string} locationName - the name of location user left.
* @param {Object} endParams - location parameters object
*/
devtodev.endProgressionEvent(locationName, endParams); var params = {
// Previously visited location (optional).
"source" : "locationSource",
// Location level of difficulty (optional).
"difficulty" : 1,
// Time spent in the location (optional).
// In case the parameter is not specified by the developer, it will be automatically calculated
// as the date difference between startProgressionEvent and endProgressionEvent method calls.
"duration" : 80,
// State/result of the location passing (required).
"success" : true,
//User spendings within the location passing (optional).
"spent" : [
{
"currency": "currency 1 name", // Currency name length max. 24 symbols.
"amount": 1 // objects with amount value less than 1 are ignored
},
{
"currency": "currency 2 name",
"amount": 2
}
],
// User earnings within the location passing (optional).
"earned" : [
{
"currency": "currency 1 name",
"amount": 1 // objects with amount value less than 1 are ignored
},
{
"currency": "currency 2 name",
"amount": 2
}
]
};/// <param name="eventId"> The name of location user entered </param>
/// <param name="eventParams"> Instance of progression parameters class </param>
DevToDev.Analytics.StartProgressionEvent(string eventId, ProgressionEventParams eventParams);/// <param name="eventId"> The name of location user left </param>
/// <param name="eventParams"> Instance of progression parameters class </param>
DevToDev.Analytics.EndProgressionEvent(string eventId, ProgressionEventParams eventParams); /// <summary> Location level of difficulty (optional). </summary>
/// <param name="difficultyLevel"> Level of difficulty </param>
SetDifficulty(int difficultyLevel);
/// <summary> Previously visited location (optional). </summary>
/// <param name="locationName"> Previously visited location name </param>
SetSource(string locationName);
/// <summary> State/result of the location passing (required). </summary>
/// <param name="isCompleted"> True if location is successfuly passed </param>
SetSuccessfulCompletion(bool isCompleted);
/// <summary>Time spent in the location (optional).
/// <para>In case the parameter is not specified by the developer, it will be automatically calculated
/// as the date difference between StartProgressionEvent and EndProgressionEvent method calls.</para>
/// </summary>
/// <param name="duration"> Time in seconds </param>
SetDuration(long duration);
/// <summary> User spendings within the location passing (optional). Dictionary key max.length is 24 symbols.</summary>
/// <param name="spent"> User spendings </param>
SetSpent(Dictionary<string, int> spent);
/// <summary> User earnings within the location passing (optional). </summary>
/// <param name="earned"> User earnings </param>
SetEarned(Dictionary<string, int> earned);/**
* The method have to be used when entering the location.
* @param String locationName - the name of location user entered.
* @param LocationEventParams params - instance of location parameters class
*/
[DevToDev startProgressionEvent: locationName withParameters: params];/**
* The method have to be used when the location passing is over.
* @param String locationName - the name of location user left.
* @param LocationEventParams params - instance of location parameters class
*/
[DevToDev endProgressionEvent: locationName withParameters: params];/**
* Location level of difficulty (optional).
* @param NSInteger difficultyLevel - level of difficulty
*/
[params setDifficulty: difficultyLevel];
/**
* Previously visited location (optional).
* @param NSString* locationName - previously visited location name
*/
[params setSource: locationName];
/**
* State/result of the location passing (required).
* @param BOOL isCompleted - true if location is successfuly passed
*/
[params setIsSuccess: isCompleted];
/**
* Time spent in the location (optional).
* In case the parameter is not specified by the developer, it will be automatically calculated
* as the date difference between startProgressionEvent and endProgressionEvent method calls.
* @param NSNumber* duration - time in seconds
*/
[params setDuration: duration];
/**
* User spendings within the location passing (optional).
* @ param NSDictionary* spent - user spendings. Key max.length is 24 symbols.
*/
[params setSpent: spent];
/**
* User earnings within the location passing (optional).
* @param NSDictionary* earned - user earnings. Key max.length is 24 symbols.
*/
[params setEarned: earned];/**
* The method have to be used when entering the location.
* @param locationName - the name of location user entered.
* @param params - instance of location parameters class
*/
DevToDev.StartProgressionEvent(locationName:String, params:LocationEventParams);/**
* The method have to be used when the location passing is over.
* @param locationName - the name of location user left.
* @param params - instance of location parameters class
*/
DevToDev.EndProgressionEvent(locationName:String, params:LocationEventParams); /**
* Location level of difficulty (optional).
* @param difficultyLevel - level of difficulty
*/
SetDifficulty(difficultyLevel:int);
/**
* Previously visited location (optional).
* @param locationName - previously visited location name
*/
SetSource(locationName:String);
/**
* State/result of the location passing (required).
* @param isCompleted - true if location is successfuly passed
*/
SetSuccessfulCompletion(isCompleted:Boolean);
/**
* Time spent in the location (optional).
* In case the parameter is not specified by the developer, it will be automatically calculated
* as the date difference between StartProgressionEvent and EndProgressionEvent method calls.
* @param duration - time in seconds
*/
SetDuration(duration:int);
/**
* User spendings within the location passing (optional).
* @ param spent - user spendings. Key max.length is 24 symbols.
*/
SetSpent(spent:Dictionary);
/**
* User earnings within the location passing (optional).
* @param earned - user earnings. Key max.length is 24 symbols.
*/
SetEarned(earned:Dictionary);/**
* The event allowing to track the stage of tutorial a player is on.
* @param NSUInteger tutorialStep - the latest successfully completed tutorial step.
*/
[DevToDev tutorialCompleted: (NSUInteger) tutorialStep];/**
* The event allowing to track the stage of tutorial a player is on.
* @param tutorialStep - the latest successfully completed tutorial step.
*/
DevToDev.tutorialCompleted(tutorialStep:int);/**
* Player has reached a new level
* @param NSInteger level - level reached by the player.
*/
[DevToDev levelUp: (NSInteger) level];/**
* Player has reached a new level
* @param int level - level reached by the player.
*/
DevToDev.levelUp(int level);/**
* <param name="level"> Level reached by the player </param>
*/
DevToDev.SDK.Level(int level);/**
* Player has reached a new level
* @param {number} level - level reached by the player.
*/
devtodev.levelUp(level);/// <summary> Player has reached a new level </summary>
/// <param name="level"> Level reached by the player </param>
DevToDev.Analytics.LevelUp(int level);/**
* Player has reached a new level
* @param NSUInteger level - level reached by the player.
*/
[DevToDev levelUp: (NSUInteger) level];/**
* Player has reached a new level
* @param level - level reached by the player.
*/
DevToDev.levelUp(level:int);/**
* Player has reached a new level
* @param NSInteger level - level reached by the player.
* @param NSDictionary resources - dictionary with the currency names and amounts
*/
NSDictionary * resources = @{@"Currency name 1" : @100, @"Currency name 2" : @10};
[DevToDev levelUp: (NSUInteger) level withResources: withResources: (NSDictionary *) resources];/**
* @param int level - level reached by the player
* @param HashMap resources - hashmap with the currency names and amounts
*/
HashMap resources = new HashMap<String, Integer>();
resources.put("Currency name 1", 1000);
resources.put("Currency name 2", 10);
DevToDev.levelUp(level, resources);/**
* <param name="level"> Player level </param>
* <param name="resources">Dictionary with the currency names and amounts</param>
*/
Dictionary<string, int> resources = new Dictionary<string, int>();
resources.Add("Currency name 1", 1000);
resources.Add("Currency name 2", 10);
DevToDev.SDK.Level(level, resources);/**
* @param {number} level - player/character's "level"
* @param {Object} resources - Object with data about currencies. Optional.
* @param {Object[]} resources.balance - Account balance of in-game currency by the end of level. * Optional.
* @param {Object[]} resources.balance[].currency - Game currency name
* @param {Object[]} resources.balance[].amount - Game currency amount
* @param {Object[]} resources.earned - Game currency earned during the level. Optional.
* @param {Object[]} resources.earned[].currency - Game currency name
* @param {Object[]} resources.earned[].amount - Game currency amount
* @param {Object[]} resources.spent - Game currency amount spent during the level. Optional.
* @param {Object[]} resources.spent[].currency - Game currency name
* @param {Object[]} resources.spent[].amount - Game currency amount
* @param {Object[]} resources.bought - Game currency amount bought during the level. Optional.
* @param {Object[]} resources.bought[].currency - Game currency name
* @param {Object[]} resources.bought[].amount - Game currency amount
*/
devtodev.levelUp(level, resources);/// <summary> Player has reached a new level</summary>
/// <param name="level"> Player level </param>
/// <param name="resources"> Dictionary with the currency names and amounts </param>
/// <example>
///
/// Dictionary<string, int> resources = new Dictionary<string, int>();
/// resources.Add("Currency name 1", 1000);
/// resources.Add("Currency name 2", 10);
///
/// </example>
DevToDev.Analytics.LevelUp(level, resources);/**
* Player has reached a new level
* @param NSInteger level - level reached by the player.
* @param NSDictionary resources - dictionary with the currency names and amounts
*/
NSDictionary * resources = @{@"Currency name 1" : @100, @"Currency name 2" : @10};
[DevToDev levelUp: (NSUInteger) level withResources: withResources: (NSDictionary *) resources];/**
* Player has reached a new level
* @param level - level reached by the player.
* @param resources - dictionary with the currency names and amounts
*/
var resources: Dictionary = new Dictionary();
resources["Currency name 1"] = 1000;
resources["Currency name 2"] = 10;
DevToDev.levelUpWithResources(level:int, resources:Dictionary);/* *
* @param NSString * currencyName - currency name (max. 24 symbols)
* @param NSInteger amount - the amount an account has been credited with.
* @param AccrualType accrualType - the way the currency was obtained: earned or purchased
*/
[DevToDev currencyAccrual: (NSInteger) amount withCurrencyName: (nonnull NSString *) currencyName
andCurrencyType: (AccrualType) accrualType];/**
* @param String currencyName - currency name (max. 24 symbols)
* @param float currencyAmount - the amount an account has been credited with
* @param AccrualType accrualType - the way the currency was obtained: earned or purchased
*/
DevToDev.currencyAccrual(currencyName, currencyAmount, accrualType);/**
* <param name="currencyName">Currency name (max. 24 symbols)</param>
* <param name="currencyAmount ">The amount an account has been credited with</param>
* <param name="accrualType">The way the currency was obtained: earned or purchased</param>
*/
DevToDev.SDK.CurrencyAccrual(string currencyName, float currencyAmount, AccrualType accrualType);/// <param name="currencyName"> Currency name (max. 24 symbols) </param>
/// <param name="currencyAmount "> The amount an account has been credited with </param>
/// <param name="accrualType"> The way the currency was obtained: earned or purchased </param>
DevToDev.Analytics.CurrencyAccrual(int amount, string currencyName, AccrualType accrualType);/**
* @param NSString * currencyName - currency name (max. 24 symbols)
* @param float amount - the amount an account has been credited with.
* @param AccrualType accrualType - the way the currency was obtained: earned or purchased
*/
/* *
* @param NSString * currencyName - currency name (max. 24 symbols)
* @param NSInteger amount - the amount an account has been credited with.
* @param AccrualType accrualType - the way the currency was obtained: earned or purchased
*/
[DevToDev currencyAccrual: (NSInteger) amount withCurrencyName: (nonnull NSString *) currencyName
andCurrencyType: (AccrualType) accrualType];/**
* @param currencyName - currency name (max. 24 symbols)
* @param currencyAmount - the amount an account has been credited with
* @param accrualType - the way the currency was obtained: earned or purchased
*/
DevToDev.currencyAccrual(currencyName:String, currencyAmount:Number, accrualType:AccrualType);typedef enum {
Earned,
Purchased
} AccrualType ;public enum AccrualType {
Earned,
Purchased
};public enum AccrualType {
Earned,
Purchased
};public enum AccrualType {
Earned,
Purchased
};typedef enum {
Earned,
Purchased
} AccrualType;AccrualType.EARNED;
AccrualType.PURCHASED;/**
* Register transactions made through the platform's payment system.
*
* @param NSString * paymentId - transaction ID (max. 64 symbols)
* @param float inAppPrice - product price (in user's currency)
* @param NSString * inAppName - product name
* @param NSString * inAppCurrencyISOCode - transaction currency (ISO 4217 format)
*/
[DevToDev realPayment: (NSString *) transactionId withInAppPrice:(float) inAppPrice
andInAppName: (NSString *) inAppName andInAppCurrencyISOCode: (NSString *) inAppCurrencyISOCode];/**
* Register transactions made through the platform's payment system.
*
* @param String paymentId - transaction ID (max. 64 symbols)
* @param float inAppPrice - product price (in user's currency)
* @param String inAppName - product name
* @param String inAppCurrencyISOCode - transaction currency
* (ISO 4217 format http://www.iso.org/iso/home/standards/currency_codes.htm Exapmle: "USD")
*/
DevToDev.realPayment(String paymentId, float inAppPrice, String inAppName,
String inAppCurrencyISOCode);/**
* In-app purchase with a definite article ID.
*
* @param NSString purchaseId - unique purchase Id or name (max. 32 symbols)
* @param NSString purchaseType - purchase type or group (max. 96 symbols)
* @param NSInteger purchaseAmount - count of purchased goods
* @param NSInteger purchasePrice - cost of purchased goods (total cost -if several goods were purchased)
* @param NSString purchaseCurrency - currency name (max. 24 symbols)
*/
[DevToDev inAppPurchase: (NSString *) purchaseId withPurchaseType: (NSString *) purchaseType
andPurchaseAmount: (NSInteger) purchase Amount andPurchasePrice: (NSInteger) purchaseprice
andPurchaseCurrency: (NSString *) purchaseCurrency];NSMutableDictionary * resources = [[NSMutableDictionary alloc] init];
[resources setObject:@100 forKey:@"currency1"];
[resources setObject:@10 forKey:@"currency2"];
//...and so on...
[DevToDev inAppPurchase:(NSString )purchaseId withPurchaseType:(NSString )purchaseType
andPurchaseAmount:(NSInteger)purchaseAmount andResources: (NSDictionary *) resources];/**
* In-app purchase with a definite article ID.
*
* @param purchaseId - unique purchase Id or name (max. 32 symbols)
* @param purchaseType - purchase type or group (max. 96 symbols)
* @param purchaseAmount - count of purchased goods
* @param purchasePrice - cost of purchased goods (total cost - if several goods were purchased)
* @param purchaseCurrency - currency name (max. 24 symbols)
*/
DevToDev.inAppPurchase(String purchaseId, String purchaseType, int purchaseAmount,
int purchasePrice, String purchaseCurrency);HashMap resources = new HashMap();
resources.put("currency_1", 120);
resources.put("currency_2", 29);DevToDev.inAppPurchase(String purchaseId, String purchaseType, int purchaseAmount, HashMap resources);/**
* <param name="purchaseId"> Unique purchase ID or name (max. 32 symbols)</param>
* <param name="purchaseType"> Purchase type or group (max. 96 symbols)</param>
* <param name="purchaseAmount"> Number of purchased goods </param>
* <param name="purchasePrice"> Cost of purchased goods (total cost - if several goods were purchased)</param>
* <param name="purchasePriceCurrency"> Currency name (max. 24 symbols)</param>
*/
DevToDev.SDK.InAppPurchase(string purchaseId, string purchaseType, int purchaseAmount,
int purchasePrice, string purchasePriceCurrency)DevToDev.SDK.InAppPurchase("sword", "weapons", 1, 200, "coins");Dictionary<string, int> resources = new Dictionary<string, int>();
resources.Add("currency_1", 120);
resources.Add("currency_2", 29);
//...and so on...
DevToDev.SDK.InAppPurchase(string purchaseId, string purchaseType, int purchaseAmount,
Dictionary<string, int> resources);/**
* Tracks in-app purchases.
*
* @param {string} purchaseId - unique purchase Id or name (max. 32 symbols)
* @param {string} purchaseType - purchase type or group (max. 96 symbols)
* @param {number} purchaseAmount - count of purchased goods
* @param {Object[]} purchasePrice - array including the names and amounts of
* the paid currencies (total cost - if several goods were purchased)
* @param {string} purchasePrice[].currency - game currency name
* @param {number} purchasePrice[].amount - currency amount
*/
devtodev.inAppPurchase(purchaseId, purchaseType, purchaseAmount, purchasePrice);var purchasePrice = [
{
“currency” : "coins", //game currency name
“amount” : 1000 //game currency amount
},
{
“currency” : "gold", //game currency name
“amount” : 10 //game currency amount
}
];
devtodev.inAppPurchase(“cloak”, “clothes”, 1, purchasePrice);/// <summary> In-app purchase with a definite ID. </summary>
/// <param name="purchaseId"> Unique purchase ID or name (max. 32 symbols)</param>
/// <param name="purchaseType"> Purchase type or group (max. 96 symbols)</param>
/// <param name="purchaseAmount"> Number of purchased goods </param>
/// <param name="purchasePrice"> Cost of purchased goods (total cost - if several goods were purchased)</param>
/// <param name="purchasePriceCurrency"> Currency name (max. 24 symbols)</param>
DevToDev.Analytics.InAppPurchase(string purchaseId, string purchaseType, int purchaseAmount,
int purchasePrice, string purchaseCurrency);Dictionary<string, int> resources = new Dictionary<string, int>();
resources.Add("currency_1", 120);
resources.Add("currency_2", 29);
//...and so on...
DevToDev.Analytics.InAppPurchase(string purchaseId, string purchaseType, int purchaseAmount,
Dictionary<string, int> resources);/**
* @param NSString eventName - event name
*/
[DevToDev customEvent: (NSString *) eventName];CustomEventParams * params_1 = [[CustomEventParams alloc] init];
[params_1 putParam:@"double" withDouble:123.1231231231231];
[params_1 putParam:@"float" withFloat:123.123123f];
[params_1 putParam:@"int" withInt:123];
[params_1 putParam:@"long" withLong:6152437L];
[param_1 putParam:@"string" withString:@"string"];/**
* @param NSString eventName - event name
* @param CustomEventParams params - event parameters
*/
[DevToDev customEvent: (NSString *) eventName withParams: (CustomEventParams *) params];/**
* Simple custom event
* @param String eventName - event name
*/
DevToDev.customEvent(eventName);CustomEventParams params = new CustomEventParams();
params.putDouble("double", 1.12);
params.putFloat("float", 9.99f);
params.putInteger("int", 145);
params.putLong("long", 123L);
params.putString("string","start");/**
* Custom event with params
* @param String eventName - event name
* @param CustomEventParams params - event parameters
*/
DevToDev.customEvent(eventName, params);/**
* <param name="eventName"> Event name </param>
*/
DevToDev.SDK.CustomEvent(string eventName);DevToDev.SDK.CustomEvent("bonus_used");/**
* <param name="eventName">Event name</param>
* <param name="eventParams">Event parameters</param>
*/
DevToDev.SDK.CustomEvent(string eventName, CustomEventParams eventParams)var cep = new CustomEventParams();
cep.AddParam("bonus_name", "your_awesome_bonus");
DevToDev.SDK.CustomEvent("bonus_used", cep);/**
* Tracks custom events.
* @param {string} eventName - event name
**/
devtodev.customEvent(eventName);/**
* Tracks custom events.
* @param {string} eventName - event name (max. 72 symbols)
* @param {Object[]} params - array of event parameters. Up to 20 params.
* @param {string} params[].name - parameter name (max. 32 symbols)
* @param {string} params[].type - parameter value type. Can be "double" or "string".
* @param {string|number} params[].value - parameter value. (max. 255 symbols)
**/
devtodev.customEvent(eventName, params);var params = [
{
"name": "score",
"type": "double",
"value": 100500,
},
{
"name": "type",
"type": "string",
"value": "fatality",
},
… //up to 10 parameters.
];
devtodev.customEvent("win", params);/**
* The method have to be used when entering the location.
* @param String locationName - the name of location user entered.
* @param LocationEventParams params - instance of location parameters class
*/
[DevToDev startProgressionEvent: locationName withParameters: params];/**
* The method have to be used when the location passing is over.
* @param String locationName - the name of location user left.
* @param LocationEventParams params - instance of location parameters class
*/
[DevToDev endProgressionEvent: locationName withParameters: params]; /**
* Location level of difficulty (optional).
* @param NSInteger difficultyLevel - level of difficulty
*/
[params setDifficulty: difficultyLevel];
/**
* Previously visited location (optional).
* @param NSString* locationName - previously visited location name
*/
[params setSource: locationName];
/**
* State/result of the location passing (required).
* @param BOOL isCompleted - true if location is successfuly passed
*/
[params setIsSuccess: isCompleted];
/**
* Time spent in the location (optional).
* In case the parameter is not specified by the developer, it will be automatically calculated
* as the date difference between startProgressionEvent and endProgressionEvent method calls.
* @param NSNumber* duration - time in seconds
*/
[params setDuration: duration];
/**
* User spendings within the location passing (optional).
* @ param NSDictionary* spent - user spendings. Key length max. 24 symbols.
*/
[params setSpent: spent];
/**
* User earnings within the location passing (optional).
* @param NSDictionary* earned - user earnings. Key length max. 24 symbols.
*/
[params setEarned: earned];// The event allowing to track the stage of tutorial a player is on.
// int32 step - the latest successfully completed tutorial step.
UDevToDevBlueprintFunctionLibrary::TutorialCompleted(int32 step);// Player has reached a new level
// int32 level - level reached by the player.
UDevToDevBlueprintFunctionLibrary::LevelUp(int32 level);// Player has reached a new level
// int32 level - level reached by the player.
// TArray<FAnalyticsEventAttr> Attributes - dictionary with the currency names and amounts
UDevToDevBlueprintFunctionLibrary::LevelUpWithAttributes(int32 level,
const TArray<FAnalyticsEventAttr>& Attributes);FAnalytics::Get().GetDefaultConfiguredProvider()->RecordCurrencyGiven(const FString& GameCurrencyType,
int GameCurrencyAmount,
const TArray<FAnalyticsEventAttribute>& EventAttrs);// Player comes to the third location on the map "Village" while following the game map.
// Create a parameters object
LocationEventParams* params = [[LocationEventParams alloc] init];
// Specify the known location parameters:
// Passing on the first level of difficulty.
[params setDifficulty:1];
// Before entering this location gamer passed the third location on the map “Village” (optional).
[params setSource: @"Vilage step 02"];
//The location passing starts (required).
[DevToDev startProgressionEvent:@"Vilage step 03" withParameters:params];
// ... Player passing the location.
// Player finishes passing of the third location on the map “Village”
// The location is passed successfully (required).
[params setIsSuccess: YES];
// The passing took 189 seconds.
[params setDuration:@189];
// Location is passed for 54 turns. While the passing gamer used boost and bought extra 5 turns.
NSDictionary* spent = @{
@"Turns" : @54,
@"Boost Bomb" : @1,
@"Extra 5 Turns" : @1
};
[params setSpent: spent];
// Gamer finished the passing with 3 stars and gained 5 coins and 1200 score.
NSDictionary* earned = @{
@"Stars" : @3,
@"Score" : @1200,
@"Coins" : @5
};
[params setEarned: earned];
// The location passing is over (required).
[DevToDev endProgressionEvent: @"Vilage step 03" withParameters: params];

Earned
TArray<FAnalyticsEventAttr>
User earnings within the location passing (optional). Key max. length is 24 symbols.
Spent
TArray<FAnalyticsEventAttr>
User spendings within the location passing (optional). Key max. length is 24 symbols.
Location parameters
Key
Type
Description
success
bool
State/result of the location passing (required).
source
FString
Previously visited location (optional).
difficulty
int32
Location level of difficulty (optional).
duration
Code
FString
Product name
In App Currency ISOCode
FString
Transaction currency (ISO 4217 format)
int32
Count of purchased goods
Field
Type
Description
purchaseType
FString
Purchase type or group (max. 96 symbols)
purchasePrice
int32
Cost of purchased goods (total cost -if several goods were purchased)
purchaseCurrency
FString
Currency name (max. 24 symbols)
TArray<FAnalyticsEventAttr>
Location parameters
Field
Type
Description
locationName
FString
The name of location user left
Attributes
TArray<FAnalyticsEventAttr>
Location parameters
// Register transactions made through the platform's payment system.
// FString transactionId - transaction ID
// float inAppPrice - product price (in user's currency)
// FString inAppName - product name
// FString inAppCurrencyISOCode - transaction currency (ISO 4217 format)
UDevToDevBlueprintFunctionLibrary::RealPayment(const FString& transactionId,
float inAppPrice,
const FString& inAppName,
const FString& inAppCurrencyISOCode);// In-app purchase with a definite article ID.
// FString ItemId - unique purchase Id or name (max. 32 symbols)
// int32 ItemQuantity - count of purchased goods
//
// FString purchaseType - purchase type or group (max. 96 symbols)
// int32 purchasePrice - cost of purchased goods (total cost -if several goods were purchased)
// FString purchaseCurrency - currency name (max. 24 symbols)
FAnalytics::Get().GetDefaultConfiguredProvider()->RecordItemPurchase(const FString& ItemId,
int ItemQuantity,
const TArray<FAnalyticsEventAttribute>& Attributes);// Player comes to the third location on the map "Village" while following the game map.
// Create a parameters object
LocationEventParams params = new LocationEventParams();
// Specify the known location parameters:
// Passing on the first level of difficulty.
params.setDifficulty(1);
// Before entering this location gamer passed the third location on the map “Village” (optional).
params.setSource("Vilage step 02");
//The location passing starts (required).
DevToDev.startProgressionEvent("Vilage step 03", params);
// ... Player passing the location.
// Player finishes passing of the third location on the map “Village”
// The location is passed successfully (required).
params.setSuccessfulCompletion(true);
// The passing took 189 seconds.
params.setDuration(189);
// Location is passed for 54 turns. While the passing gamer used boost and bought extra 5 turns.
HashMap<String, Number> spent = new HashMap<String, Number>();
spent.put("Turns", 54);
spent.put("Boost Bomb", 1);
spent.put("Extra 5 Turns", 1);
params.setSpent(spent);
// Gamer finished the passing with 3 stars and gained 5 coins and 1200 score.
HashMap<String, Number> earned = new HashMap<String, Number>();
earned.put("Stars", 3);
earned.put("Score", 1200 );
earned.put("Coins", 5);
params.setEarned(earned);
// The location passing is over (required).
DevToDev.endProgressionEvent("Vilage step 03", params);// Player comes to the third location on the map "Village" while following the game map.
// Create a parameters object
LocationEventParams locationParams = new LocationEventParams();
// Specify the known location parameters:
// Passing on the first level of difficulty.
locationParams.SetDifficulty(1);
// Before entering this location gamer passed the third location on the map “Village” (optional).
locationParams.SetSource("Vilage step 02");
//The location passing starts (required).
DevToDev.SDK.StartProgressionEvent("Vilage step 03", locationParams);
// ... Player passing the location.
// Player finishes passing of the third location on the map “Village”
LocationEventParams locationParams = new LocationEventParams();
// The location is passed successfully (required).
locationParams.SetSuccessfulCompletion(true);
// The passing took 189 seconds.
locationParams.SetDuration(189);
// Location is passed for 54 turns. While the passing gamer used boost and bought extra 5 turns.
Dictionary<string, int> spent = new Dictionary<string, int>();
spent["Turns"] = 54;
spent["Boost Bomb"] = 1;
spent["Extra 5 Turns"] = 1;
locationParams.SetSpent(spent);
// Gamer finished the passing with 3 stars and gained 5 coins and 1200 score.
Dictionary<string, int> earned = new Dictionary<string, int>();
earned["Stars"] = 3;
earned["Score"] = 1200;
earned["Coins"] = 5;
locationParams.SetEarned(earned);
// The location passing is over (required).
DevToDev.SDK.EndProgressionEvent("Vilage step 03", locationParams);// Player comes to the third location on the map "Village" while following the game map.
// Create a parameters object
var params = {};
// Specify the known location parameters:
// Passing on the first level of difficulty.
params["difficulty"] = 1;
// Before entering this location gamer passed the third location on the map “Village” (optional).
params["source"] = "Vilage step 02";
//The location passing starts (required).
devtodev.startProgressionEvent("Vilage step 03", params);
// ... Player passing the location.
// Player finishes passing of the third location on the map “Village”
// The location is passed successfully (required).
params["success"] = true;
// The passing took 189 seconds.
params["duration"] = 189;
// Location is passed for 54 turns. While the passing gamer used boost and bought extra 5 turns.
params["spent"] = [
{
"currency": "Turns",
"amount": 54
},
{
"currency": "Boost Bomb",
"amount": 1
},
{
"currency": "Extra 5 Turns",
"amount": 1
}
];
// Gamer finished the passing with 3 stars and gained 5 coins and 1200 score.
params["earned"] = [
{
"currency": "Stars",
"amount": 3
},
{
"currency": "Score",
"amount": 1200
},
{
"currency": "Coins",
"amount": 5
}
];
// The location passing is over (required).
devtodev.endProgressionEvent("Vilage step 03", params);// Player comes to the third location on the map "Village" while following the game map.
// Create a parameters object
ProgressionEventParams locationParams = new ProgressionEventParams();
// Specify the known location parameters:
// Passing on the first level of difficulty.
locationParams.SetDifficulty(1);
// Before entering this location gamer passed the third location on the map “Village” (optional).
locationParams.SetSource("Vilage step 02");
//The location passing starts (required).
DevToDev.Analytics.StartProgressionEvent("Vilage step 03", locationParams);
// ... Player passing the location.
// Player finishes passing of the third location on the map “Village”
// Create a parameters object
ProgressionEventParams locationParams = new ProgressionEventParams();
// The location is passed successfully (required).
locationParams.SetSuccessfulCompletion(true);
// The passing took 189 seconds.
locationParams.SetDuration(189);
// Location is passed for 54 turns. While the passing gamer used boost and bought extra 5 turns.
Dictionary<string, int> spent = new Dictionary<string, int>();
spent["Turns"] = 54;
spent["Boost Bomb"] = 1;
spent["Extra 5 Turns"] = 1;
locationParams.SetSpent(spent);
// Gamer finished the passing with 3 stars and gained 5 coins and 1200 score.
Dictionary<string, int> earned = new Dictionary<string, int>();
earned["Stars"] = 3;
earned["Score"] = 1200;
earned["Coins"] = 5;
locationParams.SetEarned(earned);
// The location passing is over (required).
DevToDev.Analytics.EndProgressionEvent("Vilage step 03", locationParams);// Player comes to the third location on the map "Village" while following the game map.
// Create a parameters object
LocationEventParams* params = [[LocationEventParams alloc] init];
// Specify the known location parameters:
// Passing on the first level of difficulty.
[params setDifficulty:1];
// Before entering this location gamer passed the third location on the map “Village” (optional).
[params setSource: @"Vilage step 02"];
//The location passing starts (required).
[DevToDev startProgressionEvent:@"Vilage step 03" withParameters:params];
// ... Player passing the location.
// Player finishes passing of the third location on the map “Village”
// The location is passed successfully (required).
[params setIsSuccess: YES];
// The passing took 189 seconds.
[params setDuration:@189];
// Location is passed for 54 turns. While the passing gamer used boost and bought extra 5 turns.
NSDictionary* spent = @{
@"Turns" : @54,
@"Boost Bomb" : @1,
@"Extra 5 Turns" : @1
};
[params setSpent: spent];
// Gamer finished the passing with 3 stars and gained 5 coins and 1200 score.
NSDictionary* earned = @{
@"Stars" : @3,
@"Score" : @1200,
@"Coins" : @5
};
[params setEarned: earned];
// The location passing is over (required).
[DevToDev endProgressionEvent: @"Vilage step 03" withParameters: params];// Player comes to the third location on the map "Village" while following the game map.
// Create a parameters object
var params:LocationEventParams = new LocationEventParams();
// Specify the known location parameters:
// Passing on the first level of difficulty.
params.SetDifficulty(1);
// Before entering this location gamer passed the third location on the map “Village” (optional).
params.SetSource("Vilage step 02");
//The location passing starts (required).
DevToDev.StartProgressionEvent("Vilage step 03", params);
// ... Player passing the location.
// Player finishes passing of the third location on the map “Village”
var params:LocationEventParams = new LocationEventParams();
// The location is passed successfully (required).
params.SetSuccessfulCompletion(true);
// The passing took 189 seconds.
params.SetDuration(189);
// Location is passed for 54 turns. While the passing gamer used boost and bought extra 5 turns.
var spent:Dictionary = new Dictionary();
spent["Turns"] = 54;
spent["Boost Bomb"] = 1;
spent["Extra 5 Turns"] = 1;
params.SetSpent(spent);
// Gamer finished the passing with 3 stars and gained 5 coins and 1200 score.
var earned:Dictionary = new Dictionary();
earned["Stars"] = 3;
earned["Score"] = 1200;
earned["Coins"] = 5;
params.SetEarned(earned);
// The location passing is over (required).
DevToDev.EndProgressionEvent("Vilage step 03", params);// The method have to be used when entering the location.
// FString locationName - the name of location user entered.
// TArray<FAnalyticsEventAttr> Attributes - location parameters
UDevToDevBlueprintFunctionLibrary::StartProgressionEvent(const FString& locationName,
const TArray<FAnalyticsEventAttr>& Attributes);// The method have to be used when the location passing is over.
// FString locationName - the name of location user left.
// TArray<FAnalyticsEventAttr> Attributes - location parameters
// TArray<FAnalyticsEventAttr> Earned - user earnings within the location passing (optional)
// TArray<FAnalyticsEventAttr> Spent - user spendings within the location passing (optional).
UDevToDevBlueprintFunctionLibrary::EndProgressionEvent(const FString& locationName,
const TArray<FAnalyticsEventAttr>& Attributes,
const TArray<FAnalyticsEventAttr>& Earned,
const TArray<FAnalyticsEventAttr>& Spent);int32
Time spent in the location (optional). In case the parameter is not specified by the developer, it will be automatically сalculated as the date difference between Start Progression Event and End Progression Event method calls.


