Loading...
Loading...
Loading...
Loading...
Loading...
Loading...
Loading...
Loading...
Loading...
Loading...
Loading...
Loading...
Loading...
Loading...
Loading...
Loading...
Loading...
Loading...
Loading...
Loading...
Loading...
Loading...
Loading...
Loading...
Loading...
Loading...
Loading...
Loading...
Loading...
Loading...
Loading...
Loading...
Loading...
Loading...
Loading...
Loading...
Loading...
Loading...
Loading...
Loading...
Loading...
Loading...
Loading...
Loading...
Loading...
Loading...
Loading...
Loading...
Loading...
Loading...
Loading...
Loading...
Loading...
Loading...
Loading...
Loading...
Loading...
Loading...
Loading...
Loading...
Loading...
Loading...
Loading...
Loading...
Loading...
Loading...
Loading...
Loading...
Loading...
Loading...
Loading...
Loading...
Loading...
Loading...
Loading...
Loading...
Loading...
Loading...
Loading...
Loading...
Loading...
Loading...
Loading...
Loading...
Loading...
Loading...
Loading...
Loading...
Loading...
Loading...
Loading...
Loading...
Loading...
Loading...
Loading...
Loading...
Loading...
Loading...
Loading...
Loading...
devtodev documentation helps you to gain in-depth knowledge of the product and use all opportunities offered by the platform.
Changelog for WEB SDK
Added A/B test functionality (Beta).
, which carry information about the user's personal data, are excluded from the SDK.
Visit our website www.devtodev.com and click Get started.
Fill out the registration form.
You will receive an email to confirm your registration.
Here are some of the new features you might have missed.
Released: 28/11/2025
Quickly find out the meaning behind an event. In Conversion funnels report, hover over an event or a parameter, and a description will appear. If you do not have any event descriptions yet, you can add them manually or generate them using AI in Tuning -> Custom event configurations.
Space is an information field where you will work. Later on, you will add your application to the space.
Click Create Space.
To create a space, you need to fill in:
Here are some simple steps to start using our service:


Released: 01/10/2025
We've updated our Payment structure report and added a Purchased items tab. Check this report to quickly identify poorly performing items and change your monetization accordingly.
If available, this report uses automatically tracked refund data (see setup requirements).
Released: 01/10/2025
Before you could check tutorial events only with a Status parameter: started, finished or skipped. We've added a Step parameter so you can select and analyse the exact steps of your tutorial in Custom events and Funnels reports. This allows for a more detailed FTUE analysis.
Released: 29/09/2025
By default, you can see the Total values for selected events above the chart. Previously this field was available only for table views. We've added a Show total button so you can hide this information block.
Total values are available in Basic Metrics for projects and Space.
Released: 16/09/2025
With the help of remote configuration you can:
Change app behavior for all users or just for a specific audience.
Conduct A/B tests to compare different configurations on the same audience and find the best-performing one.
With the introduction of remote configuration we've also simplified the A/B test integration.
Released: 16/09/2025
We've collaborated with Aghanim and added a new way to track payments automatically. After everything is set up, Aghanim will send Real Payment events to devtodev via API and we'll match them to users.
Released: 01/09/2025
Quickly find out the meaning behind an event. In Custom events report, hover over an event or a parameter, and a description will appear. If you do not have any event descriptions yet, you can add them manually or generate them using AI in Tuning -> Custom event configurations.
Released: 07/08/2025
An addition to our Automatic payments tracking – now you can also get refunds data automatically with a simple setup in devtodev settings. This integration allows you to receive data from App Store and Google Play.
Released: 17/07/2025
We've added more integrations for our Cohort export feature. Create segments in devtodev and engage with users using personalised communication.
Released: 17/06/2025
If you are using AI coding agents, you can try our new AI-assisted integration process. The AI will analyse your app code, suggest the necessary events and help you integrate devtodev SDK quickly.
Currently this option is available for Unity projects but we are working on extending the list of platforms.
Feel free to send us feedback regarding this feature via Contact us form or reach out to our Customer Success team directly within the platform. Please add AI INTEGRATION when submitting your request.
Released: 16/05/2025
Previously, labels were available only in Basic Metrics reports; now you can see them on the dashboard widgets. The system creates labels for new releases automatically and you can create your own labels in the Tuning section.
Released: 16/05/2025
New addition to our Cohort Export feature – OneSignal. Create a segment in devtodev and use it to send personalised messages via different channels from OneSignal.
Released: 10/04/2025
You can now add descriptions to Custom events. To help you with this process, we've added an option to quickly generate these descriptions using AI. You can always edit the generated descriptions manually.
We've also updated the Custom event configurations page so you can easily check and configure any event and its parameters.
Released: 28/03/2025
Our SDK for Web now supports A/B testing. We've also added a changelog page for Web SDK releases.
Released: 26/03/2025
Devtodev already tracks Subscriptions automatically. We've added automatic tracking for In-App Purchases. Now you can receive data about transactions from App Store and Google Play without integrating the Real Payment event.
This allows you to speed up analytics integration and get valid data directly from the store.
Name
Timezone
Logo (optional)
The timezone is important because it defines the time when one day ends and another one begins.
Fill in your billing information.
That's it! You've created your space, and now you can add applications to it.
We offer a 30-day free trial for all new users (only for the first space created using this email).

Android
iOS
Unity
Web
macOS
Windows
Unreal Engine
Godot Engine


The next step is optional. You can test the integration in test mode. It assumes that up to 100 different users can use the app, and their data will be excluded from statistics. When you switch the test mode off, all the users who had sent the data will be marked as testers in your project.
During the next step, you can add an account to collect data from the application store or skip this step and add this information later in project Settings.
The final step is to fill in the name of your app and select its genre and type. Select app type: game or app. If you choose “app” as the type, gaming events will not be tracked and displayed in the interface, even if they are integrated. Also, game-related elements will be hidden in the interface.
You can change the project type at any time in the Settings → General settings section.
Please note that you can select more than one genre.
Congratulations, you have added the application to the space!
Now you can see the standard devtodev interface and all the reports. Of course, the reports are empty until you start sending data to devtodev.
If you have added an account to collect data from the market, it will take 1 day to build the report.
If your integration uses SDK (in most cases), the next step is to integrate SDK into your app. Please read our expert tips on integration, select the necessary SDK, integrate it, and start using devtodev's full functionality!
And please don't hesitate to ask us questions. You can find the Contact us button in the top right of the devtodev interface.

Add a device to test your integration:
Test DevicesWhen developing and publishing apps targeted at children under 13 years old, you need to ensure special conditions for data processing.
Check out how to enable compliance mode for , , and .
You can check the incoming events in the User card () or in the (Settings -> SDK -> Integration -> Event Log).
To check events faster, mark the User card as a Tester. This way the log in the User card will not be cached and the events will appear much quicker.
You can change the default revenue rates for your project in Settings -> SDK -> .
If necessary, you can also disable some of the and set up transaction value limits.
Change LogLevel value to DTDLogLevel.Debug in the Initialization configuration.
Check out examples for different platforms in the section.
Some of the events and properties are sent to devtodev automatically by the SDK.
Event timestamp
Timezone
Tracking status (iOS, Android) – the state of the flag for permission of ad tracking.
App version (must be specified by developer for WEB projects).
Session start – beginning of application activity with the date.
Activity period – duration of application activity.
The source of app install (only from Google Play), sent once.
Install date – date of the first launch of an application with integrated devtodev SDK.
Last seen date – date of the last incoming query.
IP-address – anonymized IP-address.
Country – defined by IP.
The latest up-to-date version of the Web SDK: 2.2
Please see the changelog if you are using an outdated version.
Please do the following to integrate your web application with devtodev:
to the Space using the wizard for adding applications.
To integrate SDK, add the following line to the tag of your page:
Initialize the SDK.
In order for SDK for WEB to start working, it is necessary to perform initialization right after the page is loaded and you have a basic user identifier at your disposal.
You can find the App ID in the settings of the respective app in devtodev (Settings → SDK → Integration → Credentials).
config – is an object that is used for specifying additional properties during initialization.
Config
Example:
Session Measurement and Tracking in Mobile and Web Applications
Session measurement is an important metric for product analysis as it allows us to determine how frequently and for how long users interact with our website or application. However, it is important to note that session tracking methods on mobile and web applications have their own peculiarities.
When a user starts a session in the application, the SDK recognizes that the application is active, indicating that it has gained focus (when the app is brought into the foreground). If the last recorded activity was more than 10 minutes ago, a Session Start event is sent.
Application activity refers to the period of time when the application is in focus, meaning the application or web page is open and the device screen is active. The focus is lost if the application goes into the background or if another website is opened in the current tab.
We measure the duration of application activity using a technical event called User Engagement (UE). It starts counting the time as soon as the application receives focus and sends the activity counter data to the server.
If, for any reason, the information about the duration of the activity could not be sent, it will be sent the next time the application is initialized and has internet access. However, the activity will only be included in devtodev reports if it has been less than 7 days since the session, as events from a previous period more than 7 days ago are ignored.
Thus, we have information about "Session start" and the duration of activity, but there is no specific "Session end" event.
All events performed by the user are marked with the session start date on which they occurred (sessionid field in SQL tables).
It is difficult to determine the beginning and end of a session because users often switch between screens of different applications. If an application on a mobile device receives focus and the last active time (in focus) was more than 10 minutes ago, a new session will start and a Session Start event will be sent to devtodev.
For example, the user opens the application, spends a minute in it, and then puts the application in the background, a Session Start event will be sent to devtodev in the first second. After a minute, when the application goes into the background or is closed, an event with information about the duration of activity (UE) will be sent to the server as the focus is lost.
It is not possible to detect when the user closes the page. Therefore, the UE event (duration of activity) is sent to the server every 2 minutes. To minimize the loss of information about the session duration to no more than two minutes in case of session termination, the SDK additionally saves the duration every 5 seconds and will send the information about the last duration upon the next activity. If there is no next session, the information about the last two minutes may be lost.
Let's consider an example where a user opens a webpage, spends 1.5 minutes on it, then opens another page on the site and spends another 1.5 minutes there.
A Session Start event will be sent in the first second, and every 5 seconds, information about the activity will be saved. After 2 minutes from the start of the session, a UE event with 2 minutes of activity will be sent to the server, and after the third minute, the activity of 1 minute will be recorded in the Local Storage. Information about this activity will be sent during the next user session.
The SDK cannot control app activity for Windows Standalone projects hence this responsibility is passed on to the developer. During the SDK initialization, the activity is triggered automatically, and later the activity status will not change automatically.
For tracking app activity, the developer can use the DTDAnalytics.StartActivity and DTDAnalytics.StopActivity methods.
It is recommended that you use the DTDAnalytics.StopActivity method to stop the activity when the app goes into the background or being closed. If the window is re-opened from the taskbar it is recommended to renew the activity by using the DTDAnalytics.StartActivity method.
In , Engagement -> , and , we encounter the following metrics:
Session duration – average session time of one user. Calculated as (Total Sessions Length / Number of sessions) averaged by users.
Number of sessions – average number of sessions per user. Calculated as the Number of sessions divided by the Number of users.
Total daily time spent – average total time per day spent in the user application. Calculated as Total Sessions Length divided by the number of Active Users.
In the SQL wizard, there is a parameter called session.Duration, which is tracked by the UE event. The session.Duration parameter represents the duration of the activity, i.e., the time the application is in focus, and it is not equal to the session duration.
sessions.Count is the number of Session Start events received from the user.
The table has two types of eventtype field in SQL:
ss: represents the Session Start event received from the user.
ue: represents User Engagement – the time that the application was in focus (active), providing information about time parameters and activity duration.
From this data, you can calculate the average session length by dividing the sum of activity lengths from all rows for the desired period by the sum of all session starts for the same period. We recommend using extended time periods to obtain a more reliable result.
Use AI assistance to speed up the integration process.
If you have any questions regarding the integration, let us know by using the form or reach out to our Customer Success team directly within the platform. We will also greatly appreciate your feedback. Please add AI INTEGRATION when submitting your request.
We created this manual for AI code editor but you can try using other AI coding agents that can access all of application code files.
and add it to your Unity project folder.
We recommend creating a folder called docs and placing the guide inside it. This ensures the AI coding agent can easily access and use it during analysis.
Open your AI-agent, and select your Unity project folder. The agent will begin indexing all project files, including the markdown guide. Wait a few moments until indexing is complete.
Create a clear and effective prompt for the AI-agent. The prompt should:
Assign the AI a role (like "You are a product engineer").
Specify your goal: integrate DevToDev events properly.
Reference the guide using @devtodev_unity_integration_guide.md.
Copy and paste the promt text into the AI-agent chat window.
.
Attach the guide file inside the prompt. You can do this in two ways:
Find all the guide mentions in the prompt and delete that placeholder text. Then, drag the file from the docs folder into the chat window. The AI-agent will automatically recognize and link the file.
Alternatively, type @ and start typing "devtodev" — the agent will suggest the guide file. Usually it is at the top of the list.
Now click Send and let the AI coding agent generate the integration.
It will:
Analyze your codebase
Understand game logic
Suggest where and how to insert DevToDev analytics events.
Check and review the list of events generated by the AI-agent. You can edit the list by removing the unnecessary or duplicate events. You can also ask the AI to revise its suggestions.
After you have finished reviewing and modifying the suggested events file, you can proceed to the next step of integration.
The AI-agent may then generate a new class — usually something like AnalyticsManager — to send events to Devtodev.
The coding agent might show some errors if Unity has not recompiled yet. Switch to the Unity Editor and wait for it to finish compiling. Once done, the errors in AI-agent will disappear.
The AI must not change your original game logic.
It may add analytics calls (like DTDAnalytics.CustomEvent(...)), but should never modify player behavior, game flow, or state handling.
If something looks wrong — ask the AI-agent to revise it.
After generating the integration, the AI-agent will also produce a documentation file (like ANALYTICS_SETUP.md).
It describes:
Where events were added
How to use the generated AnalyticsManager class
What next steps are required to finish setup.
Follow that instruction carefully to complete your devtodev analytics integration properly.
Payment event integration and using anti-cheat methods
Here you'll find the principles of processing data about real payments, tips for the integration of the Payment event and anti-cheat methods used in devtodev.
Gross metrics are one of the key indicators of the app’s performance. Therefore, it is important to approach the integration of the very seriously.
There are four parameters that are sent in the Payment event:
Autocapture is a set of features in devtodev that allows you to collect data automatically, without manually sending events from the client side. It is designed to simplify integration, reduce engineering effort, and ensure data consistency across platforms.
Currently, Autocapture supports purchase tracking, refund tracking, and AI-assisted integration. Web auto-tracking is in development.
Each Autocapture feature collects data from validated sources such as the App Store, Google Play, or SDK behavior. In most cases, you only need to enable the feature in the devtodev settings and initialize the SDK accordingly. No additional coding is required.
In devtodev you can mark a device as a test device. You can do so in the section or in Settings -> SDK -> .
The system will exclude from the reports all incoming events from the test devices (except Real-time dashboard). You can check the evets in Settings -> SDK -> Integration -> or in the Users & Segments section.
When you mark the User card as a Tester, the log in the User card will not be cached and the events will appear much quicker.
If the app is in test mode, all devices with this app are added automatically to the list of test devices (up to 100 users). You can switch to Production mode manually in Settings -> .
Autocapture is available only for native payment systems (Google Play and App Store).
Unity Android refund tracking is not supported due to store receipt limitations.
Do not mix manual and automatic event tracking for the same transaction types.
Web tracking will be available via the devtodev Web SDK (currently in development).
devtodev SDK version
Push token – in the case of an additional initialization by the developer and with a user’s permission.
Device manufacturer (iOS, Android)
Device model (iOS, Android)
Language – device’s locale data.
OS type
OS version
Rooted/Jailbreaked OS flag
User agent string
Different device IDs depending on the platform. Disabled when COPPA Control is enabled.
Sessions by user – average number of sessions made by one user during the period.
Average session length – calculated from the data obtained from session starts and user activity time during those sessions. It is defined as the sum of the length of all sessions divided by the number of sessions within a given period.


List of all devtodev APIs
Below you can find APIs for 3rd party services. You can use them in case devtodev does not provide an integration to a specific 3rd party service.
Check the list of available Ad Revenue services.
Ad revenue APICheck the list of available Attribution trackers.
Custom postback APIBuild a report and download it as a .csv file right in the devtodev interface.
Configure data export to a data storage.
The level of logging the SDK activity. The "No" value is used by default. For troubleshooting during integration, it is recommended to set it to "Debug", and either switch it "No" or use it only for error handling "Error" in the release version.
applicationVersion
String
The app version. Cannot be empty.
Parameter
Type
Description
userId
string
Unique user identifier. For example, user’s ID in a social network, or a unique account name used for user identification on your server. If at the time of initialization this identifier is not yet available, specify the identifier later using
the setUserId method.
currentLevel
integer
The player level at the moment of devtodev SDK initialization. Must be greater than 0. It’s optional but we recommend using it for improving data accuracy.
trackingAvailability
boolean
The property allows or disallows devtodev tracking of the user. By default, it is set to true. SDK stores the previously assigned value. Pass false if the user opted out of tracking in line with GDPR.
logLevel
string
<script type="text/javascript" src="https://cdn.devtodev.com/sdk/web/devtodevsdk-2.2.js">
</script>window.devtodev.initialize("App ID", config);var config = {};
config.userId = "Unique user identifier";
config.currentLevel = 2;
config.trackingAvailability = true;
config.logLevel = "Error";
config.applicationVersion = "1";
window.devtodev.initialize("App ID", config);Transaction identifier
Item name
Item price in payment currency
Payment currency identifier.
Let’s look at each of the parameters and things to keep in mind when specifying their values while integrating devtodev SDK.
This is one of the transaction parameters where invalid values occur most often.
Here are the requirements for this parameter:
The transaction identifier is a string value of max 64 symbols. In case this limit is exceeded the value will be shortened to 64 symbols.
The identifier must be unique. Data about the transaction with already registered identifier will be discarded by the system and will not be included in statistics.
We recommend using the identifier that has been assigned to the transaction by the payment system as the transaction identifier.
In case your app is designed for Apple (iPhone, iPad, iPhone+iPad, or Mac) or Android (Google Play) platforms, the use of the transaction identifier assigned by the app store is mandatory!
Transaction identifiers that come from apps on these platforms are checked by devtodev for their compliance with the format used by these markets. This allows us to discard the most obvious cheat transactions.
It is also important to know that users who made these transactions are marked as cheaters and all their subsequent transactions are not included in statistics (you can disable this verification process in the ).
The item name is a string value that should not exceed 255 symbols. One of the most common mistakes when specifying the value of this parameter is specifying the localized name of the item in multi-language apps. This leads to the appearance of many records that describe the same item in different reports (for example, Virtual goods & purchases).
One way to avoid this situation is to specify the name of the item bundle as its name.
The item price parameter contains the sum that a user paid for the item in a payment currency. The price is specified as a floating-point number.
The currency identifier parameter must specify the currency as a three-letter code according to ISO 4217 standard (examples: USD, EUR, JPY, CNY).
When the Payment event reaches devtodev servers, before transaction data is saved, the sum is automatically converted to USD at the actual currency rate at that moment.
In case the currency identifier is not specified or the identifier is invalid, the transaction is considered invalid and is not counted in statistics.
If after converting to USD the sum exceeds $1500, the transaction is considered invalid and is not counted in statistics as well (this verification can be disabled in the Settings). When the transaction is made with an in-game currency of social network, you first need to convert this currency to any real-world currency.
It is also important to remember that the sum of the purchase sent in the Payment event shows the actual sum that the user paid (this data is used to built Gross metrics).
In order to see your net income (Revenue metrics), you need to specify the revenue rates to calculate net profit within your total revenue. The rate can be specified as single or individual for each country. This increases the accuracy in case the part of the sum is spent on taxes and fees that are individual for each country.
Unfortunately, in some situations filling in the parameters of the Payment event is not enough for getting valid data in reports, since there can be cheat transactions. There are several ways to deal with this problem, but all of them are based either on preliminary verification of the transaction or detection of suspicious user actions.
To prevent cheat transactions from getting into the report, you need to check the transaction in advance and omit sending the Payment event If the transaction turns out to be invalid.
Or you can mark the user/device as a cheater and exclude their further data from all reports. It is possible to combine both methods for greater reliability.
The process of detecting cheaters based on their behavior within apps depends on the specificity of a particular app. If you have implemented such an algorithm, you can mark suspicious users as cheaters to avoid getting data on their payments in reports. To do that, you just need to execute an SDK method or mark users via API.
One of the conditions for increasing the reliability of transaction verification is implementing it outside of the client app. You can create the system of verification and place it on your own servers or use our out-of-the-box solution – devtodev anti-cheat system.
devtodev anti-cheat allows to check the validity of transactions from the following app stores:
Apple App Store
Google Play Store
Microsoft Store (UWP).
Get response about a completed transaction from the payment system.
Either send data about the received transaction for verification by calling devtodev anti-cheat methods or use your own tools for transaction verification.
If the transaction has successfully passed verification, perform the Payment event. If the transaction has not passed verification, do not perform the Payment event.
We do not recommend to use the result of devtodev anti-cheat verification as a condition for giving or not giving in-game currency or item purchased by user.
Open the User Card and mark the User as a Tester.
You can check and configure your list of test devices in Settings -> SDK -> Test Devices.

You can find full description of devtodev events in this article:
Basic Events & Custom EventsTutorial is a very important part of any project because the first session lays the foundation for future retention and monetization indicators.
devtodev allows to analyze how users complete the tutorial, find bottlenecks, and measure the time it takes for users to complete the tutorial. These questions can be answered with the help of the Tutorial analysis report.
Many game projects have levels, which means that as users become more experienced, they gradually increase their level. In this case levels have a linear structure: the level N is followed by the level N+1.
When players move to the next level, you need to use the . Reports such as Economy balance and Player levels are built by levels and are based on this event.
Also, if your project has in-game currency, you can send information about the current amount of in-game currency players have using the LevelUp event. This data allows to evaluate the average amount of in-game currency that players have on a particular level.
For example, this is the . It shows how users are distributed among levels, the percentage of users who remain on a particular level, the revenue of a particular level, etc.
There are many projects (for example, Match-3 games), where players attempt to pass a level. Their attempts may be either successful or unsuccessful. In addition, during a certain attempt some numerical indicators can change: the number of stars, resources, in-game currency.
To analyze these attempts, we've created a basic . With Progression event you can send information about how players pass a particular game location, whether their attempt was successful, and how numerical indicators change.
Based on the Progression event, we build the , where all indicators are calculated by game locations, for successful and unsuccessful attempts.
Many games, especially f2p, have in-game currency. Players can accumulate currency, or buy it for real money. They can then spend it on virtual goods. To work with virtual currency, devtodev has developed the following events:
– to send information about purchases made by players. Please note that these are only purchases made with virtual currency, while information about purchases for real money is sent with the .
– to show information about movements of virtual currency. For example, if a player earns currency or receives it for some actions, you can use Currency Accrual to see this information.
All the game economy reports are based on these events.
With the help of the Currency Balances by Level tab in the (this one also requires a ), you can see how users spend, earn and accumulate currency on each game level.
The Top Purchases tab in the allows you to analyze the structure of the consumer basket and identify the most popular items among different categories of players.
There may be situations when your project requires events that cannot be tracked by devtodev basic events. Such events can still be sent and analyzed in our system as . It is possible to specify parameter values of custom events.
Here are some examples of user actions that can be sent as custom events: opening an in-game store, clicking on items, buying items. Based on these events, you can then build a funnel and see the conversion on each step.
Some limits for custom events:
The number of different event types sent from one project should not exceed 300.
The event name must not exceed 72 characters.
One event can contain up to 20 parameters, each of them with unique names of up to 32 symbols.
Parameters can be string or numeric:
Here is some expert advice to avoid problems with limits on custom events:
There is no need to send user IDs in parameters (they are collected by default).
Do not send time in the timestamp format (it is also collected by default).
To exclude from statistics transactions made by cheaters, you can use devtodev . By using this method, you will be able to check payments for validity before sending them to devtodev.
The verification process is the following:
Get response about a completed transaction from the payment system.
Either send data about the received transaction for verification by calling devtodev anti-cheat methods or use your own tools for transaction verification.
If the transaction has successfully passed verification, perform the Payment event. If the transaction has not passed verification, do not perform the Payment event.
We do not recommend to use devtodev Anticheat method as the only tool to validate transactions.
This generation of SDK is deprecated and is no longer supported. Information about the current version can be found here.
Please do the following to integrate your application with devtodev:
Add the application to the Space using the wizard for adding application.
Go to your project directory and place the plugin content here: ProjectName/Plugins
Restart Unreal Editor and open the plugin menu (Window > Plugins). In the "Analytics" plugin group of your project select DevToDev (and "Blueprint Analytics Framework" in case if you use blueprints). You will be offered to restart Unreal Editor again.
Finally, add the following strings into the DefaultEngine.ini configuration file (the file is in "Config" folder of your project):
To get an access to the DevToDev settings, go to Project Settings > DevToDev
Get the keys (they can be found in the application settings: Settings -> SDK -> Integration) and insert the keys in this window. Then choose the Enable Push Notifications option in case if you want to send push notifications through devtodev service.
All the events are available in the Analytics block of your Blueprint.
To initialize SDK in a blueprint, first call the "Start Session" event from the Analytics Blueprint Library.
or from the following code
Devtodev allows you to collect refund data automatically for purchases made through the Google Play and App Store platforms. Refunds are recorded as transactions with negative amounts and matched to original purchases whenever possible.
The automatic refund tracking system helps you monitor actual revenue more accurately and analyze refund patterns without manual event configuration.
Automatic refund tracking is available only for the Google Play and App Store platforms, and only for purchases made using their native payment systems. If you are using a third-party payment system, you need to send refunds manually using the Real Payment event with a negative amount.
Refunds are collected via store APIs or postbacks and processed on the server side. For each refund:
devtodev attempts to match it to an original transaction by transaction ID.
The refund is saved as a transaction with a negative amount.
The event is dated using the refund processing date (not the original payment date).
We recommend using automatic refund tracking together with to ensure accurate matching and avoid inconsistencies in reports.
To enable refund tracking:
Set up integration with the App Store or Google Play.
Go to: Settings → Payments integration → IA refunds tracking.
Click the ✎ icon next to IA refunds tracking and fill in the fields related to the platform.
Refund tracking starts working automatically on supported platforms after you enable it in the devtodev interface.
For details on how to set up integration with app stores, see:
This generation of SDK is deprecated and is no longer supported. Information about the current version can be found here.
Please do the following to integrate your application with devtodev:
Add the application to the Space using the wizard for adding application.
and add it to 'Linked Frameworks and Libraries' list in the general settings of the project.
Add init method into didFinishLaunchingWithOptions method of your AppDelegate.m
App ID and Secret key can be found in the application settings (Open "Settings" → "SDK" → "Integration").
If the application you integrate SDK in is a part of a cross-platform project, then the user data initialization is required.
Since the analytics of cross-platform projects is based on a unique user (unlike the usual projects where it is based on device identifiers), you have to:
Set the unique cross-platform user identifier (it will be used for a cross-platform project data collection).
Actualize the user data. Mostly it is about game applications where the player has a game level as a characteristic. For such projects, you need to set the current player level.
If your application allows user to re-login (changing the user during the working session of application), then the setUserID and setCurrentLevel methods should be called just after the authorization. You don't need to call the SDK initialization one more time.
To enable the debug mode and make SDK notifications displayed in the console, use this method:
Devtodev allows you to collect payment and subscription information automatically for the Google Play and App Store platforms. All you need to do is enable the corresponding module during the SDK initialization and configure store setting in the devtodev interface.
The automatic payment tracking system will help you avoid integration errors with data submitted using the Real Payment and Subscription events. This system will also help you avoid sending fraudulent transaction data, as each transaction is additionally verified on the Google Play and App Store platforms before being recorded in the database.
Important: Automatic payment tracking is only available for the Google Play and App Store platforms, and only if you are using their native payment systems. If you are using a third-party payment system, you will need to integrate the Real Payment Basic event.
While automatic payment tracking helps avoid fraudulent transaction data, this mechanism does not automatically mark users with such payments as cheaters. In case you would like to mark users as cheaters, use a or .
This generation of SDK is deprecated and is no longer supported. Information about the current version can be found here.
You have to enable Internet (enabled by default in Windows 10) and Location (if needed) in the Capabilities tab of Package.appxmanifest for correct work of the SDK.
To start working with the SDK, add the DevToDev.winmd and DevToDev.Background.winmd to the project references.
Initialize the library at Application Launching event.
App ID and Secret key can be found in the application settings (Open "Settings" → "SDK" → "Integration").
Example:
If the application you integrate SDK in is a part of cross-platform project, then the user data initialization is required.
Since the analytics of a cross-platform projects is based on a unique user (unlike the usual projects where it is based on device identifiers), you have to:
Set the unique cross-platform user identifier (it will be used for a cross-platform project data collection).
Actualize the user data. Mostly it is about game applications where the player has a game level as a characteristic. For such projects you need to set the current player level.
If your application allows user to re-login (changing the user during the working session of application), then the UserID field and SetCurrentLevel method should be called just after the authorization. You don't need to call the SDK initialization one more time.
To enable the debug mode and make SDK notifications displayed in the console use this method:
Contact us to request access. Use form or reach out to our Customer Success team directly within the platform. We will also greatly appreciate your feedback. Please add REMOTE CONFIGS when submitting your request.
Contact us to request access. Use form or reach out to our Customer Success team directly within the platform. We will also greatly appreciate your feedback. Please add REMOTE CONFIGS when submitting your request.
No SDK-side changes are required.


The maximum length of string parameter values is 255 characters.
The number of unique string parameter values cannot exceed 50000. When it exceeds 50000, the system will block the parameter.


/**
* <param name="appKey">App ID</param>
* <param name="appSecret">Application secret key</param>
*/
DevToDev.SDK.Initialize(string appKey, string appSecret);DevToDev.SDK.Initialize("3f2504e0-4f89-11d3-9a0c-0305e82c3301", "a8f5f167f44f4964e6c998dee827110c");DevToDev.SDK.UserID = "activeUserId"; //cross-platform user identifier (64 symbols max.)
/**
* <param name="appKey">App ID</param>
* <param name="appSecret">Application secret key</param>
*/
DevToDev.SDK.Initialize(string appKey, string appSecret);
/**
* <param name="level">Current level</param>
*/
DevToDev.SDK.SetCurrentLevel(int level);//to enable logging
DevToDev.SDK.LogEnabled = true;
//to disable loging
DevToDev.SDK.LogEnabled = false;DevToDev.Analytics.Uwp package using the package manager search engine and click Install. The latest version of the package is recommended.Initialize the library using the following code:
You can find the App ID in the settings of the respective app in devtodev (Settings → SDK → Integration → Credentials).
config - is a DTDAnalyticsConfiguration object instance that is used for specifying additional properties during initialization.
DTDAnalyticsConfiguration
Parameter
Type
Description
currentLevel
Integer
The player level at the moment of devtodev SDK initialization. It’s optional but we recommend using it for improving data accuracy.
userId
String
A custom user ID assigned by the developer. In the case of default calculation by device IDs, the identifier can be used for searching users in devtodev. In case the project uses calculation by user IDs, the parameter is mandatory because it becomes the principal calculation ID in devtodev.
trackingAvailability
DTDTrackingStatus (enum)
The property allows or disallows devtodev tracking of the user. By default, it is set to DTDTrackingStatus.Enable. SDK stores the previously assigned value. Pass DTDTrackingStatus.Disable if the user opted out of tracking in line with GDPR.
logLevel
Example:
Find the DevToDev.Analytics package using the package manager search engine and click Install. The latest version of the package is recommended.
Initialize the library using the following code:
You can find the App ID in the settings of the respective app in devtodev (Settings → SDK → Integration → Credentials).
config - is a DTDAnalyticsConfiguration object instance that is used for specifying additional properties during initialization.
DTDAnalyticsConfiguration
Example:
The SDK can’t control app activity hence this responsibility is passed on to the developer. During the SDK initialization, the activity is triggered automatically, and later the activity status will not change automatically. For tracking app activity, the developer can use the DTDAnalytics.StartActivity and DTDAnalytics.StopActivity methods. It is recommended that you use the DTDAnalytics.StopActivity method to stop the activity when the app goes into the background or being closed. If the window is re-opened from the taskbar it is recommended to renew the activity by using the DTDAnalytics.StartActivity method.
To get detailed information about the transaction, devtodev requires access to the App Store Server API. To grant this access, you will need to generate an In-App Purchase API key.
Generating the key:
Authorize on App Store Connect.
Navigate to the Users and Access section.
In the Integrations tab (1), select In-App Purchase from the menu on the left (2), and click (+) to add the key (3).
Specify the name of the key, for example: "devtodev API Key", and click Generate.
To grant the necessary access to the devtodev service, it is necessary to pass the following information:
Issuer ID
Key ID
The generated .p8 file of the In-App Purchase key
Go to Settings → Payments integration → IA refunds tracking.
Fill in the integration form with the data obtained earlier from the App Store:
App Bundle ID
Issuer ID
Key ID
Upload the .p8 file of the In-App Purchase key.
When the integration is complete, the status will change to Active.
Add a Configuration button. Find devtodev in Media Partners list, select it and click the Go button.
Click the Edit button on the Install event.
Open the application that you are configuring in devtodev. Open Settings -> 3rd party sources -> Attribution tracking, turn on the toggle switch on Kochava panel and copy devtodev API Key from the panel.
Insert copied API key into Kochava postback settings. Copy all other fields from the following image and click the Save button.
Important: Select Delivery method -> All
Make sure that postback has appeared on the Partner Configuration page.
devtodev allows our customers to query CPI data from Kochava via API in order to get more accurate install costs.
Check the Enable receiving CPI info by Kochava API box and fill in the form to switch on CPI data collection.
If you integrated the devtodev package manually, then you need to delete the Assets/DevToDev and Plugins/DevToDev folders.
In the Package Manager (Window → Package Manager), click + in the top left corner and select Add package from git URL.
Copy the repository URL https://github.com/devtodev-analytics/package_Messaging.git to the input box and click Add.
Wait for the Unity Package Manager to download the package and all the necessary dependencies.
If you use Android, allow dependencies in Assets → External Dependency Manager → Android Resolver → Resolve.
Download the latest version of devtodev package from the repository: https://github.com/devtodev-analytics/Unity-sdk-3.0/releases/latest
Import DTDAnalytics.unitypackage to your project
Import DTDMessaging.unitypackage to your project
If you use Android, allow dependencies in Assets → External Dependency Manager → Android Resolver → Resolve.
Open Partner Setup:
Click Add Partners:
Search devtodev and click blue plus button:
Go to devtodev Settings -> 3rd party sources -> Attribution tracking page of a preferred app and copy your API Key:
Enter your API Key in the field for corresponding platform and click Save:
Switch on the attribution in devtodev interface (Settings -> 3rd party sources -> Attribution tracking):
devtodev allows our customers to query CPI data from Adjust via API in order to get more accurate install costs.
Check the Enable receiving CPI info by Adjust KPI Service box and fill in the form to switch on CPI data collection.
Go to Data Feeds in the left menu.
Go to Webhooks in top tabs.
Click Add new webhook button
Go to devtodev Settings -> 3rd party sources -> Attribution tracking and copy postback URL, then enable integration by clicking the On switch.
In Branch.io, paste the callback to webhook Send field and click Save.
Integration is complete.
devtodev allows our customers to query CPI data from Branch.io via API in order to get more accurate install costs.
Check the Enable receiving CPI info by Query API box and fill in the form to switch on CPI data collection.
Here are some of the new features you might have missed.
Released: 21/11/2024
It is now possible to create an alert for a number of metrics straight from the report. Click on the Create alert button in the three dots menu and you will be promted to the Alerts wizard with the preselected metric.
Learn more about the Basic Metrics report
Released: 21/11/2024
By default you can see the Total values for selected events above the report. We've added a Show total button so now you can hide this information block. We've also moved all the report customization settings (Metrics settings and Conditional Formatting) to the left for easier navigation.
Released: 21/11/2024
You can now check if the data in the widget is up to date and update it without the need to refresh the whole dashboard. Click on three dots menu and select Refresh data.
Released: 17/10/2024
We have added a Select All option so you can easily share your report or dashboard with everyone. If you want to share multiple reports, there is now an option to batch select and share them in the Saved reports or Saved Dashboards section.
Released: 13/08/2024
Unified Control for Report Filters and SQL Variables: Before this update you could only add a Period type control for widgets based on non-SQL reports (Basic metrics / Custom Events / Funnel reports). Now it is possible to create and apply common filters such as Country, Language, Channel, Campaign and Paying status.
Simplified default variable value change: You can change the default value directly in the Manage controls panel, without the need to navigate to the original widget.
Released: 13/08/2024
The Player Levels report has some unique ready-to-use metrics such as Gross revenue and number or players remaining at a specific level. You can now add this report as a widget to a custom dashboard and get the full picture for your game analysis.
Released: 22/07/2024
Save the report results from the dashboard without opening the original report using Export to CSV. The result will be saved as table. This can be useful for further data processing or sharing the report to colleagues without access to devtodev.
Released: 21/06/2024
You can now save Conversion to N payment, Period until payments, Top converting goods charts to a custom dashboard as widgets. This information will help you analyse the payments in a more convenient way.
Released: 21/06/2024
The Like opertor allows you to create a mask for the string parameter values.
For example, you have a parameter called Item and it has values: offer1, offer2, offer3, offer4. Use the Like operator and type offer, this will select all four of these values in the resulting report.
Released: 21/06/2024
The Locations report contains ready-made metrics that allow you to see how users pass the different locations. You can now save this report to a dashboard with other metrics to see the whole picture.
Released: 14/05/2024
This update gives you an ability to change the name of any metric in Custom events. You can use more convenient titles and adjust the values with a Round setting. There is also an option to change the Units for a single number widget. The applied metrics' settings will also be saved when you share the report or add it to a dashboard.
Released: 14/05/2024
Results from Devtodev’s Cumulative ARPU report can now be saved to a custom dashboard as a widget. This information helps you track crucial Cumulative ARPU metric values for your project.
Released: 30/04/2024
Previously data from Custom Postback API or SDK Install referrer was not available in the Acquisition section. Now, we have added a Source filter in the Detailed stats report, where you can select the needed trafic sources.
Released: 30/04/2024
on your dashboard. Improve readability by adjusting the column width automatically (Autofit column width) or by hand. We have also added a Wrap text option for heading and table rows to allow for longer titles.
Released: 10/04/2024
With this update, we have extended the expiration date for unused segments to 60 days. If you do not apply the segment to any report, it will expire. However, you will have 30 days to recover this segment before it’s completely deleted.
Released: 21/03/2024
Users now are able to customize axis boundaries on their charts to more accurately represent data trends. In cases where the charts are not optimally positioned (or you are not happy with their placement, or want to change the position of the chart), simply clicking on the Axis Scale option allows you to define the minimum and maximum values for the axis.
Released: 20/03/2024
When a user deletes their account, or in case the user is removed from the space, their content remains in devtodev. Now, the team can manage the ownership of such content. For example, you can take ownership of the report made by the deleted user, or you can delete it from the space.
Released: 20/03/2024
When the space owner is changing, they need to transfer their ownership. With this update, the owner of the space can select a new owner in User settings and delegate their owner access.
Released: 12/03/2024
We’ve added a new metric to our Basic Metrics report – the Cohort Timespent. Previously, you may have known this metric as “Cohort Playtime,” which was created specifically to evaluate user engagement in the Sessions report. And now this metric is also available in Basic Metrics for both game projects and applications.
Released: 27/02/2024
Now you can create games and apps from scratch on all popular engines, including Godot, all while utilizing detailed data analytics tools. Devtodev platform will support you in understanding player behavior, optimization, and increasing user engagement throughout the entire lifetime of the product.
The new Godot SDK is now available for iOS, macOS, and Android platforms, providing you with the tools you need to take your games and apps to the next level.
Released: 28/01/2024
An existing dynamic segment can be duplicated with just one click. Simply copy the segment and adjust its settings to save time when creating a segment with similar conditions.
Released: 09/01/2024
You can receive notifications if the number of basic or custom events suddenly changes or differs from a specific day. These alerts will inform you about any positive or negative fluctuations.
Also, two new conditions have become available: a comparison with the previous day and a comparison with the same day last week. This allows the alert to activate when yesterday's event count is different from the count on the chosen day.
1. Download the latest version of devtodev SDK from the repository
2. Add DTDAnalytics.xcframework to the project (with Do Not Embed specified)
3. Add frameworks:
AppTrackingTransparency.framework
AdSupport.framework
4. Add initialization todidFinishLaunchingWithOptions method:
An App ID can be found in the settings of the respective app in devtodev (Settings → SDK → Integration → Credentials).
config - an object instance of DTDAnalyticsConfiguration, which is used for specifying additional properties during the initialization.
DTDAnalyticsConfiguration
Example:
Create Bridging-Header. To do this, you need to add any swift file to the project (don’t delete it later) and choose ‘Create Bridging Header’ in the offered dialog box.
Make sure that the ‘Build Settings’ for ‘Defines Module’ value evaluates to ‘YES’.
While importing, use: #import <DTDAnalytics/DTDAnalytics-Swift.h>
For SDK to function properly, it needs to be integrated at the earliest moment of the app launch. It is recommended that you use the following method of main entry point initialization:
When developing and publishing apps targeted at children under 13 years old, you need to ensure special conditions for data processing. Any mobile app aimed at children or intended for users in a region with strict regulations on child online protection, must comply with current laws.
If your app has to comply with the legal requirements (COPPA), use the following recommendations:
Implement the coppaControlEnable method. The method disables collection of ad IDs and vendor IDs (IDFA, IDFV).
To comply with
Remove AppTrackingTransparency.framework and all the links pointing to it.
Call the coppaControlEnable method before SDK initialization. If the method was not called, the SDK will work as before.
This integration is configured only in Aghanim.
By connecting Aghanim with devtodev, you can track player-generated events from the Game Hub, ensuring precise tracking of user actions across your entire game environment.
Go to the Aghanim Dashboard → Aghanim Connect → .
Click the Install button to enable the integration.
player.verify webhook responseTo ensure devtodev correctly identifies users and attributes their actions on the Game Hub, include the devtodev-specific attributes in the webhook response:
DevtodevDeviceId schemaThe device ID object must contain at least one of the following identifiers:
Once the integration is set up, Aghanim will automatically send events to devtodev, allowing you to track user purchases from the game hub.
This generation of SDK is deprecated and is no longer supported. Information about the current version can be found here.
Please perform the following actions to integrate your application with devtodev system:
add the application to the Space using the wizard for adding application
or install via CocoaPods
integrate SDK into your application. The integration may be whether partial or including all the possibilities.
is the easiest way to add devtodev into your iOS project.
Firstly, install CocoaPods using
Create a file in your Xcode project called Podfile and add the following:
Run
in your Xcode project directory. CocoaPods should download and install the devtodev library, and create a new Xcode workspace. Open this workspace in Xcode.
Download the latest version of devtodev SDK from the repository.
Include devtodev.framework dependency:
Link against the embedded framework:
Add devtodev.framework to the Linked Frameworks and Libraries section.
We recommend you set the user identifier before SDK initialization, otherwise the user identifier from the previous session will be used since the SDK initialization moment till the setUserID method call.
If your application allows user to re-login (changing the user during the working session of application), then the setUserID and setCurrentLevel methods should be called just after the authorization. You don't need to call the SDK initialization one more time.
To enable the debug mode and make SDK notifications displayed in the console use this method:
Copy devtodev API key from “3rd Party Attribution. AppsFlyer” panel on " Settings -> 3rd party sources -> Attribution tracking" page in devtodev system. Don't forget to turn on the service.
Sign in with .
Open the and start manage integration.
Select your app, paste the devtodev API key you copied before, select "All media sources, including organic", activate partner and click "Save integration". Integration completed.
For iOS applications we recommend turning off the Advanced Privacy (for iOS 14.5+ and later) option.
devtodev allows our customers to query CPI data from AppsFlyer via Pull API.
Integration can be enabled by checking the appropriate box. You will need an , which can be found on the Profile -> Security Center -> . For Apple platform App ID is Application ID without the 'id' prefix. For Android platform App ID is Android Package name. Note: App IDs are case sensitive.
This generation of SDK is deprecated and is no longer supported. Information about the current version can be found here.
Please do the following to integrate your web application with devtodev:
Add the application to the Space using the wizard for adding application.
To integrate SDK, add the following line to the tag of your page:
In order for SDK for WEB to start working, it is necessary to perform initialization right after the page is loaded and you have a basic user identifier at your disposal.
In case User ID is changed after SDK was initiated, the method should be called repeatedly with indication of a new User ID. For example, when user signs into another account in a launched messenger application.
Unique API key can be found in the application settings: "Settings" → "SDK" → "Integration".
In cross-platform applications, the additional user identifier can be used. It is a user cross-platform ID which is unique for all of the platforms. And if a cross-platform ID differs from the ID that is main for the platform, you need to set the cross-platform ID. The cross-platform ID combines the user data for a cross-platform project.
We recommend you apply this method before the SDK initialization, otherwise, the user identifier from the previous session will be used since the SDK initialization moment till the setCrossplatformUserId method call.
If it is difficult to do, set a cross-platform ID as soon as it is available in the application after SDK initialization.
If your application allows user to re-login (changing the user during the working session of application), then the setCrossplatformUserId method should be called just after the authorization. You don't need to call the SDK initialization one more time.
For the most precise data collection, we strongly recommend specifying some information about the user right after SDK is initiated.
In the first place, this additional initialization is required for gaming applications where the player has a game level as a characteristic.
It is not obligatory, but if you want to have the ability to build reports with regard to the version of your application, use this method before initialization.
To enable the debug mode and make SDK notifications displayed in the console, use this method:
Integration of push notification on UE4
This generation of SDK is deprecated and is no longer supported. Information about the current version can be found here.
Add the application to your space in devtodev system
Android. Get API key from Google APIs Console. It is nessesary to activate Google Cloud Messaging for Android before key generation. Detailed information on how to receive an API key you can find in native Android devtodev SDK documentation
iOS. Generate Developer or Production Certificate for the application and get Private key file (.p12) on its basis. Detailed information on how to receive a Private key file you can find in native iOS devtodev SDK documentation
Set Push Notification Enabled in blueprint.
Open PUSH NOTIFICATIONS section and click on "Add new campaign" button
Fill in campaign name, select an app for delivery*
Choose user group to send a message. You can choose existing segment or create a new one
Enter notification details
You can create a campaign only after at least one push token comes from devtodev SDK integrated to your application. Otherwise the app will not be displayed in the list.
This generation of SDK is deprecated and is no longer supported. Information about the .
SDK is available as a library in AAR (recommended) and JAR. The library is available in Maven Central repository and on repository.
Step 1. If you use Gradle for the applications build, add mavenCentral() into gradle.build file of your application and specify the following relationship in dependencies block:
In case you don't use Gradle, you can and add the library into the project.
Step 2. Initialize the library in the first Activity method onCreate() in the following way:
App ID and Secret key can be found in the application settings: "Settings" → "SDK" → "Integration".
var config = new DTDAnalyticsConfiguration();
config.LogLevel = DTDLogLevel.Error;
DTDAnalytics.Initialize("App ID", config);var config = new DevToDev.Analytics.DTDAnalyticsConfiguration();
config.LogLevel = DTDLogLevel.No;
config.CurrentLevel = 2;
config.UserId = "CustomUserId";
config.TrackingAvailability = DTDTrackingStatus.Enable;
DevToDev.Analytics.DTDAnalytics.Initialize("App ID", config);[Analytics]
ProviderModuleName=DevToDevFAnalytics::Get().GetDefaultConfiguredProvider()->StartSession(); #import "AppDelegate.h"
#import <devtodev/DevToDev.h>
@interface AppDelegate ()
@end
@implementation AppDelegate
- (void)applicationDidFinishLaunching:(NSNotification *)aNotification {
[DevToDev initWithKey:@"appKey" andSecretKey:@"secretKey"];
}
@end/**
* Method allows to initialize the user. It applies when SDK initialization or user relogin.
* @param String activeUserId - unique cross-platform user identifier (max. 64 symbols)
*/
[DevToDev setUserID:@"activeUserId"];
/**
* Method sets the current user level. Using this method allows to actualize the SDK user data
* in game cross-platform applications.
* @param NSUInteger level - number of current game level of the user
*/
[DevToDev setCurrentLevel:level];
/**
* devtodev App Id and Secret key can be found in the devtodev application
* settings page ("Settings" → "SDK" → "Integration")
*/
[DevToDev initWithKey:applicationId andSecretKey:secretKey];/**
* @param BOOL isActive
*/
[DevToDev setActiveLog: (BOOL) isActive];mmpid


attributes.devtodev_apikey
string
The API key of the project in devtodev. Obtain the API key by going to Settings → SDK → Integration in the application menu.
Yes
attributes.devtodev_device_id
DevtodevDeviceId
The device ID object.
Yes
devtodevId
number
The devtodev ID is the primary numeric identifier for the device/user account in the devtodev database. The devtodevId can be obtained from the devtodev SDK.
userId
string
A custom user ID assigned by the developer. Usually, a user ID on the developer's server. The ID must be specified during devtodev SDK initialization, or specified using the SetUserID method.
advertisingId
string
The Advertising ID or IDFA of the user device.
The devtodev analytics library contains an implementation of FirebaseMessagingService for working with push notifications. If you want to use your own or a third-party push notification service instead of implementing “devtodev push notification”, then you need to disable the built-in service in the manifest file.
Example:
If you want to use our SDK to work with push notifications, see this doc.
Step 3. Add the following lines at the bottom of proguard.config
If the application you integrate SDK in is a part of a cross-platform project, then the user data initialization is required.
Since the analytics of cross-platform projects is based on a unique user (unlike the usual projects where it is based on device identifiers), you have to:
Set the unique cross-platform user identifier (it will be used for cross-platform project data collection).
Actualize the user data. Mostly it is about game applications where the player has a game level as a characteristic. For such projects you need to set the current player level.
If your application allows user to re-login (changing the user during the working session of application), then the setUserID and setCurrentLevel methods should be called just after the authorization. You don't need to call the SDK initialization one more time.
To enable the debug mode and make SDK notifications displayed in the console use this method:
{
"player_id": "2D2R-OP3C",
"name": "Beebee-Ate",
"level": 42,
"attributes": {
"devtodev_apikey": "ak-XXXXXXXXXXXXXXXXXXXXXXXXXXXXXXXX",
"devtodev_device_id": {
"devtodevId": 123456,
"userId": "2D2R-OP3C",
"advertisingId": "xxxxxxxx-xxxx-xxxx-xxxx-xxxxxxxxxxxx"
},
}
}<script type="text/javascript" src="https://cdn.devtodev.com/sdk/web/v1/devtodevsdk.js">
</script>/**
* @param {string} apiKey - devtodev API key, unique API key can be found in the application
* settings ("Settings" → "SDK" → "Integration")
* @param {string} userId - Unique user identifier.
* For example, user’s ID in a social network, or a unique account name used
* for user identification on your server.
* @param {string} previousUserId - Previous unique user identifier. Optional.
* It is used in case of change of the user identifier.
*/
devtodev.init(apiKey, userId, previousUserId);/**
* Initializes the user with the specified cross-platform identifier
* @param {string} сrossplatformUserId - unique cross-platform user ID used
* for user identification on your server.
*/
devtodev.setCrossplatformUserId(сrossplatformUserId);/**
* Initializes the current user level. Required if level feature used in the app.
* @param {number} currentUserLevel- Сurrent game level of the player.
*/
devtodev.setCurrentLevel(currentUserLevel);/**
* @param {Object} appData - App data object.
* @param {string} appData.appVersion - Current app version. Required.
* @param {number} appData.codeVersion - Current code version. Optional.
*/
devtodev.setAppData(appData);/**
* Activates console log
* @param {boolean} status
*/
devtodev.setDebugLog(status);<service
android:name="com.devtodev.push.logic.DTDFcmMessagingService"
android:enabled="false">
</service>dependencies {
implementation 'com.devtodev:android:1.14.10'
implementation 'com.android.installreferrer:installreferrer:2.2'
implementation 'com.google.android.gms:play-services-base:17.6.0'
implementation 'com.google.firebase:firebase-core:19.0.0'
implementation 'androidx.preference:preference:1.1.1' //or higher, required for SDK version 1.14.8 and higher
}public class MyActivity extends Activity {
@Override
public void onCreate(Bundle savedInstanceState) {
super.onCreate(savedInstanceState);
// Initialization devtodev SDK
DevToDev.init(this, APP_ID, SECRET_KEY);
}
}-keep class com.devtodev.** { *; }
-dontwarn com.devtodev.**/**
* Method allows to initialize the user. It applies when SDK initialization or user relogin.
* @param String activeUserId - unique cross-platform user identifier (max. 64 symbols)
*/
DevToDev.setUserId(activeUserId);
/**
* Method sets the current user level. Using this method allows to actualize the SDK user data
* in game cross-platform applications.
* @param int level - number of current game level of the user
*/
DevToDev.setCurrentLevel(currentLevel);
/**
* devtodev SDK initialization
* @param String appId - devtodev App Id
* @param String secretKey - Secret key
* devtodev App Id and Secret key can be found in the devtodev application
* settings page ("Settings" → "SDK" → "Integration")
*/
DevToDev.init(getBaseContext(), appId, secretKey);/**
* @param logLevel
*/
DevToDev.setLogLevel(LogLevel logLevel);The level of logging the SDK activity. The DTDLogLevel.No value is used by default. For troubleshooting during integration, it is recommended to set it to DTDLogLevel.Debug, and either switch it off DTDLogLevel.No or use it only for error handling DTDLogLevel.Error in the release version.
ApplicationVersion
String
The app version during the devtodev SDK initialization. It is recommended that you set the app version before the initialization to make the collection of app version statistics more precise.
DTDLogLevel (enum)
The level of logging the SDK activity. The DTDLogLevel.no value is used by default. For troubleshooting during integration it is recommended to set it to DTDLogLevel.Debug, and either switch it off DTDLogLevel.No. Use DTDLogLevel.No in the release version.
Parameter
Type
Description
currentLevel
Integer
The player level at the moment of devtodev SDK initialization. It’s optional but we recommend using it for improving data accuracy.
userId
String
A custom user ID assigned by the developer. In the case of default calculation by device IDs, the identifier can be used for searching users in devtodev. In case the project uses calculation by user IDs, the parameter is mandatory because it becomes the principal calculation ID in devtodev.
trackingAvailability
DTDTrackingStatus (enum)
The property allows or disallows devtodev tracking of the user. By default, it is set to DTDTrackingStatus.Enable. SDK stores the previously assigned value. Pass DTDTrackingStatus.Disable if the user opted out of tracking in line with GDPR.
logLevel
DTDLogLevel (enum)
Bundle identifier of the application (App Bundle ID)


The level of logging the SDK activity. The DTDLogLevel.no value is used by default. For troubleshooting during integration it is recommended to set it to DTDLogLevel.debug, and either switch it off DTDLogLevel.no. Use DTDLogLevel.no in the release version.
Remove AdSupport.framework all the links pointing to it.
Parameter
Type
Description
currentLevel
int
The player level at the moment of devtodev SDK initialization. It is recommended (but optional) to use to improve data precision.
userId
string
A custom user identifier provided by the developer. If you utilize the default calculation by the device ID, this identifier can be used for finding a user in devtodev.
In case your project utilizes the calculation by the user identifier, you must set this parameter because it becomes the main user identifier in devtodev.
trackingAvailability
DTDTrackingStatus (enum)
The property allows or disallows devtodev tracking of the user. By default, it is set to DTDTrackingStatus.enable. SDK stores the previously assigned value. Pass DTDTrackingStatus.disable if the user opted out of tracking in line with GDPR.
logLevel
DTDLogLevel (enum)

For the correct SDK functioning add the following frameworks:
Security.framework (Optional)
UIKit.framework (Optional)
UserNotifications (Optional)
StoreKit.framework
AdSupport.framework
Add init method into didFinishLaunchingWithOptions method of your AppDelegate.m
If the application you integrate SDK in is a part of a cross-platform project, then the user data initialization is required. Since the analytics of cross-platform projects is based on an unique user (unlike the usual projects where it is based on device identifiers), you have to:
Set the unique cross-platform user identifier (it will be used for cross-platform project data collection).
Actualize the user data. Mostly it is about game applications where the player has a game level as a characteristic. For such projects, you need to set the current player level.
Submit the data to the application settings in devtodev system
Integrate devtodev SDK to the application (see the "SDK integration" division to learn more about integrating and initializing devtodev SDK)
Set Push Notification Enabled in blueprint.
Create a campaign for sending push notifications in "Push" section
Schedule the delivery
That's it!
Package Manager UI
Find the DevToDev.Messaging package using the package manager search engine and click Install. The latest version of the package is recommended.
To integrate WNS, you need to get the Package SID and Application Secret Key from the Microsoft Partner Center and specify them in the devtodev push notification settings (Project -> Settings-> Push notifications):
For the correct package functioning, add handlers invoke to the Windows.UI.Xaml.Application class implementation.
Besides, in the UI editor of the Package.appxmanifest file do the following:
Add Background Tasks to the Declarations tab and mark it as System Event. After that enter DevToDev.Background.ToastNotificationBackgroundTask to the Entry Point field.
Add Background Tasks to the Declarations tab and mark it as Push Notification. After that enter DevToDev.Background.RawNotificationBackgroundTask to the Entry Point field.
For the DevToDev.Messaging package functioning you need to have the main DevToDev.Analytics package installed. Initialize the SDK before initializing messages. You can read about it in more detail in the SDK initialization section.
After the SDK has been initialized you can move to initializing messages. To do this, call the method:
It is possible to listen to events from the DevToDev.Messaging package:
1. Push Token - a string that allows to identify the client on a remote server for sending him customized notifications. For listening the unique Push Token ID issue event, it is necessary to be subscribed to the event:
2. To track the errors related to the unique Push Token ID issue, it is necessary to be subscribed to the event:
Where error is a string value containing information about the error.
3. To handle incoming message data, it is necessary to be subscribed to the following event:
Where messageData belongs to the IDictionary<string, string> type and contains data sent from the server together with the message.
4. To handle notification activation events, it is necessary to be subscribed to the event:
Where messageAction is DevToDev.Messaging.DTDMessageAction class instance:
Call the method to turn notifications off:


The DevToDev SDK extends the Godot engine in a modular way and supports the following platforms: MacOS, iOS, Android.
Godot engine 4.0+ ()
.
build system.
SDK module source code ()
The SDK module is available in . Download the Source code of latest release and copy d2d_analytics folder to the modules(/godot/modules/) folder of Godot engine source code.
To work in the Godot editor, compile the engine source code and the analytics module:
For initialization, add the following code at the start of your application:
You can find the AppID in the settings of the respective app in devtodev (Settings → SDK → Integration → ).
config – an object instance of GDDTDAnalyticsConfiguration, which is used for specifying additional properties during the initialization
Example:
Open the Export Template Manager to download and install templates:
Open a terminal, go to the root directory of the engine source code. Compile a custom template for MacOS (see for MacOS), select Debug or Release build and processor architecture. To support both architectures in a single Universal 2 binary, use lipo:
The next step is to prepare a custom template as a macos.zip archive. Don't forget to add the DTDAnalytics native library, copy libDTDAnalytics.dylib to macos_template.app/Contents/MacOS/.
Open the Export menu and specify the path to the prepared custom template:
Open the Export Template Manager to download and install templates:
Open a terminal, go to the root directory of the engine source code. And compile a custom template for iOS (see for iOS). To work with the iOS simulator, compile the sources with the ios_simulator=yes flag. To support both architectures in a single Universal 2 binary, use lipo:
The next step is to prepare a custom template as an ios.zip archive. Don't forget to add the DTDAnalytics native library, copy DTDAnalytics.xcframework to ios_xcode/.
In XCode project:
Add DTDAnalytics.xcframework to the project (with Do Not Embed specified)
Create Bridging-Header. To do this, add any swift file to the project (don't delete it later) and select 'Create Bridging Header' in the dialogue box that appears.
Add frameworks:
Click to install android templates:
After installing the template, an android folder will appear in your project.
Move the d2d_analytics/native/androidAnalytics.aar to the android/plugins/ folder in your project. You will also need to create an Analytics.gdap file in android/plugins/ with the following content:
Next, Analytics should appear in the Plugins section, check it out:
The next step is to compile the Godot engine for Android (see ), choose debug or release build, and select the processor architecture.
After successful compilation execute the following commands:
In the next step in godot-4.0-stable/bin you will see godot-lib.template_debug.aar or
godot-lib.template_relaese.aar.
You need to copy and replace this file to the previously installed template in your project at the path:
appName/android/build/libs/debug - for debugging
appName/android/build/libs/release - for release
After these steps, you are ready to export your Android app.
Make sure that Use Gradle Build (in the Gradle Build section), Analytics (in the Plugins section) and the previously compiled Architecture (in the Architectures section) are selected.
This generation of SDK is deprecated and is no longer supported.
Please do the following to integrate your application with devtodev:
Add the application to the Space using the wizard for adding application. Attention! If your Adobe Air can be used for compilations for different platforms, you need to add the applications in devtodev for each platform. As a result, the statistics will be gained for each platform separately.
Add com.devtodev.sdk.ane library to your application
For Android add the following permissions to the MyApplication.xml file:
To automatically gather the referrals data on Android, add the following strings into tag
For other platforms no changes are needed.
5. Add the following imports to your source
6. Add following source into initialize event in MyApplication.mxml file:
The appKey and appSecret values are unique for each app on each platform and can be found in the settings of appropriate app ("Settings" → "SDK" → "Integration").
For example: file MyApplication.mxml:
file MyApplication.xml:
If the application you integrate SDK in is a part of cross-platform project, then the user data initialization is required.
Since the analytics of cross-platform projects is based on a unique user (unlike the usual projects where it is based on device identifiers), you have to:
Set the unique cross-platform user identifier (it will be used for cross-platform project data collection).
Actualize the user data. Mostly it is about game applications where the player has a game level as a characteristic. For such projects, you need to set the current player level.
If your application allows user to re-login (changing the user during the working session of application), then the setUserID and setCurrentLevel methods should be called just after the authorization. You don't need to call the SDK initialization one more time.
To enable the debug mode and make SDK notifications displayed in the console, use this method:
Here are some of the new features you might have missed.
Released: 20/12/2023
Results from Devtodev’s Retention report can now be added to a custom dashboard as a widget. This information helps you track crucial retention metric values for your project. The update eliminates the need for SQL in building the report and adding it to the dashboard.
Here are some examples of how you can use this functionality:
var config = new DTDAnalyticsConfiguration();
config.LogLevel = DTDLogLevel.Error;
DTDAnalytics.Initialize("App ID", config);var config = new DevToDev.Analytics.DTDAnalyticsConfiguration();
config.LogLevel = DTDLogLevel.Error;
config.CurrentLevel = 2;
config.UserId = "CustomUserId";
config.TrackingAvailability = DTDTrackingStatus.Enable;
config.ApplicationVersion = "1.2.34";
DevToDev.Analytics.DTDAnalytics.Initialize("App ID", config);let config = DTDAnalyticsConfiguration()
config.logLevel = .error
DTDAnalytics.initialize(applicationKey: "App ID", configuration: config)DTDAnalyticsConfiguration *config;
config.logLevel = DTDLogLevelError;
[DTDAnalytics applicationKey:@"App ID" configuration:config];let config = DTDAnalyticsConfiguration()
config.currentLevel = 1
config.userId = "CustomUserID"
config.trackingAvailability = .enable
config.logLevel = .no
DTDAnalytics.initialize(applicationKey: "App ID", configuration: config)DTDAnalyticsConfiguration *config;
config.currentLevel = @1;
config.userId = @"CustomUserID";
config.trackingAvailability = DTDTrackingStatusEnable;
config.logLevel = DTDLogLevelNo;
[DTDAnalytics applicationKey:@"App ID" configuration:config];@main
struct TestSwiftUIApp: App {
init() {
let config = DTDAnalyticsConfiguration()
config.logLevel = .debug
DTDAnalytics.initialize(applicationKey: "App ID", configuration: config)
}
var body: some Scene {
WindowGroup {
ContentView()
}
}
}DTDAnalytics.coppaControlEnable()
DTDAnalytics.initialize(applicationKey: "App ID", configuration: config)[DTDAnalytics coppaControlEnable];
[DTDAnalytics applicationKey:@"App ID" configuration:config];/**
* devtodev App Id and Secret key can be found in the devtodev application
* settings page (“My apps” → App Name → “Settings” → “Integration”)
*/
[DevToDev initWithKey:applicationId andSecretKey:secretKey];gem install cocoapodspod 'devtodev'pod install/**
* Method allows to initialize the user. It applies when SDK initialization or user relogin.
* @param NSString activeUserId - unique cross-platform user identifier (max. 64 symbols)
*/
[DevToDev setUserId:@"activeUserId"];
/**
* Method sets the current user level. Using this method allows to actualize
* the SDK user data in game cross-platform applications.
* @param NSUInteger level - number of current game level of the user
*/
[DevToDev setCurrentLevel:level];
/**
* devtodev App Id and Secret key can be found in the devtodev application
* settings page ("Settings" → "SDK" → "Integration")
*/
[DevToDev initWithKey:applicationId andSecretKey:secretKey];/**
* @param BOOL isActive
*/
[DevToDev setActiveLog: (BOOL) isActive];sealed partial class App : Application
{
protected override void OnLaunched(LaunchActivatedEventArgs e)
{
// Your code...
DTDMessaging.HandleActivatedEvent(e);
}
protected override void OnActivated(IActivatedEventArgs args)
{
// Your code...
DTDMessaging.HandleActivatedEvent(args);
}
}DTDMessaging.SetMessagingEnabling(true);DTDMessaging.OnTokenReceived += token => { /* Your code... */ };DTDMessaging.OnTokenFailed += error => { /* Your code... */ };DTDMessaging.OnMessageReceived += messageData => { /* Your code... */ };DTDMessaging.OnMessageActivated += messageAction => { /* Your code with token. */ };/// <summary>
/// The class contains information about notification's action.
/// </summary>
public sealed class DTDMessageAction
{
/// <summary>
/// Action type.
/// Can be: Open, Url, Share, DeepLink.
/// </summary>
public DTDMessageActionType ActionType { get; }
/// <summary>
/// Action string.
/// </summary>
public string ActionString { get; }
/// <summary>
/// Activated button ID.
/// </summary>
public string ButtonId { get; }
/// <summary>
/// Activated button's text.
/// </summary>
public string ButtonText { get; }
/// <summary>
/// Notification data.
/// </summary>
public IReadOnlyDictionary<string, string> MessageData { get; }
}DTDMessaging.SetMessagingEnabling(false);Display the retention of users who signed up for your project and then performed a desired action (e.g., created a project, started a workout, or invited a friend).
Compare the retention of users who engaged with your new features with those who did not (e.g., completed/skipped onboarding).
Add several widgets to compare the retention of users who used different methods of doing something (e.g., project creation, battle modes, price plans, payment methods, etc.).
Released: 05/12/2023
Devtodev’s Custom event, Custom funnels, and User flow reports got a new operator and parameter value that will increase their flexibility. Use the 'IS NOT' operator and 'null' parameter value to exclude certain parameters and to work with events that do not return any value.
Released: 21/11/2023
You can disable any property that you have previously added and now consider unnecessary or faulty. For example, if you initially collected the 'user type' property (such as beginner or pro), but have since decided to focus on the 'user status' property (guest/registered), you can disable the 'user type' property to maintain a cleaner and more organized report-building process.
Released: 20/11/2023
With this update a familiar 1x1 widget from SQL and Basic Metrics becomes available in the Custom events report. Select Report type -> Number and a single number for your most important KPI is ready for your dashboard.
Here are some examples of what you can check: number of in-app shop openings, average battle time in a game, conversion from workout start to finish.
Released: 30/10/2023
When creating a new devtodev project, you can now select the type of project: a game or an application. This choice will affect the customization of the devtodev interface. Depending on the type, specialized reports will be available.
You can always change the type of the project later in Settings -> General settings.
Released: 19/09/2023
Devtodev users are familiar with the 1x1 widget — a small module on your dashboard containing a single number designed to keep you informed about important metrics. With the latest update from Devtodev, you no longer need to use SQL to create widgets with basic metrics. You can simply open the Basic Metrics report, select a metric, click View -> Number, and then add this number as a widget to your dashboard. This will not only save you valuable time but also enable you to use a limited number of SQL widgets to display other metrics.
Released: 29/08/2023
When it comes to data visualization, Devtodev offers plenty of powerful tools, and SQL widgets is one of them. To give you access to even more data points on your dashboards, we’ve introduced an update that offers you the ability to display two metrics on a single 1x1 widget. Simply write a single query and get two numbers: it is easy, convenient and requires less time than creating separate queries for two individual widgets.
Released: 16/08/2023
Devtodev’s clients frequently create funnels to analyze various aspects of their apps and games. However, these funnels are often longer than a single screen, and the users find themselves having to scroll excessively, which can be quite inconvenient.
To alleviate this issue, we have recently introduced the 'Step' option to the Conversion funnel report. It is designed to save our clients time and effort while streamlining the funnel exploration process.
Released: 25/07/2023
The overview provides essential metrics for all projects in Space, allowing users to conventionally track the metrics of the projects. Additionally, it offers the option to access the prepared reports in the selected project to analyze metric rises or falls. The overview aims to briefly introduce each project's key metrics and keep users informed about devtodev's news.
Released: 18/07/2023
This update empowers you to enhance collaboration among team members by giving each step in the Tutorial analysis report a meaningful and easy-to-understand name of your choice.
By tapping on the step in the report, you can assign a name that describes the action and facilitate seamless collaboration among all team members working on the app.
Released: 27/06/2023
In our latest update we added distribution by parameter (Show % of total) across all the Basic metrics report tables. This feature proves particularly valuable when you need to determine the percentage of users with a specific attribute in relation to the total number of users in a particular group. It’s extremely convenient because you don’t need to waste time on creating separate SQL queries anymore!
Released: 20/06/2023
devtodev’s Retention reports has got several new features that will enable you to narrow down the audiences and calculate this metric more effectively.
With this update, we’ve introduced two additional options for two calculation methods (by calendar days and by 24-hour interval):
Flexible calculation start: you can now choose a specific event or several events that define a cohort for retention calculation, allowing for more tailored analysis..
Custom calculation end: you have the freedom to select a particular event that signifies a user’s return to the product, enabling more precise measurement.
Released: 25/05/2023
This update got you two new features in the Funnel report (Reports -> Conversion funnel): an alternative event that you can use when building a funnel, and an option for creating a segment of users who failed to complete all the funnel steps.
Released: 02/05/2023
This time we added several great features to the report’s Virtual goods and purchases section. They allow for a much deeper analysis of in-game currency, purchases, and real money spends.
What we did:
Added display of item groups. The groups may come in handy in case you have too many items.
Added breakdown by levels.
Introduced a number of purchases divided by the DAU metric value (“% of active”, as in the Custom events report).
Improved mean value. After the update, we calculate it as the number of items purchased at a level divided by the number of users.
Released: 17/04/2023
You can now activate Data labels on charts in Basic Metrics, Custom events or SQL reports. Use them to evaluate the dynamics and values in one glimpse.
Released: 04/04/2023
Sharing dashboards has never been so easy and convenient! devtodev already has a wide range of tools that make your work more smooth and unhindered, however, the export to pdf tool takes the process to the next level.
It’s an extremely convenient option for both senders and recipients. The senders can make sure that the recipients get only the data that they want to share with them in the exact form that they intended to show them. The recipients can get access to data without going through the whole process of signing up to the devtodev platform.
Released: 07/03/2023
Analyzing FTUE using devtodev funnels is as easy as it can be! To make the process more convenient, we are introducing ‘limitation by session’ — a new additional option that will help you with analyzing any particular user session. Now building a funnel is as easy as creating any devtodev out-of-the-box reports — simply click and analyze every aspect of it.
If you are curious about the number of users who achieve the ultimate goal during the first or the Nth session (first two, three, etc.), you can easily calculate them, build a segment and then analyze thoroughly. Simply click on ‘Conversion time limit’, set a sequential number of the session and build a funnel.
Now you can also rename funnel steps!
Released: 16/02/2023
If you have a child-directed app or game, you may worry that the data you send to devtodev is anonymised and protected enough. It’s not a problem anymore with our updated SDK because it operates in full compliance with COPPA — the Children's Online Privacy Protection Act.
This updated version of devtodev SDK does not collect, process or store ad IDs of children. It simply creates anonymised user identification numbers that can be used by the platform for tracking underaged users without influencing the decisions they make.
If you already use devtodev SDK, all you need to do is to enable the COPPA-compliance opinion before SDK initialization and delete the dependencies necessary for processing ad and vendor IDs. This will not interfere with your working process because almost all devtodev reports will stay available and you will be able to use them as you did before.
Released: 14/02/2023
We’ve added 1, 7, 14 and 30-day Cumulative ARPU to the A/B tests. You can use these metrics to improve the quality of the analysis and prove that the implemented changes did not influence other key metrics of the app.
Released: 17/01/2023
Drill down into your user flow data by setting a limit on the number of user sessions! This option comes in handy in case you want to take a closer look at what your users managed to achieve during, let’s say, their first session, and compare it with your expectations.
There are three options in this report - “No”, “Limit by first session”, and “Limit by number of sessions”. If you want to see events that users completed during their first session, choose the second option. If you want to see data for several sessions, choose the third option. In this case, the calculation is as follows: we take the specified number of sessions performed during the selected period, then we take the dates of the first and the last sessions, and after that we analyze the events performed during this period.

AppTrackingTransparency.framework
AdSupport.framework
Parameter
Type
Description
CurrentLevel
Integer
The player level at the moment of devtodev SDK initialization. It’s optional but we recommend using it for improving data accuracy.
UserId
String
A custom user ID assigned by the developer. In the case of default calculation by device IDs, the identifier can be used for searching users in devtodev. In case the project uses calculation by user IDs, the parameter is mandatory because it becomes the principal calculation ID in devtodev.
TrackingAvailability
GDDTDTrackingStatus (enum)
The property allows or disallows devtodev tracking of the user. By default, it is set to GDDTDTrackingStatus.Enable. SDK stores the previously assigned value. Pass GDDTDTrackingStatus.Disable if the user opted out of tracking in line with GDPR.
LogLevel
GDDTDLogLevel (enum)
The level of logging the SDK activity. The GDDTDLogLevel.No value is used by default. For troubleshooting during integration it is recommended to set it to GDDTDLogLevel.Debug, and either switch it off GDDTDLogLevel.No. Use GDDTDLogLevel.No in the release version.


scons platform=macos arch=x86_64
scons platform=macos arch=arm64
lipo -create bin/godot.macos.editor.x86_64 bin/godot.macos.editor.arm64 -output bin/godot.macos.editor.universal
cp -r misc/dist/macos_tools.app ./Godot.app
mkdir -p Godot.app/Contents/MacOS
cp bin/godot.macos.editor.universal Godot.app/Contents/MacOS/Godot
cp modules/d2d_analytics/native/macos/libDTDAnalytics.dylib Godot.app/Contents/MacOS/
chmod +x Godot.app/Contents/MacOS/Godot
codesign --force --timestamp --options=runtime --entitlements misc/dist/macos/editor.entitlements -s - Godot.appvar config = GDDTDAnalyticsConfiguration.new()
config.logLevel = GDDTDLogLevel.Debug
DTDAnalytics.InitializeWithConfig("AppID", config)var config = GDDTDAnalyticsConfiguration.new()
config.logLevel = GDDTDLogLevel.No
config.trackingStatus = GDDTDTrackingStatus.Enable
config.currentLevel = 1
config.userId = "unique_userId"
DTDAnalytics.InitializeWithConfig("AppID", config)scons platform=macos target=template_debug arch=x86_64
scons platform=macos target=template_debug arch=arm64
lipo -create bin/godot.macos.template_debug.x86_64 bin/godot.macos.template_debug.arm64 -output bin/godot.macos.template_debug.universalcp -r misc/dist/macos_template.app .
mkdir -p macos_template.app/Contents/MacOS
cp bin/godot.macos.template_debug.universal macos_template.app/Contents/MacOS/godot_macos_debug.universal
cp modules/d2d_analytics/native/macos/libDTDAnalytics.dylib macos_template.app/Contents/MacOS/
chmod +x macos_template.app/Contents/MacOS/godot_*
chmod +x macos_template.app/Contents/MacOS/libDTDAnalytics.dylib
zip -q -9 -r macos.zip macos_template.appscons p=ios target=template_debug
scons p=ios target=template_release
scons p=ios target=template_debug ios_simulator=yes arch=x86_64
scons p=ios target=template_debug ios_simulator=yes arch=arm64
cp -r misc/dist/ios_xcode .
cp bin/libgodot.ios.template_debug.arm64.a ios_xcode/libgodot.ios.debug.xcframework/ios-arm64/libgodot.a
lipo -create bin/libgodot.ios.template_debug.arm64.simulator.a bin/libgodot.ios.template_debug.x86_64.simulator.a -output ios_xcode/libgodot.ios.debug.xcframework/ios-arm64_x86_64-simulator/libgodot.a
cp bin/libgodot.ios.template_release.arm64.a ios_xcode/libgodot.ios.release.xcframework/ios-arm64/libgodot.a
lipo -create bin/libgodot.ios.template_debug.arm64.simulator.a bin/libgodot.ios.template_debug.x86_64.simulator.a -output ios_xcode/libgodot.ios.release.xcframework/ios-arm64_x86_64-simulator/libgodot.acp -r modules/d2d_analytics/native/ios/DTDAnalytics.xcframework ios_xcode/
cd "ios_xcode"
zip -q -r ios.zip ./*
cd ..
cp "ios_xcode/ios.zip" ./[config]
name="Analytics"
binary_type="local"
binary="Analytics.aar"
[dependencies]
remote=[
"com.google.code.gson:gson:2.8.9",
"org.jetbrains.kotlinx:kotlinx-coroutines-android:1.5.2",
"com.google.android.gms:play-services-ads-identifier:18.0.1",
"com.devtodev:android-google:1.0.0"
// Optional (recommended)
"com.android.installreferrer:installreferrer:2.2"
]
custom_maven_repos=["https://repo.maven.apache.org/maven2/"]// Example. For debug on arm64v8 architecture use:
scons platform=android target=template_debug arch=arm64v8
//for release:
scons platform=android target=template_release arch=arm64v8// Example. For debug on arm64v8 architecture use:
scons platform=android target=template_debug arch=arm64v8
//for release:
scons platform=android target=template_release arch=arm64v8 <uses-permission android:name="android.permission.INTERNET"/>
<!-- Necessary(Required for sending analytics data to our server) -->
<uses-permission android:name="android.permission.ACCESS_WIFI_STATE" />
<!-- Additional (Required for devices' MAC addresses collection) -->
<uses-permission android:name="android.permission.READ_PHONE_STATE" />
<!-- Additional (Required for cellular operator data collection) --> <receiver android:name="com.devtodev.InstallReceiver" android:enabled="true" android:exported="true">
<intent-filter>
<action android:name="com.android.vending.INSTALL_REFERRER" />
</intent-filter>
</receiver> import com.devtodev.sdk.core.DevToDev;
import com.devtodev.sdk.core.data.consts.AccrualType;
import com.devtodev.sdk.core.data.consts.Gender;
import com.devtodev.sdk.core.data.consts.SocialNetwork;
import com.devtodev.sdk.core.data.consts.TutorialState;
import com.devtodev.sdk.cheat.data.consts.VerifyStatus;
import com.devtodev.sdk.cheat.data.consts.TimeStatus;
import com.devtodev.sdk.core.data.metrics.aggregated.events.CustomEventParams; DevToDev.init(AppId:String, SecretKey:String);<?xml version="1.0" encoding="utf-8"?>
<s:Application initialize="application1_activateHandler(event)"
deactivate="application1_deactivateHandler(event)"
xmlns:fx="http://ns.adobe.com/mxml/2009"
xmlns:s="library://ns.adobe.com/flex/spark" applicationDPI="160">
<fx:Script>
<![CDATA[
import com.devtodev.sdk.core.DevToDev;
import com.devtodev.sdk.core.data.consts.AccrualType;
import com.devtodev.sdk.core.data.consts.Gender;
import com.devtodev.sdk.core.data.consts.SocialNetwork;
import com.devtodev.sdk.core.data.consts.TutorialState;
import com.devtodev.sdk.cheat.data.consts.VerifyStatus;
import com.devtodev.sdk.cheat.data.consts.TimeStatus;
import com.devtodev.sdk.core.data.metrics.aggregated.events.CustomEventParams;
protected function application1_activateHandler(event:Event):void {
DevToDev.init(AppId, SecretKey);
DevToDev.startSession();
}
protected function application1_deactivateHandler(event:Event):void {
DevToDev.endSession();
}
]]>
</fx:Script>
<fx:Declarations>
</fx:Declarations>
<s:VGroup>
</s:VGroup>
</s:Application><?xml version="1.0" encoding="utf-8" standalone="no"?>
<application xmlns="http://ns.adobe.com/air/application/17.0">
<id>com.my.application</id>
<filename>myapplication</filename>
<name>myapplication</name>
<versionNumber>1.0.0</versionNumber>
<initialWindow>
<autoOrients>true</autoOrients>
<fullScreen>false</fullScreen>
<visible>true</visible>
<softKeyboardBehavior>none</softKeyboardBehavior>
</initialWindow>
<android>
<colorDepth>16bit</colorDepth>
<manifestAdditions><![CDATA[
<manifest android:installLocation="auto">
<uses-permission android:name="android.permission.INTERNET"/>
<uses-permission android:name="android.permission.WAKE_LOCK"/>
<uses-permission android:name="android.permission.READ_PHONE_STATE"/>
<application>
<receiver android:name="com.devtodev.InstallReceiver" android:enabled="true"
android:exported="true">
<intent-filter>
<action android:name="com.android.vending.INSTALL_REFERRER" />
</intent-filter>
</receiver>
</application>
</manifest>
]]></manifestAdditions>
</android>
<iPhone>
<InfoAdditions><![CDATA[
<key>UIDeviceFamily</key>
<array>
<string>1</string>
<string>2</string>
</array>
]]></InfoAdditions>
<requestedDisplayResolution>high</requestedDisplayResolution>
</iPhone>
<extensions>
<extensionID>com.devtodev.SDK</extensionID>
</extensions>
</application>/**
* Method allows to initialize the user. It applies when SDK initialization or user relogin.
* @param activeUserId - unique cross-platform user identifier (max. 64 symbols)
*/
DevToDev.setUserId(activeUserId:String);
/**
* Method sets the current user level. Using this method allows to actualize the SDK user data
* in game cross-platform applications.
* @param level - number of current game level of the user
*/
DevToDev.setCurrentLevel(level:int);
/**
* devtodev App Id and Secret key can be found in the devtodev application
* settings page ("Settings" → "SDK" → "Integration")
* @param appKey - application key
* @param appSecret - application secret
*/
DevToDev.init(appKey:String, appSecret:String);/**
* @param logLevel (set logLevel=1 to enable log, 0 to disable)
*/
DevToDev.setLogLevel(logLevel:int);


To begin working with analytics, you need to start sending events (information about user activity in the project) to the analytics system.
devtodev provides basic events that drive the majority of the reports.
Users start with opening the app, and this process we call "starting a session". For your convenience, in the majority of devtodev SDKs this event is integrated automatically.
There is no separate event in devtodev that describes a session by its duration and start or end date.
We use two events that we can use to examine the duration of the sessions. The first event captures the start date of a new session and the second captures the duration of each application activity (time when application is in focus). In our experience, this is the most reliable solution at the moment.
At the moment when application receives focus (this may be the moment the SDK is initialized / the application is opened / the device wakes up from the sleep mode with the focus on the application), we begin to assume that the application becomes active and begin to count the duration of the activity.
If the application loses focus (minimizing the application / device is going into the sleep mode / switching to another application / exiting the application), we consider that the activity is completed and we send its duration to the devtodev server. This is an application activity event.
We consider the start of a new session to be the moment when the application receives focus (see the description above), but at the same time we take into account that more than 10 minutes have passed since the last activity of the application. Otherwise, we count that the previously launched session continues. More detailed information on tracking sessions can be found on the page.
If users can use real money to make purchases in your project, you need to integrate the Payment event. When devtodev receives data about sessions and payments in your app, we can calculate all financial metrics (gross, revenue, average check) and metrics of the project’s financial efficiency (ARPU, ARPPU, paying share, LTV).
If your application has subscriptions, you can integrate this event to analyze the financial data as well as the structure of your subscribers. Devtodev integrations allow you to receive information about subscription purchases even if the user doesn’t open the app (auto-renewable subscriptions).
Using this event you can evaluate the effectiveness of the tutorial steps system, analyze how users complete the tutorial, find bottlenecks, and measure the time it takes for users to complete the tutorial. The event should be sent at the end of each tutorial step indicating the number of completed steps as a parameter.
Here are some predefined values for the Tutorial Step event parameter:
0 - the user skipped the tutorial
-1 - the user started the tutorial
-2 - the user finished the tutorial
devtodev is a universal analytics system, and our structure of basic events is designed for game projects specifically. However, there may be situations when your project requires events that are not provided by the devtodev basic events. Such events can still be sent and analyzed in our system - as custom events.
Here are some examples of users' actions that can be sent as custom events: when users open an in-game store, click on items, buy items. Based on these events, you can build a funnel and see the conversion on each step.
Some limits for custom events:
The number of different event types sent from one project shouldn't exceed 300 (see ).
The event name must not exceed 72 characters.
One event can contain up to 20 parameters, which must have unique names of up to 32 symbols.
Parameters can be string and numeric: - the maximum length of parameter values is 255 characters; - the number of string parameter values cannot exceed 50 000; when it exceeds 50 000, the further sending of information about the parameter and possibilities to work with it will be blocked.
Here is some expert advice to avoid problems with limits in custom events:
There is no need to send user IDs in parameters (they are collected by default).
Do not send time in the timestamp format (it is also collected by default).
This event is for games only. It is worthwhile to integrate this event into a game type project, as specified in the . In projects with the “app” type, game events will not be tracked and displayed in the interface, even if they are integrated. You can verify and change the project type in Settings → .
You can analyze the distribution of the players over the levels. Many game projects have levels, which means that as users become more experienced, they gradually increase their level. In this case levels have a linear structure: the level N is followed by the level N+1. If your project has in-game currency, using the LevelUp event you can send information about the current amount of in-game currency players have. This data allows evaluating the average amount of in-game currency that players have on a particular level.
The event should be sent right after the player reaches the next level.
This event is for games only. It is worthwhile to integrate this event into a game type project, as specified in the . In projects with the “app” type, game events will not be tracked and displayed in the interface, even if they are integrated. You can verify and change the project type in Settings → .
This specific event is a part of the LevelUp event and does not require a separate dispatch. Send this event to track the average amount of in-game currency earned or purchased during a level after each time an in-game account is replenished.
This event is for games only. It is worthwhile to integrate this event into a game type project, as specified in the . In projects with the “app” type, game events will not be tracked and displayed in the interface, even if they are integrated. You can verify and change the project type in Settings → .
There are many projects (for example, Match-3 games), where players make an attempt to complete a level. Their attempts may be either successful or unsuccessful. In addition, during a certain attempt different numerical indicators can be changed: the number of stars, resources, in-game currency.
To analyze such attempts, devtodev provides a basic Progression event. In the Progression event you send information about how players pass a particular game location, whether their attempt is successful, and how numerical indicators change.
This event is for games only. It is worthwhile to integrate this event into a game type project, as specified in the . In projects with the “app” type, game events will not be tracked and displayed in the interface, even if they are integrated. You can verify and change the project type in Settings → .
Many games, especially f2p, have in-game currency. Players can spend it on virtual goods. To work with virtual currency purchases, devtodev has developed the Virtual Currency Payment event.
WSA Integration
For the Messaging module to function you need the basic Analytics package. Before the notification initialization, you need to initialize the SDK. More about it you can read here: Unity Integration.
Add the DTDAnalytics initialization block after the DTDMessaging initialization block.
Use the following method to check current status:
The current module status will be sent to onGetMessagingEnabling callback.
You can listen to basic events of the Messaging module: create the class that implements the IDTDPushListener interface and send it to the DTDMessaging.WSA.SetPushListener method.
Class example:
A complete example of notification module initialization:
Build a Windows Store App in Unity. After the app is built, a Visual Studio project will be created. Proceed with the following changes.
There is a difference in the implementation of the elements mentioned below for different types of projects:
Put the following source in your App class (usually it is App.xaml.cpp file). Add several lines of code in a generated App.xaml.cpp class. After defining headers:
And at the end of of the App::OnLaunched(LaunchActivatedEventArgs^ e) and App::OnActivated(IActivatedEventArgs^ args) functions.
For Example:
Put the following source in your App class (usually it is App.cpp file). Add several lines of code in a generated App.cpp class. After defining headers:
And at the end of of the App::OnActivated(CoreApplicationView^ sender, IActivatedEventArgs^ args) function.
Besides, in the UI editor of the Package.appxmanifest file you need to do the following:
Add Background Tasks in the Declarations tab and mark it as System Event. After that, add DevToDev.Background.ToastNotificationBackgroundTask to the Entry Point field.
Add Background Tasks in the Declarations tab and mark it as Push Notification. After that, add DevToDev.Background.RawNotificationBackgroundTask to the
To disable notifications, call the following method:
Contact us to request access. Use form or reach out to our Customer Success team directly within the platform. We will also greatly appreciate your feedback. Please add REMOTE CONFIGS when submitting your request.
Remote Configuration (Remote config or RC) allows you to customize the app by sending key-value pairs directly to the user’s device. These configs are defined in the devtodev interface and sent to the SDK immediately or at a scheduled time. Remote configs are stored on the devtodev servers. This allows to trigger changes in the app, without updating app versions or changing app code every time.
Before using a remote configuration in devtodev interface, you need to set variables through the SDK and use the methods to apply new parameters. If the app is offline and will not be able to present the config to the user, they will see default values and the app will continue to function correctly.
Integrate remote configs with devtodev SDK:
Remote configuration SDK integrationIn order to create and send a remote configuration to user devices, you need to set parameter values and define conditions to select the audience.
Conditions define the user group (similar to a segment) that will see the modified interface. You can use basic and custom user properties, as well as previously created segments, to filter the audience.
The order of conditions determines their evaluation sequence. The parameter value is assigned based on the first condition that evaluates to true. The condition at the top of the list has the highest priority.
The order is important since several conditions may apply to one user. For example, Parameter A is sent to users from the US that have finished 5 levels. Parameter B is for users that have completed the onboarding (onboarding is obligatory). In this case, both parameters can apply to the US, 5+ levels group of users. You can change the order of the Conditions to define the parameter configuration these users will see.
You can filter the conditions by selecting Filter in the top right corner.
Click +Condition to add a new condition.
Configure your condition settings:
Condition name
Color – select a color tag. You can use the color tags to organize and filter your conditions.
Description – add details about this condition and audience.
Next, define the Audience conditions with user properties.
Select when the new parameter value will apply to the condition audience:
Permanent – the changes will apply instantly.
Scheduled – the changed parameter value will apply only during the set time frame.
Click Finish to complete condition creation.
You can change the condition settings later using the Edit button (pencil icon) or simply by clicking on the condition card.
Parameters represent changes in the app’s UI/UX, a configuration of the interface visible to selected users. They should be pre-implemented in the app and linked to a variable. Parameter value is stored in a key-value format, for example, “button_color” = “green“.
The Parameters section shows detailed information about all of your created parameters:
Parameter – name, value type and description.
Condition – to what audience does this parameter apply.
Value – shows parameter value for each condition.
Users – how many users have this configuration.
You can filter the parameters by selecting Filter in the top roght corner.
Click +Parameter to add a new parameter.
Configure your parameter settings:
Parameter name (key) – the name should be unique and correspond to the variable in your app code.
Type – value type can be a Number, String, JSON or Boolean.
Description – what does this parameter change in the app.
Default value – set the default value for any condition.
Next, configure Conditional values.
Click +Condition and select one or multiple conditions from the list.
Define a parameter value for each condition or use an in-app deafult.
Click Finish to complete parameter creation.
If you do not have any created yet, you can click Finish and add a condition later.
You can change the parameter later using the Edit button in three dots menu.
For convenience, you can organise parameters in folders. Click Add Folder, give it a name and description and click Create Folder.
You can move parameters to different folders.
Click on three dots on the right and click Move to folder, select a destination folder and click Move.
You can also move parameters in bulk: select the necessary parameters and click Move to Folder button in the top right corner.
To edit folder information, delete or ungroup a folder, select a corresponding option in the three dots menu.
Each configuration of parameters and conditons is stored as a different version.
You can compare the versions side by side and, if needed, Roll back to an old version of the configuration. Rolling back will create a new version of the config and send changes to user devices.
We will add an option to send a parameter configuration directly from the A/B test page in the future updates.
For now, if you would like to check which parameter configuration performs better during an A/B test, you need to do the following:
Before launching an A/B test, create a condition with the same audience that will be used in the test.
Create a parameter configuration that you would like to test with this condition.
Publish changes. The configuration will be sent to user devices.
Launch the A/B test. The SDK will update the configuration on device and all events will be marked with an A/B test group.
For now, you cannot use Custom events to define a audience. However, you can create a with the necessary event and use this segment instead.
You cannot see the current configuration in the user card.
The stores around 200 configuration versions.
To initialize the service, call the startAutoTracking method of the DTDPurchases interface. Call the method after the SDK initialization call:
Subscription renewals, cancellations, and other status changes are tracked using server-to-server data from the App Store. See the following sections for setup.
In order to be able to track status changes for subscriptions that were issued prior to the devtodev SDK integration, you must send the history of previously purchased user subscriptions to devtodev.
The SDK keeps track of the need to send this historical data so that it does not make “unnecessary” requests to the App Store. Use the isRestoreTransactionHistoryRequired method to check whether it is necessary to send data about previously purchased subscriptions to devtodev.
The isRestoreTransactionHistoryRequired method returns a BOOL value.
Here is an example of a purchase history request with the check:
To get detailed information about the transaction, devtodev requires access to the App Store Server API. To grant this access, you will need to generate an In-App Purchase API key.
Generating the key:
Authorize on .
Navigate to the Users and Access section.
In the Integrations tab (1), select In-App Purchase from the menu on the left (2), and click (+) to add the key (3).
Go to Settings → Payments integration → IAP auto tracking → Integrate.
Fill in the integration form with the data :
App Bundle ID
In order for IAP auto tracking to work correctly with subscriptions, you need to integrate App Store Server Notification. Go to Settings → Payments integration → Subscriptions → Integrate.
Fill in the iOS Bundle ID and copy the Endpoint URL.
Navigate to . In the left menu column, under General, go to App information


void DTDMessaging.WSA.SetMessagingEnabling(bool value)
The method responsible for enabling or disabling of the push notification module
void DTDMessaging.WSA.GetMessagingEnabling(Action<bool> onGetMessagingEnabling)
The method that returns current state of the push notification module to onGetMessagingEnabling callback
void DTDMessaging.WSA.SetPushListener (IDTDPushListener pushListener)
It sets a listener for push notification event trapping
To be protected from fraudulent transactions, we recommend you to use devtodev Anticheat service.
Use this method, and devtodev will check the transaction's validity with the payment platform, and the response will be returned to the application.
The result can take one of the following values:
In case of a successful check call the following main SDK method:
If the transaction hasn’t passed verification, do not perform the Payment event.
We do not recommend to use the result of devtodev anti-cheat verification as a condition for giving or not giving in-game currency or item purchased by a user!
To check for time cheats call checkTime method every time when the app is being launched
The result can take one of the following values:
To be protected from fraudulent transactions, we recommend you to use devtodev Anticheat service
Use this method, and devtodev will check the transaction validity with the payment platform, and the response will be returned to the application.
Call following method when GooglePlay returns the transaction to your onActivityResult:
You can get sharedSecret key here:
Go to the Google Play Developer Console and sign in. Make sure that you sign in to the account from which the application you are licensing is published (or will be published).
In the application details page, locate the Services & APIs link and click it.
In the Services & APIs page, locate the Licensing & In-App Billing section.
Your public key for licensing is given in the Your License Key For This Application field.
The result can take one of the following values:
In case of a successful check call following the main SDK method:
If the transaction hasn’t passed verification, do not perform the Payment event.
We do not recommend to use the result of devtodev anti-cheat verification as a condition for giving or not giving in-game currency or item purchased by a user!
To check for time cheats call checkTime method every time when the app is being launched
The result can take one of the following values:
To be protected from fraudulent transactions, we recommend you to use devtodev Anticheat service.
Use this method, and devtodev will check the transaction validity with the payment platform, and the response will be returned to the application.
1. Call the method for payment verification:
or if you are using Unity IAP plugin:
where OnReceiptVerifyCallback is the function like this:
Here's how to find your application's public key for licensing (for Google Play platform only, for other platforms the publicKey is not used):
Go to the Google Play Console and sign in. Make sure that you sign in to the account from which the application you are licensing is published (or will be published).
In the application details page, locate the Services & APIs link and click it.
In the Services & APIs page, locate the Licensing & In-App Billing section. Your public key for licensing is given in the Your License Key For This Application field.
ReceiptVerificationStatus can take one of the following values:
Сore SDK should be initialized prior to the call of VerifyPayment function.
2. In case of an unsuccessful check (ReceiptNotValid result) do not call SDK method RealPayment. In other cases:
To check for time cheats call VerifyTime method.
1. Call the method to time verification:
where OnTimeVerifyCallback is the function like this:
DevToDevTimeVerificationStatus can take one of the following values:
Сore SDK should be initialized prior to the call of VerifyTime function.
#if UNITY_WSA
DTDMessaging.WSA.SetMessagingEnabling(true);
#endif##if UNITY_WSA
DTDMessaging.WSA.{AnyMethod}
#endif#void GetMessagingEnabling(Action<bool> onGetMessagingEnabling)public class MyPushListener : IDTDPushListener
{
public void OnPushServiceRegistrationSuccessful(string deviceId)
{
Debug.Log(deviceId);
}
public void OnPushServiceRegistrationFailed(string error)
{
Debug.Log(error);
}
public void OnPushNotificationReceived(DTDPushMessage message)
{
Debug.Log(message);
}
public void OnInvisibleNotificationReceived(DTDPushMessage message)
{
//IOS only.
}
public void OnPushNotificationOpened(DTDPushMessage pushMessage, DTDActionButton actionButton)
{
Debug.Log(pushMessage.ToString());
Debug.Log(actionButton.ToString());
}
}public class MyPushListener : IDTDPushListener
{
public void OnPushServiceRegistrationSuccessful(string deviceId)
{
Debug.Log(deviceId);
}
public void OnPushServiceRegistrationFailed(string error)
{
Debug.Log(error);
}
public void OnPushNotificationReceived(DTDPushMessage message)
{
Debug.Log(message);
}
public void OnInvisibleNotificationReceived(DTDPushMessage message)
{
Debug.Log(message);
}
public void OnPushNotificationOpened(DTDPushMessage pushMessage, DTDActionButton actionButton)
{
Debug.Log(pushMessage.ToString());
Debug.Log(actionButton.ToString());
}
}
public class NotificationExample : MonoBehaviour
{
private const string APP_KEY = "***************"
void Start()
{
DTDAnalytics.Initialize(APP_KEY);
#if UNITY_WSA
DTDMessaging.WSA.SetPushListener(new PushListener());
DTDMessaging.WSA.SetMessagingEnabling(true);
#endif
}
}//...headers
extern "C" __declspec(dllimport) void __stdcall AddActivatedEventArgs(IInspectable* activatedEventArgs);void App::OnActivated(IActivatedEventArgs^ args)
{
//...other code
AddActivatedEventArgs(reinterpret_cast<IInspectable*>(static_cast<Platform::Object^>(args)));
}
void App::OnLaunched(LaunchActivatedEventArgs^ e)
{
auto args = static_cast<IActivatedEventArgs^>(e);
AddActivatedEventArgs(reinterpret_cast<IInspectable*>(static_cast<Platform::Object^>(args)));
}//...headers
extern "C" __declspec(dllimport) void __stdcall AddActivatedEventArgs(IInspectable* activatedEventArgs);void App::OnActivated(CoreApplicationView^ sender, IActivatedEventArgs^ args)
{
//...other code
AddActivatedEventArgs(reinterpret_cast<IInspectable*>(static_cast<Platform::Object^>(args)));
}DTDMessaging.WSA.SetMessagingEnabling(false);[DevToDevCheat verifyPaymentWithCompletion:(void (^)(ReceiptStatus))completionBlock];typedef enum {
ReceiptValid,
ReceiptNotValid,
ReceiptServerError,
ReceiptInternalError,
ReceiptSandbox
} ReceiptStatus;[DevToDev realPayment: (NSString *) transactionId withInAppPrice:(float) inAppPrice
andInAppName: (NSString *) inAppName andInAppCurrencyISOCode: (NSString *) inAppCurrencyISOCode];[DevToDevCheat checkTime: (void (^)(TimeStatus status)) completionBlock];typedef enum {
Valid,
Forward,
Rewind
} TimeStatus;DevToDevCheat.verifyPayment(String receipt, String signature, String publicKey,
OnVerifyListener onVerifyListener);public enum VerifyStatus {
Valid,
Invalid,
InternalError,
ServerError
};DevToDev.realPayment(String pPaymentId, float pInAppPrice, String pInAppName, String pInAppCurrencyISOCode);DevToDevCheat.verifyTime(OnTimeVerifyListener onTimeVerifyListener);public enum TimeStatus {
Valid,
Forward,
Rewind
};DevToDev.AntiCheat.VerifyReceipt(string receipt, string signature, string publicKey,
OnReceiptVerifyCallback callback);DevToDev.AntiCheat.VerifyReceipt(string purchasedProduct, string publicKey, OnReceiptVerifyCallback callback)public void onReceiptVerifyCallback (DevToDev.ReceiptVerificationStatus status) {
Debug.Log ("Verification status" + status);
//TODO put your source here
}public enum ReceiptVerificationStatus {
ReceiptValid,
ReceiptNotValid,
ReceiptServerError,
ReceiptSandbox,
ReceiptInternalError
};DevToDev.Anatylics.RealPayment(string pPaymentId, float pInAppPrice, string pInAppName,
string pInAppCurrencyISOCode);DevToDev.AntiCheat.VerifyTime(OnTimeVerifyCallback callback);public void onTimeVerifyFinished (DevToDev.TimeVerificationStatus status) {
Debug.Log ("Verification status" + status);
//TODO put your source here
};public enum TimeVerificationStatus {
TimeValid,
TimeForward,
TimeRewind
};Set values and select conditions
Last published – date when the configuration was published.
You can use in-app default – in this case the parameter will use the default value define in your app code.


DTDAnalytics 3.9.0
DTDPurchases 3.9.0
Specify the name of the key, for example: "devtodev API Key", and click Generate.
To grant the necessary access to the devtodev service, it is necessary to pass the following information:
Issuer ID
Key ID
The generated .p8 file of the In-App Purchase key
Bundle identifier of the application (App Bundle ID)
Key ID
Upload the .p8 file of the In-App Purchase key.
When the integration is complete, the status will change to Active.
Save


DTDAnalytics.Initialize(APPKey, new DTDAnalyticsConfiguration
{
UserId = userId,
ApplicationVersion = Application.version,
CurrentLevel = lvl,
LogLevel = DTDLogLevel.No,
TrackingAvailability = DTDTrackingStatus.Enable
});
DTDPurchases.StartAutoTracking();let config = DTDAnalyticsConfiguration()
DTDAnalytics.initialize(applicationKey: "App ID", configuration: config)
DTDPurchases.startAutoTracking()DTDAnalyticsConfiguration *config;
[DTDAnalytics applicationKey:@"App ID" configuration:config];
[DTDPurchases startAutoTracking];CocoaPods is the easiest way to add devtodev into your iOS project.
1. Firstly, install CocoaPods using:
2. In the project directory execute the command:
3. In the created Podfile add the dependency:
4. Finally, run the command in your Xcode project directory:
CocoaPods should download and install the devtodev library, and create a new Xcode workspace. Open this workspace in Xcode.
1.
2. Add DTDAnalytics.xcframework to the project
3. Add frameworks:
AppTrackingTransparency.framework
AdSupport.framework
4. Add initialization todidFinishLaunchingWithOptions method:
An App ID can be found in the settings of the respective app in devtodev (Settings → SDK → Integration → Credentials).
config - an object instance of DTDAnalyticsConfiguration, which is used for specifying additional properties during the initialization.
DTDAnalyticsConfiguration
Example:
Create Bridging-Header. To do this, you need to add any swift file to the project (don’t delete it later) and choose ‘Create Bridging Header’ in the offered dialog box.
Make sure that the ‘Build Settings’ for ‘Defines Module’ value evaluates to ‘YES’.
While importing, use: #import <DTDAnalytics/DTDAnalytics-Swift.h>
For SDK to function properly, it needs to be integrated at the earliest moment of the app launch. It is recommended that you use the following method of main entry point initialization:
When developing and publishing apps targeted at children under 13 years old, you need to ensure special conditions for data processing. Any mobile app aimed at children or intended for users in a region with strict regulations on child online protection, must comply with current laws.
If your app has to comply with the legal requirements (COPPA), use the following recommendations:
Implement the coppaControlEnable method. The method disables collection of ad IDs and vendor IDs (IDFA, IDFV).
To comply with
Remove AppTrackingTransparency.framework and all the links pointing to it.
Call the coppaControlEnable method before SDK initialization. If the method was not called, the SDK will work as before.
The Privacy Manifest is a new way introduced at for third-party SDK developers to provide information about their privacy policies.
The Privacy Manifest describes the methods for ensuring code confidentiality in the application in a unified format. When publishing the application, Xcode will combine the privacy manifests of all third-party SDKs used in your application into a single, convenient report. This report makes it easier to create more accurate privacy labels (Nutrition Labels).
The Privacy Manifest includes the following sections for data entry:
Privacy Tracking Enabled
Privacy Tracking Domains
Privacy Nutrition Label Types
Privacy Accessed API Types
Privacy Tracking Enabled. A Boolean value indicating whether the application or third-party SDK uses data for tracking, as defined within the App Tracking Transparency framework.
Privacy Tracking Domains. An array of strings listing the internet domains that the application or third-party SDK connects to and participates in tracking.
Privacy Nutrition Label Types. An array of dictionaries describing the types of data collected by the application or third-party SDK. Nutrition Labels are needed to let users know what data the application collects before installing it from the App Store.
Privacy Accessed API Types. An array of dictionaries describing the types of APIs accessed by the application or third-party SDK, which are marked as APIs and require verification for access.
Privacy Nutrition Label Types
Privacy Accessed API Types
Privacy Nutrition Label Types
Privacy Accessed API Types
Since we distribute our SDKs as binary dependencies, we have implemented a signing practice. Now, when you use a new version of the SDK, Xcode will confirm that it has been signed by us, increasing the integrity of the software supply chain.
This generation of SDK is deprecated and is no longer supported. Information about the current version can be found here.
Only Unity 5.4 and above is supported.
Please do the following to integrate your application with devtodev:
Add the application to the Space using the wizard for adding an application.
Attention! If your Unity project can be used for compilations for different platforms, you need to add the applications in devtodev for each platform. As a result, the statistics will be gained for each platform separately.
Attention! If you install SDK versions (1.*) 2.0, 2.0.1 or 2.0.2, you have to delete them before integrating the latest version.
Switch on "Analytics" by pressing "On" button
Add AppKey and SecretKey for all the using platforms (you can select the platform by clicking on it). If you need to debug, switch logging on.
App ID and Secret key can be found in the application settings (Open "Settings" → "SDK" → "Integration").
Script with all needed parameters if SDK initialization and tracking the user session will be automatically created and added to the scene.
Using code. Add the following strings to the GameObject which will be on the scene during the whole cycle of application work:
The appId and appSecret values are unique for each app on each platform and can be found in the settings of appropriate app ("Settings" → "SDK" → "Integration").
Add following lines at the bottom of proguard config
If you are planning to build an app for iOS, you need to add libz.tbd to the XCode project settings. This library is used by devtodev Unity SDK to compress data sent to devtodev servers. Also, you have to add UserNotifications.framework as an optional library.
Please add AdSupport.framework into the project for your SDK to function correctly with iOS and also add AppTrackingTransparency.framework for iOS 14.
Here’s how you can add them.
Option 1
1. Create Editor folder in the Assets folder.
2. In the Assets folder create DevToDevPostBuild.cs script. The script is below:
3. Uncomment proj.AddFrameworkToProject(projectGuid, "AppTrackingTransparency.framework", true); if necessary.
Option 2.
1. Add AdSupport.framework into the Frameworks section of the generated Unity xcodeproj project.
2. For iOS 14, also add AppTrackingTransparency.framework.
If the application you integrate SDK in is a part of a cross-platform project, then the user data initialization is required.
Since the analytics of cross-platform projects is based on a unique user (unlike the usual projects where it is based on device identifiers), you have to:
Set a unique cross-platform user identifier (it will be used for cross-platform project data collection).
Actualize the user data. Mostly it is about game applications where the player has a game level as a characteristic. For such projects, you need to set the current player level.
If your application allows user to re-login (changing the user during the working session of application), then the UserID property and CurrentLevel method should be called just after the authorization. You don't need to call the SDK initialization one more time.
To enable the debug mode and make SDK notifications displayed in the console use this method:
The data about the amount of sessions and their length is collected automatically by default.
In case you want to control the beginning and the end of a session manually, use the methods below:
For the start of the session use the StartSession method:
For the end of the session use the EndSession method:
Read an and make sure you follow all the recommendations.
Delete a meta file from DevToDevOSX.bundle:
Rename CFBundleIdentifier in Info.plist inside the devtodev plugin, for example:
Sign the DevToDevOSX.bundle with the .entitlements you created earlier. To do this, type the following into the macOS Terminal:
Android Push Notifications
This generation of SDK is deprecated and is no longer supported. Information about the current version can be found here.
Push Notifications on Android are sent with the help of the FCM service. To work with it, two keys are required: a client and server key. If you have a project, move on to the second part of this article.
Add a new project to the .
Fill in the name and country of your project.
Congratulations, the project has been created! Now you need to indicate the package name of your Android app.
After a successful registration in Firebase, you can receive your keys that you will use in devtodev.
Go to the settings of your Android project.
Remember or copy Server key and Sender ID from the Cloud Messaging tab. You will need them to integrate push notifications and create push campaigns.
Download the generated by google-service.json file and add it to the project.
The Google services plugin for loads the google-services.json file that you just downloaded. Modify your build.gradle files to use the plugin.
Project-level build.gradle (<project>/build.gradle):
App-level build.gradle (<project>/<app-module>/build.gradle):
Finally, press "Sync now" in the bar that appears in the IDE:
In Activity (where the SDK initializes) add the push notifications initialization and the listener of push notifications processing.
In case you use several push notifications services or would like to use your own implementation of FirebaseMessagingService, please add the call of the method for displaying messages sent from the devtodev system:
For example:
1. Go to and then to your project settings. On the Cloud messaging tab get the Firebase Cloud Messaging token of your project.
2. Proceed to Settings of your app in devtodev.
3. Go to Integration page and insert the previously received Firebase Cloud Messaging token to the FCM token field in Push notifications section.
4. If the Firebase Cloud Messaging token is correct, you will see the following result
Open PUSH NOTIFICATIONS section and click on 'Add new campaign" button
Fill in campaign name, select an app for delivery*
Choose user group to send a message. You can choose existing segment or create a new one
Enter notification details
You can create a campaign only after at least one push token comes from devtodev SDK integrated to your application. Otherwise the app will not be displayed in the list.
Integration of push notifications on Windows 8.1 and Windows 10
This generation of SDK is deprecated and is no longer supported. Information about the current version can be found here.
To enable Push Notifications you will have to perform the following actions:
Add the application to your space in devtodev system
Activate Windows Messaging Service ang get SID and Client Secret values
Add SID and Client Secret to the application integration settings in devtodev system
Integrate devtodev SDK to the application (see the "SDK integration" section to learn more how to integrate and initialize devtodev SDK)
Go to the application settings in your Windows Store dashboard
Open Push Notifications submenu in Services menu
Go to Live Services site:
"Package SID" and "Client secret" will be your SID and Client Secret strings respectively
Integrate devtodev SDK to your project. Even if you don't need devtodev analytics in your app, you should call DevToDev.SDK.Initialize(string appKey, string appSecret).
Add the following source after DevToDev.SDK.Initialize(string appKey, string appSecret) is called:
The PushType can have one of the following values:
The control of the current value of a badge. When an app is launched the current value of a badge is reset to zero by default. In order to disable automatic resetting to zero and manually control the value of a badge use the following methods:
1. Proceed to Settings of your app.
2. Go to PUSH NOTIFICATIONS page in Settings and insert the previously received Package SID and Client secret to appropriate fields in Push notifications section.
3. If the Package SID and Client secret are correct, you will see the following result:
Open PUSH NOTIFICATION section and click on "Add new campaign" button
Fill in campaign name, select an app for delivery*
Choose the user group to send a message. You can choose existing segment or create a new one
Enter toast or tile details
*Attention! You can create a campaign only after at least one push token comes from devtodev SDK integrated to your application. Otherwise the app will not be displayed in the list.


If you want to migrate to devtodev from another analytical system, move your data from your company's data collection mechanism, or use the data stored on your servers, feel free to use our Import Data Wizard.
We recommend that you start importing your historical data no later than one month after connecting your project to devtodev. At the same time, it is desirable that the right-hand border of the data interval is as close as possible to the start date of importing your historical data to devtodev.
You can import any data about users or events that are allowed by the devtodev data API. The most frequent task is to import an existing user database (with information about registration dates, player character levels, and other characteristics), data on payments, and user sessions. You can also dispatch other events but it is not reasonable to cover a period longer than 90 days from the import start date.
DTDAnalytics.isRestoreTransactionHistoryRequired { isNeedRestore in
if isNeedRestore {
DispatchQueue.main.async {
SKPaymentQueue.default().restoreCompletedTransactions()
}
}
}[DTDAnalytics isRestoreTransactionHistoryRequiredWithCompletionHandler:^(BOOL isNeedRestore){
if (isNeedRestore == true) {
dispatch_async(dispatch_get_main_queue(), ^{
[SKPaymentQueue.defaultQueue restoreCompletedTransactions];
});
}
}];if (Application.platform == RuntimePlatform.IPhonePlayer || Application.platform == RuntimePlatform.OSXPlayer)
{
var apple = storeExtensionProvider.GetExtension<IAppleExtensions>();
DTDAnalytics.IsRestoreTransactionHistoryRequired((required) =>
{
if(!required) return;
apple.RestoreTransactions((success, text) =>
{
Debug.Log(success ? $"Purchases restored successfully on iOS." : $"{text}");
});
});
}sudo gem install cocoapodspod initplatform :ios, '9.0'
target 'TargetName' do
use_frameworks!
pod 'DTDAnalytics', '~> 2.0.0'
endpod install


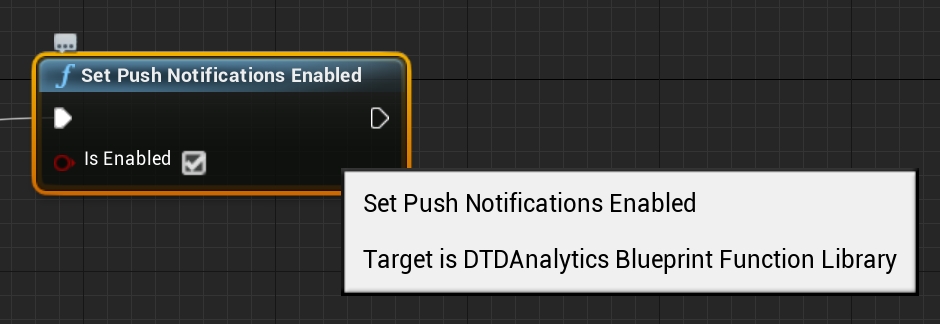


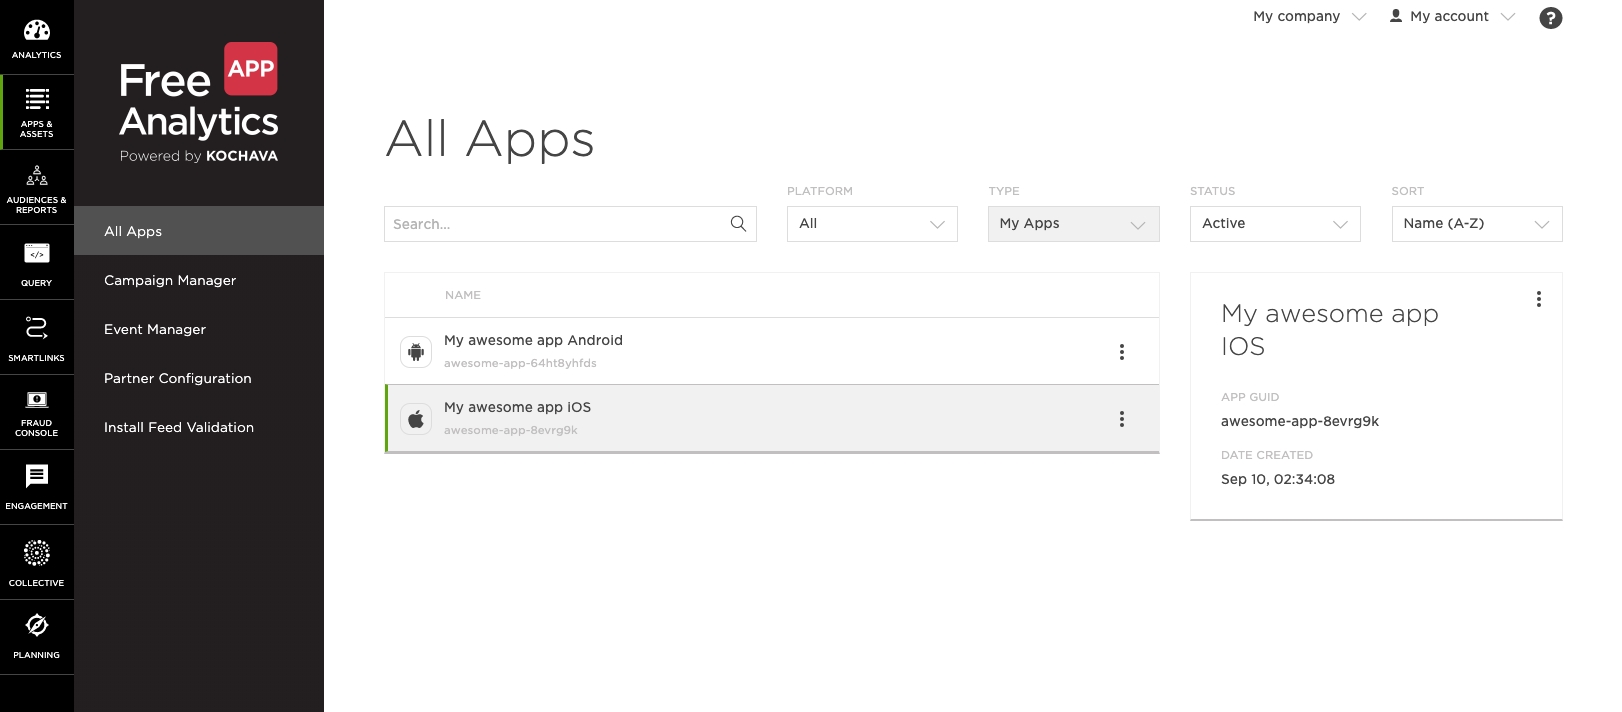
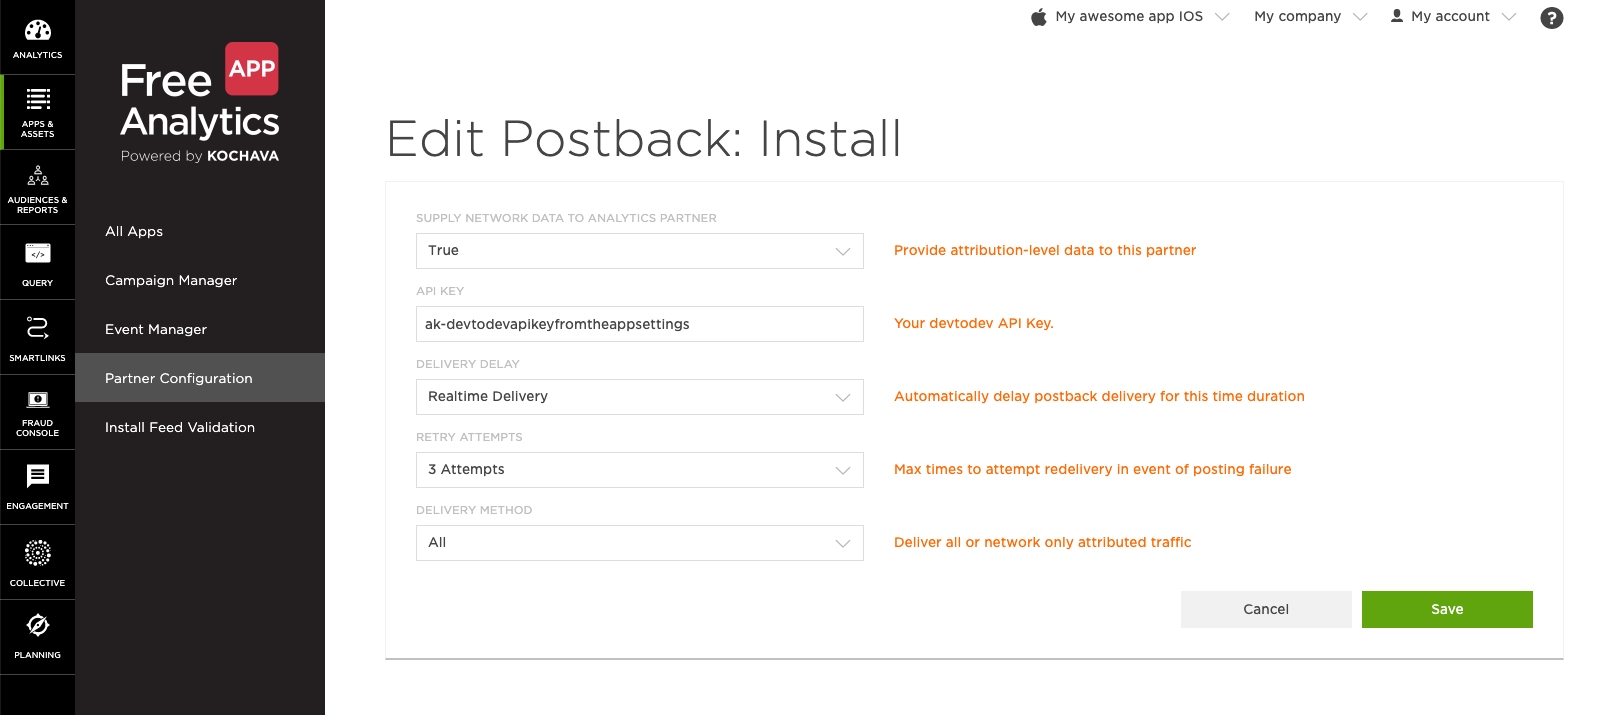
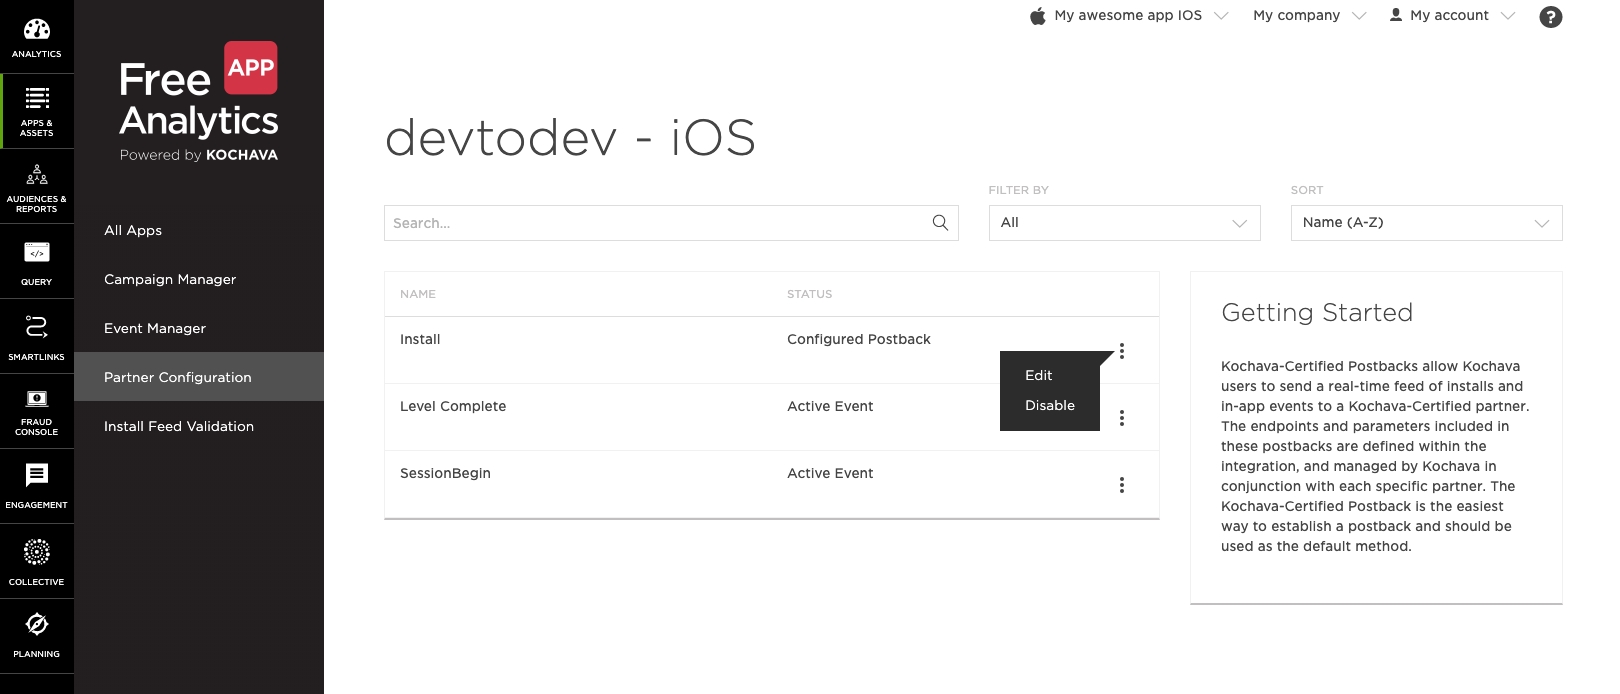
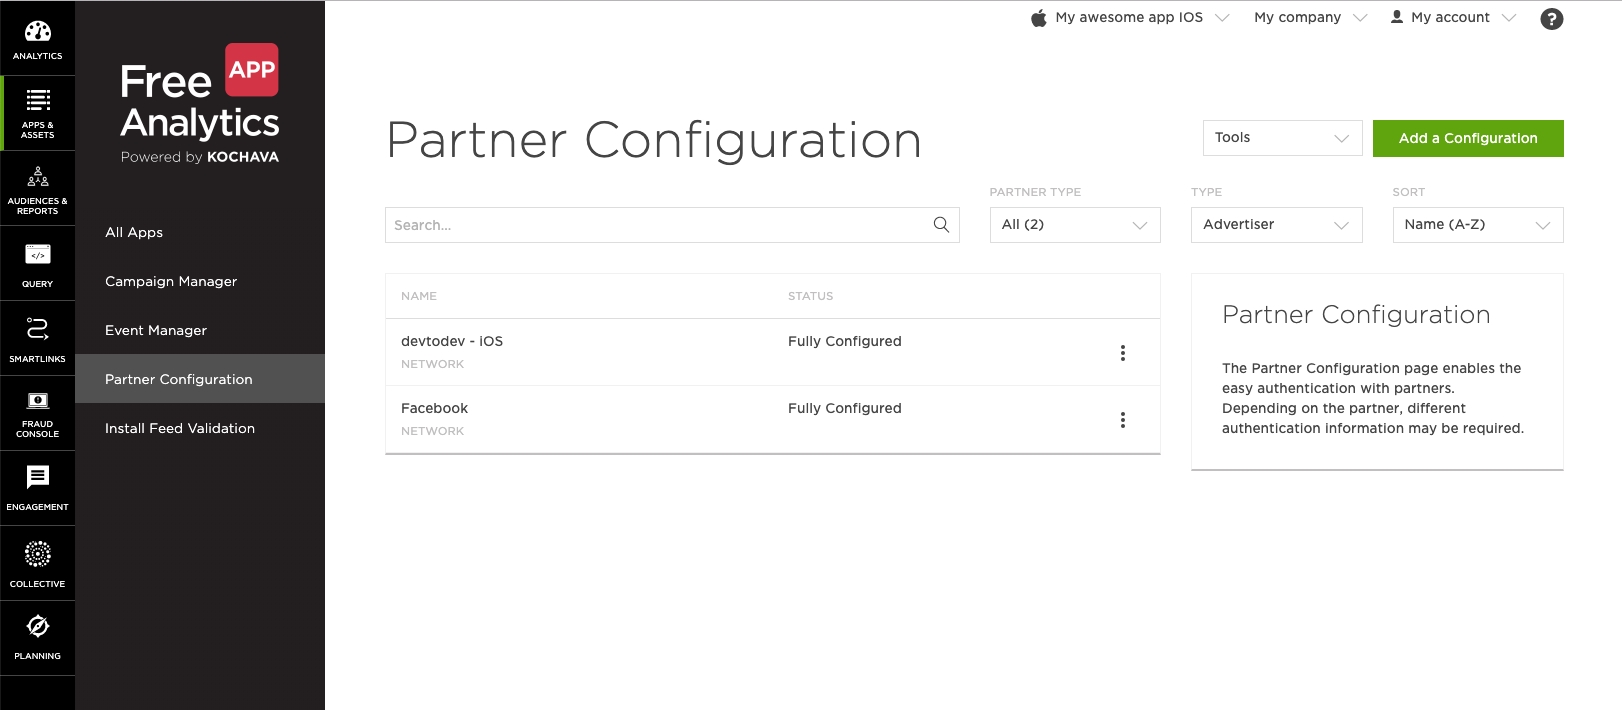
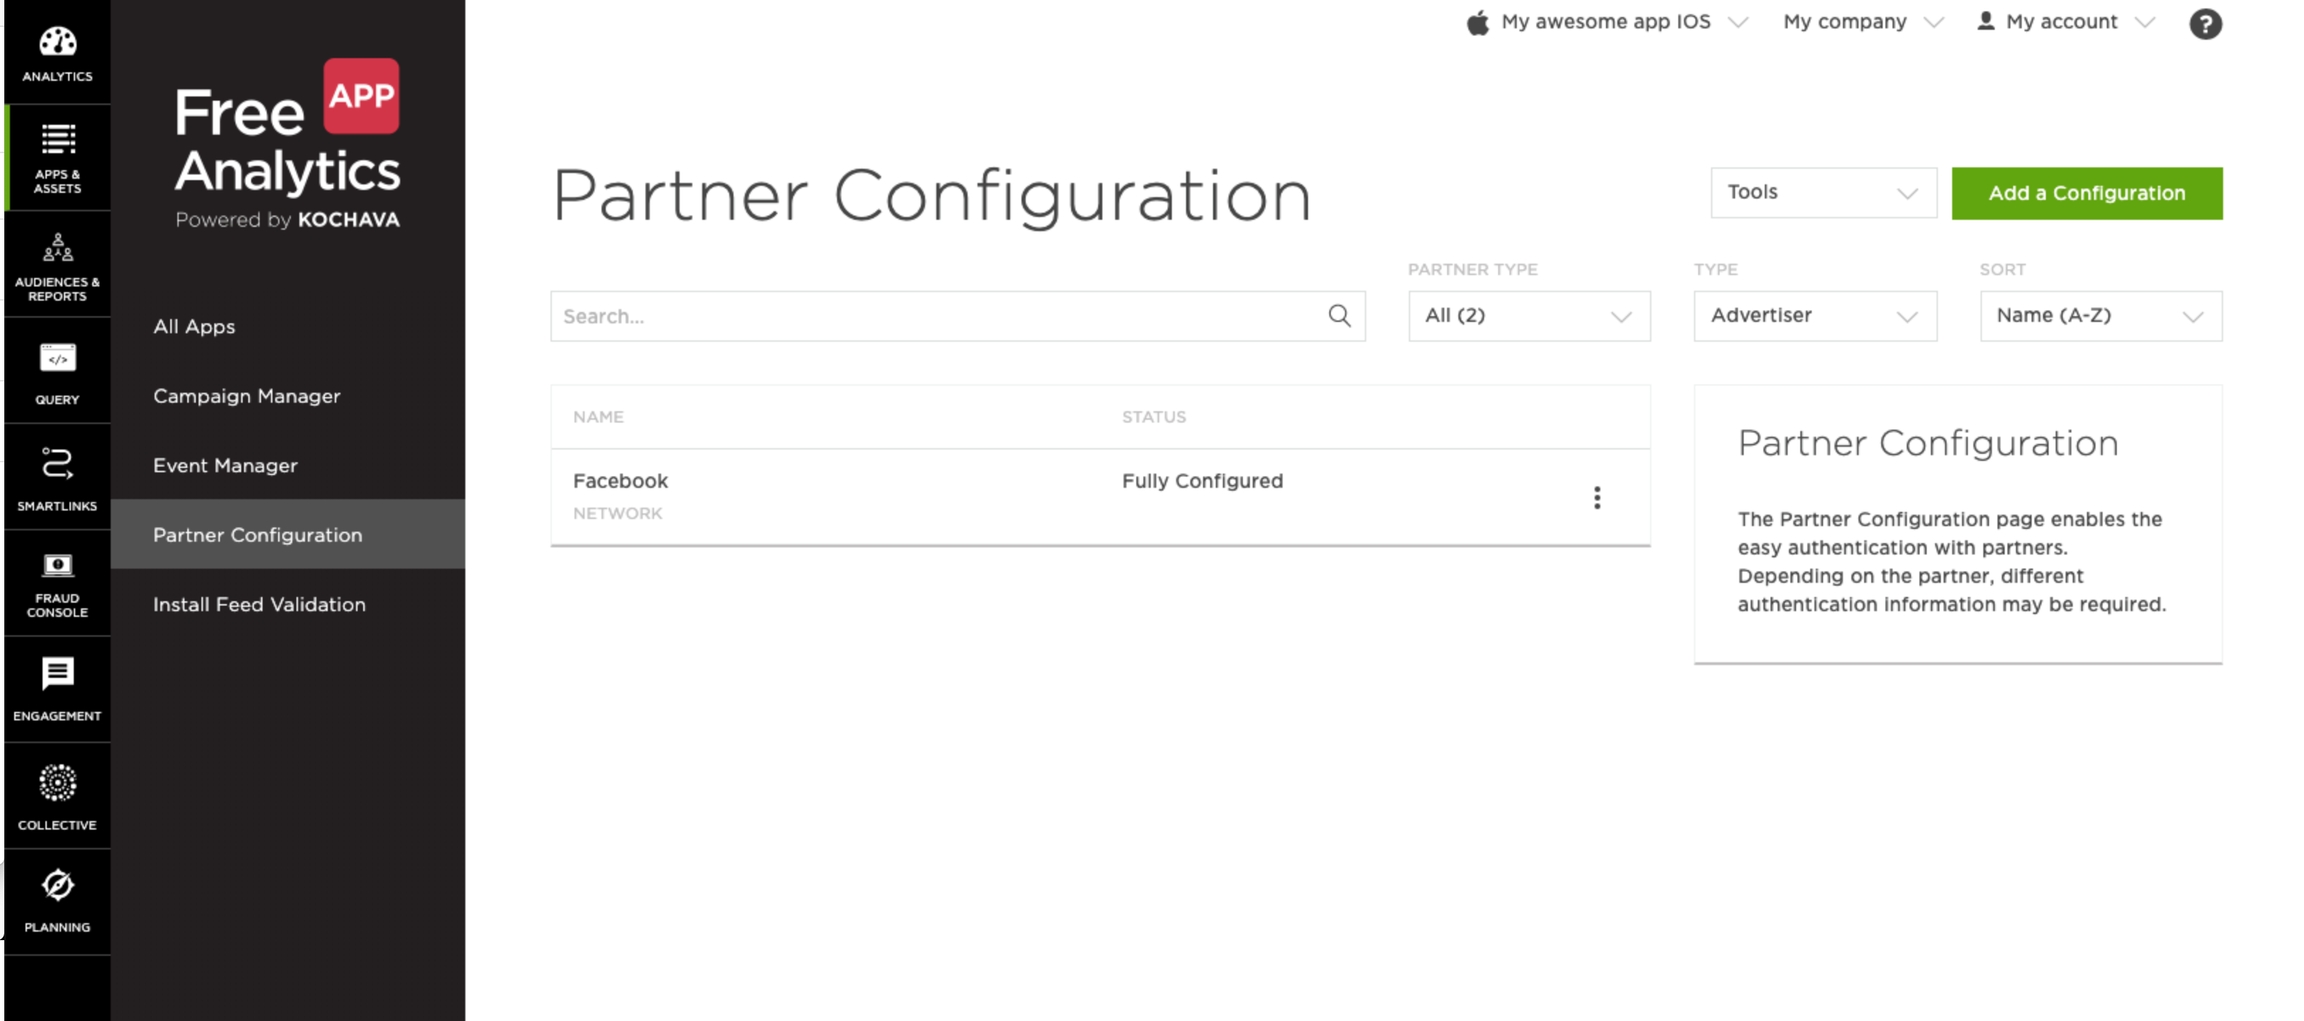
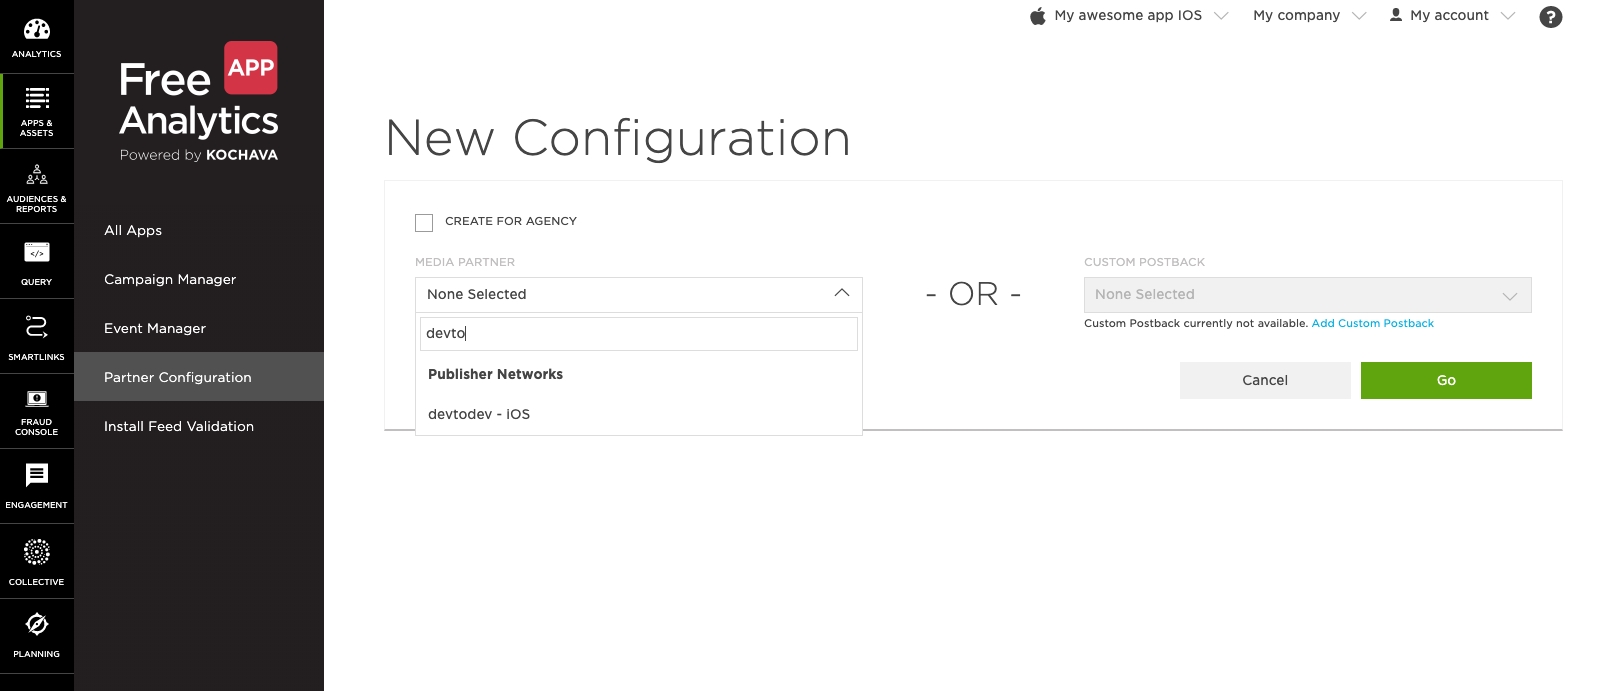
The level of logging the SDK activity. The DTDLogLevel.no value is used by default. For troubleshooting during integration it is recommended to set it to DTDLogLevel.debug, and either switch it off DTDLogLevel.no. Use DTDLogLevel.no in the release version.
Remove AdSupport.framework all the links pointing to it.
Analytics
Purchase History
No
No
Analytics
Other Data Types
No
No
Analytics
Parameter
Type
Description
currentLevel
int
The player level at the moment of devtodev SDK initialization. It is recommended (but optional) to use to improve data precision.
userId
string
A custom user identifier provided by the developer. If you utilize the default calculation by the device ID, this identifier can be used for finding a user in devtodev.
In case your project utilizes the calculation by the user identifier, you must set this parameter because it becomes the main user identifier in devtodev.
trackingAvailability
DTDTrackingStatus (enum)
The property allows or disallows devtodev tracking of the user. By default, it is set to DTDTrackingStatus.enable. SDK stores the previously assigned value. Pass DTDTrackingStatus.disable if the user opted out of tracking in line with GDPR.
logLevel
Product Interaction
No
No
Analytics
Device ID
No
No
Analytics
User ID
No
User Defaults
CA92.1: Access info from same app, per documentation
Device ID
No
No
Analytics
Other Data Types
No
No
Analytics
User Defaults
CA92.1: Access info from same app, per documentation
DTDLogLevel (enum)
No
let config = DTDAnalyticsConfiguration()
config.logLevel = .error
DTDAnalytics.initialize(applicationKey: "App ID", configuration: config)DTDAnalyticsConfiguration *config = [[DTDAnalyticsConfiguration alloc] init];
config.logLevel = DTDLogLevelError;
[DTDAnalytics applicationKey:@"App ID" configuration:config];let config = DTDAnalyticsConfiguration()
config.currentLevel = 1
config.userId = "CustomUserID"
config.trackingAvailability = .enable
config.logLevel = .no
DTDAnalytics.initialize(applicationKey: "App ID", configuration: config)DTDAnalyticsConfiguration *config;
config.currentLevel = @1;
config.userId = @"CustomUserID";
config.trackingAvailability = DTDTrackingStatusEnable;
config.logLevel = DTDLogLevelNo;
[DTDAnalytics applicationKey:@"App ID" configuration:config];@main
struct TestSwiftUIApp: App {
init() {
let config = DTDAnalyticsConfiguration()
config.logLevel = .debug
DTDAnalytics.initialize(applicationKey: "App ID", configuration: config)
}
var body: some Scene {
WindowGroup {
ContentView()
}
}
}DTDAnalytics.coppaControlEnable()
DTDAnalytics.initialize(applicationKey: "App ID", configuration: config)[DTDAnalytics coppaControlEnable];
[DTDAnalytics applicationKey:@"App ID" configuration:config];For 1.*
Assets/DevToDev/ (the folder)
Assets/Plugins/Android/ (files android-suport-v4.jar, AndroidManifest.xml, devtodev.jar, devtodev_android_wrapper.jar, google-play-services.jar)
Assets/Plugins/iOS/ (files AccrualType.h, CustomEventParams.h, all DevToDev*.h, Gender.h, libdevtodev.a, ReceiptStatus.h, SocialNetwork.h, TimeStatus.h, TutorialState.h)
Assets/Plugins/Metro/devtodev.dll
For 2.0
Assets/devtodev (the folder)
Assets/Plugins/DevToDevOSX.bundle
After deleting, unpack devtodev.unitypackage version 2.1 and replace all the files. If you used an interface integration, you have to re-integrate SDK.
Unpack the devtodev.unitypackage into the project
There are 2 types of integration available:
In the interface.
Open the main screen of the app.
Open Window/devtodev menu, then you'll see the following window:
Optional. To set the custom icons to be shown in push-notification on the SDK part, use the following methods: To set the small icon:
To set the default color of the small icon:
To set the large icon:
Use resources of your app. For example, R.drawable.ic_launcherIcons which set in the push-notification wizard have priority over the icons which set in these methods.
Make some tests and correct the message if it's required
Schedule the delivery
That's it!
Add several lines of the code to switch on the push notification in the SDK
Create a campaign for sending push notifications in "Push" section
Attention! There is a difference in the implementation of the elements mentioned below for Windows 8.1+ and Windows 10+ projects.
Windows 8.1+: Put the following source in your Application class (usually it is App.xaml.cs file) at the end of the OnLaunched(LaunchActivatedEventArgs e) function. For Example:
Windows 10+: Put the following source in your Application class (usually it is App.xaml.cs file) at the end of the OnLaunched(LaunchActivatedEventArgs e) and OnActivated(IActivatedEventArgs args) functions. For Example:
Make sure that these functions are enabled in Package.appmanifest of you project (the flag "Toast capable" is enabled by default for Windows 10+ projects, it is absent in the manifest).
Add the following two Background Tasks in Package.appmanifest:
Keep in mind that your application must be built with the same Windows Store preferences you used in Chapter 3.2. In the "Create App Packages" window you have to log in with your Live ID and pick the appropriate application form the list. A file Package.StoreAssociation.xml will be added into the Project.
Schedule the delivery
That's it!
The best option of importing historical data is when you set custom user IDs tracking in the devtodev system. A custom user ID in the devtodev system is an ID assigned by the developer (see setUserId method in the devtodev SDK integration documentation for the corresponding platform). This is usually the number of the record about the user in your database or a third-party ID by which you authorize and identify the user.
Attention! By default, devtodev uses device ID for identification. Switching the project to identification by user ID can be done by contacting your account manager or by writing a request to our technical support. Switching to identification by user ID is irreversible!
After the date of switching the project to identification by user ID, it is advisable to wait 7 days before the start of importing historical data.
But there is a nuance when it comes to importing historical data - during data merging, the data obtained from third parties will be lost (statistics from markets, data on traffic sources from advertising trackers, and data on income received from advertising networks). If you have such data, then after completing the import process, contact your account manager and they will try to reload the data for the required period.
To start the process of importing historical data, go to the settings of the project into which you want to load historical data and select Import Historical Data.
Preparation stage Click on the start button on the Historical data page. A temporary project will be created in devtodev (you can see it in the list of projects). It will have the same name as the original project, but with the addition of the TMP suffix. You will need to export your historical data to this temporary project. To upload, use the API key that you see on the Import Historical data page. Check out the devtodev data API documentation. Prepare a script that will send the historical data of the project to devtodev. It is extremely important that events are dispatched in chronological order for (at least) each user individually (in a JSON file the dispatched events should be ordered starting from the older ones at the beginning of the file to the newer ones at the end).
Data loading stage After you have prepared the data for loading and are ready to start exporting them to devtodev, click the Start loading data button. At this moment, our server will switch to the mode of receiving historical data. Load the prepared data. If there is a lot of data, then you can expect the loading process to take up to several days. You should aim to keep it within 2 weeks.
Processing uploaded data After your script has finished uploading data to devtodev, click the Upload Finished button on the data upload step. After clicking this button, we will start transferring the uploaded data to our database and calculating metrics for this period of time. The calculation can take up to several hours. At the end of the data processing, the interface for loading historical data will automatically proceed to the next step - data verification. Once data processing is completed we will additionally send you a bell notification.
Reviewing the loaded data This is an extremely important step in the data loading process because it is here that you understand whether you did everything right and are satisfied with the result, or something went wrong, which means that you have to implement the necessary changes and try importing again. Open the devtodev interface and go through all the temporary project reports that can be built from the data you have imported. It is best if you compare the metric data aggregated by devtodev after importing with the metric data aggregated by the analytical system from which you are migrating. If you see incorrect data in the reports (the data does not match the information from your previous analytical system reports), try to find out what could have caused this problem, and to be more accurate, what data could be loaded incorrectly. Contact devtodev support if you are unable to determine the source of the problem. To reupload historical data, click the Clear uploaded data button. Then the data will be deleted and you can try again. If you don’t want to make another attempt, click the Cancel process button. If devtodev shows the data you expected to see - hooray! You have succeeded and you can complete the migration process.
Attention! If you agree with the result and complete the process of importing historical data (click the Verified button), then re-export or adding another chunk of historical data will be impossible. This action is irreversible!
5. Historical data is loaded
Well done, not everyone can reach this stage! Your temporary project ceased to exist. From now on, only the project with the loaded historical data is available to you.
You can encapsulate the events either by using historical streamflow or by sending all events for each user individually. But the main thing is that events must be ordered by the date from the oldest to the newest in both each individual parcel and during the entire data loading process.
As first events, we recommend sending data about the user/device and the application, dating them with the date of user registration. Then you can send any other events.
This is an example of sent data:
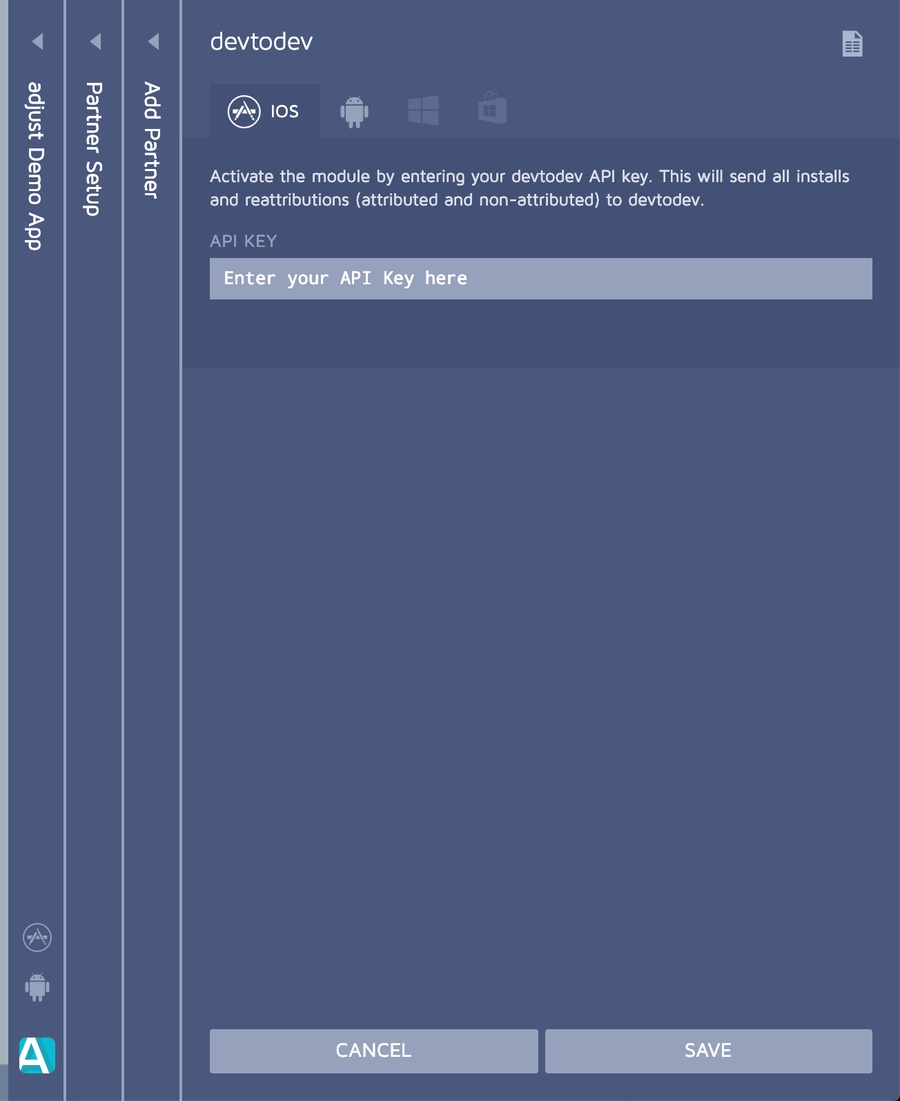
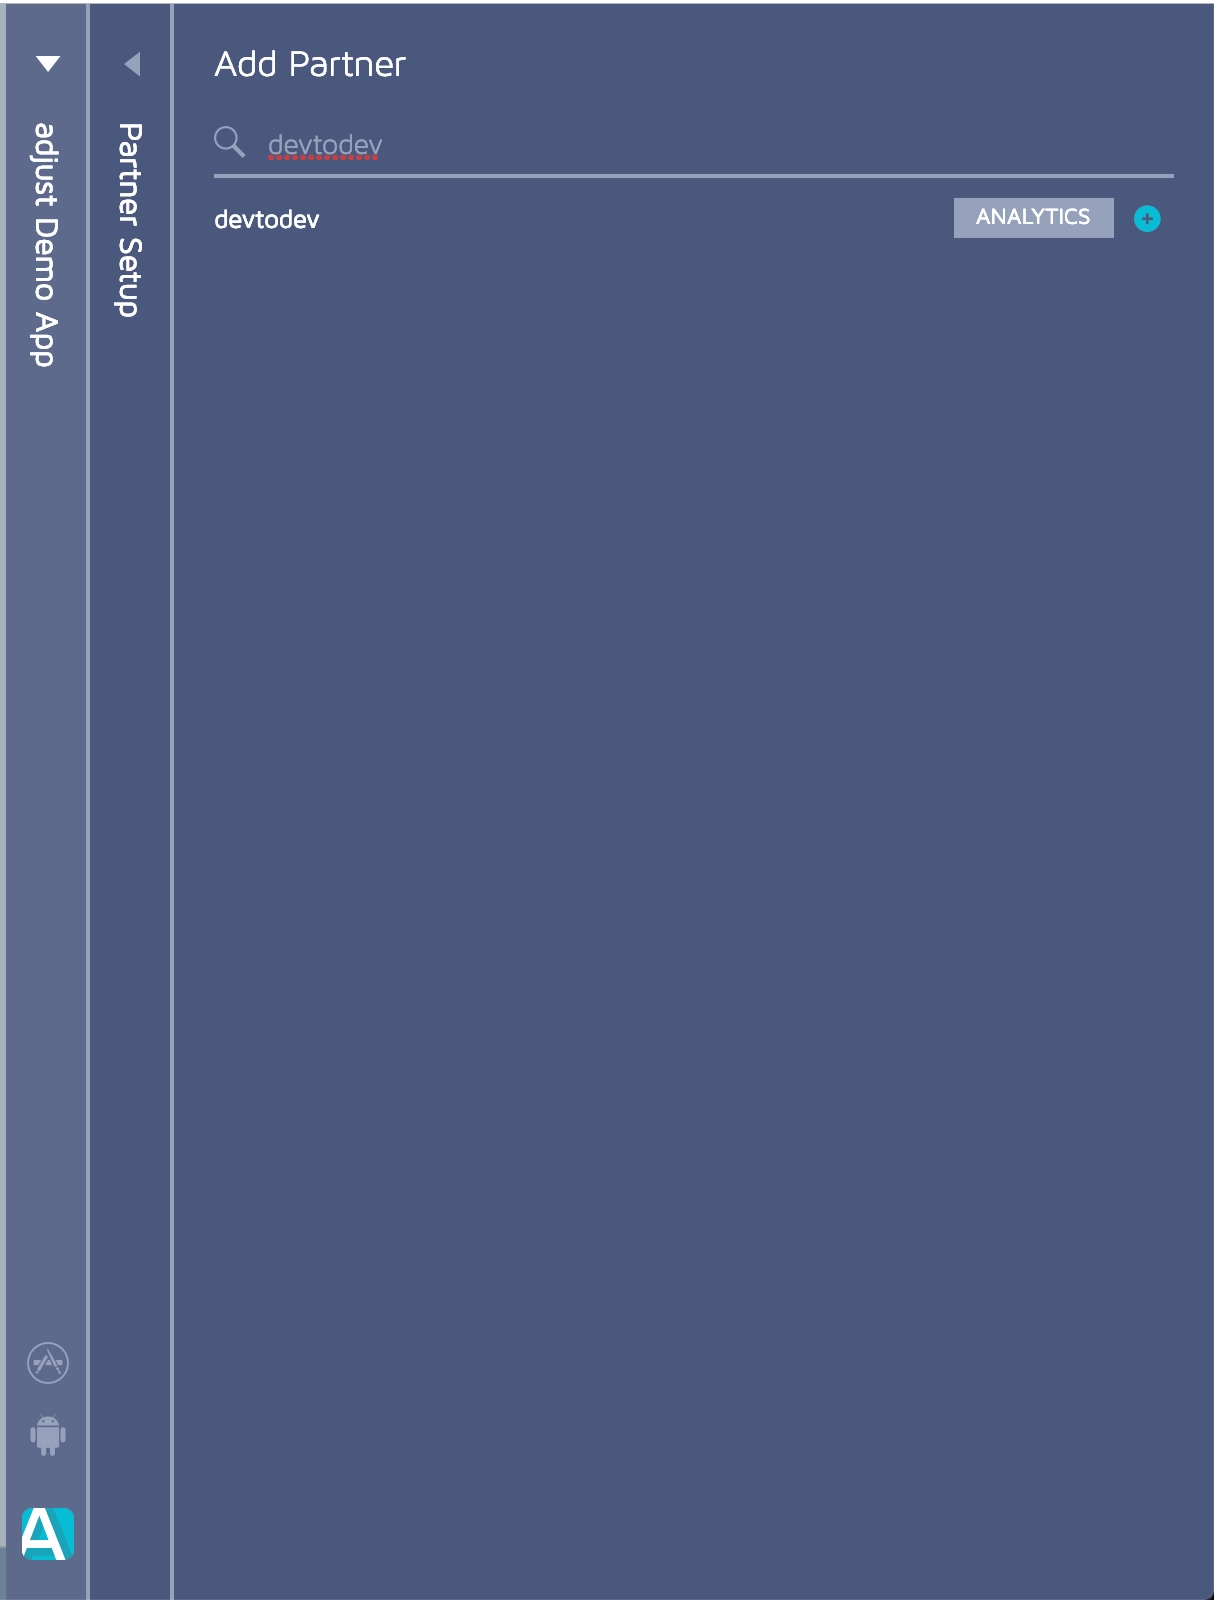
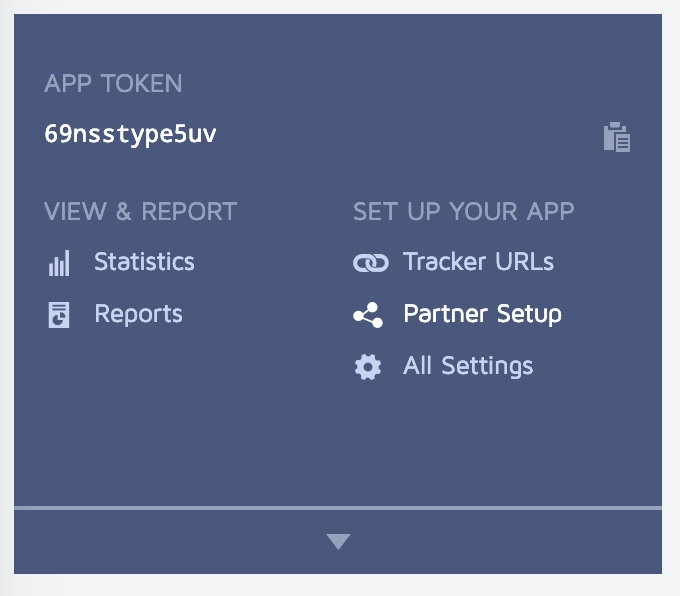

Prerequisite:
Currently remote configs are available only for SDK version 2.6.0 (Android & iOS) and Unity 3.10.0 and higher.
Go to under your Google account. Select the project (1) for which you want to configure Google Play Developer API. Then go to the APIs and services section (2).
Go to the Library section.
Find the Google Play Developer API section.
Press ENABLE to enable the Google Play Androd Developer API.
Go to the section.
Select the project to link the service account and where you will collect subscription data later. Create a new project if it is not in the list.
In the list of available service keys, click CREATE SERVICE ACCOUNT.
Go to the in the Pub/Sub service.
Select the project where you would like to collect subscription data. Click CREATE TOPIC.
To create a topic: fill in the Topic ID (use the screenshot below as an example), disable Add a default subscription option (1) and click CREATE (2).
Go to Settings → Payments integration → IA refunds tracking and click edit (3).
Fill in the integration form with the data obtained earlier:
Android App ID
To set up user permission, you need to log into your Google Play Console account and invite your .
Sign into the .
In the Users and permissions section, you can add users and manage their permissions.
Go to Users and permissions.
Click Invite user to finish the user setup.
After in the Pub/Sub service, you'll need to register the created topic as a target for Real-time developer notifications (RTDN).
Go to the app’s Monetise with Play → Monetisation setup section.
Enter the full name of the topic in the Topic name field.
Tick the Enable real-time notifications checkbox.
Send a test notification using the link below (4). If everything is configured correctly, the test notification will change the integration status of the


public class YourBehaviourScript : MonoBehaviour
{
void Start()
{
#if UNITY_ANDROID
// <param name="androidAppId"> devtodev App ID for Google Play version of application </param>
// <param name="androidAppSecret"> devtodev Secret key for Google Play version of application </param>
DevToDev.Analytics.Initialize(string androidAppId, string androidAppSecret);
#elif UNITY_IOS
// <param name="iosAppId"> devtodev App ID for App Store version of application </param>
// <param name="iosAppSecret"> devtodev Secret key for App Store version of application </param>
DevToDev.Analytics.Initialize(string iosAppId, string iosAppSecret);
#elif UNITY_WEBGL
// <param name="webglAppId"> devtodev App ID for Web version of application </param>
// <param name="webglAppKey"> devtodev Secret key Web version of application </param>
DevToDev.Analytics.Initialize(string webglAppId, string webglAppSecret);
#elif UNITY_STANDALONE_WIN
// <param name="winAppId"> devtodev App ID for Windows Store version of application </param>
// <param name="winAppSecret"> devtodev Secret key for Windows Store version of application </param>
DevToDev.Analytics.Initialize(string winAppId, string winAppSecret);
#endif
}
};-keep class com.devtodev.** { *; }
-dontwarn com.devtodev.**#if UNITY_IOS
using System.IO;
using UnityEditor;
using UnityEditor.Callbacks;
using UnityEditor.iOS.Xcode;
namespace DevToDev
{
public class DevToDevPostBuild
{
const string APP_TARGET_NAME = "Unity-iPhone";
[PostProcessBuildAttribute(1)]
public static void OnPostprocessBuild(BuildTarget target, string pathToBuiltProject)
{
if (target != BuildTarget.iOS)
{
return;
}
iOSPostBuild(pathToBuiltProject);
}
private static void iOSPostBuild(string projPath)
{
string pbxprojPath = projPath + "/Unity-iPhone.xcodeproj/project.pbxproj";
PBXProject proj = new PBXProject();
proj.ReadFromString(File.ReadAllText(pbxprojPath));
string projectGuid = proj.TargetGuidByName(APP_TARGET_NAME);
proj.AddFrameworkToProject(projectGuid, "AdSupport.framework", true);
// IOS 14. Xcode 12 required.
//proj.AddFrameworkToProject(projectGuid, "AppTrackingTransparency.framework", true);
File.WriteAllText(pbxprojPath, proj.WriteToString());
}
}
}
#endif
/// <summary> Property allows to initialize the user.
/// It applies when SDK initialization or user relogin.</summary>
/// <param name="activeUserId">unique cross-platform user identifier (max. 64 symbols)</param>
DevToDev.Analytics.UserId = activeUserID;
/// <summary> Method sets the current user level.
/// Using this method allows to actualize the SDK user data in game cross-platform applications.</summary>
/// <param name="level">number of current game level of the user</param>
DevToDev.Analytics.CurrentLevel(level);
/// <summary> Property allows to set current application version.
/// Attention! This property is necessary for WEB and Windows Standalone apps only.
/// It will be ignored on other platforms.</summary>
/// <param name="version"> current version of your application</param>
DevToDev.Analytics.ApplicationVersion = version;
/// <summary> devtodev App Id and Secret key can be found in the devtodev application
/// settings page ("Settings" → "SDK" → "Integration") </summary>
DevToDev.Analytics.Initialize(string appId, string appSecret);/// <summary> Enable/Disable log</summary>
/// <param name="isEnabled">Enabled/Disabled log</param>
DevToDev.Analytics.SetActiveLog(bool isEnabled);//Call this when the session starts or is resumed
DevToDev.Analytics.StartSession();//Call this when the session is completed
DevToDev.Analytics.EndSession();File.Delete (projPath + "/Contents/Plugins/DevToDevOSX.bundle/Contents.meta");string plistPath = appPath + "/Contents/Plugins/DevToDevOSX.bundle/Contents/Info.plist";
PlistDocument plist = new PlistDocument ();
plist.ReadFromString (File.ReadAllText (plistPath));
plist.root.SetString ("CFBundleIdentifier", PlayerSettings.applicationIdentifier + ".devtodev");
File.WriteAllText (plistPath, plist.WriteToString ());codesign -f --deep -s 'Mac Developer: Developer Name' --entitlements "yourapp.entitlements" "path/to/your.app/Contents/Plugins/DevToDevOSX.bundle"DevToDevPushManager.setCustomSmallIcon(int resourceId);DevToDevPushManager.setCustomSmallIconColor(int colorHexadecimal)DevToDevPushManager.setCustomLargeIcon(int resourceId);buildscript {
dependencies {
// Add this line
classpath 'com.google.gms:google-services:4.3.3'
}
}dependencies {
...
implementation 'com.devtodev:android:1.14.5'
implementation 'com.google.android.gms:play-services-base:17.1.0'
implementation 'com.google.firebase:firebase-core:17.2.3'
implementation 'com.google.firebase:firebase-messaging:20.1.0'
}
// Add to the bottom of the file
apply plugin: 'com.google.gms.google-services'DevToDevPushManager.displayPushNotification(Context context, RemoteMessage remoteMessage);public class MyFirebaseMessagingService extends FirebaseMessagingService {
@Override
public void onMessageReceived(RemoteMessage remoteMessage) {
Map<String, String> data = remoteMessage.getData();
if (data != null) {
if (data.containsKey("_k")) {
DevToDevPushManager.displayPushNotification(this, remoteMessage);
} else {
showNotification(remoteMessage);
}
}
}
}public class MainActivity extends AppCompatActivity implements PushListener {
@Override
protected void onCreate(Bundle savedInstanceState) {
super.onCreate(savedInstanceState);
setContentView(R.layout.activity_main);
DevToDevPushManager.setPushListener(this);
DevToDevPushManager.init(getIntent());
}
@Override
public void onRegisteredForPushNotifications(String s) {
// Insert the code for processing the received token
}
@Override
public void onFailedToRegisteredForPushNotifications(String s) {
// Insert the code for tracking integration errors
}
@Override
public void onPushNotificationsReceived(Map<String, String> map) {
// Insert the code to track received notifications
}
@Override
public void onPushNotificationOpened(PushMessage pushMessage, @Nullable ActionButton actionButton) {
// Insert the code to track opened notification
}
}protected override void OnLaunched(LaunchActivatedEventArgs e) {
//...other source
DevToDev.PushManager.HandleToastNavigation(e.Arguments);
}protected override void OnLaunched(LaunchActivatedEventArgs e) {
//...other source
DevToDev.PushManager.HandleToastNavigation(e.Arguments);
}
protected override void OnActivated(IActivatedEventArgs args) {
//...other source
if (args.Kind == ActivationKind.ToastNotification) {
var toastArgs = args as ToastNotificationActivatedEventArgs;
DevToDev.PushManager.HandleToastNavigation(toastArgs.Argument);
}
}//It is called when push token is received successfully
PushManager.PushTokenReceived = (pushToken) => {
//pushToken - the string contains the push token
};
//It is called when there is an error in push token delivery.
PushManager.PushTokenFailed = (error) => {
//error - the error string. This function will be called when push token have not been obtained.
};
//It is called when push notification is received.
PushManager.PushReceived = (PushType type, IDictionary<string, string> pushAdditionalData) => {
//type - type of the push message
//params - IDictionary<string, string> with the custom user parameters form the push message
};
//It is called when push notification is opened.
PushManager.PushOpened = (PushMessage pushMessage, ActionButton actionButton) => {
//pushMessage - DevToDev.PushMessage. Represents toast notification message
//actionButton - DevToDev.ActionButton. Windows 10 only!
//Represents toast button that was clicked. Could be null if toast body was clicked
};
DevToDev.PushManager.Initialize();public enum PushType {
ToastNotification, //Notification that can be seen by a user.
SilentNotification //Raw-notification. A user can't see it.
}//Disables automatic clearing of a badge at start.
//Must be called before DevToDev.PushManager.Initialize();
DevToDev.PushManager.AutoClearBadgeOnStart = false;
//Decreases the current value of a badge on "number" units.
DevToDev.PushManager.DecreaseBadge(int number);
//Clears the current value of a badge.
DevToDev.PushManager.ClearBadgeCount();{
"reports": [
{
"deviceId": "user id",
"userId": "user id",
"packages": [
{
"language": "en",
"country": "GB",
"appVersion": "1.2",
"events": [
{
"code": "di",
"osVersion": "10.2.2",
"os": "iOS",
"displayPpi": 401,
"displayResolution": "1920x1080",
"dispalyDiagonal": "5.5",
"manufacturer": "Apple",
"model": "iPhone8,2",
"userAgent": "Mozilla/5.0 (Macintosh; Intel Mac OS X 10_12_2) AppleWebKit/602.3.12 (KHTML, like Gecko) Version/10.0.2 Safari/602.3.12",
"timeZoneOffset": 7200,
"idfv": "30FE1CE1-1125-4657-97B0-638744C3C6D1",
"idfa": "0A60DCF2-3186-4801-9192-D8CFA995DD6D",
"timestamp": 1710772505122
},
{
"code": "ss",
"timestamp": 1710772505123,
"level": 1
},
{
"code": "pl",
"timestamp": 1710772511089,
"sessionId": 1710772505123,
"level": 1,
"parameters": {
"nickname": "John Doe",
"cheater": false
}
},
{
"code": "tr",
"timestamp": 1710772715371,
"sessionId": 1710772505123,
"level": 1,
"step": -1
},
{
"code": "tr",
"timestamp": 1710772725344,
"sessionId": 1710772505123,
"level": 1,
"step": 1
},
{
"code": "lu",
"timestamp": 1710772736345,
"sessionId": 1710772505123,
"level": 2,
"balance": {
"money1": 123,
"money2": 11
}
},
{
"code": "tr",
"timestamp": 1710772741456,
"sessionId": 1710772505123,
"level": 2,
"step": 2
},
{
"code": "tr",
"timestamp": 1710772752425,
"sessionId": 1710772505123,
"level": 2,
"step": -2
},
{
"code": "ce",
"timestamp": 1710772773675,
"sessionId": 1710772505123,
"level": 2,
"name": "eventName",
"parameters": {
"intParameter": 134,
"stringParameter": "hello",
"doubleParameter": 12.98
}
},
{
"code": "rp",
"timestamp": 1710772798278,
"sessionId": 1710772505123,
"level": 2,
"productId": "com.example.application.starterpack",
"orderId": "280001601071201",
"price": 19.99,
"currencyCode": "USD"
},
{
"code": "ue",
"timestamp": 1710772898278,
"level": 2,
"length": 393,
"sessionId": 1710772505123
}
]
}
]
}
]
}
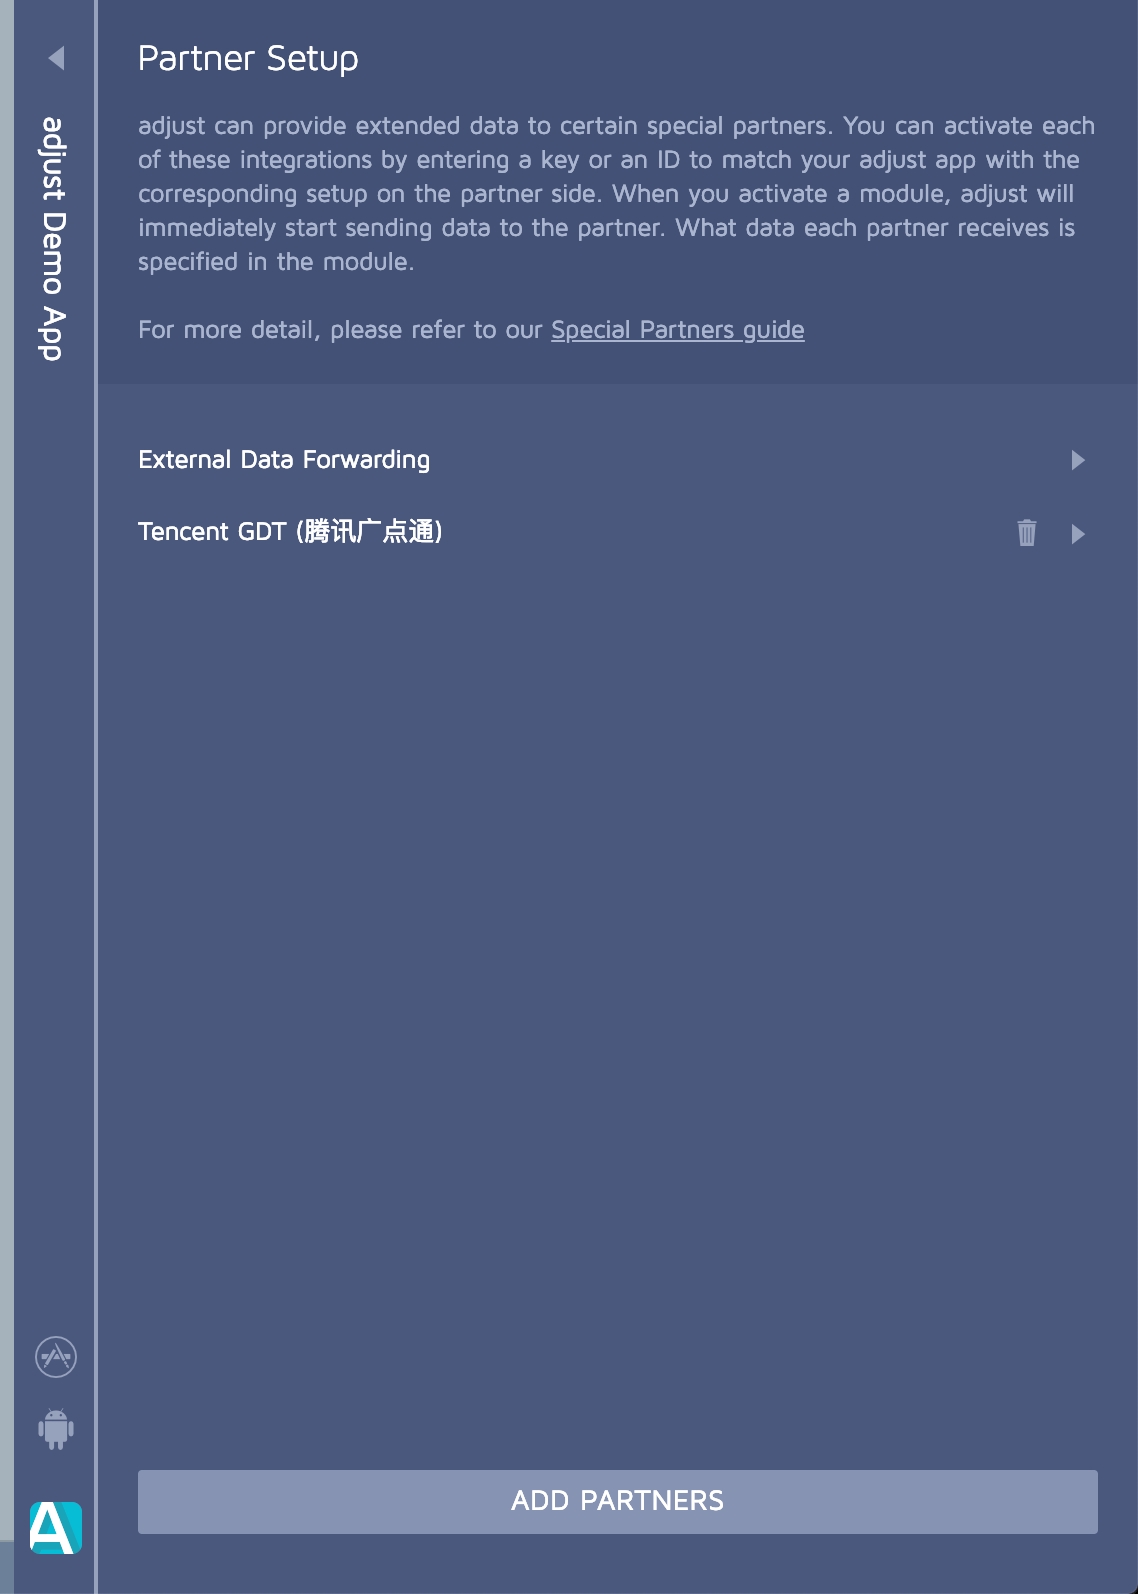
If a user enters an A/B test, they will receive parameter values accoring to their test group configuration.
Parameter values received during an A/B test rewrite the default values and previously set values from the remote config. These test values cannot be changed until you finish the experiment (A/B test value has the highest priority).
The priority order for parameter value source is the following:
Top priority – A/B test parameter value.
Remote config value from devtodev server.
Least priority – Default value defined in the application code.
Fill in the Service account name field. The Service Account ID field will be filled in automatically (use the screenshot below as an example) and click CREATE AND CONTINUE.
Skip the optional steps 2-3 and click DONE at the end of the form.
After creating a service account, you will be returned to the available Service accounts list.
Select the created account and open the KEYS tab (1), click ADD KEY (2), and then select the JSON key type option (3) in the pop-up window.
Click CREATE to confirm your choice.
The generated private key file will be downloaded automatically. You will need to upload this key to devtodev later in the following steps (see Settings on devtodev side).
Go to the IAM section (1) in the Permissions tab and click GRANT ACCESS (2) to add roles to the service account.
In the New principals section (3), enter the service account address and grant it the Pub/Sub Subscriber role (4).
If you do not have this role, you need to activate the Pub/Sub service in the Cloud Console (activate Pub/Sub API).
Save the changes (5).
Select a topic, click on three dots and select View permissions.
Click ADD PRINCIPAL to add the service account.
Add the [email protected] service account and grant it the role of Pub/Sub Publisher. Save the changes.
Open the list of subscriptions and click CREATE SUBSCRIPTION.
In the appeared form:
Specify the Subscription ID (1).
Fill in the Topic name in Select a Cloud Pub/Sub topic field (2).
In the Delivery type select Push (3).
Copy Endpoint URL from devtodev (see steps 8-9) and insert it in the Endpoint URL field (4). All other parameters remain unchanged. Save the changes.
To get Endpoint URL, go to devtodev, select the same app and open app settings (Settings → Payments integration → IA refunds tracking).
Copy the Endpoint URL and paste it in the corresponding field in Google Cloud (step 7).
Upload the Private key file obtained in Service Account step.
Click Save.
When the integration is complete, the status will change to Active.
Click Invite new users.
Add Service Account as a new user:
Add your service account email in the Email address field (1).
In the Permissions section (2) select the apps (3) accessible to the service account. Click Apply (5).
Grant permissions to individual apps, or use account permissions to grant access to all apps in your developer account.
Grant the necessary rights to perform actions (see next step Account permissions).
Open Account permissions tab. Grant the following permissions:
View app information (1)
View app quality information (2)
View financial data (3)
Click Apply to confirm.
Click Save changes to finish the setup.


com.devtodev:android-analytics:'2.2.3' and above you need to add com.devtodev:android-google:'1.0.1'. This framework encapsulates work with Google ads ID. When developing and publishing apps for kids COPPA, you don’t need com.devtodev:android-google. You can find more information about working with COPPA at the end of this guide.
In the Project build.gradle file, declare the mavenCentral repository:
If you use Gradle for building apps specify the following dependencies in the application build.gradle file.
dependencies {
// Requirement
implementation ("com.google.code.gson:gson:*.*.*")
implementation ("com.google.android.gms:play-services-ads-identifier:*.*.*")
// Starting from version 2.2.3 and above, it is required
implementation ("com.devtodev:android-google:*.*.*")
// if you use AAR (recommended) or JAR downloaded from GitHub, please add:
dependencies {
// Requirement
implementation 'com.google.code.gson:gson:*.*.*'
implementation 'com.google.android.gms:play-services-ads-identifier:*.*.*'
// Starting from version 2.2.3 and above, it is required
implementation 'com.devtodev:android-google:*.*.*'
// if you use AAR (recommended) or JAR downloaded from GitHub, please add:
implementation fileTree(dir: "libs", include: ["*.aar"])
Working with Advertising ID with Android API level less than 26
If you plan to use com.google.android.gms:play-services-ads-identifier:18.2.0 and above, you need to add com.android.tools:desugar_jdk_libs to maintain backward compatibility with devices with API level less than 26, see Use Java 8 language features and APIs | Android Studio | Android Developers
We also recommend AGP 8.0+ as it makes it easier to configure com.android.tools:desugar_jdk_libs
If you use Gradle for compiling apps, declare the following dependencies in the build.gradle file in the dependency block:
In the Project build.gradle file declare the agconnect plugin
In the application build.gradle file declare the following dependencies:
And add a plugin:
For more information see huawei official documents.
The com.devtodev.android-huawei framework works with OAID and ODID IDs. In case the OAID is undefined, we use the ODID. For both IDs to work correctly, take the following steps:
After taking all the steps described above, open the ‘App information’ section and download agconnect-services.json. You need to place this file in the app folder (read more).
Use the following way to initialize the library in the first Activity onCreate() method:
You can find the App ID in the settings of the respective app in devtodev (Settings → SDK → Integration → Credentials).
config - is a DTDAnalyticsConfiguration object instance that is used for specifying additional properties during initialization.
DTDAnalyticsConfiguration
Parameter
Type
Description
currentLevel
Integer
The player level at the moment of devtodev SDK initialization. It’s optional but we recommend using it for improving data accuracy.
userId
String
A custom user ID assigned by the developer. In the case of default calculation by device IDs, the identifier can be used for searching users in devtodev. In case the project uses calculation by user IDs, the parameter is mandatory because it becomes the principal calculation ID in devtodev.
trackingAvailability
DTDTrackingStatus (enum)
The property allows or disallows devtodev tracking of the user. By default, it is set to DTDTrackingStatus.enable. SDK stores the previously assigned value. Pass DTDTrackingStatus.disable if the user opted out of tracking in line with GDPR.
logLevel
Example:
Add the following strings to the proguard-rules.pro file of your app
When developing and publishing apps targeted at children under 13 years old, you need to ensure special conditions for data processing. Any mobile app aimed at children or intended for users in a region with strict regulations on child online protection, must comply with current laws.
If your app has to comply with the legal requirements (COPPA), use the following recommendations:
Implement the coppaControlEnable method. The method disables collection of ad IDs and vendor IDs.
If your app is using Google services, remove the following dependencies from gradle:
If your app is using Huawei services, remove the following dependencies from gradle:
Call the coppaControlEnable method before SDK initialization. If the method was not called, the SDK will work as before.

Android Integration
Push Notifications on Android are sent with the help of the FCM service.
You can find instructions on how to create a project in Firebase and integrate Firebase Services into your application in the Firebase documentation.
In devtodev (Settings → Push notifications → Push notifications panel), specify the Firebase project ID and authorize devtodev to send messages and manage messaging subscriptions for your Firebase application.
To get the Firebase project ID, go to the Project Settings → General of your Android project in the Firebase Console. Copy the ID and paste it in devtodev settings.
Download google-services.json and put it to Assets folder.
1. For the Messaging module to function you need the basic Analytics package. Before the notification initialization, you need to initialize the SDK. More about it you can read here: .
2. After the DTDAnalytics initialization block add:
3. To activate the Messaging module, call :
Optional:
You can listen to basic notification module events. To do this, create a class that implements the IDTDPushListener interface and pass it to the DTDMessaging.Android.SetPushListener method.
Example of the class:
Full example of notification module initialization:
To set a custom sound, icon and its colour in a push notification, copy icons and sounds files in the Assets/Plugins/Android/res/ folder and add the following strings to the manifest file code:
To set a large user icon in the push notification, add:
Delete the \Assets\Plugins\Android\res folder (together with the .meta file) - it will cause an error during assembly.
Create a new folder in a separate folder outside of the project.
In the new folder, create
Create a res folder in the same folder.
Add your resources to the res folder while keeping the folder structure intact (drawable, xml, raw, etc.). An example of the resulting structure:
Run the following code in the in the command line/terminal:
Place the resulting aar file to the \Assets\Plugins\Android\ (edited) folder
Add the following strings to the project’s Android manifest file ( \Assets\Plugins\Android\AndroidManifest.xml):
DTDPushMessage). Main class propertiesDTDActionButton)A/B testing is the best way to challenge your hypotheses. A/B testing is essentially an experiment where you show your users different variants of the app at random and then analyze the results to determine which variation performed better.
In devtodev, you can work with A/B testing in the ‘A/B Testing’ section on the app level. All tests are stored in one table. Besides basic information about each test, you can see its status. There are five types of status:
Draft – draft of an unexecuted test.
Stopped – the test was stopped before completion. It’s not possible to restart the test. If you want to restart it, make a copy of the test and launch it.
In progress – the test is currently in progress.
Finished: No winner – test results determined that there was no winner.
Finished: Success – test results determined a winner group.
Before creating a test in the devtodev interface, you need to set variables through the SDK and use the methods for launching A/B tests. Use certain classes to set the variables and their default values. In case the variables are involved with the test, their values will vary depending on the group defined by the server. If the app will be offline and won’t be able to present the test to the user, he will see default values and the app will continue to function correctly.
you can find more information about SDK configuration (about setting variables and methods for launching A/B tests).
To go to the test creation wizard, open the desired devtodev project, navigate to the ‘A/B Testing’ tab and click the ‘+ Add new A/B test’ button.
You have opened the segment creation wizard that consists of five steps:
Enter a unique name of the test and its description. Try to make the description of the test as detailed as possible: its hypothesis, audience, description of the test groups, target metric, desired outcome, etc. Or simply insert a link to the test description. Check out this article to .
In this section, you need to create test assignment rules and define the audience size. Use the ‘Filter your audience’ and ‘Triggering event’ sections to set the assignment rules.
Filter your audience – use this option to define user properties that are needed to be included into the test. The devtodev SDK which is integrated into the application, will use the filters to select the audience whose current properties match the test requirements.
In this example, all paying users will participate in the test.
If you use several filters at once, only users or devices (this depends on the selected user identification method) that meet all conditions will participate in the test.
Set a triggering event if you want your test to include only the users who performed a certain event.
In this example, the devtodev SDK will include the user or device (this depends on the selected user identification method) in the test when the SDK receives information that the said user or device reached the fourth level.
To each trigger event, you can add more parameters that are related to the event. Events have different lists of additional parameters (see ).
The selected filters and trigger events cannot be altered after the start of the experiment.
The filters and trigger events become available for audience configuration after at least one event/property is received via the SDK, processed and accounted for in the devtodev analytics.
When applying both filters and trigger events, all conditions have to be met for the user/device to be included into the test.
Audience fraction – use this option to define the percentage or an absolute number of users out of those selected by the filter and/or completed the trigger event who will participate in the test. If the initial audience size is not enough for drawing firm conclusions, you can change it even after the test begins.
If you need to run several tests in parallel, then:
You need to create non-overlapping test audiences
If your audience overlaps, you need to configure the audience fraction so that part of the audience will be included into each test (e.g. 50% of the overlapping audience gets included into each of the two tests).
If you know the number of users that you need to achieve a statistically significant result, insert it in the ‘Max number of observation’ cell.
In this example, 100% of users who completed more than three levels at the time of a sign up will be included in the test.
A user can be excluded from the test only in two cases:
The test time is up.
The test is stopped.
In this section, you can define the goal of your A/B test – metrics for analysis, criteria for stopping the experiment for a group, and the duration of the experiment.
You can set up one ‘Primary metric’ and no more than five ‘Secondary metrics’ for each test. The ‘Primary metric’ is used to assess the test result and to calculate statistical significance of the obtained result. ‘Secondary metrics’ are optional and do not take part in the final result assessment. However, they can improve the quality of the analysis and prove that the implemented changes did not influence other key metrics of the app.
For example, you can select one of the following as a secondary metric:
One of the fundamental metrics (ARPU, Paying conversion, Day-N retention, etc.)
User engagement with an event.
Average number of times an event was completed (per user).
Below, you can set the ‘Estimated experiment duration’ (days). The test will be stopped after the set number of days. You can also automatically stop the test execution in case the winning group is defined – simply check the ‘Stop the experiment when there is a winning group’ box.
If you don’t see any sense in continuing the test or you want to change the group settings and restart it, you are free to change the duration of the test or even stop it anytime during its course.
To calculate the size of the test audience, use any of the . To use them, first estimate the current value of the Primary metric and then define the result that you expect to get from the tested changes. In addition, you can set up several user experience funnels and display their results in the test report. This will give you additional information about how successful the test has been.
The main goal of the test above is to improve conversion to payment. However you can use the same method to test the conversion to trial or to ARPU.
One of the most crucial steps is setting up test groups and variables. You create a config containing various groups and their parameters. After the devtodev SDK reports that the user has been successfully included in the experiment, one of the groups becomes available in the app via the SDK.
By default, there are two groups available to you: Group A and a control group. You can increase the number of groups to maximum 4 in a single test by clicking the ‘+Add group’ button.
The control group usually includes users as they currently are. This way, you can test other variants to see the change in their metrics, relative to the same metrics at the moment. For each group you need to define a set of variables that is composed of the name of the variable and its value. The variables have to be defined inside of your app – they are supposed to grant your users different experiences.
In the above example, you can see three groups: the control group (it has default parameters) and two more groups that have other parameters for the button_color and button_size variables. The test will be focused on defining the most favorable size and color of the button. If one of the groups wins, it may lead to the change of interface for all users of the app.
When the app is launching, the SDK defines the test that the user will participate in. Then he is randomly assigned to a test group and the SDK applies all the variables defined for this group.
To make sure that all the test groups are set up correctly and that the app is handling the selected variables the right way, we highly recommend you to test the current test settings. In this section, you can check how the A/B test configuration runs on test devices, manually determine relevant groups for them and also check how the design and app behavior change in different groups.
Click ‘+Add test device’ to add a test device using an Advertising ID / User ID / devtodev ID or select it from the list of test devices in the current devtodev Space. After that, select a user group that you want to test on and click ‘Start checking’.
The settings of the selected group will be applied to the selected test device. From this moment on, the test device will start the test for the selected group and they will not wait for meeting the entry conditions that you have specified above.
Test devices do not save the information about the active test or the group. After you successfully finish testing one group, select the next one for the same test device and click ‘Restart checking’.
After you check all group settings on the test devices, you can launch the test for the entire selected audience or save it as a draft.
The test can have several outcomes. Let's look at them in more detail.
Force stop and test delete
It may so happen that you’ve launched an incorrectly configured test and now you need to stop it. To do this, you can select the required test by clicking on it in the list of experiments.
To stop the test (full stop, no chance to resume) – open the A/B test report and click on the edit icon in the upper right corner. The test editing wizard will open. Click on the Stop Test button at the bottom of the wizard page.
To remove the A/B test from the list – open the test editing wizard. At the bottom of the wizard page, click the Delete Test button. Please note that you can delete only the tests that were stopped or completed. The created A/B tests stay in the project until the user deletes them.
The SDK updates the A/B test config only during initialization. If the deleted experiment was previously activated on any device, then when the SDK is initialized, it will be available for activation. After the config gets updated, the SDK will remove this test from the database but will not report it via external interfaces.
This is intended to avoid changing the app settings that were received from the experiment config at the beginning of the session (e.g, the UI that the user is currently interacting with). The next time the app starts, the test will be deleted during SDK initialization.
Do not update the app interface and behavior when the user interacts with it. Do not use the network to receive default parameters. It is better to define them in the app
Test completion using the specified criteria
If you check the ‘Stop the experiment when there is a winning group’ box at the third step of the A/B test creation process, the test will automatically stop if ‘Probability to be best’ of one of the groups is larger than 95%. This metric (Probability to be best) can be considered to be a Bayesian approach. This value is auto-calculated for each group based on the selected Primary metric. If you want to stop the test when reaching a higher number (e.g. 99%), you can change the test duration and continue with its execution until you reach the desired outcome.
The test can finish when it reaches the end of the time period specified at the ‘Goals’ step in the ‘Estimated experiment duration → duration days’ section which is responsible for the test duration. For example, you set ‘duration days’ as 3. This means that the entire audience has only three days since the test creation to be included into the test and participate in it. When the app is launched and the SDK is initialized, it will compare the current time with the end time of the test. If the experiment time is up, the SDK will erase the test from the database and the users will not be able to receive any data. If the test time has run out when the app has been used, the SDK will not respond.
This is intended to avoid changing the app settings that were received from the experiment config at the beginning of the session (e.g, the UI that the user is currently interacting with). The next time the app starts, the test will be deleted as described above.
During the test execution, a report on the test results will be built and updated in real time. In the upper block, you can find all the basic information about the current state:
Current test status
Name of the group with the highest ‘Probability to be best’ and its value
Number of groups, total number of users in the test, and number of users in each group
Experiment time frame
Below you can see a graph. Its horizontal axis represents calendar days starting from the test start date, while the vertical axis represents the value of the selected metric for each of the groups. You can select the displayed metric in the top left corner of the graph. These are:
The Primary and Secondary metrics selected in the wizard
Probability to be best
A/B test audience
Underneath you can find a table with aggregated values for each of the metrics in each test group and their fluctuations relative to the control group. The ‘Probability to be best’ is also calculated for each metric including the Secondary. This way you can make sure that all the tested changes do not influence other metrics in a negative way. After that you can see the funnels configured in the A/B test creation wizard. They contain data on the number of users at each funnel stage, conversion rate from one stage to another, and the ‘Probability to be best’ for conversion from the first to the last stage.
When a user gets included into a test group, he is automatically marked with the ID of this group.
If you want to drill down even more and understand a subtle difference in metrics and behavior of the users, you can use these user groups as filters in any devtodev reports. Simply go to the report filters, open the ‘Segments’ tab, and select the required segment.
A/B test segment values are saved as a separate user property (‘A/B test groups’) in the user card at the moment the user gets included into an A/B test group.
The user can not enroll into two A/B tests at the same time. He can be included into one test and after it completes, be included into another. In this case, the ‘ A/B test groups’ field will contain names of the two groups.
To initialize the service, call the startAutoTracking method of the DTDPurchases interface. Call the method after the SDK initialization call:
The SDK will automatically restore the list of previously purchased subscriptions at the first launch of the autotracking service. No additional integration is required.
Go to under your Google account. Select the project (1) for which you want to configure Google Play Developer API. Then go to the APIs and services section (2).
Go to the Library section.
Find the Google Play Developer API section.
Press ENABLE to enable the Google Play Androd Developer API.
Go to the section.
Select the project to link the service account and where you will collect subscription data later. Create a new project if it is not in the list.
In the list of available service keys, click CREATE SERVICE ACCOUNT.
Go to the in the Pub/Sub service.
Select the project where you would like to collect subscription data. Click CREATE TOPIC.
To create a topic: fill in the Topic ID (use the screenshot below as an example), disable Add a default subscription option (1) and click CREATE (2).
Go to Settings → Payments integration → IAP auto tracking and click edit (3).
Fill in the integration form with the data obtained earlier:
Android App ID
To set up user permission, you need to log into your Google Play Console account and invite your .
Sign into the .
In the Users and permissions section, you can add users and manage their permissions.
Go to Users and permissions.
Click Invite user to finish the user setup.
After in the Pub/Sub service, you'll need to register the created topic as a target for Real-time developer notifications (RTDN).
Go to the app’s Monetise with Play → Monetisation setup section.
Enter the full name of the topic in the Topic name field.
Tick the Enable real-time notifications checkbox.
Send a test notification using the link below (4). If everything is configured correctly, the test notification will change the integration status of the
android {
defaultConfig {
// Required when setting minSdkVersion to 20 or lower
multiDexEnabled = true
}
compileOptions {
// Flag to enable support for the new language APIs
coreLibraryDesugaringEnabled = true
// Sets Java compatibility to Java 8
sourceCompatibility JavaVersion.VERSION_1_8
targetCompatibility JavaVersion.VERSION_1_8
}
}
dependencies {
// For AGP 7.4+
coreLibraryDesugaring ("com.android.tools:desugar_jdk_libs:2.0.3")
// For AGP 7.3
// coreLibraryDesugaring ("com.android.tools:desugar_jdk_libs:1.2.3")
// For AGP 4.0 to 7.2
// coreLibraryDesugaring ("com.android.tools:desugar_jdk_libs:1.1.9")
}android {
defaultConfig {
// Required when setting minSdkVersion to 20 or lower
multiDexEnabled true
}
compileOptions {
// Flag to enable support for the new language APIs
coreLibraryDesugaringEnabled true
// Sets Java compatibility to Java 8
sourceCompatibility JavaVersion.VERSION_1_8
targetCompatibility JavaVersion.VERSION_1_8
}
}
dependencies {
// For AGP 7.4+
coreLibraryDesugaring 'com.android.tools:desugar_jdk_libs:2.0.3'
// For AGP 7.3
// coreLibraryDesugaring 'com.android.tools:desugar_jdk_libs:1.2.3'
// For AGP 4.0 to 7.2
// coreLibraryDesugaring 'com.android.tools:desugar_jdk_libs:1.1.9'
}dependencies {
// Requirement
implementation ("com.google.code.gson:gson:*.*.*")
implementation ("com.huawei.agconnect:agconnect-core:*.*.*")
implementation ("com.huawei.hms:opendevice:*.*.*")
// Starting from version 2.2.3 and above, it is required
implementation ("com.devtodev.android-huawei:*.*.*")
implementation ("com.huawei.hms:ads-identifier:*.*.*")
// if you use AAR (recommended) or JAR downloaded from GitHub, please add:
implementation(fileTree(mapOf("dir" to "libs", "include" to listOf("*.aar"))))
// or just add the dependency, get the latest version from
// https://mvnrepository.com/artifact/com.devtodev/android-analytics
implementation ("com.devtodev:android-analytics:*.*.*")
}dependencies {
// Requirement
implementation 'com.google.code.gson:gson:*.*.*'
implementation 'com.huawei.agconnect:agconnect-core:*.*.*'
implementation 'com.huawei.hms:ads-identifier:*.*.*'
implementation 'com.huawei.hms:opendevice:*.*.*'
// Starting from version 2.2.3 and above, it is required
implementation 'com.devtodev.android-huawei:*.*.*'
// if you use AAR (recommended) or JAR downloaded from GitHub, please add:
implementation fileTree(dir: "libs", include: ["*.aar"])
// or just add the dependency, get the latest version from
// https://mvnrepository.com/artifact/com.devtodev/android-analytics
implementation 'com.devtodev:android-analytics:*.*.*'
}class MainActivity : Activity() {
override fun onCreate(savedInstanceState: Bundle?) {
super.onCreate(savedInstanceState)
val analyticsConfiguration = DTDAnalyticsConfiguration()
analyticsConfiguration.logLevel = DTDLogLevel.Error
DTDAnalytics.initialize("App ID", analyticsConfiguration, context = this)
}
}public class MainActivity extends Activity {
@Override
protected void onCreate(Bundle savedInstanceState) {
super.onCreate(savedInstanceState);
DTDAnalyticsConfiguration configuration = new DTDAnalyticsConfiguration();
configuration.setLogLevel(DTDLogLevel.Error);
DTDAnalytics.INSTANCE.initialize("App ID", configuration, context);
}
}val config = DTDAnalyticsConfiguration()
config.currentLevel = 1
config.userId = "CustomUserID"
config.trackingAvailability = DTDTrackingStatus.Enable
config.logLevel = DTDLogLevel.No
DTDAnalytics.initialize("App ID", config, context = this)DTDAnalyticsConfiguration config = new DTDAnalyticsConfiguration();
config.setCurrentLevel(1);
config.setUserId("CustomUserID");
config.setTrackingAvailability(DTDTrackingStatus.Enable);
config.setLogLevel(DTDLogLevel.No);
DTDAnalytics.INSTANCE.initialize("App ID", config, context);'com.google.android.gms:play-services-ads-identifier'
'com.devtodev:android-google''com.huawei.hms:ads-identifier'
'com.huawei.hms:opendevice'
'com.devtodev.android-huawei'DTDAnalytics.coppaControlEnable()
DTDAnalytics.initialize("App ID", config, context = this)DTDAnalytics.INSTANCE.coppaControlEnable();
DTDAnalytics.INSTANCE.initialize("App ID", config, context);repositories {
//.. other repositories
mavenCentral()
}repositories {
//.. other repositories
mavenCentral()
maven { url 'https://developer.huawei.com/repo/' }
}
allprojects {
repositories {
//.. other repositories
mavenCentral()
// Configure the Maven repository address for the HMS Core SDK.
maven {url 'https://developer.huawei.com/repo/'}
}
}dependencies {
classpath 'com.huawei.agconnect:agcp:*.*.*'
}plugins {
//.. other plugins
id 'com.huawei.agconnect'
}-keep class com.devtodev.** { *; }
-dontwarn com.devtodev.**
// For Google Mobile Services
-keep class com.google.android.gms.** { *; }
// For Huawei Mobile Services
-keep class com.huawei.hms.**{*;}


companypackageUsed to pass the push notification to the FirebaseMessagingService if it was implemented by the client but not by the SDK
void DTDMessaging.SetPushListener (IDTDPushListener pushListener)
It sets a listener for push notification event trapping
bool IsBackground
The button-click app open mode
void DTDMessaging.Android.Initialize()
The push notification initialization method
void DTDMessaging.Android.StartPushService()
The push notification activation method. It passes the isAllowed current state
void DTDMessaging.Android.PushIsAllowed (bool isAllowed)
A property responsible for the activation/deactivation of push notifications.When the state transitions, it sends a pt with isAllowed (true or false) status to the server.
The isAllowed flag status is stored in the SDK.
void DTDMessaging.Android.GetPushState(Action<bool?> onGetPushState)
The method that returns the push module state to onGetPushState callback. If getting the current state is impossible, it returns null
void DTDMessaging.Android.GetToken(Action<string> onGetToken)
The method that returns push registration token to onGetToken callback
IDictionary<string,string> GetData():
Complete information passed with the push notification.
DTDActionType ActionType:
The property that returns the value of enum’s DTDActionType.
Possible values:
App - app open
Url - external link open
Share - share content
Deeplink - an in-app link opening
string ActionString
The property that returns an optional action identifier
IDictionary<string,string> AdditionalData()
Additional data sent to push notification
DTDActionType ActionType
The property that returns the value of enum’s DTDActionType.
Possible values:
App - app open
Url - external link open
Share - share content
Deeplink - an in-app link opening
string ActionString
Property that returns an optional action identifier
string ButtonId
Property that returns the ID of the clicked button
string ButtonText
Property that returns the text of the clicked button
string ButtonIcon
Property that returns the button icon name

void DTDMessaging.Android.ProcessPushNotification (IDictionary<string, string> firebaseMessaging)
Prerequisites:
DTDAnalytics 2.5.0 and higher
Fill in the Service account name field. The Service Account ID field will be filled in automatically (use the screenshot below as an example) and click CREATE AND CONTINUE.
Skip the optional steps 2-3 and click DONE at the end of the form.
After creating a service account, you will be returned to the available Service accounts list.
Select the created account and open the KEYS tab (1), click ADD KEY (2), and then select the JSON key type option (3) in the pop-up window.
Click CREATE to confirm your choice.
The generated private key file will be downloaded automatically. You will need to upload this key to devtodev later in the following steps (see Settings on devtodev side).
Go to the IAM section (1) in the Permissions tab and click GRANT ACCESS (2) to add roles to the service account.
In the New principals section (3), enter the service account address and grant it the Pub/Sub Subscriber role (4).
If you do not have this role, you need to activate the Pub/Sub service in the Cloud Console (activate Pub/Sub API).
Save the changes (5).
Select a topic, click on three dots and select View permissions.
Click ADD PRINCIPAL to add the service account.
Add the [email protected] service account and grant it the role of Pub/Sub Publisher. Save the changes.
Open the list of subscriptions and click CREATE SUBSCRIPTION.
In the appeared form:
Specify the Subscription ID (1).
Fill in the Topic name in Select a Cloud Pub/Sub topic field (2).
In the Delivery type select Push (3).
Copy Endpoint URL from devtodev (see steps 8-9) and insert it in the Endpoint URL field (4). All other parameters remain unchanged. Save the changes.
To get Endpoint URL, go to devtodev, select the same app and open app settings (Settings → Payments integration → Subscriptions). Click Integrate.
Copy the Endpoint URL and paste it in the corresponding field in Google Cloud (step 7).
Upload the Private key file obtained in Service Account step.
Click Save.
When the integration is complete, the status will change to Active.
If you use subscriptions, go to Payments integration → Subscriptions and click Integrate.
Upload the Private key file obtained in Service Account step (1).
Specify Android App ID (2).
Add all existing subscriptions, specifying the bundle, subscription period, and name for each subscription.
Click Save (3) to finish integration.
Click Invite new users.
Add Service Account as a new user:
Add your service account email in the Email address field (1).
In the Permissions section (2) select the apps (3) accessible to the service account. Click Apply (5).
Grant permissions to individual apps, or use account permissions to grant access to all apps in your developer account.
Grant the necessary rights to perform actions (see next step Account permissions).
Open Account permissions tab. Grant the following permissions:
View app information (1)
View app quality information (2)
View financial data (3)
Click Apply to confirm.
Click Save changes to finish the setup.

dependencies {
implementation ("com.devtodev:android-google-purchases:*.*.*")
// Starting from version 6.0.0
implementation ("com.android.billingclient:billing:*.*.*")
}val config = DTDAnalyticsConfiguration()
DTDAnalytics.initialize("App ID", config, context)
DTDGooglePurchases.initialize(context)
DTDGooglePurchases.startAutoTracking()DTDAnalytics.Initialize(APPKey, new DTDAnalyticsConfiguration
{
UserId = userId,
ApplicationVersion = Application.version,
CurrentLevel = lvl,
LogLevel = DTDLogLevel.No,
TrackingAvailability = DTDTrackingStatus.Enable
});
DTDPurchases.StartAutoTracking();DTDAnalyticsConfiguration config = new DTDAnalyticsConfiguration();
DTDAnalytics.INSTANCE.initialize(appKey, config, context);
DTDGooglePurchases.INSTANCE.initialize(context);
DTDGooglePurchases.INSTANCE.startAutoTracking();dependencies {
implementation 'com.devtodev:android-google-purchases:*.*.*'
// Starting from version 6.0.0
implementation 'com.android.billingclient:billing:*.*.*'
}DTDLogLevel (enum)
The level of logging the SDK activity. The DTDLogLevel.no value is used by default. For troubleshooting during integration it is recommended to set it to DTDLogLevel.debug, and either switch it off DTDLogLevel.no. Use DTDLogLevel.no in the release version.
Add the application to your space in devtodev system.
Generate Developer or Production Certificate for the application and get Private key file (.p12) on its basis.
Submit the data to the application settings in devtodev system.
Integrate devtodev SDK to the application (see the SDK integration section to learn more about integrating and initializing devtodev SDK).
Add several lines of the code to switch in the push notification to the SDK.
Create a campaign for sending push notifications in section.
First enable push notifications in your Xcode project.
The library provides support for iOS 10 notification attachments, such as images, animated gifs, and video. In order to take advantage of this functionality, you will need to create a notification service extension alongside your main application.
Create a new iOS target in Xcode (File -> New -> Target) and select the Notification Service Extension type.
In Member Center, the Push Notifications service will appear as Configurable (not Enabled) until you create a client SSL certificate.
Drag the devtodevAppExtensions.framework into your app project.
Modify your extension.
Delete all dummy source code for your new extension
Inherit from DTDMediaAttachmentExtension in NotificationService
Use Xcode to enable push notifications in the target’s Capabilities pane:
Enable Background Modes and Remote notifications under the target’s Capabilities section:
You use Member Center to generate a push notification client SSL certificate that allows your notification server to connect to the APNs. Each App ID is required to have its own client SSL certificate. The client SSL certificate Member Center generates is a universal certificate that allows your app to connect to both the development and production environments.
To generate a universal client SSL certificate
In Certificates, Identifiers & Profiles, select Certificates.
Click the Add button (+) in the upper-right corner.
Under Production, select the “Apple Push Notification service SSL (Sandbox & Production)” checkbox, and click Continue.
Choose an App ID from the App ID pop-up menu, and click Continue. Choose the explicit App ID that matches your bundle ID.
Follow the instructions on the next webpage to create a certificate request on your Mac, and click Continue.
Click Choose File.
In the dialog that appears, select the certificate request file (with a .certSigningRequest extension), and click Choose.
Click Generate.
Click Download.
Open "Keychain access" application
If the certificate hasn't been added to keychain access yet, choose "File" → "Import". Find the certificate file (CER-file) provided by Apple
Choose "Keys" section in "Keychain access" application
Choose a personal key associated with your iPhone developer certificate. Personal key is identified by open certificate associated with it "iPhone developer: ". Choose "File" → Export objects. Save key as .p12
You'll be suggested to create a password which is used when you need to import the key to another computer
Convert Apple certificate file to the PEM-file. Start following command-line operation from bin catalog OpenSSL.
Convert personal key from Mac OS keychain to the PEM-key:
Now you are able to create P12-file using PEM-key and iPhone developer certificate:
If you are using key from Mac OS keychain then choose PEM-version created in the previous step. Otherwise, you can use OpenSSL key for Windows OS.
Upload the .p12-file into Integration section of application settings panel (Settings -> Push Notifications):
After the certificate has been generated you can start to integrate Push SDK into your app.
1. Open the "Capabilities" tab in the XCode. Switch "Push Notifications" and "Background Modes" to ON. In "Background Modes" check "Remote notifications".
2. Add the following strings to the AppDelegate class:
If you are using iOS 12 or above, you can specify custom options for notification settings:
3. Open "Build Settings", find the parameter "Other Linker Flags", then add 2 flags: -ObjC and -lc++
4. Compile and run the app. You will need a device because the simulator does not support push notifications. Xcode will automatically choose a new provisioning profile. If an error occurred during the launch make sure that there is a correct profile set in the Code Signing Identity. You'll be asked to confirm push notifications. An app will request permission only once, if user confirms it - notifications will be accepted otherwise he won't get any push messages from your app. Users can change it in device settings.
1. Open PUSH NOTIFICATIONS section and click on the "Add new campaign" button
2. Fill in the campaign name
3. Choose a user group to send a message. You can choose an existing segment or create a new one
4. Enter notification details
5. Test push notification (or skip this step)
6. Confirm push gateway
7. Schedule the delivery
8. That's it!


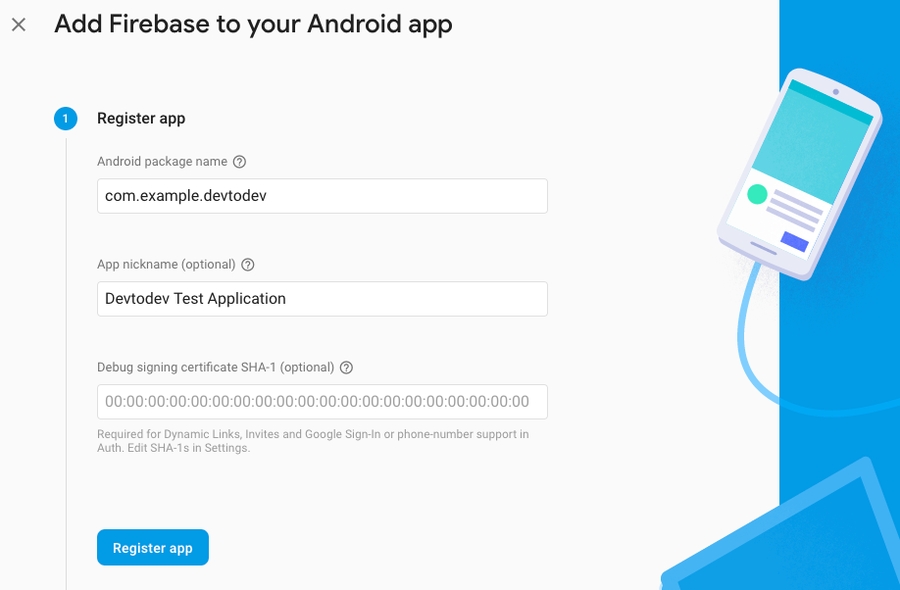
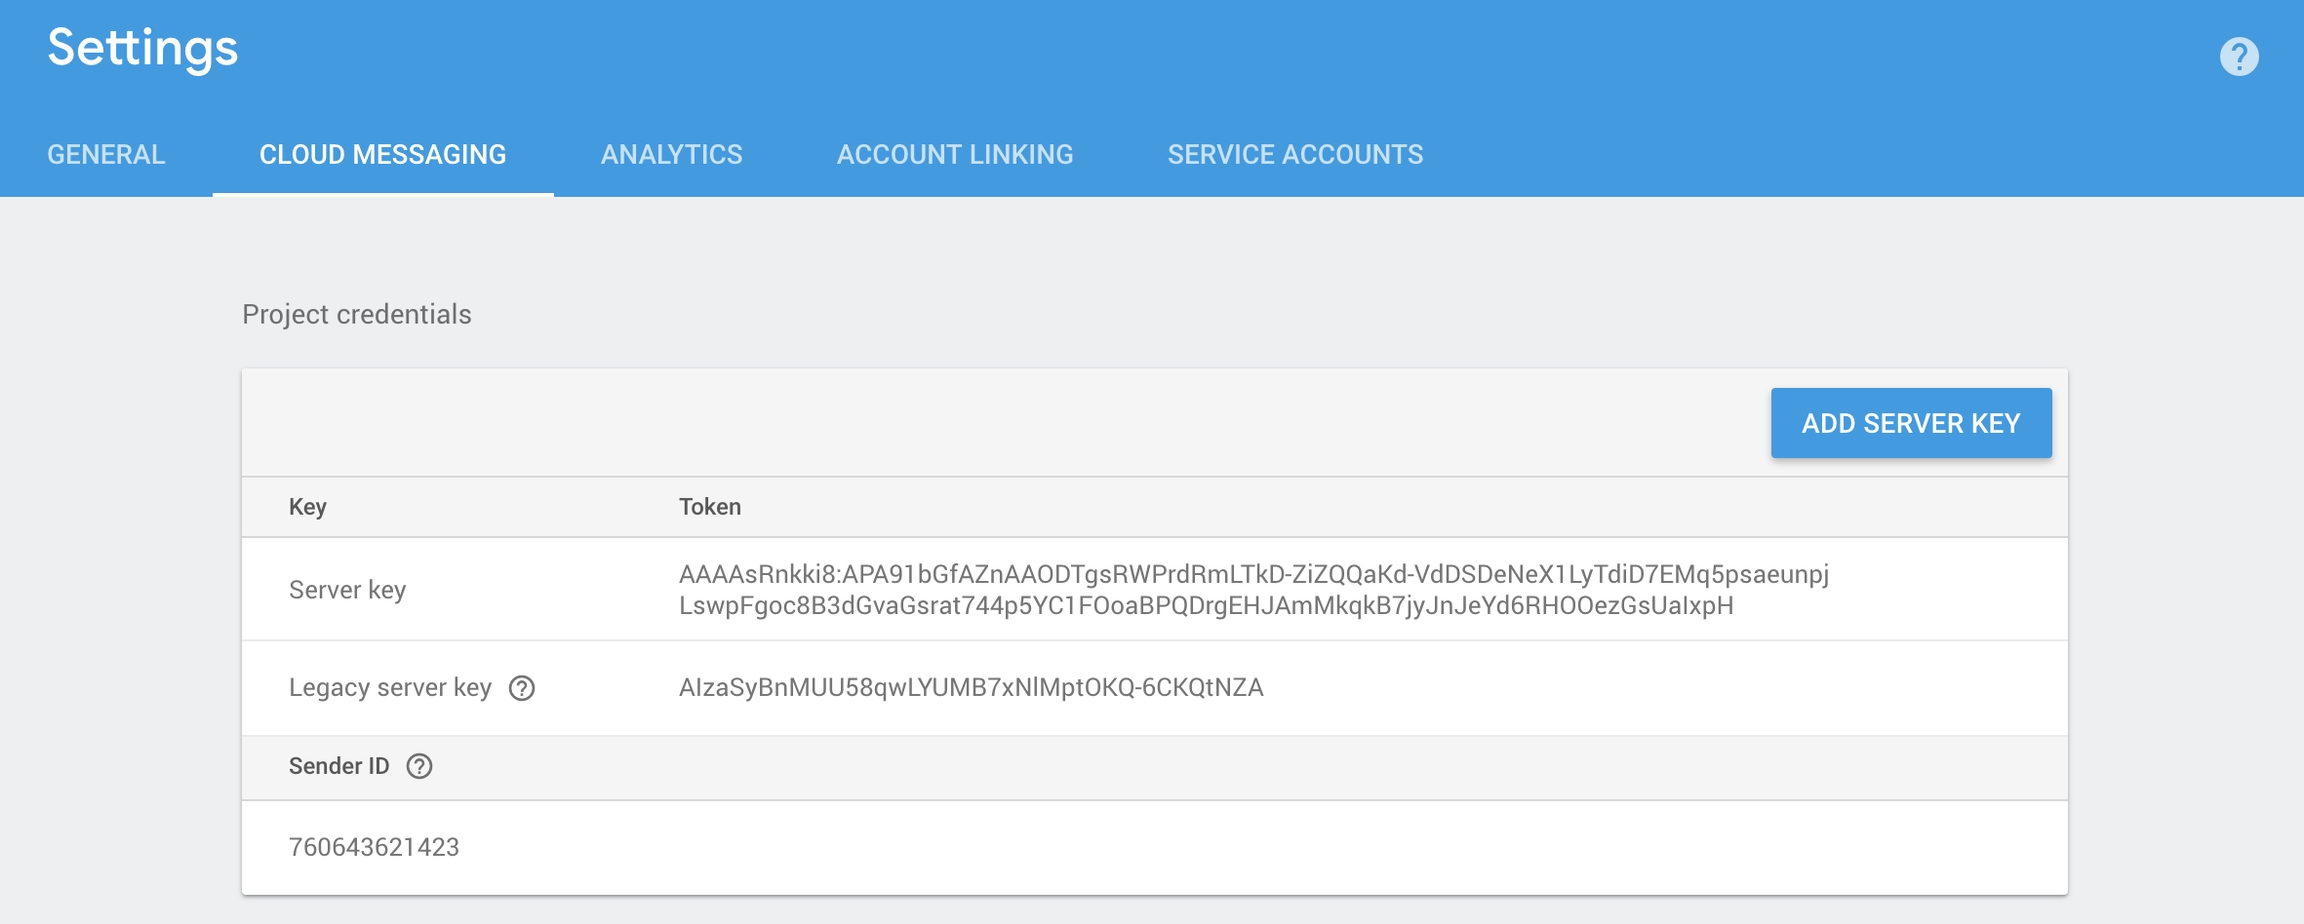


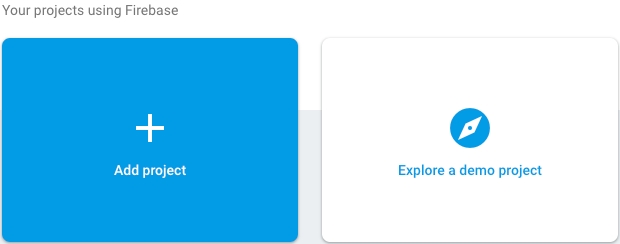
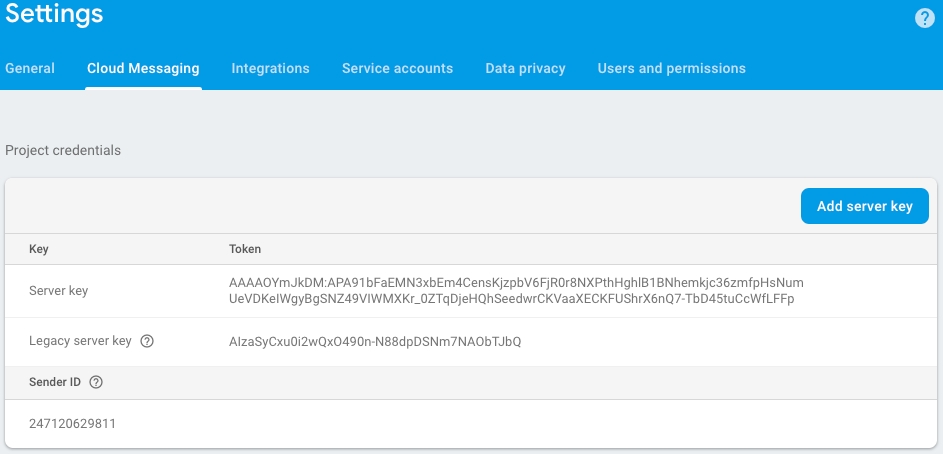


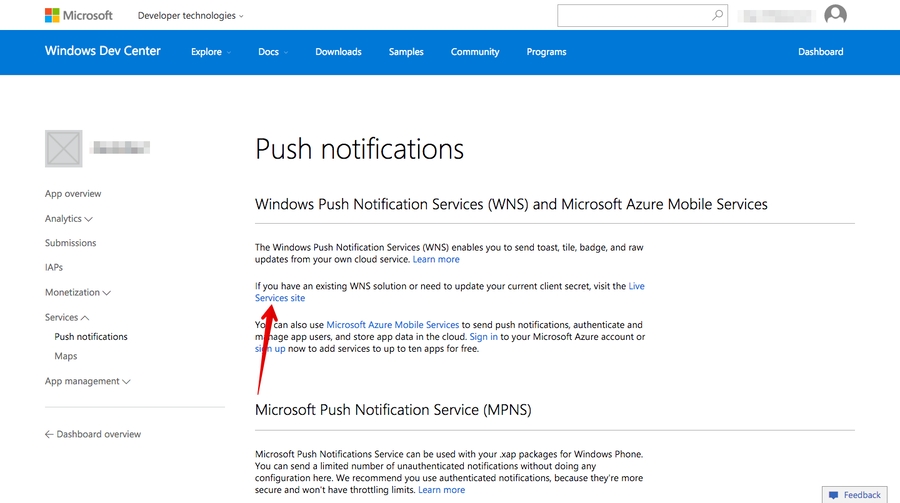
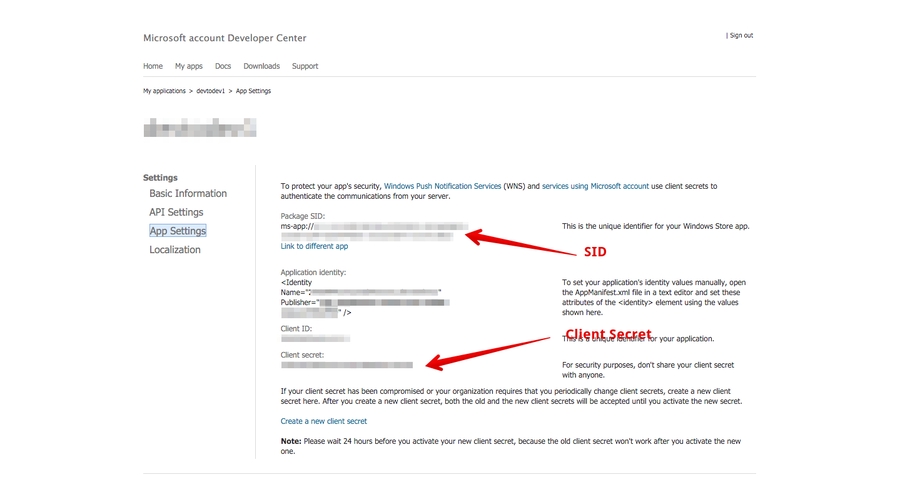


The SDK is available in GitHub repository. Download the Source code (zip) of latest release. Unzip the archive and copy DTDAnalytics folder to the Plugins folder of your project.
For a C++ project type, add the DTDAnalytics name to the list of dependency module names to the <module_name>.Build.cs file of the module in which you plan to use the plugin.
Example:
A class that implements analytic methods.
Header file:
A class that implements user card methods.
The class header:
SDK tracking status.
Header file:
Values:
Unknown = 0 - leave tracking unchanged
Enable = 1 - tracking enabled
Disable = 2 - tracking disabled
Example:
SDK logging level.
Header file:
Values:
Unknown = 0 - leave logging level unchanged
No = 1 - logging disabled
Error = 2 - logging of errors
Example:
Types of resource accumulation.
Header file:
Values:
Earned = 0 - earned resources
Bought = 1 - purchased resources
Example:
Predefined social media.
Header file:
Values:
Facebook = 0
Vkontakte = 1
Twitter = 2
Example:
Referral properties.
Header file:
Values:
Source = 0
Medium = 1
Content = 2
Example:
An optional parameter of int32 type
Header file:
For your convenience, we implemented the conversion constructor:
Example:
An optional parameter of FString type.
Header file:
For your convenience, we implemented the conversion constructor:
Example:
Configuration of the analytics plugin.
Header file:
Example:
Custom parameters of a custom event.
Header file:
Example:
Parameters of the progression start event.
Header file:
Example:
Parameters of the progression completion event.
Header file:
Example:
Header file:
Definitions:
User gender.
Header file:
Values:
Unknown = 0
Male = 1
Female = 2
Example:
This generation of SDK is deprecated and is no longer supported. Information about the .
To enable Push Notifications you will have to perform the following actions:
DTDMessaging.Android.Initialize();DTDMessaging.Android.StartPushService();public class MyPushListener : IDTDPushListener
{
public void OnPushServiceRegistrationSuccessful(string deviceId)
{
Debug.Log(deviceId);
}
public void OnPushServiceRegistrationFailed(string error)
{
Debug.Log(error);
}
public void OnPushNotificationReceived(DTDPushMessage message)
{
Debug.Log(message);
}
public void OnInvisibleNotificationReceived(DTDPushMessage message)
{
//IOS only.
}
public void OnPushNotificationOpened(DTDPushMessage pushMessage, DTDActionButton actionButton)
{
Debug.Log(pushMessage.ToString());
Debug.Log(actionButton.ToString());
}
}public class MyPushListener : IDTDPushListener
{
public void OnPushServiceRegistrationSuccessful(string deviceId)
{
Debug.Log(deviceId);
}
public void OnPushServiceRegistrationFailed(string error)
{
Debug.Log(error);
}
public void OnPushNotificationReceived(DTDPushMessage message)
{
Debug.Log(message);
}
public void OnInvisibleNotificationReceived(DTDPushMessage message)
{
Debug.Log(message);
}
public void OnPushNotificationOpened(DTDPushMessage pushMessage, DTDActionButton actionButton)
{
Debug.Log(pushMessage.ToString());
Debug.Log(actionButton.ToString());
}
}
public class NotificationExample : MonoBehaviour
{
private const string APP_KEY = "***************"
void Start()
{
DTDAnalytics.Initialize(APP_KEY);
DTDMessaging.Android.SetPushListener(new PushListener());
DTDMessaging.Android.Initialize();
DTDMessaging.Android.StartPushService();
}
}<meta-data
android:name="com.devtodev.push.default_small_icon"
android:resource="@drawable/ic_icon_name" />
<meta-data
android:name="com.devtodev.push.default_small_icon_color"
android:resource="@color/icon_color" /><meta-data
android:name="com.devtodev.push.default_large_icon"
android:resource="@mipmap/ic_large_icon_name"/><manifest package="com.company.package">
</manifest>├─── AndroidManifest.xml
└─── res
└─── drawable
└─── smallIcon0.png
└─── mipmap
└─── largeIcon0.png
└─── raw
└─── iconsound.wav jar cvf resources.aar -C . .<meta-data android:name="com.devtodev.push.default_small_icon" android:resource="@drawable/smallIcon0" />
<meta-data android:name="com.devtodev.push.default_large_icon" android:resource="@mipmap/largeIcon0" />//NotificationService.h
#import <devtodevAppExtensions/devtodevAppExtensions.h>
@interface NotificationService : DTDMediaAttachmentExtension
@end
//NotificationService.m
#import "NotificationService.h"
@implementation NotificationService
// NOTE: Keep this empty implementation to prevent class stripping.
@endopenssl x509 -in developer_identity.cer -inform DER -out developer_identity.pem -outform PEMopenssl pkcs12 -nocerts -in mykey.p12 -out mykey.pemopenssl pkcs12 -export -inkey mykey.key -in developer_identity.pem -out iphone_dev.p12#import "AppDelegate.h"
#import <devtodev/devtodev.h>
@implementation AppDelegate
- (BOOL)application:(UIApplication *)application didFinishLaunchingWithOptions:(NSDictionary
*)launchOptions {
[DevToDev initWithKey:@“APP_KEY” andSecretKey:@“SECRET_KEY”];
dispatch_async(dispatch_get_main_queue(), ^{
[DevToDev pushManager].delegate = self;
[DevToDev pushManager].pushNotificationsOptions = (DTDNotificationOptionAlert | DTDNotificationOptionBadge | DTDNotificationOptionSound);
[DevToDev pushManager].pushNotificationsEnabled = YES;
});
// Your code...
return YES;
}
/**
* @brief Device received a token and was successfully subscribed for notifications
* @param deviceToken device push token
**/
-(void) didRegisterForRemoteNotificationsWithDeviceToken: (NSString *) deviceToken {
}
/**
* @brief Error occured while registering for push notifications
* @param error text
**/
-(void) didFailToRegisterForRemoteNotificationsWithError: (NSError *) error {
}
/**
* @brief Push notification has been received by the device
* @param notification data
**/
-(void) didReceiveRemoteNotification: (NSDictionary *) notification {
}
/**
* @brief Push notification has been opened
* @param pushMessage body
* @param actionButton button that was clicked
**/
-(void) didOpenRemoteNotification: (DTDPushMessage *) pushMessage withAction: (DTDActionButton *) actionButton {
}
/**
* @brief Push notification receive response
* Note: This method is relevant only for iOS 10 and above.
* @param response notification
**/
-(void) didReceiveNotificationResponse: (DTDNotificationResponse *)response {
}typedef NS_OPTIONS(NSUInteger, DTDNotificationOptions) {
DTDNotificationOptionBadge = (1 << 0),
DTDNotificationOptionSound = (1 << 1),
DTDNotificationOptionAlert = (1 << 2),
DTDNotificationOptionCarPlay = (1 << 3),
DTDNotificationOptionCriticalAlert = (1 << 4),
DTDNotificationOptionProvidesAppNotificationSettings = (1 << 5),
DTDNotificationOptionProvisional = (1 << 6)
};


Warning = 3 - logging of warnings and errors
Info = 4 - logging of information messages, warnings and errors
Debug = 5 - logging of debugging messages, informational messages, warnings and errors
Googleplus = 3Whatsapp = 4
Viber = 5
Evernote = 6
Googlemail = 7
Linkedin = 8
Pinterest = 9
Reddit = 10
Renren = 11
Tumblr = 12
Qzone = 13
Campaign = 3Term = 4
FDTDOptionalString
Application version (Windows)
TrackingAvailability
EDTDTrackingStatus
Tracking settings
TMap<FString, bool>
Boolean parameters
TMap<FString, int64>
Resources earned
HasValue
bool
Option label
Value
int32
Parameter value
HasValue
bool
Option label
Value
FString
Parameter value
LogLevel
EDTDLogLevel
Logging level
CurrentLevel
FDTDOptionalInt32
Current level
UserId
FDTDOptionalString
User ID
StringParameters
TMap<FString, FString>
String parameters
IntParameters
TMap<FString, int64>
Integer parameters
FloatParameters
TMap<FString, float>
Real parameters (floating-point numbers)
Difficulty
FDTDOptionalInt32
Difficulty
Source
FDTDOptionalString
Source
SuccessfulCompletion
bool
Successful completion of the progression (‘false’ by default)
Duration
int32
Duration (if 0, duration is calculated automatically)
Spent
TMap<FString, int64>
Resources spent
appKey
FString
You can find it in the settings of the corresponding application in devtodev (Settings → SDK → Integration → Credentials → App ID)
appKey
FString
You can find it in the settings of the corresponding application in devtodev (Settings → SDK → Integration → Credentials → App ID)
config
FDTDAnalyticsConfiguration
Initialization parameters


ApplicationVersion
BoolParameters
Earned
PublicDependencyModuleNames.Add("DTDAnalytics");#include "DTDAnalytics/Public/DTDAnalyticsBPLibrary.h"#include "DTDAnalytics/Public/DTDUserCardBPLibrary.h"#include "DTDAnalytics/Public/DTDTrackingStatus.h"EDTDTrackingStatus TrackingStatus = EDTDTrackingStatus::Enable;#include "DTDAnalytics/Public/DTDLogLevel.h"EDTDLogLevel LogLevel = EDTDLogLevel::Info;#include "DTDAnalytics/Public/DTDAccrualType.h"EDTDAccrualType AccrualType = EDTDAccrualType::Earned;#include "DTDAnalytics/Public/DTDSocialNetwork.h"EDTDSocialNetwork SocialNetwork = EDTDSocialNetwork::Facebook;#include "DTDAnalytics/Public/DTDReferralProperty.h"EDTDReferralProperty ReferralProperty = EDTDReferralProperty::Source;#include "DTDAnalytics/Public/DTDOptionalInt32.h"FDTDOptionalInt32(int32 value) : HasValue(true), Value(value) {}FDTDOptionalInt32 OptionalParameter = 1;#include "DTDAnalytics/Public/DTDOptionalString.hFDTDOptionalString(FString value) : HasValue(true), Value(value) {}FDTDOptionalString OptionalParameter = FString("StringValue");#include "DTDAnalytics/Public/DTDAnalyticsConfiguration.h"FDTDAnalyticsConfiguration config;
config.LogLevel = EDTDLogLevel::Debug;
config.CurrentLevel = 3;
config.UserId = FString("CUID");
config.ApplicationVersion = FString("1.2.3");
config.TrackingAvailability = EDTDTrackingStatus::Enable;#include "DTDAnalytics/Public/DTDCustomEventParams.h"FDTDCustomEventParams params;
params.BoolParameters.Add("BoolKey", true);
params.FloatParameters.Add("FloatKey", 3.3);
params.IntParameters.Add("IntKey");
params.StringParameters.Add("StringKey", "StringValue");#include "DTDAnalytics/Public/DTDStartProgressionEventParams.h"FDTDStartProgressionEventParams params;
params.Difficulty = 3;
params.Source = FString("Source");#include "DTDAnalytics/Public/DTDFinishProgressionEventParams.h"FDTDFinishProgressionEventParams params;
params.Duration = 200;
params.SuccessfulCompletion = true;
params.Earned.Add("CurrencyName1", 1);
params.Spent.Add("CurrencyName2", 2);#include "DTDAnalytics/Public/DTDDelegates.h"DECLARE_DELEGATE_OneParam(FDTDLongListenerDelegate, int64);
DECLARE_DELEGATE_OneParam(FDTDGetterStringDelegate, const FString&);
DECLARE_DELEGATE_OneParam(FDTDGetterBoolDelegate, bool);
DECLARE_DELEGATE_OneParam(FDTDGetterIntDelegate, int32);
DECLARE_DELEGATE_OneParam(FDTDGetterLongDelegate, int64);
DECLARE_DELEGATE_OneParam(FDTDGetterGenderDelegate, EDTDGender);
DECLARE_DELEGATE_TwoParams(FDTDGetterOptionalStringDelegate, bool, const FString&);
DECLARE_DELEGATE_TwoParams(FDTDGetterOptionalBoolDelegate, bool, bool);
DECLARE_DELEGATE_TwoParams(FDTDGetterOptionalFloatDelegate, bool, float);
DECLARE_DELEGATE_TwoParams(FDTDGetterOptionalLongDelegate, bool, int64);
DECLARE_DELEGATE_ThreeParams(FDTDGetterOptionalStringWithKeyDelegate, bool, const FString&, const FString&);
DECLARE_DELEGATE_ThreeParams(FDTDGetterOptionalBoolWithKeyDelegate, bool, const FString&, bool);
DECLARE_DELEGATE_ThreeParams(FDTDGetterOptionalFloatWithKeyDelegate, bool, const FString&, float);
DECLARE_DELEGATE_ThreeParams(FDTDGetterOptionalLongWithKeyDelegate, bool, const FString&, int64);#include "DTDAnalytics/Public/DTDGender.h"EDTDGender Gender = EDTDGender::Female;UDTDAnalyticsBPLibrary::Initialize("AppKey");FDTDAnalyticsConfiguration config;
config.LogLevel = EDTDLogLevel::No;
config.CurrentLevel = 3;
config.UserId = FString("CUID");
config.ApplicationVersion = FString("1.2.3");
config.TrackingAvailability = EDTDTrackingStatus::Enable;
UDTDAnalyticsBPLibrary::InitializeWithConfig("AppKey", config);Add the application to your space in devtodev system
Android. Get API key from Google APIs Console. It is necessary to activate Google Cloud Messaging for Android before key generation. Detailed information on how to receive an API key you can find in native Android devtodev SDK documentation
iOS. Generate Developer or Production Certificate for the application and get Private key file (.p12) on its basis. Detailed information on how to receive a Private key file you can find in native iOS devtodev SDK documentation
Submit the data to the application settings in devtodev system
Integrate devtodev SDK to the application (see the "" to learn more about integrating and initializing devtodev SDK)
Add several lines of the code to switch in the push notification to the SDK
Create a campaign for sending push-notifications in "Push" section
Go to Firebase console and then to your project or create a new one. Here is complete guide on adding your project to Firebase console and enabling Cloud messaging.
Download google-services.json from your Firebase console. Add this file into your project’s Assets folder.
Please do the following to find google-services.json:
Choose your project in the Firebase console
Choose project settings in the Project overview
3. Scroll down to the SDK setup and configuration. Click on the google-services.json
If you want to use both devtodev and Firebase Messaging services at the same time, you need to disable Firebase listener.
Find androidmanifest.xml used in your app. If you don’t use Custom Manifest, you need to create it. Tick the Custom Main Manifest checkbox:
You can read more about the manifest here.
Add the following line to the “Application” section:
You should get something like this:
Build a Windows Store App in Unity. After the app is built, Visual Studio project will be created. Proceed with the following changes.
.NET + D3D: Put the following source in your App class (usually it is an App.cs file) at the end of the ApplicationView_Activated(CoreApplicationView sender, IActivatedEventArgs args) function.
.NET + XAML: Put the following source in your App class (usually it is an App.xaml.cs file) at the end of the OnLaunched(LaunchActivatedEventArgs args) and OnActivated(IActivatedEventArgs args) functions.
IL2CPP + XAML: Put the following source in your App class (usually it is App.xaml.cpp file). Add several lines of code in a generated App.xaml.cpp class. After defining headers:
And at the end of of the App::OnLaunched(LaunchActivatedEventArgs^ e) and App::OnActivated(IActivatedEventArgs^ args) functions.
For Example:
IL2CPP + D3D: Put the following source in your App class (usually it is App.cpp file). Add several lines of code in a generated App.cpp class. After defining headers:
And at the end of of the App::OnActivated(CoreApplicationView^ sender, IActivatedEventArgs^ args) function.
Make sure that these functions are enabled in Package.appmanifest of you project (the flag "Toast capable" is enabled by default for Windows 10+ projects, it is absent in the manifest).
Add the following three Background Tasks in Package.appmanifest:
Entry point for Push Notification tasks type:
Entry points for System Event tasks type:
You must also associate your application with the Windows Store app (otherwise push notifications will not be delivered). Open "Store->Associate App with the Store" menu, login with your Live ID and pick the appropriate application form the list. A file Package.StoreAssociation.xml will be added into the Project.
Build an iOS App in Unity. After the app is built, Xcode project will be created. Proceed with the following changes
Enable push notifications in your Xcode project
The library provides support for iOS 10 notification attachments, such as images, animated gifs, and video. In order to take advantage of this functionality, you will need to create a notification service extension alongside your main application
Create a new iOS target in Xcode (File -> New -> Target) and select the Notification Service Extension type
In Member Center, the Push Notifications service will appear as Configurable (not Enabled) until you create a client SSL certificate
Add devtodevAppExtensions.framework to newly created extension. Make sure that Deployment Target is pointed as iOS 10.0 or higher:
Make sure that field Architectures contains "Standard architectures armv7, arm64" setting both in the project and the extension build settings:
Modify your extension:
Delete all dummy source code for your new extension
Inherit from DTDMediaAttachmentExtension in NotificationService
Use Xcode to enable push notifications in the target’s Capabilities pane:
Enable Background Modes and Remote notifications under the target’s Capabilities section:
Using the graphic interface:
Open the Window/devtodev menu element
Switch Push Notifications tumbler on
If you need to use push token for some aims or to handle the getting of notifications by user, add the GameObject with the following function to the scene:
Set the target game object, needed script and functions in the interface:
Using code: Before calling Analytics.Initialize add the following strings:
1. Open PUSH NOTIFICATIONS section and click on the "Add new campaign" button
2. Fill in the campaign name, select an app for delivery 3. Choose a user group to send a message. You can choose an existing segment or create a new one 4. Enter notification details 5. Schedule the delivery 6. That's it!
You can create a campaign only after at least one push token comes from devtodev SDK integrated into your application. Otherwise, the app will not be displayed in the list.
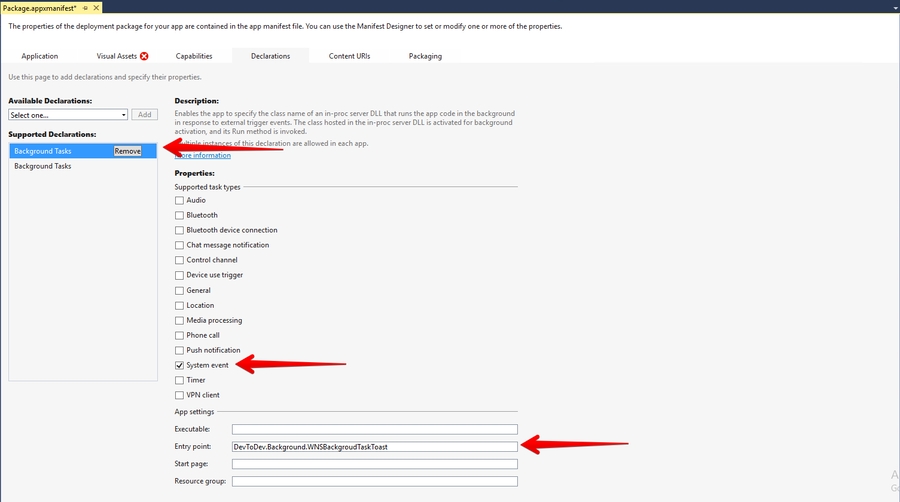
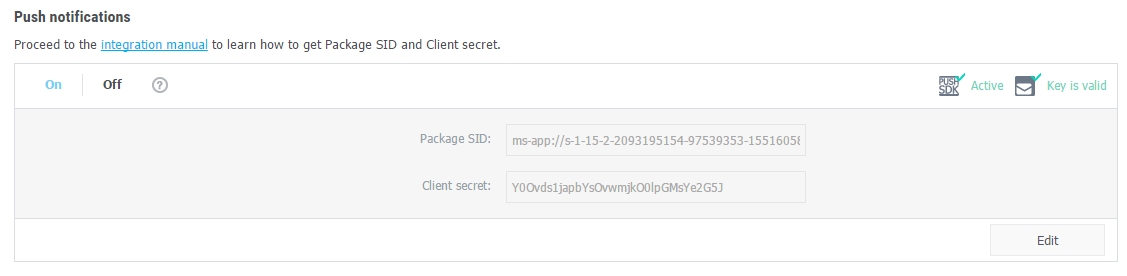


Check out this guide to A/B testing essentials and strategies!
To use Push API you need to have individual User API token, which can be found in the settings of space.
You’ll see the block with User API token on the space settings page only if your tariff plan and access rights allow to use devtodev API. You can reset User API token or create it again on the same page.
In order to display the notifications on the device, an SDK integration is required.
The request of assignment should be sent to:
Where
user_token – individual User API token of a user. It could be sent with both GET and POST methods.
v1 – the current version of API.
Request content is sent with POST method in JSON format.
The body of a request can contain the following properties:
An example of a request for sending a simple notification to an iOS device:
POST
If a request is formed correctly and there are no obstacles for sending a notification to users, the answer is a JSON of the following type:
where
audience (number) – the number of users found.
successful (number) – the number of successfully sent notifications.
erroneous (number) – the number of notifications rejected by the delivery service.
In case there is an error in a request, the answer is made in the following format:
where
status_code (number) – a general status of an error.
errors (array) – an array of error descriptions.
code (number) – the exact code of an error from the table of errors.
The list of possible errors is given in a table below.
Besides the errors listed above, error_details field may contain errors from the connected notification services. You can find descriptions of such errors in documentation for these services:
iOS Integration
You use Member Center to generate a push notification client SSL certificate that allows your notification server to connect to the APNs. Each App ID is required to have its own client SSL certificate. The client SSL certificate Member Center generates is a universal certificate that allows your app to connect to both the development and production environments.
<service android: name = "com.google.firebase.messaging.cpp.ListenerService"
android: exported = "true"
android: enabled = "false"
tools: node = "replace" /><?xml version="1.0" encoding="utf-8"?>
<manifest xmlns:android="http://schemas.android.com/apk/res/android" xmlns:tools="http://schemas.android.com/tools" package="com.devtodev.unitysdk2" android:versionCode="1" android:versionName="1.0">
<application android:label="@string/app_name" android:icon="@drawable/app_icon">
<service android:name="com.google.firebase.messaging.cpp.ListenerService" android:exported="true" android:enabled="false" tools:node="replace" />
<!-- The MessagingUnityPlayerActivity is a class that extends
UnityPlayerActivity to work around a known issue when receiving
notification data payloads in the background. -->
<activity android:name="com.google.firebase.MessagingUnityPlayerActivity" android:configChanges="fontScale|keyboard|keyboardHidden|locale|mnc|mcc|navigation|orientation|screenLayout|screenSize|smallestScreenSize|uiMode|touchscreen">
<intent-filter>
<action android:name="android.intent.action.MAIN" />
<category android:name="android.intent.category.LAUNCHER" />
</intent-filter>
<meta-data android:name="unityplayer.UnityActivity" android:value="true" />
</activity>
<service android:name="com.google.firebase.messaging.MessageForwardingService" android:exported="true" />
</application>
</manifest>private void ApplicationView_Activated(CoreApplicationView sender, IActivatedEventArgs args) {
//...other code
DevToDev.ActivatedEventHandler.Handle(args);
}protected override void OnLaunched(LaunchActivatedEventArgs e) {
//...other code
DevToDev.ActivatedEventHandler.Handle(e);
}
protected override void OnActivated(IActivatedEventArgs args) {
//...other source
DevToDev.ActivatedEventHandler.Handle(args);
}//...headers
extern "C" __declspec(dllimport) void __stdcall AddActivatedEventArgs(IInspectable* activatedEventArgs);void App::OnActivated(IActivatedEventArgs^ args) {
//...other code
AddActivatedEventArgs(reinterpret_cast<IInspectable*>(static_cast<Platform::Object^>(args)));
}
void App::OnLaunched(LaunchActivatedEventArgs^ e) {
//...other code
auto args = static_cast<IActivatedEventArgs^>(e);
AddActivatedEventArgs(reinterpret_cast<IInspectable*>(static_cast<Platform::Object^>(args)));
}//...headers
extern "C" __declspec(dllimport) void __stdcall AddActivatedEventArgs(IInspectable* activatedEventArgs);void App::OnActivated(CoreApplicationView^ sender, IActivatedEventArgs^ args) {
//...other code
AddActivatedEventArgs(reinterpret_cast<IInspectable*>(static_cast<Platform::Object^>(args)));
}devtodev.background.PushNotificationTriggerTaskdevtodev.background.ToastNotificationActionTriggerTask
devtodev.background.ToastNotificationHistoryChangedTriggerTask//NotificationService.h
#import <devtodevAppExtensions/devtodevAppExtensions.h>
@interface NotificationService : DTDMediaAttachmentExtension
@end
//NotificationService.m
#import "NotificationService.h"
@interface NotificationService ()
@endpublic void PushReceived(IDictionary<string, string> pushAdditionalData) {
//pushAdditionalData - push-notification data that you send to your app
}
public void PushOpened(DevToDev.PushMessage pushMessage, DevToDev.ActionButton actionButton) {
//pushMessage - DevToDev.PushMessage. Represents toast notification message
//actionButton - DevToDev.ActionButton. Represents toast button that was clicked.
// Could be null if toast body was clicked
}
public void PushTokenFailed(string error) {
//handle push-notifications error here
}
public void PushTokenReceived(string pushToken) {
//pushToken - your push token
}
DevToDev.PushManager.PushReceived = PushReceived;
DevToDev.PushManager.PushOpened = PushOpened;
DevToDev.PushManager.PushTokenFailed = PushTokenFailed;
DevToDev.PushManager.PushTokenReceived = PushTokenReceived;
DevToDev.PushManager.PushNotificationsOptions = (DTDNotificationOptions.Alert | DTDNotificationOptions.Badge | DTDNotificationOptions.Sound | DTDNotificationOptions.Provisional); //Notification options for iOS, optional property
DevToDev.PushManager.PushNotificationsEnabled = true;
// FOR ANDROID ONLY! Optional. Using custom push-notification icons on Android.
// <summary> To set the custom icons to be shown in push-notification on the SDK part,
// use the following methods.
// Attention! Icons which set in the push-notification wizard
// have priority over the icons which set in these methods.</summary>
// <param name="iconName">Icon file from resources of your app
// (from Assets/Plugins/Android/res folder)</param>
//FOR ANDROID ONLY! To set the small icon:
DevToDev.PushManager.CustomSmallIcon = iconName;
//FOR ANDROID ONLY! To set the large icon:
DevToDev.PushManager.CustomLargeIcon = iconName;


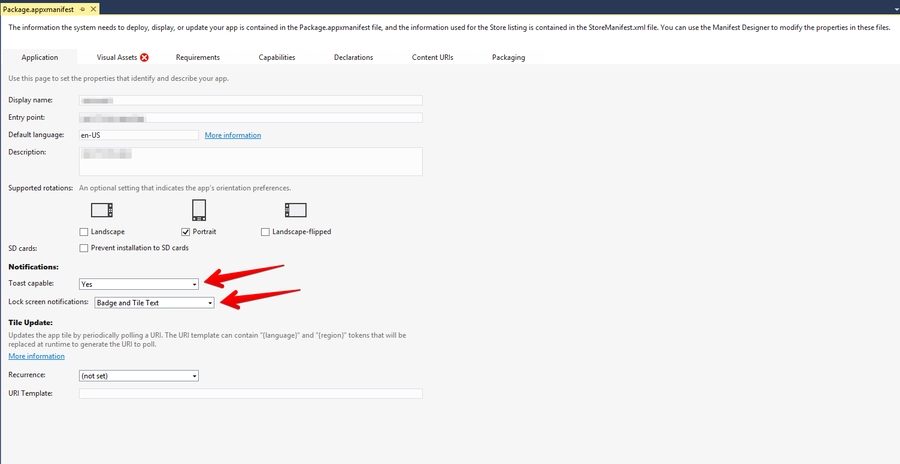
string
Optional. The unique identifier of a request. It is specified by a developer. It is used for the filtering of repeated sendings of identical requests in case of the loss of connection, etc. Requests with the same identifier can't be repeated during 10 minutes after their sending.
audience
array
Required. An array of mailing audience. The element of an array is an object with an individual for every platform set of user identifiers. It is allowed to specify several known identifiers for one user. The maximum number of elements of an array is 1000.
The lists of available identifiers can be found in the description to each platform.
ios
object
An object containing a notification and its properties for the
android
object
An object containing a notification and its properties for the .
win
object
An object containing a notification and its properties for the . Use this object for any version of Windows (Windows Phone 8.1, Windows Phone 10, Windows 8.1, Windows 10).
uwp
object
An object containing a notification and its properties for the 10 / WP 10. Don’t use this object for sending to other versions of Windows.
error_details (array) – a detailed description of reasons of a delivery fail.
msg (string) – a brief description of an error.
Malformed json
JSON error in the body of the request. Fix the formatting error.
400
4
Field not found: %field_name%
An obligatory field can not be found. You need to complete the request with this field.
400
6
Invalid app id %app id value%
The requested project can not be found. An unknown application. This error can arise when a user makes a mistake with an app ID or when an application with this ID has been removed.
401
11
Authorization error. Wrong user token %user_token value%
Authorization error. The set token is wrong. User_token field. User API token.
401
12
Authorization error. User_token is not set.
Authorization error. User_token field is absent. User API token should be set either as a parameter in GET string of the request or in POST body of the request.
403
13
Access denied. You have no access to the app %app id value%
Access error. User has no access to this application.
403
14
Access denied. You have no access to the report file %file id value%
Access error. User has no access to this file. This error can arise if you have to access the application used in a previously created request.
403
15
Access denied. You have no access to API.
Access error. No access to User API token. This error can arise when access rights have been changed (as a consequence of changing a user role or tariff plan).
403
23
Access denied. You have no access to Push API.
Access error. This error can arise when you have no rights to Push API for your user role or tariff plan.
400
24
Push service is not enabled in an application settings.
Push service is disabled. Enable the service on the of an app.
400
25
The devtodev SDK is not integrated with the application you specified
The SDK is not integrated.
400
26
No push token has been received from the devtodev SDK integrated with the app you specified. Please make sure the SDK is integrated correctly.
No push token has been received from the devtodev SDK integrated with the app you specified. Please make sure the SDK is integrated correctly.
400
27
The audience array should not contain more than 1000 elements.
The audience array contains more than 1000 elements. Reduce the number of users in one request.
400
28
Unexpected value for field %field%. Received value: %value%. Expected values: %values%.
There is an unexpected value for the field. Use the recommendation and correct the request.
400
29
Unexpected field %field%
The request contains the field not specified in the documentation. The field must be excluded from the request.
400
30
Invalid value for field %field%. Received value: %value%. Expected: %description%
Invalid value has been attributed to the field. Use the recommendation and correct the request.
400
31
Notification payload size limit exceeded.
Reduce the payload size.
400
32
The sending was blocked. The request with the %pack_id% identifier has already been sent during previous 10 minutes.
Requests with the same identifier can't be repeated during 10 minutes after their sending.
400
33
The requested users have not been found, or there have been no push-token received from them.
The requested users have not been found, or there have been no push-token received from them.
user_token
string
Required. An individual user API token. It can be found on the space settings page. It is possible to send it with both POST and GET methods.
app_id
string
Required. An application identifier. It can be found in the application’s settings in the Integration section. Required.
campaign_tag
string
Optional. The name of a campaign. The grouping of statistics for the assessment of the efficiency of a campaign is made by the name of a campaign. The API Stats report can be found in the Push section.
500
1
Unknown Error
Unknown error. Please contact devtodev technical support.
400
2
Request body is empty
The empty body of the request. There is no POST data in the request.
400


pack_id
3
If you have previously used the Unity SDK version 2+, you need to delete the following files and folders in the "Assets" folder of your project:
To integrate devtodev analytics SDK, you can use one of the two methods: by using the Unity Package Manager (recommended) or by manually importing the unitypackage.
If you integrated the devtodev package manually, then you need to delete the Assets/DevToDev and Plugins/DevToDev folders.
Open the Package Manager (Window → Package Manager), click + in the top left corner and select Add package from git URL.
Copy the repository URL https://github.com/devtodev-analytics/package_Analytics.git to the input box and click Add.
Wait for the Unity Package Manager to download the package.
For Android projects, add an identification package:
If you work with SDK version 3.5.0 and above, and you want to use Google Ad ID, you need to add devtodev-analytics/package_Google. When developing and publishing apps for kids (COPPA), you do not need devtodev-analytics/package_Google. Read more about working with COPPA in the COPPA section.
If you work with SDK version 3.5.0 and above, and you want to use Huawei Ad ID, you need to add . When developing and publishing apps for kids , you do not need . Read more about working with in the .
Download DTDAnalytics.unitypackage from http://github.com/devtodev-analytics/Unity-sdk-3.0/releases/latest.
In the Unity Editor menu, open Assets → Import Package → Custom Package.
Select the DTDAnalytics.unitypackage that you have just downloaded.
Click Import.
For Android projects, import an identification package:
If you work with SDK version 3.5.0 and above, and you want to use Google Ad ID, you need to import the DTDGoogle.unitypackage. When developing and publishing apps for kids (COPPA), you do not need the DTDGoogle.unitypackage. Read more about working with COPPA in the COPPA section.
If you work with SDK version 3.5.0 and above, and you want to use Huawei Ad ID, you need to import the DTDHuawei.unitypackage. When developing and publishing apps for kids , you do not need the DTDHuawei.unitypackage. Read more about working with in the .
Create a script with the following code and attach it to the GameObject that will survive the entire life cycle of the app.
You can find the AppID in the settings of the respective app in devtodev (Settings → SDK → Integration → Credentials).
config - an object instance of DTDAnalyticsConfiguration, which is used for specifying additional properties during the initialization.
DTDAnalyticsConfiguration
Parameter
Type
Description
CurrentLevel
Integer
The player level at the moment of devtodev SDK initialization. It’s optional but we recommend using it for improving data accuracy.
UserId
String
A custom user ID assigned by the developer. In the case of default calculation by device IDs, the identifier can be used for searching users in devtodev. In case the project uses calculation by user IDs, the parameter is mandatory because it becomes the principal calculation ID in devtodev.
TrackingAvailability
DTDTrackingStatus (enum)
The property allows or disallows devtodev tracking of the user. By default, it is set to DTDTrackingStatus.Enable. SDK stores the previously assigned value. Pass DTDTrackingStatus.Disable if the user opted out of tracking in line with GDPR.
LogLevel
Example:
SDK Activity
The SDK can’t control app activity in case you use Windows Standalone therefore this responsibility is shifted to the developer. While initializing the SDK, the activity starts automatically and after that, the activity status will not auto-change. To track app activity, the developer can use the following methods: DTDAnalytics.StartActivity and DTDAnalytics.StopActivity. It is recommended to use the DTDAnalytics.StopActivity method to stop activity when the app goes into the background or gets closed. You can use the DTDAnalytics.StartActivity method to resume activity when the app gets reopened from the taskbar.
For other platforms, there is no need to manually call the DTDAnalytics.StartActivity and DTDAnalytics.StopActivity methods.
To resolve external android dependencies, you need to use External Dependency Manager for Unity.
Add the following strings to proguard.txt (read more about Unity proguard here):
Select your project in https://developer.huawei.com/consumer/en/service/josp/agc/index.html#/myProject In the “General information” section find “App information” and download the “agconnect-services.json“ file.
If you imported the DTDGoogle package, delete the imported files Assets\Plugins\DevToDev\Android\DTDGoogleAndroid.dll and Assets\DevToDev\Analytics\Editor\GoogleDependencies.xml
Import the DTDHuawei.unitypackage manually from GitHub or use Unity Package Manager with .
In the assets/Plugins/Android/ folder create a settingsTemplate.gradle file with the following content:
Open Window → devtodev and select Create android plugin folder
Copy the “agconnect-services.json“ file to the Assets\Plugins\Android\devtodev.plugin folder
Open Assets → External Dependency Manager → Android ResolverAssets → External Dependency Manager → Android Resolver and click Resolve
To add the following rule:
To integrate with Xcode, the SDK uses PostProcessBuild in the DTDPostProcessAnalytics and DTDPostProcessMessaging scripts. If you use custom PostProcessBuild scripts, add them callbackOrder of less than 98 to avoid conflicts.
At WWDC23 Apple introduced new privacy manifests and xcframework signature. More information about it can be found here.
When developing and publishing apps targeted at children under 13 years old, you need to ensure special conditions for data processing. Any mobile app aimed at children or intended for users in a region with strict regulations on child online protection, must comply with current laws.
If your app has to comply with the legal requirements (COPPA), use the following recommendations:
Implement the CoppaControlEnable method. The method disables collection of ad IDs and vendor IDs (IDFA, IDFV).
To comply with Apple’s guidelines, remove from Xcode project:
AppTrackingTransparency.framework and all the links pointing to it.
AdSupport.framework and all the links pointing to it.
Depending on the SDK version:
3.9.0 and older:
Set IS_COPPA_ENABLED = true in DTDPostProcessAnalytics.cs (Assets/DevToDev/Analytics/Editor)
3.9.1 and newer: Add a new : DTD_COPPA
Implement the CoppaControlEnable method. The method disables collection of ad IDs and vendor IDs.
If you are using DTDGoogle or DTDHuawei from Unity Package Manager, disable it.
If you are using DTDGoogle.unitypackage, remove the following files:
Call the CoppaControlEnable method before SDK initialization. If the method was not called, the SDK will work as before.
To generate a universal client SSL certificate
In Certificates, Identifiers & Profiles, select Certificates.
Click the Add button (+)
Under Production, select the “Apple Push Notification service SSL (Sandbox & Production)” checkbox, and click Continue.
Choose an App ID from the App ID pop-up menu, and click Continue. Choose the explicit App ID that matches your bundle ID.
Create a certificate request on your Mac.
Click Choose File.
In the dialog that appears, select the certificate request file (with a .certSigningRequest extension), and click Choose File.
Click Generate.
Click Download.
Open "Keychain access" application
If the certificate hasn't been added to keychain access yet, choose "File" → "Import". Find the certificate file (CER-file) provided by Apple
Choose "Keys" section in "Keychain access" application
Choose a personal key associated with your iPhone developer certificate. Personal key is identified by open certificate associated with it "iPhone developer: ". Choose "File" → Export objects. Save key as .p12
You'll be suggested to create a password which is used when you need to import the key to another computer
Upload the .p12-file into Integration section of application settings panel (Settings -> Push Notifications):
1. For the Messaging module to function you need the basic Analytics package. Before the notification initialization, you need to initialize the SDK. More about it you can read here: Unity Integration.
2. After the DTDAnalytics initialization block call the StartNotificationService method to activate the Messaging module:
You can listen to basic notification module events. To do this, create a class that implements the IDTDPushListener interface and pass it to the DTDMessaging.IOS.SetPushListener method.
Example:
You can specify the necessary display options using the DTDMessaging.IOS.SetNotificationOptions method.
Example:
A complete example of the notification module initialization:
void DTDMessaging.IOS.StartPushService()
The method responsible for push notification activation:
Requests user permission to receive push notifications
Sends push token and current state isAllowed
void DTDMessaging.IOS.GetToken(Action<string> onGetToken)
The method that returns current push token to onGetToken callback
DTDMessaging.IOS.SetPushListener(IDTDPushListener listener)
The method for assigning a push notification event listener
void DTDMessaging.IOS.PushNotificationsOptions(uint options)
options is responsible for setting up the display of Push Notifications. It is set by the developer to select the method of notifying the user. It can be changed by the end-user.
By default, it has the value:
[.DTDNotificationOptionBadge, .DTDNotificationOptionSound, .DTDNotificationOptionAlert]
void DTDMessaging.IOS.PushIsAllowed (bool isAllowed )
The method is responsible for enabling / disabling the ability to send a push notification to the user from devtodev.
void OnPushServiceRegistrationSuccessful (string deviceId);
The method is called if a push token is successfully received, represented by a string.
void OnPushServiceRegistrationFailed (string error);
The method is called if at the time of receiving a pushToken errors occur. It passes the text of the error that occurred
void OnInvisibleNotificationReceived (DTDPushMessage message);
The method is called when an invisible remote push notification is received. The DTDPushMessage object is passed
void OnPushNotificationReceived (DTDPushMessage message);
The method is called when a remote push notification is received while the application runs in the Foreground state. The DTDPushMessage object is passed.
void OnPushNotificationOpened (DTDPushMessage pushMessage, DTDActionButton actionButton);
The method is called when the end-user opens a remote push notification. The DTDPushMessage object and the optional DTDActionButton object are passed.
IDictionary<string,string> GetData():
Complete information passed with the push notification.
DTDActionType ActionType:
The property that returns the value of enum’s DTDActionType.
Possible values:
App - app open
Url - external link open
Share - share content
Deeplink - open a link that leads straight to a specific in-app location
string ActionString
The property that returns an optional action identifier
IDictionary<string,string> AdditionalData()
Additional data sent to push notification
DTDActionType ActionType
The property that returns the value of enum’s DTDActionType.
Possible values:
App - app open
Url - external link open
Share - share content
Deeplink - open a link that leads straight to a specific in-app location
string ActionString
The property that returns an optional action identifier
string ButtonId
The property that returns the ID of the clicked button
string ButtonText
The property that returns the text of the clicked button
It is an OptionSet used for push notification authorization and configuration interaction with users.
Attention: The user can change the allowed parameters in the notification settings at any time.
Possible values:
DTDNotificationOptionBadge - an option for displaying a badge on the application icon
DTDNotificationOptionSound - an option for playing sound
DTDNotificationOptionAlert - an option for displaying an alert
DTDNotificationOptionCarPlay - an option for showing a push notification in CarPlay DTDNotificationOptionCriticalAlert - an option for playing sound for critical alerts regardless of whether “do not disturb” is on or not. (Critical alerts require special permission from Apple). Available from iOS 12.0 onwards
DTDNotificationOptionProvidesSettings - an option for indicating that the system should show a notification settings button in the application. Available from iOS 12.0 onwards
DTDNotificationOptionProvisional - an option for sending provisional notifications to the Notification Center without interrupting functioning processes. Available from iOS 12.0 onwards
DTDNotificationOptionAnnunciation - an option for Siri to automatically read messages through AirPods. Available from iOS 13.0 onwards
Attention: DTDNotificationOptionProvisional - Provisional push notifications are shown in the User Notification Center but not on the lock screen. This type of push notification doesn’t require an explicit opt-in from the user. You can start sending them as soon as the user installs and launches your app. However, the user can also explicitly enable/disable your notifications.
Use this setting to avoid the permission request on app launch because it is seen as intrusive, and most users opt-out of it.
It’s also important that when using the DTDNotificationOptionProvisional setting, the user needs to go to Notification Center settings to allow explicit notifications.
After the build, open the signing and capabilities tab in the XCode project settings and add "Push Notifications" and "Background Modes" (tick the box against Remote notifications).
The framework provides support for iOS 10+ notification attachments, such as images, animated gifs, and video. In order to take advantage of this functionality, you will need to create a notification service extension alongside your main application. Create a new iOS target in Xcode (File -> New -> Target) and select the Notification Service Extension type. In the Member Center, a Push Notifications service will appear as Configurable (not Enabled) until you create a client SSL certificate.
The framework supports notification attachments: images, audio, and video. To enable the functionality, you need to complete several steps:
Create a new iOS target in Xcode (File -> New -> Target) and select the Notification Service Extension
Set language to ‘Swift’
In the next window, click ‘Activate’
In the ‘Build Settings’ tap, change 'Architectures’ to ‘Standard Architecture (arm64, armv7)
Open the ‘Frameworks’ folder in your project, find the ‘DTDMessagingUnity’ framework and tick the box of your target in the ‘Target Membership’ section
In the NotificationService class (in the folder named after your target), replace the code with the following:
To use custom sounds for push notifications, you need to copy the necessary sound files to the Libraries folder of your Xcode project. You can read more about supported formats here.
When creating a push company, it is important to specify the full name of the sound with file extension (for example, sound.wav).
To export data to BigQuery you will need to:
Create a service account, if it does not already exist.
Get service account credentials.
Create a dataset.
Choose what kind of data you want to export to your dataset.
In the request specify the following details:
Service account credentials;
Name and location of the dataset in BigQuery;
Export configuration (see below).
If you do not have a service account, create one by following the Google Cloud manual.
Your service account has to have rights for table creation and data upload. Add bigquery.user or bigquery.admin role to your service account. Make sure to add these permissions to your role:
bigquery.jobs.create
bigquery.tables.create
Create credentials for your service account, if there are none yet. Follow to create access keys. To create keys, add serviceAccountKeyAdmin role to your service account.
Follow this manual to create a dataset in BigQuery.
Name your dataset devtodev, that way we can send your data to BigQuery.
Also, while creating a dataset, keep location in mind.
You cannot change the location of the dataset later! More on locations in BigQuery.
After creating a service account and a dataset we need to configure export in devtodev.
You can choose one of two ways to export your data:
Export data to one table — all event data will be uploaded to one common table named p<project id>_events.
Export data by event type — every event type will be uploaded to their respective table. The list of event types is below.
Every event type will have a table with a name like this p<project id>_events_<event type>[_<event name>]. For example:
p234_rp —this is a table for real payment events from a project with id 234.
p234_ce_mission_start — this is a table for a custom event named “mission_start“ from a project with id 234.
You can match project name and project id in the _projects table, which will be automatically filled at the time of the first export.
Active user information will be uploaded to a separate table named p<project id>_users regardless of how you choose to upload event data.
To export data to Amazon S3 you will need to:
Create an account, if it does not already exist.
Get credentials (accessKey and secretKey).
Create a bucket.
Choose what kind of data you want to export to your bucket.
In the request specify the following details:
Account credentials;
Name and region of the bucket in Amazon S3;
Export configuration (see below).
If you do not already have an account, follow this AWS manual to create one.
See this manual for more detail on how to find your credentials.
We need accessKey and secretKey which are located in ~/.aws/credentials file. We will also need your region information, it is located in ~/.aws/config file. Execute aws configure command in AWS developer console to get accessKey and secretKey.
Example:
Follow this manual to create a bucket in S3.
The Name of the bucket should be unique, see more on bucket naming. Also, while creating a dataset, keep the region in mind.
Objects can never leave the region unless they are explicitly transferred! More on AWS regions.
After creating an account and a bucket we need to configure export in devtodev.
Your data will be stored in a bucket directory named p<project id> which will store .csv files compressed with gzip. Each directory will have a project_info.txt file with the project name and application id in devtodev service.
You can choose one of two ways to export your data:
Export data to one table — all event data will be uploaded to one common table.
Example of such table: 2021_05_26_08_00_54common86ddf8a5-1e7f-4f2c-a4d3-22f4d6a8860c
Export data by event type — every event type will be uploaded to their respective table. The list of event types is below.
Some examples:
2021_05_26_08_08_28ce[editor_item_remove]a9413576-0a32-4a2a-ad84-940150e9a218 — this is a table for a custom event named “editor_item_remove“.
2021_05_26_08_08_11rp556dbd8d-71c9-41b4-9564-d43b39ca1b7d — this is a table for real payment events.
Active user information will be uploaded to a separate users table regardless of how you choose to upload event data.
Example of such table: 2021_05_26_08_07_52users439c129f-d70b-4f98-ad86-4cb01054732b
During export configuration you can select what type of events you want to export. You can also select which project should be exported and which should not.
The list below contains event types (with fields) available for export.
Event name
Event code
Additional fields
EventTrackingStatus
ts
allow_tracking — is tracking allowed
EventUserInfo
ui
language — device locale
custom_udid — custom user id
EventDeviceInfo
di
device_version
device_os
display_resolution
display_dpi
androidid
idfa
idfv
advertisingid
serialid
manufacturer
model
device_model
EventDeviceInfoV2
Conduct A/B tests to compare different configurations on the same audience and find the best performing one.
Please note that in order for remote configuration mechanism to work, you will need to prepare all of the possible changes beforehand. This includes the possible changes in app logic and interface.
In devtodev, A/B test is considered a specific case of a remote configuration.
This is a short description of how the RC integration will work.
In your app, you will need to declare a set of variables and set default values for these variables. We’ll call these variables Parameters.
Use these parameters in your app according to your realisation of the app logic. Note that parameter value can change and it will affect the app behavior the way it’s determined by your business logic. There is a special method to get the current parameter value.
Integrate a listener method that will notify you if at least one parameter value has changed. Add a reaction logic to this notification based on our proposed strategies.
to activate the remote configs.
In the devtodev interface you can change parameter values for a specific audience (Remote Configuration) or create an A/B test (A/B Testing).
During initialization, devtodev SDK makes a request to the server and receives a list of parameters and their new values according to the configuration. If you also conduct an A/B test at the same time, the SDK will receive a set of conditions to enter the test, a test group and parameter values.
If the SDK receives a new value for at least one of the parameters in current configuration, it will notify you. This change can be triggered by a remote config or when the user enters an A/B test. The SDK will give you a list of parameter changes and triggers for each change source. Using the update notification and list of changes, select one of the strateges to react.
When you receive a notification about parameter changes, you can activate () the values according to your app logic. You will be able to use the updated parameter values until you receive and apply a new configuration. You can check for changes right after devtodev SDK initialization.
Attention! If the user enters an A/B test, the SDK will mark of their events with an A/B test group regardless whether you have activated the proposed parameter changes. We recommend activating and applying these changes as soon as possible!
The parameter always has a defined default value. This value can be changed if you set a new value using the remote configuration.
Set the variable (parameter) values in the DTDRemoteConfig class using the DTDRemoteConfig.defaults property.
After setting DTDRemoteConfig.defaults, you will be able to get parameter values using the DTDRemoteConfig.config property.
Always use the config property to get up-to-date parameter value configurations.
When you start an A/B test in devtodev, the SDK checks the conditions to enter the experiment. If the user is suitable for the experiment, the SDK will wait for a test group from devtodev server to enter the experiment.
You can reduce or extend the wait time value.
For example:
In this case, the SDK will be waiting for a group from the server no longer than two seconds. After that, the experiment will be cancelled and the test configuration will be impossible to activate. During the following SDK initialization (application re-start) the user will be able to enter the experiment again.
You can set the DTDRemoteConfig.groupDefinitionWaiting value only before SDK initialization!
In order to use the remote configs or A/B tests, use the DTDAnalytics.initializeWithRemoteConfig to initialize devtodev SDK.
If you have previously worked with devtodev A/B tests, you will need to change the DTDAnalytics.initializeWithAbTest method to DTDAnalytics.initializeWithRemoteConfig for SDK initialization. The initializeWithAbTest method is not supported in SDK 2.6.0 (Unity 3.10.0) and higher.
The DTDRemoteConfigListener currently implements only one method – onChanged(update: DTDRemoteConfigUpdate) with a different signature. You will need to remove the onReceived(result: DTDRemoteConfigReceiveResult) and onPrepareToChange() methods, since the updated A/B test mechanism does not utilize these methods.
Unlike the previous SDK versions, the onChanged(update: DTDRemoteConfigUpdate) method will be called only when there is a change in the remote configuration or A/B test.
When you migrate to SDK version 2.6.0 (Unity 3.10.0) and higher, during the first SDK initialization the onChanged(update: DTDRemoteConfigUpdate) method will be called automatically if the device is participating in an active A/B test.
The method will notify you the config with A/B test variables is ready. Since the device is already participating in the test, the latest configuration is already available in DTDRemoteConfig.config.
You must call the applyConfig method to apply and use the test values.
The following SDK launches will not call the onChanged(update: DTDRemoteConfigUpdate) method automatically.
devtodev server sends new or updated parameter configuration to the SDK.
The onChanged() method is called.
The SDK found and activated (entered) a suitable experiment.
The onChanged() method is called.
When the experiment is finished and parameter values are different from the experiment configuration, the onChanged() method is called.
To accept and activate the remote configuration, call the DTDRemoteConfig.applyConfig() method.
When you apply the new configuration, the default, remote config and test group values will intersect according to their priority order. After that the new configuration values will be available in the DTDRemoteConfig.config property.
To decline a remote config or A/B test participation, call the DTDRemoteConfig.resetConfig() method. After calling this method, the parameter values will be set to defaults.
The SDK stores the received configuration until the user deletes the application from the device. Or until you call resetConfig to reset all the active and unapplied configs to defaults.
The onChanged(update: DTDRemoteConfigUpdate) method notifies the developer that the configuration has changed. The DTDRemoteConfigUpdate object stores the list of updated keys.
Besides the key-value pairs, you can check the how a parameter was updated (remote config or A/B test) using the DTDRemoteChangeSource. Knowing the source of change can be useful to select the best strategy to apply the configuration in different cases at the right moment.
Activating config during the current session. In case you need to get the results of parameter configuration change during the same session, call the DTDRemoteConfig.applyConfig() method at any convenient time after the onChanged was triggered.
The onChanged is triggered when the devtodev server sends a new or updated config to the device.
A/B testing. When you are working with A/B tests, we recommend calling the DTDRemoteConfig.applyConfig() method as soon as possible because the user will be assigned a test group immediately after the onChanged was triggered.
Activating config in a different session. If you do not have a config that you need to activate during the current session, you can call the DTDRemoteConfig.applyConfig() method at any time during the following SDK launches instead of applying config right after onChanged is triggered.
The SDK provides threads synchronization when working with this class.
groupDefinitionWaiting:Double
Wait time for A/B test configuration.
Default value - 10.0 (measured in seconds).
defaults: Map<String, Any>
Paramateres and their default values.
config: DTDRemoteConfigCollection
A collection of current parameters and their values for A/B tests.
It allows access to the configuration values by using the subscripting syntaxis.
applyConfig()
Applies the remote config or A/B test configuration. After the call, the new config is ready for use in the app.
resetConfig()
Resets the config values to defaults.
cacheTestExperiment()
A debug method for saving a test experiment after restarting the application.
Wrapper for collecting remote parameters. Enables access to configuration values by using subscripting syntax.
Wrapper for working with remote configuration variables (parameters). It presents a method for data source identification, as well as methods for presenting values in the form of various data types.
DTDRemoteConfigSource.Undefined
The variable could not be found in the default or the remote configuration.
DTDRemoteConfigSource.Defaults
The variable is set by default.
DTDRemoteConfigSource.Remote
The variable is set by remote config.
DTDRemoteConfigSource.AbTest
The variable is set by the test group.
stringValue
String?
Gets the value as a optional string.
floatValue
Float
Gets the value as a Float.
doubleValue
Double
Gets the value as a Double.
int32Value
Int32
Gets the value as a Int32.
Implements the method that reports about remote configuration and A/B test update.
onChanged(update: DTDRemoteConfigUpdate)
Notifies the developer that the configuration has changed with a list of updated variables.
val keys: List<DTDRemoteConfigChangeKey>
Contains a list of updated keys.
The source of the key update.
val key: String
val source: DTDRemoteConfigSource
Contains the key name and update source.
This messages may be useful for debugging.
[A/B-Test Module] The Server refused to conduct the experiment.
devtodev server refused to send the experiment configuration.
[A/B-Test Module] Offer from devtodev not received within the allotted N seconds.
The backend offer is returned after wait time is over e.g. due to a bad internet connection.
[A/B-Test Module] Offer from devtodev not received within the allotted N seconds.
The SDK was unable to receive an offer from the backend within N seconds e.g, due to a bad internet connection or network problems.
In this exapmle we set the default values for variables (parameters) title, buttonText, tutorial before devtodev SDK initialization.
After the onChanged method is triggered, we call DTDRemoteConfig.applyConfig() and apply the received parameter values without any conditions. All inside the onChanged method.
You can get the parameter values in any other place in the app in addition to the onChanged method.
In this exapmle we set the default values for variables (parameters) title, buttonText, tutorial before devtodev SDK initialization.
After the onChanged method is triggered, we check if there are any keys that were updated for the A/B test.
If there is such key, the user will immediately enter the A/B test and get the experiment configuration.
If no key was updated for the A/B test, this means the SDK received only new remote configs without A/B test configuration and you do not need to call DTDRemoteConfig.applyConfig() right away.
You can apply the remote config at any convenient moment even after the app restarts.
We have added a DTDRemoteConfig.applyConfig() call after the SDK initialization. Since the onChanged was triggered in the previous app launch, we have the up-to-date remote config values on the device.
Contact us to request access. Use Contact Us form or reach out to our Customer Success team directly within the platform. We will also greatly appreciate your feedback. Please add REMOTE CONFIGS when submitting your request.
Prerequisite:
Currently remote configs are available only for SDK version 2.6.0 (Android & iOS) and Unity 3.10.0 and higher.
If a user enters an A/B test, they will receive parameter values accoring to their test group configuration.
Parameter values received during an A/B test rewrite the default values and previously set values from the remote config. These test values cannot be changed until you finish the experiment (A/B test value has the highest priority).
The priority order for parameter value source is the following:
Top priority – A/B test parameter value.
Push token. If you use push token, all fields with other identifiers will be ignored!
advertisingId
string
Advertising ID
androidId
string
Android ID
serialId
string
Serial ID
userId
string
User id is applicable if an internal identifier (cross-platform user identifier) is used in your app.
devtodevId
number
Numeric user identifier in devtodev database.
The object of a message for the Android platform contains 2 fields:
payload (object) - describes the main content of a notification
options (object) - describes the optional settings of notification delivery
Property
Type
Description
title
string
A short string describing the purpose of a notification.
text
string
The text of an alert message.
data
object
Optional if notification is not hidden. You can pass custom parameters with messages and use them within an app. For instance, you can activate advertising campaign or any other functionality for a user who has received this message.
Example:
"data": {
"my_key": "value",
"my_another_key": "15"
}
small_icon
Property
Type
Description
hidden
boolean
Switching the notification to the hidden mode. If “true” - a notification will not be displayed to a user, but will be transferred to an app. Such a message must not contain any properties except data in the “payload” object.
priority
string
Optional. The priority of a notification. Default value is "normal". Specify one of the following values:
high" – GCM attempts to deliver high priority messages immediately allowing the GCM service to wake a sleeping device when possible and open a network connection to your app server. Apps with instant messaging, chat, or voice call alerts, for example, generally need to open a network connection and make sure GCM delivers the message to the device without delay. Set high priority only if the message is time-critical and requires the user’s immediate interaction, and beware that setting your messages to high priority contributes to a battery drain more compared to normal priority messages.
"normal" — This is the default priority for message delivery. Normal priority messages won't open network connections on a sleeping device, and their delivery may be delayed to preserve a battery. For less time-sensitive messages (such as notifications of new email or other data to sync) choose normal delivery priority.
expire
number
This option identifies the date when a notification is no longer valid and can be discarded. It is possible to use either relative time in seconds passed since the moment of sending, or specify an exact date in UNIX epoch format expressed in seconds (UTC).
Default value is 7 days (604800 seconds) after sending. Max. relative value for Android platform is 2 419 200 seconds (4 weeks).
Keep in mind that an "expire" value of 0 means messages that can't be delivered immediately will be discarded. However, as long as such messages are never stored, this provides the best latency for sending notifications.
collapse_key
POST
POST
Property
Type
Description
token
string
Integration of push notifications on Android and iOS using devdodev SDK for Adobe Air
This generation of SDK is deprecated and is no longer supported.
Push Notifications are availible only for iOS and Android.
Go to and then to your project or create a new one.
Current project:
New project:
Save the google-services.json file and add it to your app so that it is placed inside the Assets folder in a ready .apk file. If you use Flash Builder IDE simply copy it in the root folder, Flash Builder will do the rest for you.
Update Adobe Air SDK. Pay attention that version of the Adobe Air SDK should be at least 22.0, otherwise FCM classes will not be imported into your project. However, you still can use Analytics, but application will not be able to accept Push Notifications.
Add dependencies to your project. These libraries are located in the same archive with com.devtodev.SDK.ane extension in the dependencies folder. These extensions contain firebase, gps и android-support libraries Java, that are used for sending Push Notifications. If you have already imported firebase-auth, firebase-common, firebase-iid, firebase-messaging, play-services-auth, play-services-base, play-services-basement, support-v4 or they are included in other extensions, you don't need to import them again. In any case, we recommend to use data from the library of a version not lower than 25. Add the following to the manifest file of your app:
Add the following to your application's manifest:
1. Proceed to Setting -> PUSH NOTIFICATIONS:
2. Insert the previously received Server API Key to the API Key field in Push notifications section.
3. If the Server API Key is correct, you will see the following result
Open PUSH NOTIFICATIONS section and click on 'Add new campaign' button
Fill in campaign name, select an app for delivery
Choose user group to send a message. You can choose existing segment or create a new one.
Enter notification details
You can create a campaign only after at least one push token comes from devtodev SDK integrated to your application. Otherwise the app will not be displayed in the list.
To enable Push Notifications, please perform the following actions:
Add the application to your space in devtodev system
Generate Developer or Production Certificate for the application and get Private key file (.p12) on its basis
Submit the data to the application settings in devtodev system
Integrate devtodev SDK to the application (see the “SDK integration” division to learn more about integrating and initializing devtodev SDK)
Open "Keychain access" utility (Launchpad → Other) and choose "Request a Certificate From a Certificate Authority" option.
Fill in all requied fields in Certificate Assistant window, set flag an "Saved on disk" item and click "Continue". Save the file.
Log in at iOS Provisioning Portal. Open "App IDs" section, choose your app and click "Edit".
Follow these steps to export the certificate from Apple web-site to the P12-file:
Open "Keychain access" application
If the certificate hasn't been added to keychain access yet, choose "File" → "Import". Find the certificate file (CER-file) provided by Apple
Choose "Keys" section in "Keychain access" application
Choose personal key associated with your iPhone developer certificate. Personal key is identified by open certificate associated with it "iPhone developer: ". Choose "File" → Export objects. Save key as .p12
Convert Apple certificate file to the PEM-file. Start the following command-line operation from bin catalog OpenSSL.
Convert personal key from Mac OS keychain to the PEM-key:
Now you are able to create P12-file using PEM-key and iPhone developer certificate:
If you are using key from Mac OS keychain than choose PEM-version created at previous step.
Otherwise you can use OpenSSL key for Windows OS.
Upload the .p12-file into Integration section of application settings panel (Settings -> PUSH NOTIFICATIONS):
After the certificates has been generated you can start to integrate Push SDK into you app.
Add the following to your application's manifest. Don't forget that the minimum supported version is iOS 7:
Attention! If you use Production Certificate for signing application package, don't forget to change "development" value to "production".
Add the following imports to your source:
Add the push notifications initialization before the DevToDev.init(appKey:String, appSecret:String) method was called:
Xcode will automatically choose new provisioning profile. If an error occurred during the launch make sure that there is a correct profile set in the Code Signing Identity. You'll be asked to confirm push notifications. An app will request permission only once, if user confirm it - notifications will be accepted otherwise he wont get any push messages from your app. User can change it in device settings.
1. Open PUSH NOTIFICATIONS section and click on "Add new campaign" button.
2. Fill in campaign name
3. Choose user group to send a message. You can choose existing segment or create a new one.
4. Enter notification details
5. Test push notification (or skip this step)
6. Confirm push gateway
7. Schedule the delivery
8. That's it!


https://www.devtodev.com/api/v1/push/send?user_token=USER_API_TOKENhttps://devtodev.com/api/v1/push/send{
"user_token": "xxxxxxxxxxxxxxxxxxxxxxxxxxxxxxxx",
"app_id": "xxxxxxxx-xxxx-xxxx-xxxx-xxxxxxxxxxxx",
"campaign_tag": "campaign name",
"pack_id": "uniqueid1234",
"audience": [{
"idfa": "XXXXX-XXXXX-XXXXXX-XXXXXX"
},
{
"idfa": "YYYYY-YYYYY-YYYYYY-YYYYYY"
}],
"ios": {
"payload": {
"text": "Hello world!"
},
"options": {
"priority": "normal",
"expire": 36000
}
}
}{
"status_code": 200,
"data": {
"status": "complete",
"result": {
"audience": 100500,
"successful": 100477,
"erroneous": 23,
"error_details": []
}
}
}{
"status_code": 400,
"errors": [{
"code": 3,
"msg": "Error description"
}]
}using DevToDev.Analytics;
using UnityEngine;
public class DTDObject : MonoBehaviour
{
void Start()
{
#if UNITY_ANDROID
DTDAnalytics.Initialize("androidAppID");
#elif UNITY_IOS
DTDAnalytics.Initialize("IosAppID");
#elif UNITY_WEBGL
DTDAnalytics.Initialize("WebAppID");
#elif UNITY_STANDALONE_WIN
DTDAnalytics.Initialize("winAppID");
#elif UNITY_STANDALONE_OSX
DTDAnalytics.Initialize("OsxAppID");
#elif UNITY_WSA
DTDAnalytics.Initialize("UwpAppID");
#endif
}
}var config = new DTDAnalyticsConfiguration
{
ApplicationVersion = "1.2.3",
LogLevel = DTDLogLevel.No,
TrackingAvailability = DTDTrackingStatus.Enable,
CurrentLevel = 1,
UserId = "unique_userId"
};using DevToDev.Analytics;
using UnityEngine;
public class DTDObject : MonoBehaviour
{
void Start()
{
#if UNITY_ANDROID
DTDAnalytics.Initialize("androidAppID", config);
#elif UNITY_IOS
DTDAnalytics.Initialize("iOSAppID", config);
#elif UNITY_WEBGL
DTDAnalytics.Initialize("WebAppID", config);
#elif UNITY_STANDALONE_WIN
DTDAnalytics.Initialize("winAppID", config);
#elif UNITY_STANDALONE_OSX
DTDAnalytics.Initialize("OSXAppID", config);
#elif UNITY_WSA
DTDAnalytics.Initialize("UwpAppID", config);
#endif
}
}-keep class com.devtodev.** { *; }
-dontwarn com.devtodev.**DTDAnalytics.CoppaControlEnable();
DTDAnalytics.Initialize("App ID", config);DTDMessaging.IOS.StartNotificationService();public class MyPushListener : IDTDPushListener
{
public void OnPushServiceRegistrationSuccessful(string deviceId)
{
Debug.Log(deviceId);
}
public void OnPushServiceRegistrationFailed(string error)
{
Debug.Log(error);
}
public void OnPushNotificationReceived(DTDPushMessage message)
{
Debug.Log(message);
}
public void OnInvisibleNotificationReceived(DTDPushMessage message)
{
Debug.Log(message);
}
public void OnPushNotificationOpened(DTDPushMessage pushMessage, DTDActionButton actionButton)
{
Debug.Log(pushMessage.ToString());
Debug.Log(actionButton.ToString());
}
}DTDMessaging.IOS.SetNotificationOptions(DTDNotificationOptions.Alert | DTDNotificationOptions.Badge | DTDNotificationOptions.Sound);public class MyPushListener : IDTDPushListener
{
public void OnPushServiceRegistrationSuccessful(string deviceId)
{
Debug.Log(deviceId);
}
public void OnPushServiceRegistrationFailed(string error)
{
Debug.Log(error);
}
public void OnPushNotificationReceived(DTDPushMessage message)
{
Debug.Log(message);
}
public void OnInvisibleNotificationReceived(DTDPushMessage message)
{
Debug.Log(message);
}
public void OnPushNotificationOpened(DTDPushMessage pushMessage, DTDActionButton actionButton)
{
Debug.Log(pushMessage.ToString());
Debug.Log(actionButton.ToString());
}
}
public class NotificationExample : MonoBehaviour
{
private const string APP_KEY = "***************"
void Start()
{
DTDAnalytics.Initialize(APP_KEY);
DTDMessaging.IOS.SetNotificationOptions(DTDNotificationOptions.Alert | DTDNotificationOptions.Badge | DTDNotificationOptions.Sound);
DTDMessaging.IOS.SetPushListener(new PushListener());
DTDMessaging.IOS.StartNotificationService();
}
}import UserNotifications
import DTDMessagingUnity
class NotificationService: DTDMediaAttachmentExtension {
}$ aws configure
AWS Access Key ID [None]: AKIAIOSFODNN7EXAMPLE
AWS Secret Access Key [None]: wJalrXUtnFEMI/K7MDENG/bPxRfiCYEXAMPLEKEY
Default region name [None]: us-west-2
Default output format [None]: jsondevtodev_id — numeric user id
main_id — string user id
crossplatform_id — cross platform user id, only for projects with set user id identification
uc_createtime — user registration date
uc_first_paymenttime — first payment date
uc_last_paymenttime — last payment date
uc_payment_cnt — number of payments
uc_payment_sum — sum of payments
uc_level — user level
uc_country — country
uc_language — language
uc_age — age
uc_gender — gender
uc_cheater — mark a cheater
uc_tester — mark a tester// Initialization of defaults
DTDRemoteConfig.defaults = mapOf(
"title" to "local title data",
"buttonText" to "local button data",
"tutorial" to "local tutorial data"
)
// DTDAnalytics Initialization
DTDAnalytics.initializeWithRemoteConfig(
this.appKey, config, context.applicationContext,
object : DTDRemoteConfigListener {
// onChanged implementation
override fun onChanged(update: DTDRemoteConfigUpdate) {
// Apply config data
DTDRemoteConfig.applyConfig()
// Take data from config
val titleValue = DTDRemoteConfig.config["title"].stringValue
val buttonTextValue = DTDRemoteConfig.config["buttonText"].stringValue
val tutorialValue = DTDRemoteConfig.config["tutorial"].stringValue
Log.d("[remoteConfig]", "title after applyConfig: $titleValue")
Log.d("[remoteConfig]", "buttonTextValue after applyConfig: $buttonTextValue")
Log.d("[remoteConfiga]", "tutorialValue after applyConfig: $tutorialValue")
}
}
) public class RemoteConfigListenerExample : IDTDRemoteConfigListener
{
public void OnChanged(Dictionary<string, DTDRemoteConfigSource> updatedKeys)
{
DTDRemoteConfig.ApplyConfig();
// Take data from config
var titleValue = DTDRemoteConfig.Config["title"].StringValue();
var buttonTextValue = DTDRemoteConfig.Config["buttonText"].StringValue();
var tutorialValue = DTDRemoteConfig.Config["tutorial"].StringValue();
Debug.Log($"[remoteConfig] title after applyConfig: {titleValue}");
Debug.Log($"[remoteConfig] buttonTextValue after applyConfig: {buttonTextValue}");
Debug.Log($"[remoteConfiga] tutorialValue after applyConfig: {tutorialValue}");
}
}
public class RemoteConfigExample
{
public void InitializeDevToDev(string appKey, DTDAnalyticsConfiguration analyticsConfiguration)
{
DTDRemoteConfig.Defaults = new Dictionary<string, object>
{
{ "title", "local title data" },
{ "buttonText", "local button data" },
{ "tutorial", "local tutorial data" }
};
DTDAnalytics.InitializeWithRemoteConfig(appKey, analyticsConfiguration,
new RemoteConfigListenerExample());
}
}// Initialization of defaults
DTDRemoteConfig.defaults = mapOf(
"title" to "local title data",
"buttonText" to "local button data",
"tutorial" to "local tutorial data"
)
// DTDAnalytics Initialization
DTDAnalytics.initializeWithRemoteConfig(
this.appKey, config, context.applicationContext,
object : DTDRemoteConfigListener {
// onChanged implementation
override fun onChanged(update: DTDRemoteConfigUpdate) {
// Check if there are a/b test keys
val abTestKey = update.keys.firstOrNull { it.source == DTDRemoteConfigSource.AbTest }?.key
if (abTestKey != null) {
//Apply config data
DTDRemoteConfig.applyConfig()
// Take data from config
val titleValue = DTDRemoteConfig.config["title"].stringValue
val buttonTextValue = DTDRemoteConfig.config["buttonText"].stringValue
val tutorialValue = DTDRemoteConfig.config["tutorial"].stringValue
Log.d("[remoteConfig]", "title after applyConfig with a/b test: $titleValue")
Log.d("[remoteConfig]", "buttonTextValue after applyConfig a/b test: $buttonTextValue")
Log.d("[remoteConfig]", "tutorialValue after applyConfig a/b test: $tutorialValue")
}
}
}
}
)
//Apply config data
DTDRemoteConfig.applyConfig()
// Take data from config
val titleValue = DTDRemoteConfig.config["title"].stringValue
val buttonTextValue = DTDRemoteConfig.config["buttonText"].stringValue
val tutorialValue = DTDRemoteConfig.config["tutorial"].stringValue
Log.d("[remoteConfig]", "title after applyConfig: $titleValue")
Log.d("[remoteConfig]", "buttonTextValue after applyConfig: $buttonTextValue")
Log.d("[remoteConfig]", "tutorialValue after applyConfig: $tutorialValue")
public class RemoteConfigListenerExample : IDTDRemoteConfigListener
{
public void OnChanged(Dictionary<string, DTDRemoteConfigSource> updatedKeys)
{
DTDRemoteConfig.ApplyConfig();
// Take data from config
var hasAbTestKey = updatedKeys.Any(x => x.Value == DTDRemoteConfigSource.ABTest);
if (hasAbTestKey)
{
var titleValue = DTDRemoteConfig.Config["title"].StringValue();
var buttonTextValue = DTDRemoteConfig.Config["buttonText"].StringValue();
var tutorialValue = DTDRemoteConfig.Config["tutorial"].StringValue();
Debug.Log($"[remoteConfig] title after applyConfig: {titleValue}");
Debug.Log($"[remoteConfig] buttonTextValue after applyConfig: {buttonTextValue}");
Debug.Log($"[remoteConfiga] tutorialValue after applyConfig: {tutorialValue}");
}
}
}
public class RemoteConfigExample
{
public void InitializeDevToDev(string appKey, DTDAnalyticsConfiguration analyticsConfiguration)
{
DTDRemoteConfig.Defaults = new Dictionary<string, object>
{
{ "title", "local title data" },
{ "buttonText", "local button data" },
{ "tutorial", "local tutorial data" }
};
DTDAnalytics.InitializeWithRemoteConfig(appKey, analyticsConfiguration,
new RemoteConfigListenerExample());
}
} DTDRemoteConfig.groupDefinitionWaiting = 2https://devtodev.com/api/v1/push/send{
"user_token": "xxxxxxxxxxxxxxxxxxxxxxxxxxxxxxxx",
"app_id": "xxxxxxxx-xxxx-xxxx-xxxx-xxxxxxxxxxxx",
"campaign_tag": "campaign name",
"pack_id": "uniqueid1234",
"audience": [{
"token": "xxxxxxxxxxxxxxxxxxxxxxxxxxxxxxxxxxxxxx",
"advertisingId": "xxxxxxxx-xxxx-xxxx-xxxx-xxxxxxxxxxxx",
"androidId": "xxxxxxxxxxxxxxxxxxxxxxxxx",
"userId": "xxxxxxxxxxxx"
}],
"android": {
"payload": {
"title": "Title of the notification",
"text": "Notification content.",
"data": {
"key1": "value",
"key2": "15"
},
"small_icon": "smallicon",
"icon": "midicon",
"image": "https://domain.com/pic.png",
"sound": "bingbong",
"vibration": true,
"led_color": "#ff0000",
"color": "#ff0000",
"action": {
"url": "http://www.domain.com"
},
"interactive": {
"buttons": [{
"id": "accept",
"text": "Accept",
"handling": "foreground",
"action": {
"url": "http://www.domain.com/accept"
}
}, {
"id": "decline",
"text": "Decline",
"handling": "background"
}]
}
},
"options": {
"hidden": false,
"priority": "normal",
"expire": 36000,
"collapse_key": "collapse1"
}
}
}https://devtodev.com/api/v1/push/send{
"user_token": "xxxxxxxxxxxxxxxxxxxxxxxxxxxxxxxx",
"app_id": "xxxxxxxx-xxxx-xxxx-xxxx-xxxxxxxxxxxx",
"campaign_tag": "campaign name",
"pack_id": "uniqueid1234",
"audience": [{
"token": "xxxxxxxxxxxxxxxxxxxxxxxxxxxxxxxxxxxxxx",
"advertisingId": "xxxxxxxx-xxxx-xxxx-xxxx-xxxxxxxxxxxx",
"androidId": "xxxxxxxxxxxxxxxxxxxxxxxxx",
"userId": "xxxxxxxxxxxx"
}],
"android": {
"payload": {
"data": {
"key1": "value",
"key2": "15"
}
},
"options": {
"hidden": true,
"priority": "normal",
"expire": 36000
}
}
}public void PushReceived(IDictionary<string, string> pushAdditionalData) {
//pushAdditionalData - push-notification data that you send to your app
}
public void PushOpened(DevToDev.PushMessage pushMessage, DevToDev.ActionButton actionButton) {
//pushMessage - DevToDev.PushMessage. Represents toast notification message
//actionButton - DevToDev.ActionButton. Represents toast button that was clicked. Could be null if toast body was clicked
}
public void PushTokenFailed(string error) {
//handle push-notifications error here
}
public void PushTokenReceived(string pushToken) {
//pushToken - your push token
}string
Optional. You may use an icon from resources of your app. You should use resource name of the icon in this field.
color
string
Optional. The parameter recolors the small icon of an app displayed in a notification in the specified color ("#RRGGBB"). This N parameter on Android also recolors the name of an app and texts on notification buttons.
Example:
"color": "#ff0000"
icon
string
Optional. Use the URL to a notification icon or a resource name.
image
string
Optional. The value is image URL. Images should be ≤ 450dp wide, ~2:1 aspect. The image will be center cropped.
sound
string
Optional. A media file to play in place of a default sound. If a sound file doesn’t exist or default is specified as the value, the default notification sound is played. The audio must be in one of the audio data formats that are compatible with system sounds. Supports “default” or the filename of a sound resource bundled in an app. Android sound files must reside in /res/raw/ If the option is not used, a notification comes silently.
badge
int
Optional. This property was added in Android O. The value of the badge on the home screen app icon. If not specified, the badge is not changed. If set to 0, the badge is removed.
vibration
boolean
Optional. In case of "true" during notification delivery a device will vibrate (if permission VIBRATION is received)
led_color
string
Optional. LED hex color ("#RRGGBB"), a device will do its best approximation.
Example:
"led_color": "#ff0000"
action
object
Optional. The action after a click on the body of a notification. By default, a click opens an app. It is also possible to perform the following actions:
deeplink (string) - Direct a user to a specific resource either within your app or on the web.
url (string) - Open a web page in a mobile browser, or any valid device-level URL such as Google Play or app protocol links.
share (string) - The Share Action drives a user to share your message when they interact with your push notification.
Examples:
"action": {
"url": "http://www.domain.com"
}
"action": {
"deeplink": "your-url-scheme://host/path"
}
"action": {
"share": "Happy holidays!"
}
interactive
object
Optional. It is possible to specify an array of notification buttons in an “interactive” object. Each button should contain the following properties:
id (string) - The button identifier. It is transferred to an app.
text (string) - A text on a button
handling (string) - The type of processing
background - The button closes a notification. The parameters of a notification are transferred to an app, but an app does not open. It is impossible to tie an action to a button in this regime.
foreground - The button opens an app. The parameters of a notification are transferred to an app, but an app does not open. It is possible to tie an action to a button in this regime. The list of actions and the principle is analogical to actions with the body of a message.
Example:
"interactive": {
"buttons": [{
"id": "accept",
"text": "Accept",
"handling":"foreground",
"action": {
"url": "http://www.domain.com/accept"
},
{
"id": "decline",
"text": "Decline",
"handling":"background"
}]
}
string
Optional. Notifications are not collapsible by default.
If multiple messages are sent with this key, the most recent message will suppress all previous unread messages with the same key.
Collapsible messages are a better choice from a performance standpoint provided your application doesn't need to use non-collapsible messages. However, if you use collapsible messages, remember that GCM only allows a maximum of 4 different collapse keys to be used by the GCM connection server per registration token at any given time. You must not exceed this number, or it could cause unpredictable consequences.
channel_id
string
Optional. The notification's channel id (this property was added in Android O). The app must create a channel with this ID before any notification with this key is received. If you don't send this key in the request, or if the channel id provided has not yet been created by your app, devtodev SDK uses the channel id specified by default ("channel_id": "_devtodev" - name: General notifications).
badge_icon_type
int
Optional. This property was added in Android O (API level 26). 0 - Default. If this notification is being shown as a badge, always show as a number. 1 - If this notification is being shown as a badge, use the getSmallIcon() to represent this notification. 2 - If this notification is being shown as a badge, use the getLargeIcon() to represent this notification.
di
device_version
device_os
display_resolution
display_dpi
display_diagonal
manufacturer
model
offset — user timezone offset
androidid
openudid
idfa
idfv
advertisingid
serialid
install_source
user_agent
EventRealPaymentEntry
rp
currency
product
payment_id
price_usd
payment_status
EventGamePurchase
ip
amount
item_type
item
inapp_currencies — structure with info on currency type and its amount spent on item purchase
EventCustomColumnar
ce
event_name
event_params — structure with parameter names and values
EventProgression
pe
location
spent
earned
source
difficulty
success
duration
EventTester
tstr
tester
EventCheater
ch
cheater
EventRegistrations
rg
this event only has basic fields
EventGender
gr
gender
EventAge
ag
age
EventGameSessionStart
ss
amount
EventUserEngagement
ue
duration
EventPeople
pl
name
phone
photo
event_params — other custom fields
EventSocialNetworkPost
sp
network reason
EventSocialNetworkConnect
sc
network
EventTutorial
tr
step
EventLevelUp
lu
local_duration
absolut_duration
spent
earned
balance
bought
EventApplicationInfo
ai
sdk_version
app_version
bundle_id
engine
EventWipe
wipe
save_cheater_tester
save_custom_props
save_paying_status
save_registration
EventAlive
al
this event only has basic fields
EventReferal
rf
publisher
sub_publisher
sub_ad
sub_ad_group
sub_campaign
sub_placement
sub_site
cost
EventSubscription
sbs
source payment_type start_time expiry_time event_type price_usd product original_payment_id
payment_id purchase_type promo_code promo_type payment_status eventlevel
EventAdRevenue
adrv
source ad_unit ad_network
placement
revenue
Least priority – Default value defined in the application code.
int64Value
Int32
Gets the value as a Int32.
integerValue
Int
Gets the value as a Int.
boolValue
Bool
Gets the value as a Bool.


If you are using DTDHuawei.unitypackage, remove the following files:
DTDLogLevel (enum)
The level of logging the SDK activity. The DTDLogLevel.no value is used by default. For troubleshooting during integration it is recommended to set it to DTDLogLevel.Debug, and either switch it off DTDLogLevel.No. Use DTDLogLevel.No in the release version.
ApplicationVersion
String
The app version during the devtodev SDK initialization. Use the property on the WinStandalone platform only. For all other platforms, data is collected automatically.


Add the following imports to your source:
Add the push notifications initialization before the DevToDev.init(appKey:String, appSecret:String) method was called:
onPushToken, onPushTokenFailed, onPushReceived and onPushOpened are the functions that take following arguments:
Make some tests and correct the message if it's required
Schedule the delivery
That's it!
Add several lines of the code to switch in the push notification to the SDK
Create a campaign for sending push notifications in “Push” section
At first, you need to generate Certificate Signing Request. We have already done it, so you can just click "Continue".
At next step you need to upload the CSR to the Apple server. Choose the CSR-file and click "Generate".
Certificate generation takes just a few seconds. After generation is finished click "Download" and then "Done".
You'll need to repeat this process to generate the Production Certificate when your app will be ready for release. All steps are the same.
You'll be suggested to create a password which is used when you need to import the key to another computer.
Compile and run the app. You will need a device, because simulator does not support push notifications.
Example:
Add your google-services.json file to the project's root directory. It will be used to configure notifications during the project-building process.
In the case your Unreal Engine is built from GitHub source code:
Enable notifications in the settings of your project: Edit → Project Settings → iOS → Enable Remote Notifications Support
In the case your Unreal Engine is not built from GitHub source code:
Add the parameter to the engine configuration file (<proj_dir>/Config/DefaultEngine.ini):
A class that implements analytic methods.
Header file:
Notification action type
Header file:
Values:
App = 0 - default value
Url = 1 - external link opening
Share = 2 - share contentc
DeepLink = 2 - an in-app link opening
Notification data container.
Header file:
ActionType
EDTDNotificationActionType
Тип действия уведомления
ActionString
FString
Идентификатор действия уведомления
Data
TMap<FString, FString>
Данные уведомления
Notification action data container.
Header file:
ActionType
EDTDNotificationActionType
Тип действия уведомления
ActionString
FString
Идентификатор действия уведомления
ButtonId
FString
Идентификатор нажатой кнопки
iOS only
Push Notification display settings are Bitflags that are managed by the developer and allow for selecting the method of user notification. It can be altered by the end user.
By default, it has the value: Badge|Sound|Alert
Header file:
Values:
None = 0 - nothing
Badge = 1 << 0 - can display a badge on the app icon
Sound = 1 << 1 - can play a sound
Alert = 1 << 2 - can display an alert
CarPlay = 1 << 3 - can display a push notification on CarPlay
CriticalAlert = 1 << 4 - critical alerts can play a sound even if Do Not Disturb is enabled (critical alerts require a special entitlement issued by Apple). Available from iOS 12 onwards.
AppNotificationSettings = 1 << 5 - this option defines that the system should display a notification settings button in the app. Available from iOS 12.0 onwards.
Provisional = 1 << 6 - an option for sending provisional notifications to the Notification Center without interrupting functioning processes. Available from iOS 12.0 onwards.
Use this setting to avoid the permission request on app launch because it is seen as intrusive, and most users opt out of it.
It’s also important that when using the Provisional setting, the user needs to go to Notification Center settings to allow explicit notifications.
Header file:
Delegates:
Notification module initialization:
A method responsible for enabling/disabling push notifications. When the state changes, it sends an event that includes the availability status (true or false). The availability status flag is stored in the SDK.
Get the current availability status flag (true or false):
onResult
FDTDMessagingDynamicBoolParamsDelegate
FDTDMessagingBoolParamsDelegate
Callback
Get a current unique device ID used in the notification system:
onResult
FDTDMessagingDynamicStringParamsDelegate
FDTDMessagingStringParamsDelegate
Callback.
Set a token listener. The listener will be executed when the SDK updates a unique device ID in the notification system.
listener
FDTDMessagingDynamicStringParamsDelegate
FDTDMessagingStringParamsDelegate
Listener.
Set a listener for errors in token reception. The listener will be executed when an error occurs while the SDK updates a unique device ID in the notification system.
listener
FDTDMessagingDynamicStringParamsDelegate
FDTDMessagingStringParamsDelegate
Listener.
Set a listener for notification reception. The listener will be executed when the SDK receives a notification.
listener
FDTDMessagingDynamicNotificationParamsDelegate
FDTDMessagingNotificationParamsDelegate
Listener.
Set a listener for invisible notification reception. The listener will be executed when the SDK receives an invisible notification.
listener
FDTDMessagingDynamicNotificationParamsDelegate
FDTDMessagingNotificationParamsDelegate
Listener.
Set a listener for notification activation. The listener will be executed when the notification gets activated.
listener
FDTDMessagingDynamicNotificationActionParamsDelegate
FDTDMessagingNotificationActionParamsDelegate
Listener.
iOS only
Set notification parameters.
options
int32
Options.
An int32 type value is used as an argument of this method. However, this argument should be calculated by using enumerators of EDTDIOSNotificationOptions and bitwise OR operator.
The query body is a JSON object with fields described in the table below.
notificationType
Type of notification
originalTransactionId
ID of the original transaction
transactionId
Transaction ID
startDateMs
Subscription start date in milliseconds in UTC
expiresDateMs
Subscription expiration date in milliseconds in UTC
purchase
First-time subscription purchase
renewal
Active subscription renewal
refund
Money refund
cancellation
Cancellation of an active subscription and proportional refund
If the notification is accepted, the response status is 200. If the query is incorrect, the response status is 400. In case of an internal error, the response status is 500.
In case the status is 400 or 500, the error description will be indicated in the query body as a JSON object:
Available notification types for a trial (all postbacks should be flagged as ‘isTrial = true’):
purchase – trial subscription
cancellation – subscription cancellation before the end of that trial
2. Available notification types for subscription purchase:
purchase – subscription purchase
renewal – subscription renewal
cancellation – premature termination of a subscription and proportional refund
refund – money refund
notificationType
Notification type = purchase
originalTransactionId
ID of the original transaction
transactionId
Transaction ID
startDateMs
Trial start date in milliseconds in UTC
expiresDateMs
Trial expiration date in milliseconds in UTC
notificationType
Notification type = cancellation
originalTransactionId
ID of the original transaction
transactionId
Transaction ID
expiresDateMs
Trial expiration date in milliseconds in UTC
product
Subscription SKU
notificationType
Notification type = purchase
originalTransactionId
ID of the original transaction
transactionId
Transaction ID
startDateMs
Subscription start date in milliseconds in UTC
expiresDateMs
Subscription expiration date in milliseconds in UTC
notificationType
Notification type = renewal
originalTransactionId
ID of the original transaction
transactionId
Transaction ID
startDateMs
Subscription start date in milliseconds in UTC
expiresDateMs
Subscription expiration date in milliseconds in UTC
notificationType
Notification type = cancellation
originalTransactionId
ID of the original transaction
transactionId
Transaction ID
expiresDateMs
Subscription expiration date in milliseconds in UTC
product
Subscription SKU
notificationType
Notification type = refund
originalTransactionId
ID of the original transaction
transactionId
Transaction ID
expiresDateMs
Subscription expiration date in milliseconds in UTC
product
Subscription SKU
void DTDMessaging.IOS.GetPushState(Action<bool> onGetPushState)
The method that returns the push module state to onGetPushState callback


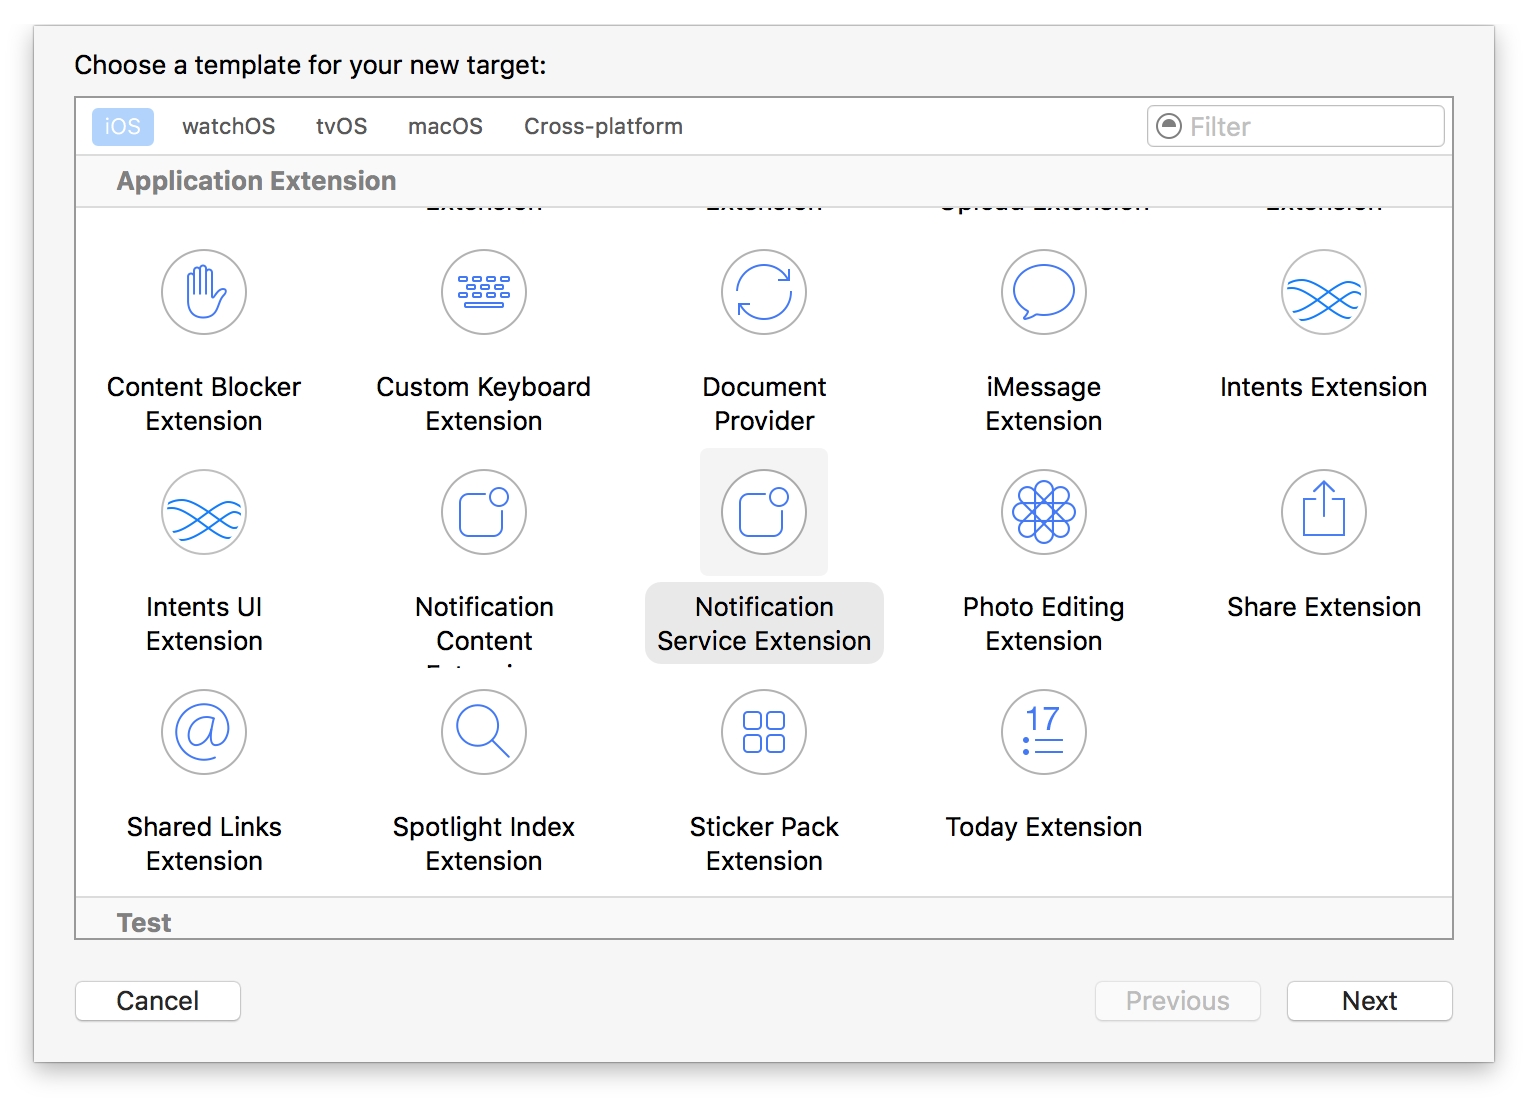


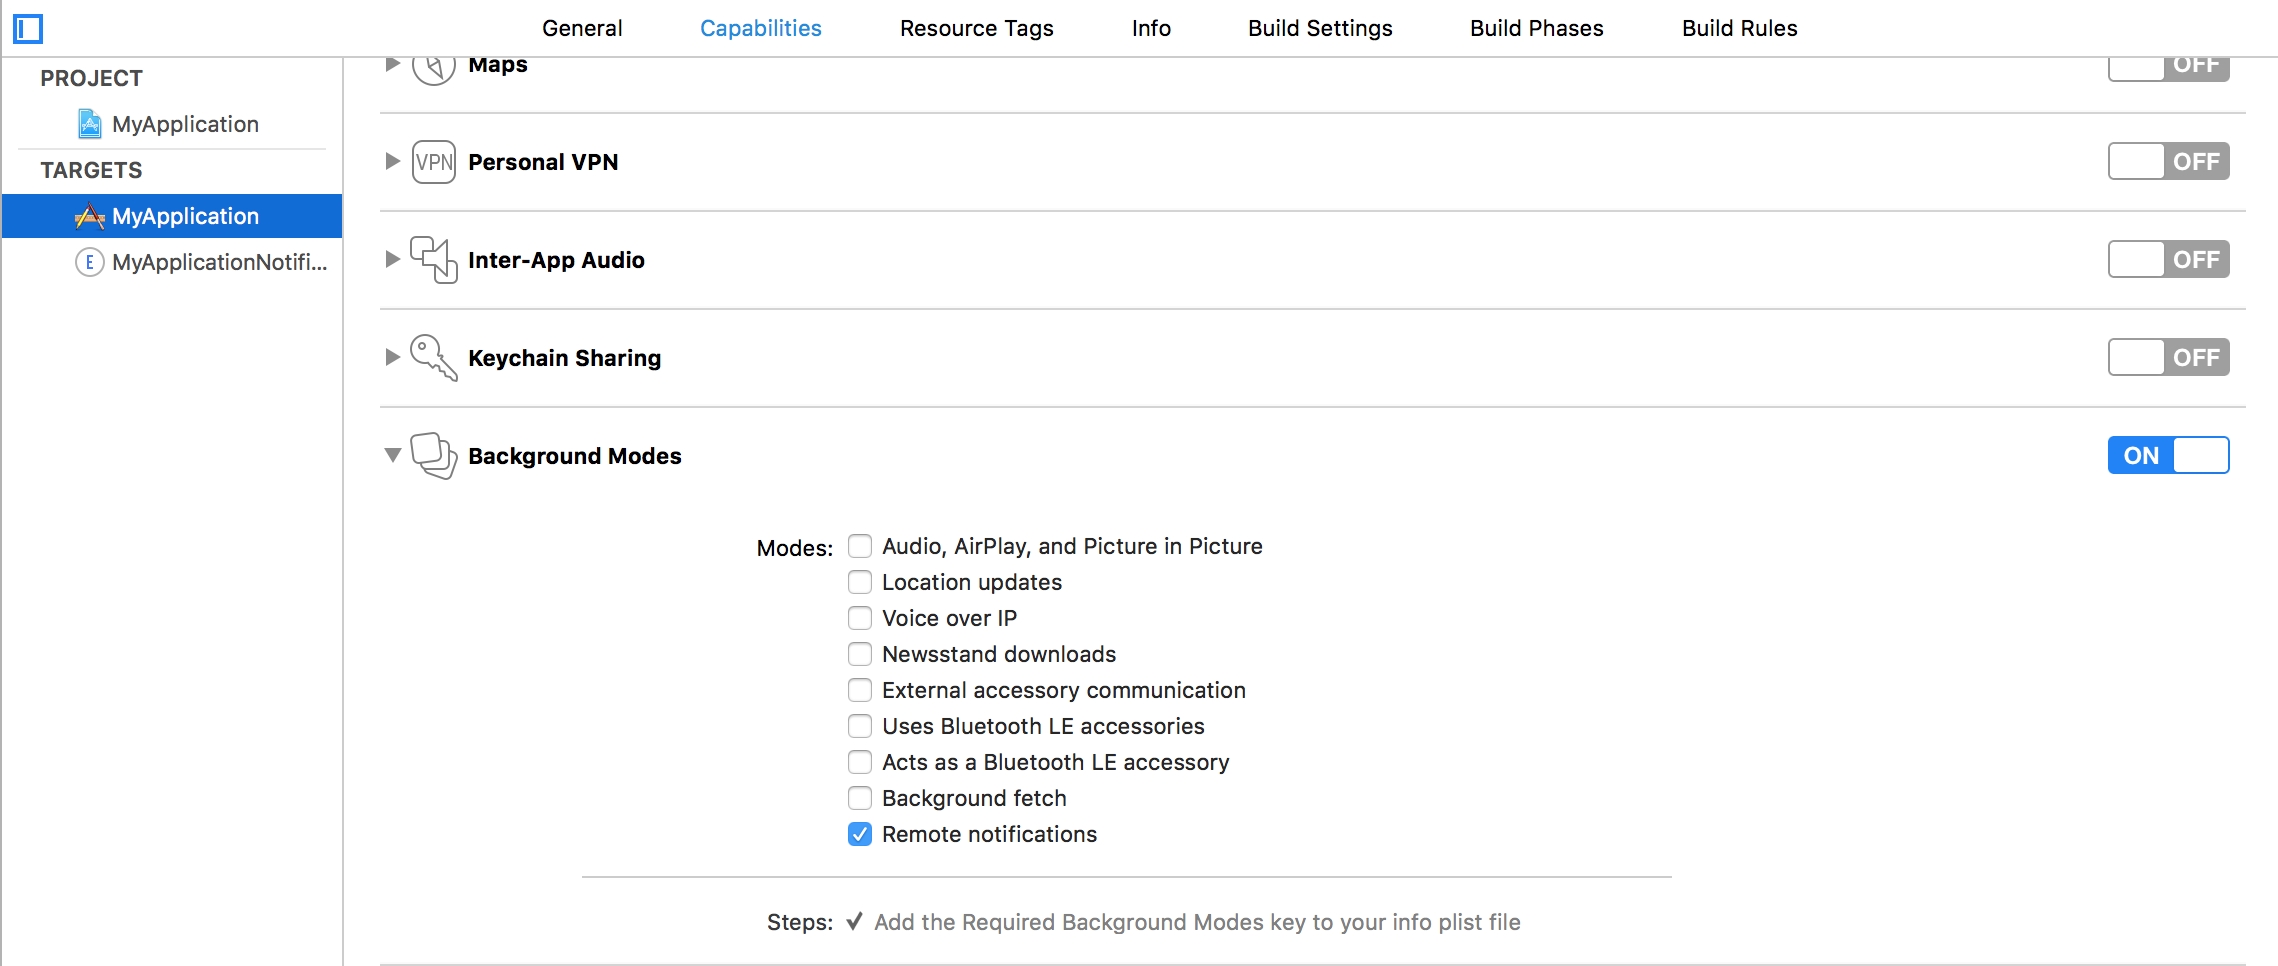
devtodev Push API supports two different formats of notification sending to Windows operational systems:
Universal format described in this section works on the basis of Legacy tiles and toast schema. It can be used on Windows Phone 8.1, Windows Phone 10, Windows 8.1, Windows 10. It is described by the "win" object.
UWP format - can be used only for Windows 10 and Windows Phone 10. It is described by the "uwp" object.
In order to find a user to whom you need to send a notification, you can specify one or several available identifiers:
Object "windows" can contain two properties :
The property that describes a message can be represented by one of 4 possible objects:
toast (object) - the result of sending is the delivery of toast-notification
raw (object) - sends a hidden toast-notification
tile (object) - changes tile content of an app
badge (object) - changes the value of a badge field displayed in a tile of an app
The property that describes additional parameters of a message represented by the object “options”. Optional.
Example
Example
Example
Example
Additional settings of notification delivery and display ("options" object)


Assets\Plugins\Android\settingsTemplate.gradle
Assets\Plugins\DevToDev\Android\DTDHuaweiAndroid.aar
Assets\DevToDev\Analytics\Editor\HuaweiDependencies.xmlimport java.nio.file.Files
static void enableJetifier(Project project) {
project.ext['android.useAndroidX'] = true
project.ext['android.enableJetifier'] = true
}
static void addBuildscript(Project project) {
project.buildscript {
repositories {
maven { url 'https://plugins.gradle.org/m2/' }
maven { url 'https://developer.huawei.com/repo/' }
}
dependencies {
classpath 'com.huawei.agconnect:agcp:1.6.5.300'
}
}
}
static void applyPlugins(Project project) {
if (project.name != 'launcher') return
project.afterEvaluate {
it.apply plugin: 'com.huawei.agconnect'
}
}
static void copyAppGalleryJson(Project project) {
if (project.name != 'launcher') return
def destinationFile = new File("${project.rootDir}/launcher/agconnect-services.json")
if (destinationFile.exists()) return
def sourceFile = new File("${project.rootDir}/unityLibrary/devtodev.plugin/agconnect-services.json")
Files.copy(sourceFile.toPath(), destinationFile.toPath())
}
gradle.rootProject {
it.afterEvaluate {
it.allprojects {
enableJetifier(it)
addBuildscript(it)
applyPlugins(it)
copyAppGalleryJson(it)
}
}
}
include ':launcher', ':unityLibrary'
**INCLUDES**-keep class com.devtodev.** { *; }
-dontwarn com.devtodev.**
-keep class com.huawei.hms.**{*;}Assets\DevToDev\Analytics\Editor\GoogleDependencies.xml
Assets\Plugins\DevToDev\Android\DTDGoogleAndroid.aarimport com.devtodev.sdk.push.DevToDevPushManager;
import com.devtodev.sdk.push.logic.ActionButton;
import com.devtodev.sdk.push.logic.PushMessage;DevToDevPushManager.setOnFailedToRegisteredForPushNotifications(onPushTokenFailed);
DevToDevPushManager.setOnRegisteredForPushNotifications(onPushToken);
DevToDevPushManager.setOnPushNotificationsReceived(onPushReceived);
DevToDevPushManager.setOnPushNotificationOpened(onPushOpened);
DevToDevPushManager.setPushNotificationsEnabled(true);/**
* @param token - push token
*/
protected function onPushToken(param:String):void {
}
/**
* @param error - error message
*/
protected function onPushTokenFailed(param:String):void {
}
/**
* @param pushData - Dictionary with push message and custom push fields
*/
protected function onPushReceived(pushData:Dictionary):void {
}
/**
* @param message - PushMessage. Represents toast notification message
* @param button - ActionButton. Represents toast notification button that was clicked. Could be null if notification body was clicked
*/
protected function onPushOpened(message:PushMessage, button:ActionButton):void {
}<application>
<extensions>
<extensionID>com.devtodev.air.extensions.gps-auth</extensionID>
<extensionID>com.devtodev.air.extensions.gps-base</extensionID>
<extensionID>com.devtodev.air.extensions.gps-basement</extensionID>
<extensionID>com.devtodev.air.extensions.supportv4</extensionID>
<extensionID>com.devtodev.air.extensions.firebase-auth</extensionID>
<extensionID>com.devtodev.air.extensions.firebase-common</extensionID>
<extensionID>com.devtodev.air.extensions.firebase-iid</extensionID>
<extensionID>com.devtodev.air.extensions.firebase-messaging</extensionID>
<!-- this library should be already added for analytics -->
<extensionID>com.devtodev.SDK</extensionID>
...
</extensions>
</application>openssl x509 -in developer_identity.cer -inform DER -out developer_identity.pem -outform PEMopenssl pkcs12 -nocerts -in mykey.p12 -out mykey.pemopenssl pkcs12 -export -inkey mykey.key -in developer_identity.pem -out iphone_dev.p12<iPhone>
<InfoAdditions><![CDATA[
<key>MinimumOSVersion</key>
<string>7.0</string>
<key>UIDeviceFamily</key>
<array>
<string>1</string>
<string>2</string>
</array>
...
]]></InfoAdditions>
<Entitlements>
<![CDATA[
<key>aps-environment</key>
<string>development</string>
]]>
</Entitlements>
</iPhone>import com.devtodev.sdk.push.DevToDevPushManager;
import com.devtodev.sdk.push.logic.ActionButton;
import com.devtodev.sdk.push.logic.PushMessage;DevToDevPushManager.setOnFailedToRegisteredForPushNotifications(onPushTokenFailed);
DevToDevPushManager.setOnRegisteredForPushNotifications(onPushToken);
DevToDevPushManager.setOnPushNotificationsReceived(onPushReceived);
DevToDevPushManager.setOnPushNotificationOpened(onPushOpened);
DevToDevPushManager.setPushNotificationsEnabled(true);<!--Replace 'com.example.application' to your package -->
<manifest package="com.example.application" ...>
<uses-permission android:name="com.google.android.c2dm.permission.RECEIVE" />
<permission android:name="com.example.gcm.permission.C2D_MESSAGE" android:protectionLevel="signature" />
<uses-permission android:name="com.example.gcm.permission.C2D_MESSAGE" />
<application>
<meta-data android:name="com.google.android.gms.version" android:value="@integer/google_play_services_version" />
<receiver android:name="com.google.firebase.iid.FirebaseInstanceIdReceiver" android:exported="true" android:permission="com.google.android.c2dm.permission.SEND" >
<intent-filter>
<action android:name="com.google.android.c2dm.intent.RECEIVE" />
<action android:name="com.google.android.c2dm.intent.REGISTRATION" />
<category android:name="com.example.application" />
</intent-filter>
</receiver>
<service android:name="com.devtodev.push.logic.DTDFcmMessagingService" android:exported="false">
<intent-filter>
<action android:name="com.google.firebase.MESSAGING_EVENT"/>
</intent-filter>
</service>
<service android:name="com.devtodev.push.logic.DTDFcmInstanceIdService" android:exported="false">
<intent-filter>
<action android:name="com.google.firebase.INSTANCE_ID_EVENT"/>
</intent-filter>
</service>
<receiver android:name="com.devtodev.push.logic.PushClickReceiver" android:enabled="true" android:exported="true">
<intent-filter>
<action android:name="com.devtodev.android.push.CLICKED" />
</intent-filter>
</receiver>
<activity android:name="com.devtodev.push.logic.PushHandlerActivity"/>
</application>
</manifest>/**
* @param token - push token
*/
protected function onPushToken(param:String):void {
}
/**
* @param error - error message
*/
protected function onPushTokenFailed(param:String):void {
}
/**
* @param pushData - Dictionary with push message and custom push fields
*/
protected function onPushReceived(pushData:Dictionary):void {
}
/**
* @param message - PushMessage. Represents toast notification message
* @param button - ActionButton. Represents toast notification button that was clicked. Could be null if notification body was clicked
*/
protected function onPushOpened(message:PushMessage, button:ActionButton):void {
}PublicDependencyModuleNames.Add("DTDMessaging");// Some code/Script/IOSRuntimeSettings.IOSRuntimeSettings]
bEnableRemoteNotificationsSupport=True#include "DTDMessaging/Public/DTDMessagingBPLibrary.h"#include "DTDMessaging/Public/DTDNotificationActionType.h"#include "DTDMessaging/Public/DTDNotification.h"#include "DTDMessaging/Public/DTDNotificationAction.h#include "DTDMessaging/Public/DTDIOSNotificationOptions.h"#include "DTDMessaging/Public/DTDMessagingDelegates.h"DECLARE_DELEGATE_OneParam(FDTDMessagingBoolParamsDelegate, bool);
DECLARE_DELEGATE_OneParam(FDTDMessagingStringParamsDelegate, const FString&);
DECLARE_DELEGATE_OneParam(FDTDMessagingNotificationParamsDelegate, const FDTDNotification&);
DECLARE_DELEGATE_TwoParams(FDTDMessagingNotificationActionParamsDelegate, const FDTDNotification&, const FDTDNotificationAction&);UDTDMessagingBPLibrary::Initialize();UDTDMessagincgBPLibrary::SetAvailability(true);auto onResult = new FDTDMessagingBoolParamsDelegate();
onResult->BindLambda([](bool value)
{
// Your code...
});
UDTDMessagingBPLibrary::GetAvailability(*onResult);auto onResult = new FDTDMessagingStringParamsDelegate();
onResult->BindLambda([](const FString& value)
{
// Your code...
});
UDTDMessagingBPLibrary::GetToken(*onResult);auto listener = new FDTDMessagingStringParamsDelegate();
listener->BindLambda([](const FString& value)
{
// Your code...
});
UDTDMessagingBPLibrary::SetTokenListener(*listener);auto listener = new FDTDMessagingStringParamsDelegate();
listener->BindLambda([](const FString& value)
{
// Your code...
});
UDTDMessagingBPLibrary::SetTokenErrorListener(*listener);auto listener = new FDTDMessagingNotificationParamsDelegate();
listener->BindLambda([](const FDTDNotification& notification)
{
// Your code...
});
UDTDMessagingBPLibrary::SetNotificationReceiveListener(*listener);auto listener = new FDTDMessagingNotificationParamsDelegate();
listener->BindLambda([](const FDTDNotification& notification)
{
// Your code...
});
UDTDMessagingBPLibrary::SetInvisibleNotificationReceiveListener(*listener);auto listener = new FDTDMessagingNotificationActionParamsDelegate();
listener->BindLambda([](const FDTDNotification& notification, const FDTDNotificationAction& action)
{
// Your code...
});
UDTDMessagingBPLibrary::SetNotificationActionListener(*listener);int32 options = EDTDIOSNotificationOptions::Badge |
EDTDIOSNotificationOptions::Sound |
EDTDIOSNotificationOptions::Alert;
UDTDMessagingBPLibrary::IOSSetNotificationOptions(options);https://statgw.devtodev.com/subscriptions/api?apikey={project’s API key}{
"title": "Bad request",
"error": "Not set parameter api-key"
}POST https://statgw.devtodev.com/subscriptions/api?apikey=ak-cDNRQl0Lypq4AOUrx8aGGMnmJT1FSebd
{
"notificationType":"PURCHASE",
"transactionId":"transactionId",
"startDateMs":1640072573468,
"expiresDateMs":1640245373468,
"product":"com.demo.bundle.weekly",
"price":90.9,
"currency":"RUB",
"isTrial":false,
"devtodevId":4064192
}
product
Subscription SKU
productType
Subscription type (line)
price
Subscription price
currency
Currency of the subscription payment
isTrial
The event is flagged if it is trial and is not flagged if it’s a subscription
gracePeriod
Extension of subscription renewal date in days. If this field is filled in and the user did not renew the subscription before the expiration date, then wait for gracePeriod days value to flag it as expired.
Fields for user identification (Attention! Regardless of the type of notification, at least one of the user IDs must be specified in the query)
idfa
Available platforms: iOS
idfv
Available platforms: iOS
advertisingId
Available platforms: Android, Windows
androidId
Available platforms: Android
userId
The same as Main ID in user card
customId
String custom user ID
Available platforms: all platforms
devtodevId
d2d numeric user id. Available platforms: all platforms
product
Subscription SKU
productType
Subscription type (line)
isTrial
true
productType
Subscription type (line)
isTrial
true
product
Subscription SKU
productType
Subscription type (line)
isTrial
false
price
Subscription price
currency
Currency of the subscription payment
gracePeriod
Extension of subscription renewal date in days
product
Subscription SKU
productType
Subscription type (line)
isTrial
false
price
Subscription price
currency
Currency of the subscription payment
gracePeriod
Extension of subscription renewal date in days
productType
Subscription type (line)
isTrial
false
productType
Subscription type (line)
isTrial
false
price
The amount of money refunded to the user
currency
Currency of the subscription payment
ButtonText
FString
Текст нажатой кнопки
ButtonIcon
FString
Иконка нажатой кнопки
IsBackground
bool
Режим открытия приложения кнопкой


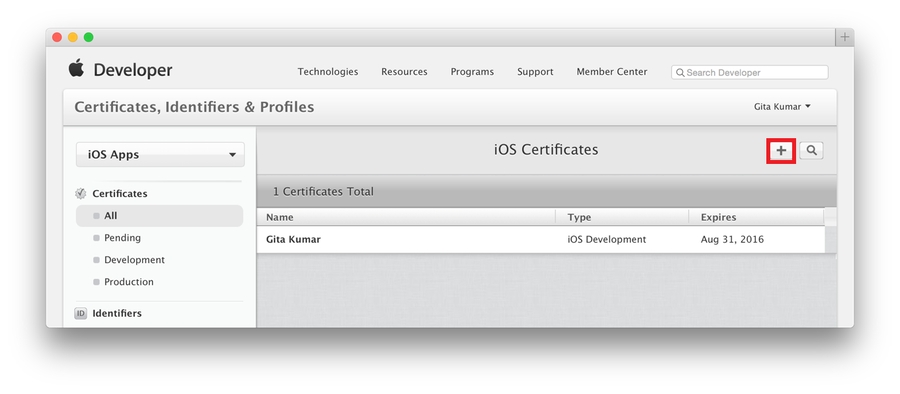


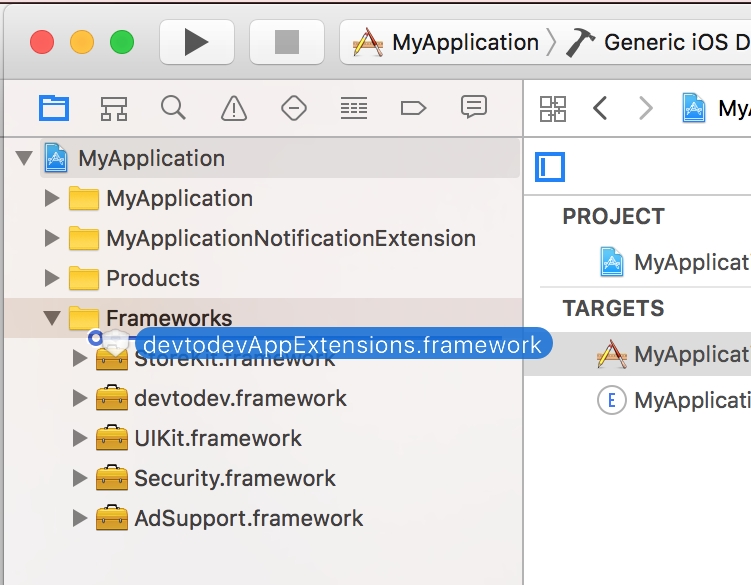
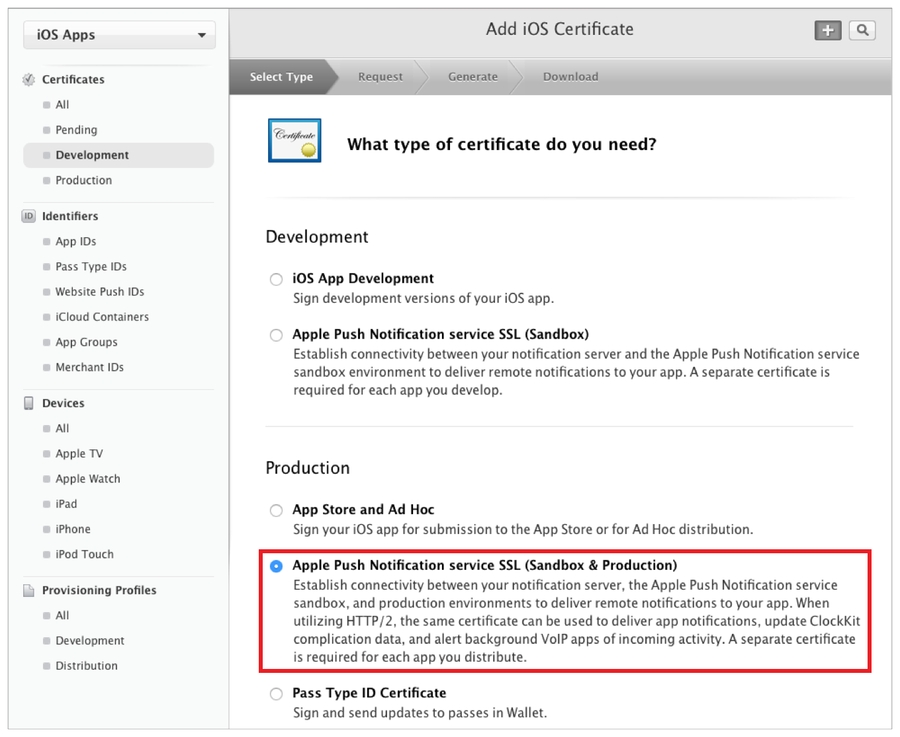

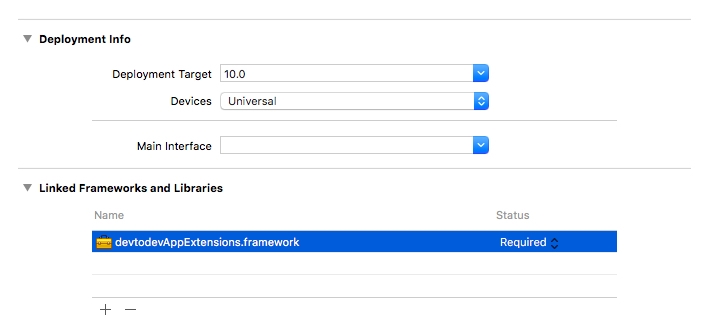
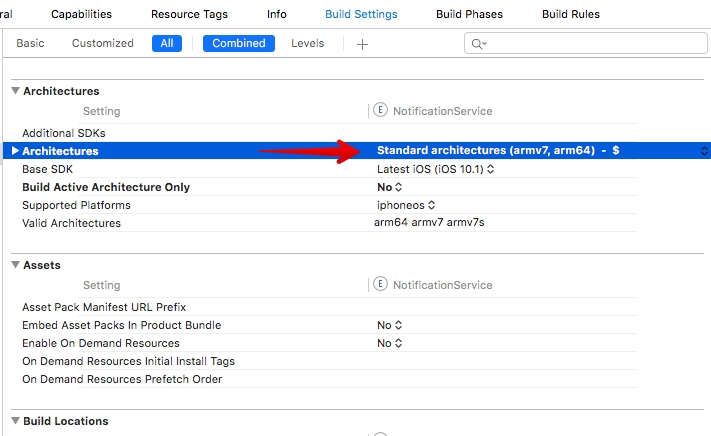

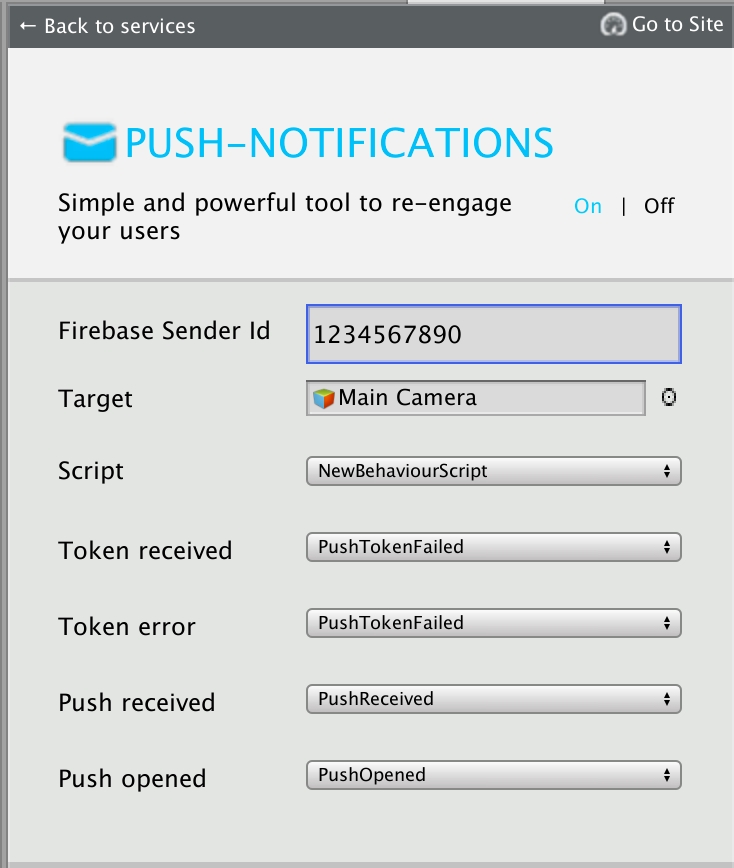

User id is applicable if an internal identifier (cross-platform user identifier) is used in your app.
devtodevId
number
Numeric user identifier in devtodev database.
Optional. You can pass custom parameters with messages and use them within an app. For instance, you can activate advertising campaign or any other functionality for the user who has received this message.
Example:
"data": {
"my_key": "value",
"my_another_key": "15"
}
icon
string
Optional. To replace the application icon (that shows up on the top left corner of the toast) use the URL or the resource name.
Any toast shown on Windows Phone 8.1 does not display the images (the app icon only). In Windows 10 the image is expressed using the URI of the image source, using one of these protocol handlers:
A web-based image: http:// or https://
An image included in the app package: ms-appx:///
sound
string
Optional. A media file to play in place of a default sound. If the option is not used, a notification comes silently. This property can have one of the following string values:
Default
IM
action
object
Optional. Available for Windows 10 and WP 10 only. Action after a click on the body of a notification. By default, a click simply opens an app. It is also possible to perform the following actions:
deeplink (string) - Direct the user to a specific resource, either within your app or on the web.
url (string) - Open a web page in a mobile browser, or any valid device-level URL such as Windows Store or app protocol links.
share (string) - The Share Action drives a user to share your message when they interact with your push notification.
interactive
object
Optional. Available for Windows 10 and WP 10 only. It is possible to specify an array of notification buttons in the “interactive” object. Each button must contain the following properties:
id (string) - Button identifier. It is transferred to an app
text (string) - Text on a button
handling (string) - The type of processing
Third string on the tile.
text4
string
Fourth string on the tile.
image
string
Optional.Application-relative or Internet URI of the image.
Example:
"red.jpg" (if image is stored in an app’s installation directory or local storage folder)
"http://my.domain.com/img/red.jpg" (for Internet URIs).
We recommend using images with size 336 pixels by 336 pixels.
Important Note:
If you need to use remote Internet URIs for Tile images, you must take the following steps:
Property
Type
Description
token
string
Push token. If you use push token, all fields with other identifiers will be ignored!
advertisingId
string
Advertising ID
serialId
string
Hardware serial number
userId
Property
Type
Description
title
string
Required. A short string describing the purpose of a notification.
text
string
Required. Main text of a notification message .
text2
string
Optional. Additional text of a notification.
data
Property
Type
Description
data
object
Required. You can pass custom parameters with messages and use them within an app. For instance, you can activate advertising campaign or any other functionality for user who has received this message.
Example:
"data": {
"my_key": "value",
"my_another_key": "15"
}
badge
string
Optional. A number from 1 to 99. A value of 0 is equivalent to the glyph value "none" and will clear a badge.
Instead of a number, a badge can display one of a non-extensible set of status glyphs:
activity
none
alarm
alert
attention
available
away
busy
error
newMessage
paused
playing
unavailable
It is also possible to send values incrementing or decrementing the current value in a “+2”, “-1” format. In case the previous value was the glyph or 0, the value will be increment. Decrement does not influence the zero value and the glyph.
Property
Type
Description
text1
string
First string on the tile.
with_header
boolean
Set True to mark "text1" field as a heading to show it larger.
text2
string
Second string on the tile.
text3
Property
Type
Description
badge
string
A number from 1 to 99. A value of 0 is equivalent to the glyph value "none" and will clear a badge.
Instead of a number, a badge can display one of a non-extensible set of status glyphs:
activity
none
alarm
alert
attention
available
away
busy
error
newMessage
paused
playing
unavailable
Property
Type
Description
expire
number
This option identifies the date when the tile or toast is no longer valid and can be discarded. It is possible to use either relative time in seconds passed since sending, or to specify an exact date in UNIX epoch format date expressed in seconds (UTC). Default value is 7 days (604800 seconds) after sending.
string
object
string
If the transaction has successfully passed verification, perform the Payment event. If the transaction has not passed verification, do not perform the Payment event.
The devtodev service allows you to validate transactions to prevent fraud from influencing your statistics. For this, you need to integrate DTDAntiCheat module.
We strongly discourage you from using verification results for deciding on allowing or denying users to receive their purchases! We do not recommend to mark users as cheaters based on the results of this verification! Employ this method exclusively for preventing fraud transaction data from being sent to devtodev!
To validate the transaction you can use the verifyPayment(completionHandler: @escaping (DTDVerifyResponse) -> Void) method immediately during the transaction processing, e.g.:
extension Purchases: SKPaymentTransactionObserver {
func paymentQueue(_ queue: SKPaymentQueue, updatedTransactions transactions: [SKPaymentTransaction]) {
for transaction in transactions {
switch transaction.transactionState {
case
DTDVerifyResponseThe DTDVerifyResponse object returned while validating the transaction has two properties:
DTDReceiptStatusThe enum type returned as a result of validation can receive the following values:
To validate the transaction you can use the (void)verifyPaymentCompletion:( void (^ _Nonnull)(DTDVerifyResponse * _Nonnull))completionHandler; method immediately during the transaction processing, e.g.:
DTDVerifyResponseThe DTDVerifyResponse object returned while validating the transaction has two properties:
When Google Play sends the transaction back to your onActivityResult, validate it by calling the following method: verifyPayment(receipt: String, signature: String, publicKey: String, completionHandler:(DTDVerifyResponse) -> Unit) immediately during the transaction processing, e.g.:
DTDVerifyResponseThe DTDVerifyResponse object returned while validating the transaction has two properties:
devtodev sends a request for transaction verification to the payment platform and then forwards the answer to the app.
To validate the transaction you can use the Task<DTDReceiptStatus> VerifyPayment(string: receipt) method. As an argument pass the PurchaseResults.ReceiptXml property. More information about it .
Example of verification:
DTDVerifyResponseIf you use Unity IAP for payment validation, call the following method: void VerifyPayment(string publicKey, string receipt, Action completionHandler)
Example:
To validate data received from Google Play, use void VerifyPayment(string publicKey, string receipt, string signature,Action<DTDVerifyResponse> completionHandler) when handling the transaction.
Pay your attention that if you use several spaces, each of them will have an individual User API token.
The result of the request is the obtaining of the list of all existing labels categories for the app.
Request:
POST
Response:
The request is used to remove or rename a category. The category can be removed only if its full name is specified. One request can remove only one category. In case the parameter move_labels_to_category is specified, labels that belong to the category that is going to be removed will be transfered to the specified category. If the specified category doesn't exist, it will be created. If move_labels_to_category is not specified, all the labels that belong to the category will be removed.
Request:
POST
Response:
The result of the request is the obtaining of the list of labels that are presented as objects.
You can use filters to get some specific labels you need. In case no filter is specified, you will receive the whole list of labels. It is possible to use any combination of fields in a filter.
Request:
POST
Response:
The filter can be described with an object, where the following comparison operators can be the properties:
API operator
Math operator
Description
gt
>
Greater than
lt
<
Less than
eq
=
Equal
gte
The empty object describes the filter that selects all the events in which the parameter value is not null or empty string.
In case the specified category doesn't exist, it will be created. If string values of fields exceed the maximum, they will be cut off.
If you need to specify an event without time length, start_date must be equal to end_date or end_date must not be specified.
Request:
POST
Response:
To edit a label you need to specify its identifier (id). All the specified fields for the label will be replaced. In case the specified category doesn't exist, it will be created.
If it is necessary to change the dates of an event, you must specify start_date. It is impossible to specify end_date without specifying start_date. If the label is used in relation to a continuous event (start_data and end_date are different timestamps), but in an edited version only the start_date is received, the label becomes a point that characterizes an instant event.
Request:
POST
Response:
The request is used to delete one or several labels. To delete a label its identifier is required. The request without specified identifiers is not valid.
Request:
POST
Response:
Error handling
In case there is an error in a request, the response is made in the following format:
where
status_code (number) - the general status of an error
errors (array) - an array of error descriptions
code (number) - the exact code of an error from the table of errors
msg (string) - a brief description of an error
The list of possible errors is given in a table.
Status code
Code
Value of "msg" field
Error description
500
1
Unknown Error
Unknown error. In case it repeats, please contact technical support.
400
2
Request body is empty
Request body is empty. There is no POST data in the request.
400
Name
Field
Limitation
Label name
name
not more than 10 symbols
Short description of a label
description
not more than 512 symbols
Category name
category
not more than 30 symbols
Not more than 30 labels in one request on labels creation
Not more than 500 labels to be created in a calendar day for User API token
Not more than 200 labels to be created in a calendar day for an app


Android Push Notifications
Push Notifications on Android are sent with the help of the FCM service.
Register and open the project creation window in Firebase.
Click Add project.
Write the name of your project. At this stage, you can also set your own unique project identifier or use the one that Firebase will generate for you automatically.
After creating the project card, create an Android application by clicking on the Android icon.
Register your android package name.
Download the google-services.json file and use it according to the instructions of firebase.
Add firebase dependencies according to the firebase documentation.
Complete the application registration, you will see the project overview section.
Select your application by clicking on it, you will see a gear on the right side, click on it to go to project settings.
Go to the cloud messages section, make sure that the Firebase Cloud Messaging API (V1) is active (if not, activate it).
Go to the general section and copy the value of the Project ID field and paste it into the devtodev web interface.
The Project ID is also available from the Firebase main screen in the project cards. After setting up the application, the card should look like this:
It should have a Project ID and an android icon.
Next, open the push notifications integration settings panel in the application settings section in devtodev service (App → Settings → Push notifications → Push notifications panel). Push edit button (pencil symbol).
You will need to specify the Firebase Project ID and authorize devtodev to send messages and manage messaging subscriptions for your Firebase application. To authorise the application, you must use Google login and password of a user with sufficient access rights to the project on Firebase. After that click Save button.
The Messaging module is available as an AAR (recommended) and JAR library. The library is available in the MavenCentral and .
1. If you use Gradle for the applications build, add mavenCentral() into gradle.build file of your application and specify the following relationship in dependencies block:
2. To the app manifest add the following:
3. To add a user icon to your push notification and change its color, add the following strings to the manifest file code:
To add a large user icon to your push notifications, add:
Example:
4. After the DTDAnalytics initializer, add the DTDMessaging initializer.
Example:
5. Subscribe a DTDPushListener to receive information about the DTDMessaging functioning.
Example:
6. Call the DTDMessaging.startPushService() method to activate the Messaging module.
When using Android 13 or higher, notifications are disabled by default. The app won’t receive notifications until you request a new permission (POST_NOTIFICATIONS) and the user grants this permission to your app.
For notifications to work properly, add the following line to the manifest file:
You can check the operation of the POST_NOTIFICATIONS permission in your app by inserting this example in the code:
If the check results in a negative answer (access is not granted), call this method:
Its execution will call a dialog that in turn will ask the user to opt in:
This code is going to help you get the user’s decision:
Note. In SDK ver. 2.1.5 or higher, if the permission is not granted, you will see this message in the log from DTDMessaging: “Notifications don’t work. Permission android.permission.POST_NOTIFICATIONS is not granted”.
DTDMessaging moduleDTDPushListener Interface MethodsDTDPushMessage).DTDActionButton)
{
"user_token": "xxxxxxxxxxxxxxxxxxxxxxxxxxxxxxxx",
"app_id": "xxxxxxxx-xxxx-xxxx-xxxx-xxxxxxxxxxxx",
"campaign_tag": "campaign name",
"pack_id": "uniqueid1234",
"audience": [{
"token": "xxxxxxxxxxxxxxxxxxxxxxxxxxxxxxxxxxxxxx",
"advertisingId": "xxxxxxxx-xxxx-xxxx-xxxx-xxxxxxxxxxxx",
"serialId": "xxxxxxxxx",
"customUid": "xxxxxxxxxxxx"
}],
"win": {
"toast": {
"title": "Toast title",
"text": "Toast message",
"data": {
"key1": "value",
"key2": "15"
},
"icon": "https://domain.com/pic.png",
"sound": "default",
"action": {
"url": "http://www.domain.com"
},
"interactive": {
"buttons": [{
"id": "accept",
"text": "Accept",
"handling": "foreground",
"action": {
"url": "http://www.domain.com/accept"
}
}, {
"id": "decline",
"text": "Decline",
"handling": "background"
}]
}
},
"options": {
"expire": 36000
}
}
}{
"user_token": "xxxxxxxxxxxxxxxxxxxxxxxxxxxxxxxx",
"app_id": "xxxxxxxx-xxxx-xxxx-xxxx-xxxxxxxxxxxx",
"campaign_tag": "campaign name",
"pack_id": "uniqueid1234",
"audience": [{
"token": "xxxxxxxxxxxxxxxxxxxxxxxxxxxxxxxxxxxxxx",
"advertisingId": "xxxxxxxx-xxxx-xxxx-xxxx-xxxxxxxxxxxx",
"serialId": "xxxxxxxxx",
"customUid": "xxxxxxxxxxxx"
}],
"win": {
"raw": {
"data": {
"key1": "value",
"key2": "15"
},
"badge": "+1"
}
}
}{
"user_token": "xxxxxxxxxxxxxxxxxxxxxxxxxxxxxxxx",
"app_id": "xxxxxxxx-xxxx-xxxx-xxxx-xxxxxxxxxxxx",
"campaign_tag": "campaign name",
"pack_id": "uniqueid1234",
"audience": [{
"token": "xxxxxxxxxxxxxxxxxxxxxxxxxxxxxxxxxxxxxx",
"advertisingId": "xxxxxxxx-xxxx-xxxx-xxxx-xxxxxxxxxxxx",
"serialId": "xxxxxxxxx",
"customUid": "xxxxxxxxxxxx"
}],
"win": {
"tile": {
"text1": "Text 1",
"text2": "Text 2",
"text3": "Text 3",
"text4": "Text 4",
"with_header": "true",
"image": "https://domain.com/pic.png"
},
"options": {
"expire": 36000
}
}
}{
"user_token": "xxxxxxxxxxxxxxxxxxxxxxxxxxxxxxxx",
"app_id": "xxxxxxxx-xxxx-xxxx-xxxx-xxxxxxxxxxxx",
"campaign_tag": "campaign name",
"pack_id": "uniqueid1234",
"audience": [{
"token": "xxxxxxxxxxxxxxxxxxxxxxxxxxxxxxxxxxxxxx",
"advertisingId": "xxxxxxxx-xxxx-xxxx-xxxx-xxxxxxxxxxxx",
"serialId": "xxxxxxxxx",
"customUid": "xxxxxxxxxxxx"
}],
"win": {
"badge": {
"badge": "99"
}
}
}https://www.devtodev.com/api/v1/labels/categories/get{
"user_token": "xxxxxxxxxxxxxxxxxxxxxxxxxxxxxxxx", // devtodev user API token
"app_id": "xxxxxxxx-xxxx-xxxx-xxxx-xxxxxxxxxxxx" // devtodev App ID
}{
"status_code": 200,
"data": {
"status": "complete",
"categories": [
"category name",
"category name 2"
]
}
}https://www.devtodev.com/api/v1/labels/categories/delete{
"user_token": "xxxxxxxxxxxxxxxxxxxxxxxxxxxxxxxx",
"app_id": "xxxxxxxx-xxxx-xxxx-xxxx-xxxxxxxxxxxx",
"category": "category to be removed",
"move_labels_to_category": "category to which the labels will be moved"
}{
"status_code": 200,
"data": {
"status": "deleted",
"category": "category to be removed"
}
}https://www.devtodev.com/api/v1/labels/get{
"user_token": "xxxxxxxxxxxxxxxxxxxxxxxxxxxxxxxx",
"app_id": "xxxxxxxx-xxxx-xxxx-xxxx-xxxxxxxxxxxx",
"filters": {
"id": {
"in": [100500, 100501]
},
"category": {
"in": ["category name", "category name 2"]
},
"start_date": {
"gte": 1478625206
},
"end_date": {
"lte": 1478625206
}
}
}{
"status_code": 200,
"data": {
"status": "complete",
"labels": [{
"id": 100500,
"name": "label name",
"description": "short label description",
"category": "category name",
"start_date": 1478625206,
"end_date": 1478625206
}]
}
}https://www.devtodev.com/api/v1/labels/add{
"user_token": "xxxxxxxxxxxxxxxxxxxxxxxxxxxxxxxx",
"app_id": "xxxxxxxx-xxxx-xxxx-xxxx-xxxxxxxxxxxx",
"labels": [{
"name": "label name",
"description": "short label description",
"category": "category name",
"start_date": 1478625206,
"end_date": 1478625206
}]
}{
"status_code": 201,
"data": {
"status": "created",
"labels": [{
"id": 100500,
"name": "label name",
"description": "short label description",
"category": "category name",
"start_date": 1478625206,
"end_date": 1478625206
}]
}
}https://www.devtodev.com/api/v1/labels/edit{
"user_token": "xxxxxxxxxxxxxxxxxxxxxxxxxxxxxxxx",
"app_id": "xxxxxxxx-xxxx-xxxx-xxxx-xxxxxxxxxxxx",
"id": 100500,
"name": "label name",
"description": "short label description",
"category": "category name",
"start_date": 1478625206,
"end_date": 1478625206
}{
"status_code": 200,
"data": {
"status": "complete",
"labels": [{
"id": 100500,
"name": "label name",
"description": "short label description",
"category": "category name",
"start_date": 1478625206,
"end_date": 1478625206
}]
}
}https://www.devtodev.com/api/v1/labels/delete{
"user_token": "xxxxxxxxxxxxxxxxxxxxxxxxxxxxxxxx",
"app_id": "xxxxxxxx-xxxx-xxxx-xxxx-xxxxxxxxxxxx",
"ids": [100500, 100501]
}{
"status_code": 200,
"data": {
"status": "deleted",
"labels": [{
"id": 100500,
"name": "label name",
"description": "short label description",
"category": "category name",
"start_date": 1478625206,
"end_date": 1478625206
}]
}
}{
"status_code": 500,
"errors": [{
"code": 3,
"msg": "Malformed json"
}]
}A local image (Only supported for desktop apps.): file:///
SMS
Looping.Alarm
Looping.Alarm2
Looping.Alarm3
Looping.Alarm4
Looping.Alarm5
Looping.Alarm6
Looping.Alarm7
Looping.Alarm8
Looping.Alarm9
Looping.Alarm10
Looping.Call
Looping.Call2
Looping.Call3
Looping.Call4
Looping.Call5
Looping.Call6
Looping.Call7
Looping.Call8
Looping.Call9
Looping.Call10
On mobile platform, this property can also contain the path to a local audio file, with one of the following prefixes:
ms-appx:///
ms-appdata:///
"action": {
"url": "http://www.domain.com"
}
"action": {
"deeplink": "your-url-scheme://host/path"
}
"action": {
"share": "Happy holidays!"
}
background - A button closes an app. Notification parameters are transferred to an app, but an app doesn’t open. It is impossible to tie an action to a button in this regime.
foreground - A button opens an app. Notification parameters are transferred to an app. It is possible to tie an action to a button in this regime. The list of actions and the principle is analogical to actions with the body of a message.
Example:
"interactive": {
"buttons": [{
"id": "accept",
"text": "Accept",
"handling":"foreground",
"action": {
"url": "http://www.domain.com/accept"
},
{
"id": "decline",
"text": "Decline",
"handling":"background",
}]
}
Ensure the remote image file size is less than 150 KB.
Ensure the image can be downloaded in 60 seconds or less.
>=
Greater than or equal
lte
<=
Less than or equal
neq
!=
Not equal
eq
In the list
neq
Not in the list
3
Malformed json
There is an error of JSON format in the request body. Fix the error of format.
400
4
Field not found: %field_name%
The required field is not specified in the request. Please add it to the request.
400
5
Field %field_name% has type %received_type% but %expected_type% expected
The type of data doesn't match the expected type. Follow the recommendation and change the data type to the expected one. It is possible to use the following types of data: boolean, integer, float, number (integer+float), string.
400
6
Invalid app id %app id value%
The requested app is not found. The app is unknown. The error can appear in case the specified app identifier is wrong or when the app has been removed.
401
11
Authorization error. Wrong user token %user_token value%
Authorization error. The specified User API token is wrong. Check the value of the specified key.
401
12
Authorization error. User_token is not set.
Authorization error. User API token is not specified in the request parameters. It is necessary to specify User API token ("user_token" field) in every request.
403
13
Access denied. You have no access to the app %app id value%
Access error. The owner specified in the User API token request has no access rights to the app specified in the same request.
403
15
Access denied. You have no access to API.
Access error. You have no access to devtodev API. The error can appear when User API token owner's access rights to the service API are changed as a result of the change of the user's role or the change of the price plan.
403
23
Access denied. You have no access to Labels API.
Access error. The error can appear in case the User API token owner has no access to the Labels API service due to the limitations of the user's role or limitations of the price plan of the space.
400
28
Unexpected value for field %field%. Received value: %value%. Expected values: %values%.
Unexpected value for the field. Follow the recommendations and correct the request.
400
29
Unexpected field %field%
The request contains the field that is not specified in the documentation. The field must be excluded from the request.
400
30
Invalid value for field %field%. Received value: %value%. Expected: %description%
Invalid value has been attributed to the field. Follow the recommendations and correct the request.
404
34
No results matched the request
The requested data is missing.
429
35
Quota exceeded. %% new labels per day per application quota has been exceeded.
The daily limit is exceeded. Tomorrow you will be able to add labels to the app again.
400
37
New labels array should not contain more than %% elements.
The array of labels contains more than 30 elements. Reduce the number of labels created in one request.
429
36
Quota exceeded. %% new labels per day per user quota has been exceeded.
The daily limit is exceeded. You will be able to add a new set of labels tomorrow.
400
38
Labels feature is not available for cross-platform projects
The labels feature is not available for cross-platform projects. Labels can be applied only to ordinary apps or branch-apps of cross-platform projects.

Description
receiptStatus
Enum type DTDReceiptStatus that represents the result of the transaction validation.
verificationResult
Additional information from the validation server.
The enum type returned as a result of validation can receive the following values:
Value
Description
receiptValid
The payment is valid, the transaction is genuine.
receiptNotValid
The payment is invalid, the transaction may be a duplicate or fraud.
receiptServerError
Server error when validating the payment.
receiptSandbox
Test payment.
receiptInternalError
Internal SDK error.
Property
Description
receiptStatus
Enum type DTDReceiptStatus that represents the result of the transaction validation.
verificationResult
Additional information from the validation server.
The enum type returned as a result of validation can receive the following values:
Value
Description
receiptValid
The payment is valid, the transaction is genuine.
receiptNotValid
The payment is invalid, the transaction may be a duplicate or fraud.
receiptServerError
Server error when validating the payment.
receiptInternalError
Internal SDK error.
Property
Description
ReceiptStatus
Enum type DTDReceiptStatus that represents the result of the transaction validation.
VerificationResult
Additional information from the validation server.
The enum type returned as a result of validation can receive the following values:
Value
Description
Valid = 0L
The payment is valid, the transaction went through successfully
Invalid = 1L
The payment is invalid, the transaction may be a duplicate or fraud
ServerError = 2L
Server error when validating the payment
InternalError = 4L
Internal SDK error
Go to the Google Play Console and sign in. Make sure that you sign in to the account from which the app you are licensing is published (or will be published).
In the app details page, locate the Services & APIs link and click it.
In the Services & APIs page, locate the Licensing & In-App Billing section. Your public key for licensing is given in the Your License Key For This Application field.
If you use Unity IAP for payment validation, call the following method: void VerifyPayment(string receipt, Action completionHandler)
If you use Unity IAP for payment validation, call the following method: void VerifyPayment(string receipt, Action completionHandler)
The DTDVerifyResponse object returned while validating the transaction has two properties:
Property
Description
receiptStatus
Enum type DTDReceiptStatus that represents the result of the transaction validation.
verificationResult
Additional information from the validation server.
The enum type returned as a result of validation can receive the following values:
Value
Description
receiptValid
The payment is valid, the transaction is genuine.
receiptNotValid
The payment is invalid, the transaction may be a duplicate or fraud.
receiptServerError
Server error when validating the payment.
receiptSandbox
Test payment.
receiptInternalError
Internal SDK error.
Property
Description
receiptStatus
Enum type DTDReceiptStatus that represents the result of the transaction validation.
verificationResult
Additional information from the validation server.
Value
Description
receiptValid
The payment is valid, the transaction is genuine.
receiptNotValid
The payment is invalid, the transaction may be a duplicate or fraud.
receiptServerError
Server error when validating the payment.
receiptSandbox
Test payment.
receiptInternalError
Internal SDK error.
Property
- (void)paymentQueue:(SKPaymentQueue *)queue updatedTransactions:(NSArray *)transactions{
for(SKPaymentTransaction *transaction in transactions) {
switch(transaction.transactionState){
case SKPaymentTransactionStatePurchasing: {
// Your code ...
break;
}
case SKPaymentTransactionStatePurchased: {
// Your code ...
[DTDAntiCheat verifyPaymentCompletion:^(DTDVerifyResponse * _Nonnull response) {
switch ([response receiptStatus]) {
case ReceiptStatusReceiptInternalError: {
break;
}
case ReceiptStatusReceiptValid: {
break;
}
case ReceiptStatusReceiptSandbox: {
break;
}
case ReceiptStatusReceiptServerError: {
break;
}
case ReceiptStatusReceiptNotValid: {
break;
}
}
}];
break;
}
case SKPaymentTransactionStateRestored: {
// Your code ...
break;
}
case SKPaymentTransactionStateFailed: {
// Your code ...
break;
}
case SKPaymentTransactionStateDeferred: {
// Your code ...
break;
}
}
}
}DTDAntiCheat.verifyPayment(
receipt = "receipt",
signature = "signature",
publickKey = "publickKey"
) { dtdVerifyResponse ->
val verificationResult = dtdVerifyResponse.verificationResult
/* your code here */
when (dtdVerifyResponse.receiptStatus) {
DTDReceiptStatus.ReceiptValid -> { /* your code here */ }
DTDReceiptStatus.ReceiptNotValid -> { /* your code here */ }
DTDReceiptStatus.ReceiptServerError -> { /* your code here */ }
DTDReceiptStatus.ReceiptInternalError -> { /* your code here */ }
}
}DTDAntiCheat.INSTANCE.verifyPayment("receipt", "signature", "publickKey",
dtdVerifyResponse -> {
// your code
switch (dtdVerifyResponse.getReceiptStatus()) {
case ReceiptValid:
// your code
break;
case ReceiptNotValid:
// your code
break;
case ReceiptInternalError:
// your code
break;
case ReceiptServerError:
// your code
break;
}
return null;
});var result = await DTDAntiCheat.VerifyPayment("receipt");
switch (result)
{
case DTDReceiptStatus.Valid:
break;
case DTDReceiptStatus.Invalid:
break;
case DTDReceiptStatus.ServerError:
break;
case DTDReceiptStatus.InternalError:
break;
default:
throw new ArgumentOutOfRangeException();
}public PurchaseProcessingResult ProcessPurchase (PurchaseEventArgs e)
{
DTDAntiCheat.VerifyPayment(yourPublicKey, e.purchasedProduct.receipt, result =>
{
if (result.ReceiptStatus == DTDReceiptVerificationStatus.ReceiptValid ||
result.ReceiptStatus == DTDReceiptVerificationStatus.ReceiptInternalError ||
result.ReceiptStatus == DTDReceiptVerificationStatus.ReceiptServerError)
{
// Code for valid result.
}
else
{
// Code for invalid result.
}
});
}public void MyNativeCallback (string publicKey, string receipt, string signature)
{
DTDAntiCheat.VerifyPayment(publicKey, receipt, signature, result =>
{
if (result.ReceiptStatus == DTDReceiptVerificationStatus.ReceiptValid ||
result.ReceiptStatus == DTDReceiptVerificationStatus.ReceiptInternalError ||
result.ReceiptStatus == DTDReceiptVerificationStatus.ReceiptServerError)
{
// Code for valid result.
}
else
{
// Code for invalid result.
}
});
}public PurchaseProcessingResult ProcessPurchase (PurchaseEventArgs e)
{
DTDAntiCheat.VerifyPayment(e.purchasedProduct.receipt, result =>
{
if (result.ReceiptStatus == DTDReceiptVerificationStatus.ReceiptValid ||
result.ReceiptStatus == DTDReceiptVerificationStatus.ReceiptInternalError ||
result.ReceiptStatus == DTDReceiptVerificationStatus.ReceiptServerError)
{
// Code for valid result.
}
else
{
// Code for invalid result.
}
});
}Sets a small custom user icon.
Written in the manifest file
<meta-data android:name="com.devtodev.default_small_icon_color" android:resource="@color/colorPrimary" />
Sets a color of the small custom user icon.
Written in the manifest file
<meta-data android:name="com.devtodev.push.default_large_icon" android:resource="@mipmap/largeIcon" />
Sets a large custom user icon.
DTDMessaging.getToken()
Returns a push notification registration token (firebaseToken).
DTDMessaging.processPushNotification(Context context, RemoteMessage remoteMessage)
Used to pass the push notification to the FirebaseMessagingService if it was implemented by the client but not by the SDK.
DTDMessaging.setPushListener(DTDPushListener pushListener)
(DTDPushListener pushListener) - sets a listener for push notification event trapping.
The text body.
group
String?
A group of messages.
getSound(context: Context)
Uri?
Returns the storage path of an audio file.
getSoundName()
String?
The notification sound name.
tag
String?
The notification tag.
color
String?
The notification color.
bigPicture
String?
The notification banner if specified.
actionType
DTDActionType
The property that returns an enum’s DTDActionType value.
Possible values:
Url - an external link opening
Share - content sharing
Deeplink
actionString
String?
The property that returns an optional action ID.
getIcon(context: Context, userIcon: Int)
Int
The icon resource identifier specified by the user (if specified).
largeIcon
String?
The large notification icon name.
actions
List<DTDActionButton>
The list of action buttons used in the push notification.
isApiSource
Boolean
Specifies whether the push notification was sent using the devtodev API.
The property that returns the button’s icon name.
isBackground
Boolean
The button-click app open mode.
text
String?
The property that returns the text of the tapped button.
Object
Description
DTDMessaging
The main object for push notification initialization.
DTDMessaging.initialize(Context context)
The push notification initialization method.
DTDMessaging.startPushService()
The push notification activation method. It passes the isAllowed current state.
DTDMessaging.pushNotificationsAllowed = true or false
A property responsible for the activation/deactivation of push notifications.
Functions as a getter (describes the current state) and a setter (sets the current state).
When the state transitions, it sends a pt with isAllowed (true or false) status to the server.
The isAllowed flag status is stored in the SDK.
DTDMessaging.setIntent(Intent intent)
A method of passing a user intent to the SDK using PushMessage.
DTDPushListener Interface Methods
Description
onPushServiceRegistrationSuccessful(String deviceId)
Returns a push notification registration token (firebaseToken).
onPushServiceRegistrationFailed(String error)
Returns errors during push notification registration.
onPushNotificationReceived(Map<String, String> message)
Returns a directory with data for improving your push notifications.
onPushNotificationOpened(DTDPushMessage pushMessage, @Nullable DTDActionButton actionButton)
Returns pushMessage and actionButton if they were tapped.
Property
Type
Description
getData()
Map<String, String>
Complete information sent with the use of a remote push notification.
systemId
Int
The notification ID used in the devtodev system.
getTitle(context:Context)
String?
Returns the selected message title or app name if the former is unavailable.
body
Property
Type
Description
Id
String?
The property that returns the tapped button ID.
actionString
String?
The property that returns the optional action ID.
actionType
DTDActionType
The property that returns an enum’s DTDActionType value.
Possible values:
App - a default value
Url - an external link opening
Share - content sharing
Deeplink - an in-app link opening
icon


Written in the manifest file
<meta-data android:name="com.devtodev.push.default_small_icon" android:resource="@drawable/smallIcon" />
String?
String?


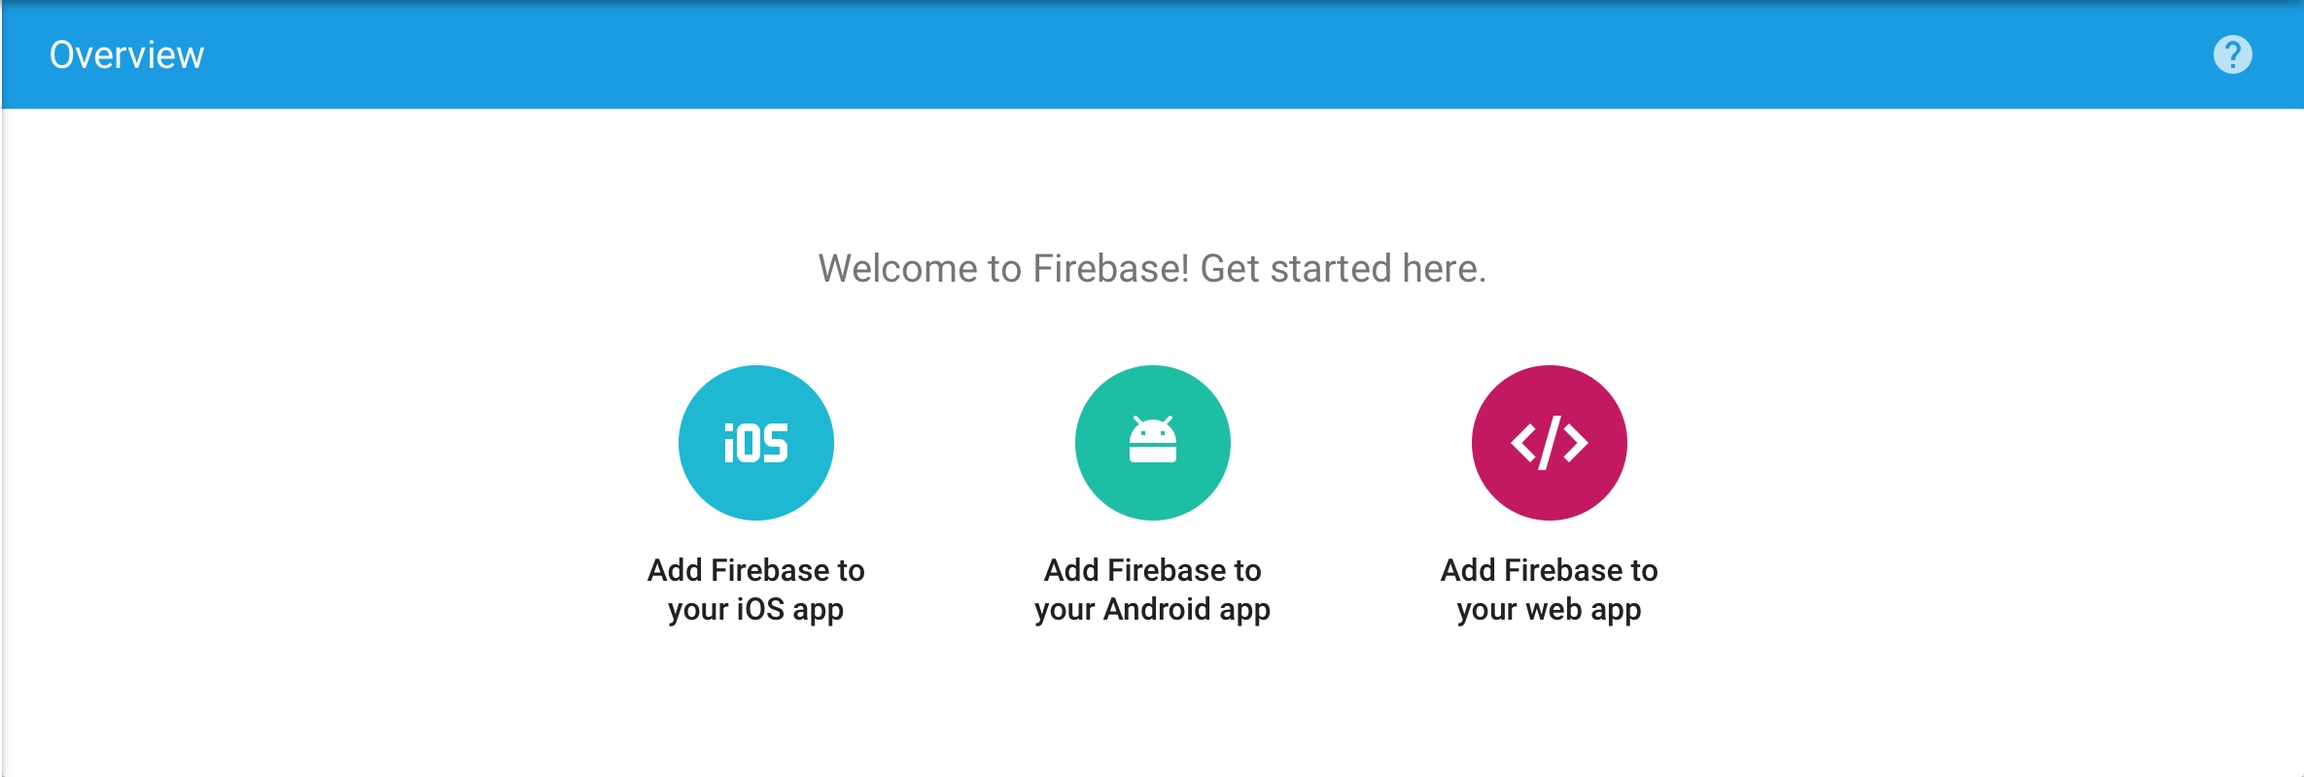


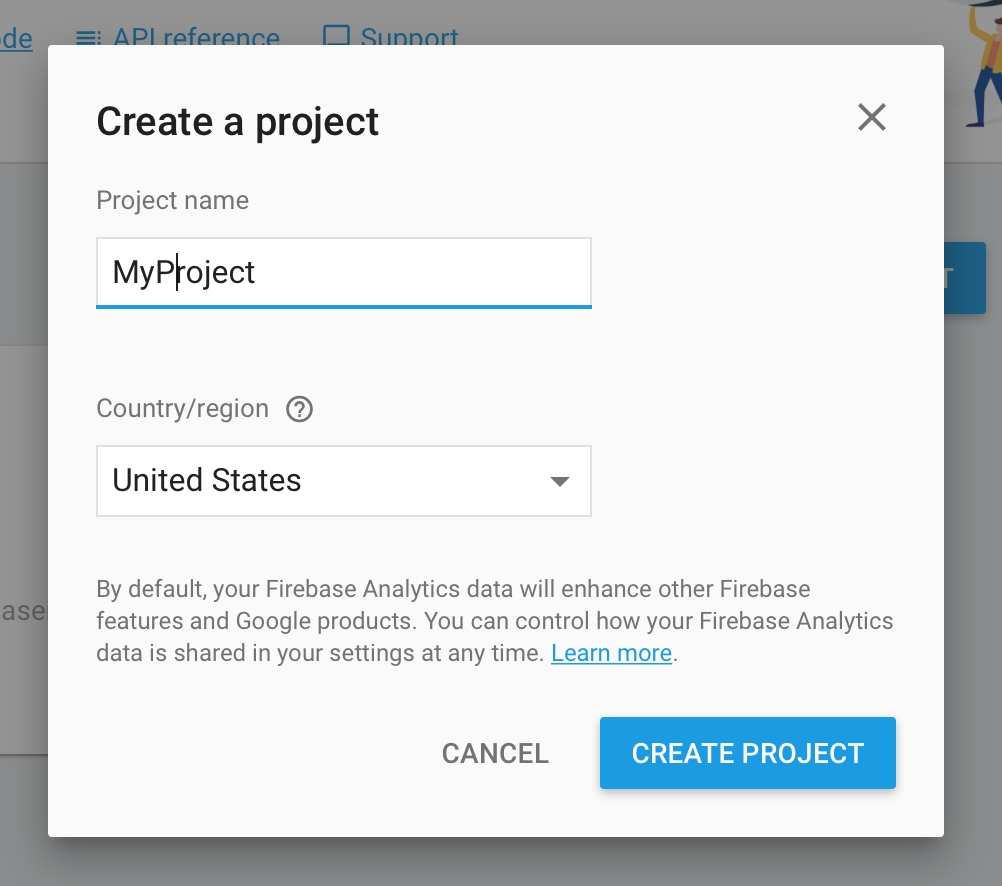


defaultConfig {
//other existing fields
versionName = "1.0" //your app version (required)
}
dependencies {
// Requirement
implementation("androidx.appcompat:appcompat:*.*.*")
implementation("com.google.code.gson:gson:*.*.*")
implementation("com.google.firebase:firebase-messaging:*.*.*")
implementation("com.google.android.gms:play-services-ads-identifier:*.*.*")
// if you use AAR (recommended) or JAR downloaded from GitHub, please add:
implementation(fileTree(mapOf("dir" to "libs", "include" to listOf("*.aar"))))
// or just add the dependency, get the latest version from
// https://mvnrepository.com/artifact/com.devtodev/android-analytics
implementation("com.devtodev:android-analytics:*.*.*")
// https://mvnrepository.com/artifact/com.devtodev/android-messaging
implementation("com.devtodev:android-messaging:*.*.*")
// Optional (recommended)
implementation("com.android.installreferrer:installreferrer:*.*")
}defaultConfig {
//other existing fields
versionName "1.0" //your app version (required)
}
dependencies {
// Requirement
implementation 'androidx.appcompat:appcompat:*.*.*'
implementation 'com.google.code.gson:gson:*.*.*'
implementation 'com.google.android.gms:play-services-ads-identifier:*.*.*'
implementation 'com.google.firebase:firebase-messaging:*.*.*'
// if you use AAR (recommended) or JAR downloaded from GitHub, please add:
implementation fileTree(dir: "libs", include: ["*.aar"])
// or just add the dependency, get the latest version from
// https://mvnrepository.com/artifact/com.devtodev/android-analytics
implementation 'com.devtodev:android-analytics:*.*.*'
// https://mvnrepository.com/artifact/com.devtodev/android-messaging
implementation 'com.devtodev:android-messaging:*.*.*'
// Optional (recommended)
implementation 'com.android.installreferrer:installreferrer:*.*'
}<!-- permission.POST_NOTIFICATIONS for API level 33 or higher -->
<uses-permission android:name=“android.permission.POST_NOTIFICATIONS”/>
<application>
<service
android:name="com.devtodev.push.internal.logic.DTDFcmMessagingService"
android:exported="true">
<intent-filter>
<action android:name="com.google.firebase.MESSAGING_EVENT"/>
</intent-filter>
</service>
<receiver
android:name="com.devtodev.push.internal.logic.PushClickReceiver"
android:enabled="true"
android:exported="true">
<intent-filter>
<action android:name="com.devtodev.android.push.CLICKED" />
</intent-filter>
</receiver>
</application><meta-data
android:name="com.devtodev.push.default_small_icon"
android:resource="@drawable/ic_icon_name" />
<meta-data
android:name="com.devtodev.push.default_small_icon_color"
android:resource="@color/icon_color" /><meta-data
android:name="com.devtodev.push.default_large_icon"
android:resource="@mipmap/ic_large_icon_name"/><application
<!-- Your tags -->
<service
android:name="com.devtodev.push.internal.logic.DTDFcmMessagingService">
<intent-filter>
<action android:name="com.google.firebase.MESSAGING_EVENT" />
</intent-filter>
</service>
<receiver
android:name="com.devtodev.push.internal.logic.PushClickReceiver"
android:enabled="true"
android:exported="true">
<intent-filter>
<action android:name="com.devtodev.android.push.CLICKED" />
</intent-filter>
</receiver>
<meta-data
android:name="com.devtodev.push.default_small_icon"
android:resource="@drawable/ic_baseline" />
<meta-data
android:name="com.devtodev.push.default_small_icon_color"
android:resource="@color/colorPrimary" />
<meta-data
android:name="com.devtodev.push.default_large_icon"
android:resource="@mipmap/baseline_accessibility_black_18"/>
</application>val analyticsConfiguration = DTDAnalyticsConfiguration()
analyticsConfiguration.logLevel = DTDLogLevel.Error
DTDAnalytics.initialize(
appKey = "projectKey",
analyticsConfiguration = analyticsConfiguration,
context = this
)
DTDMessaging.initialize(context = this)DTDAnalyticsConfiguration analyticsConfiguration = new DTDAnalyticsConfiguration();
analyticsConfiguration.setLogLevel(DTDLogLevel.Error);
DTDAnalytics.INSTANCE.initialize("projectKey",analyticsConfiguration,context);
DTDMessaging.INSTANCE.initialize(context);DTDMessaging.setPushListener(object : DTDPushListener {
override fun onPushServiceRegistrationSuccessful(deviceId: String) {
//do something
}
override fun onPushServiceRegistrationFailed(error: String) {
//do something
}
override fun onPushNotificationReceived(message: Map<String, String?>?) {
//do something
}
override fun onPushNotificationOpened(pushMessage: DTDPushMessage, actionButton: DTDActionButton?) {
//do something
}
})DTDMessaging.INSTANCE.setPushListener(new DTDPushListener() {
@Override
public void onPushServiceRegistrationSuccessful(@NonNull String deviceId) {
//do something
}
@Override
public void onPushServiceRegistrationFailed(@NonNull String error) {
//do something
}
@Override
public void onPushNotificationReceived(@Nullable Map<String, String> message) {
//do something
}
@Override
public void onPushNotificationOpened(@NonNull DTDPushMessage dtdPushMessage, @Nullable DTDActionButton dtdActionButton) {
//do something
}
});<uses-permission android:name=“android.permission.POST_NOTIFICATIONS”/>@RequiresApi(33)
private fun notificationPermissionIsGranted(): Boolean {
val res = context.checkCallingOrSelfPermission(POST_NOTIFICATIONS)
return res == PackageManager.PERMISSION_GRANTED
}@RequiresApi(33)
private Boolean notificationPermissionIsGranted() {
int res = context.checkCallingOrSelfPermission(POST_NOTIFICATIONS);
return res == PackageManager.PERMISSION_GRANTED;
}requestPermissions(arrayOf(Manifest.permission.POST_NOTIFICATIONS), yourCode)String[] permissionsArr = {Manifest.permission.POST_NOTIFICATIONS};
requestPermissions(permissionsArr, yourCode);override fun onRequestPermissionsResult(
requestCode: Int,
permissions: Array<String?>,
grantResults: IntArray
) {
super.onRequestPermissionsResult(requestCode, permissions, grantResults)
if (requestCode == yourCode) {
if (grantResults.isNotEmpty() && grantResults[0] == PackageManager.PERMISSION_GRANTED) {
//permission is granted
} else {
//permission is not granted, notifications are not available
}
}
}@Override
public void onRequestPermissionsResult(int requestCode, @NonNull String[] permissions, @NonNull int[] grantResults) {
super.onRequestPermissionsResult(requestCode, permissions, grantResults);
if (requestCode == yourCode) {
if (grantResults.length > 0 && grantResults[0] == PackageManager.PERMISSION_GRANTED) {
//permission is granted
} else {
//permission is not granted, notifications are not available
}
}
}
You use Member Center to generate a push notification client SSL certificate that allows your notification server to connect to the APNs. Each App ID is required to have its own client SSL certificate. The client SSL certificate Member Center generates is a universal certificate that allows your app to connect to both the development and production environments.
To generate a universal client SSL certificate
In , select Certificates.
Click the Add button (+)
Under Production, select the “Apple Push Notification service SSL (Sandbox & Production)” checkbox, and click Continue.
Open "Keychain access" application
If the certificate hasn't been added to keychain access yet, choose "File" → "Import". Find the certificate file (CER-file) provided by Apple
Choose "Keys" section in "Keychain access" application
Choose a personal key associated with your iPhone developer certificate. Personal key is identified by open certificate associated with it "iPhone developer: ". Choose "File" → Export objects. Save key as .p12
Upload the .p12-file into Integration section of application settings panel (Settings -> Push Notifications):
is the easiest way to add devtodev into your iOS project.
1. Firstly, install CocoaPods using:
2. In the project directory execute the command:
3. In the created Podfile add the dependency:
4. Finally, run the command in your Xcode project directory:
CocoaPods should download and install the devtodev library, and create a new Xcode workspace. Open this workspace in Xcode.
To connect the module for processing push notifications, you need to:
.
Add DTDAnalytics.xcframework to the project (check Do Not Embed).
Add DTDMessaging.xcframework to the project (check Do Not Embed)
In the Xcode project settings, open the tab, and add: "Push Notifications" and "Background Modes" respectively.
In the "Background Modes" section, enable "Remote notifications".
Add initialization to didFinishLaunchingWithOptions method:
To handle SDK delegate methods, you need to add the implementation of the DTDMessagingDelegate protocol.
The DTDMessaging module provides support for notifications with attachments. These notifications are available since iOS 10. Attachments support images, animated gifs and videos. To use this function, you will need to create a “Notification Service Extension“, for this create a new target in your application settings:
Open Xcode (File -> New -> Target). Select Notification Service Extension.
The next step is to modify the Notification Extension class as follows:
Delete all auto-generated code.
Inherit Notification Extension class from DTDMediaAttachmentExtension
Example:
DTDMessaging moduleDTDMessagingDelegate methodsDisplaying push notifications in Foreground state is available since iOS 10.0.
By default, according to Apple Push Notification Guidelines, the display of push notification in the Foreground state is disabled. In order to set the display method, you must:
Assign delegate for UNUserNotificationCenter
Or pass a parameter in the push notification constructor (_fg = 1). In this case, the display method will be formed from the Notification settings.
Or delegate the system method userNotificationCenter willPresent notification
An example of a delegated method implementation:
It is an OptionSet that is used to pass push notification authorization and set up interactions with users.
Possible values:
DTDMediaAttachmentExtensionTo handle the application attitude to displaying push notifications, you need to add a Notifications service Extension. And inherit NotificationService from DTDMediaAttachmentExtension
To use custom sounds for push notifications, you need to copy the necessary sound files to the Libraries folder of your Xcode project. You can read more about supported formats .
When creating a push company, it is important to specify the full name of the sound with file extension (for example, sound.wav).
DTDMessaging automatically swizzles notification tracking and APNS-token usage methods by default. If you want to disable the function, add the flag DTDMessagingSwizzlingEnabled (boolean) in the app’s Info.plist file and set it to NO (0). However, if you disable notification swizzling, you will need additional integration for accurate analytics:
For sending APNS-token to DTDMessaging:
For sending information about the application:
devtodev Push API supports two different formats of notification sending to Windows operational systems:
UWP format described in this section can be used only for Windows 10 and Windows Phone 10. It is described by the "uwp" object.
The universal format works on a basis of Legacy tiles and toast schema. It can be used for Windows Phone 8.1, Windows Phone 10, Windows 8.1, Windows 10. It is described by the "windows" object.
Use this object (“uwp”) if your clients are users of OS Windows 10 and Windows Phone 10 only. With the help of this method it is possible to realize more opportunities offered by Windows 10.
In order to find an addressee to whom you need to send a notification, it is possible to specify one or several available identifiers:
Object "uwp" can contain 2 properties:
The property that describes a message can be represented by one of 4 possible objects: - toast (object) - the result of sending is the delivery of toast-notification - raw (object) - sends a hidden toast-notification - tile (object) - changes the tile content of an app - badge (object) - changes the value of a badge field displayed on a tile
The property that describes additional parameters of a message is represented by the object “options”. Optional.
Example
In UWP format every of tile’s size must be described separately, therefore, the object “tile” can contain up to 4 properties:
small
medium
wide
large (only for desktop)
Each of these sizes is described by an object with the following properties:
Example
Example
Example

Create a certificate request on your Mac.
Click Choose File.
In the dialog that appears, select the certificate request file (with a .certSigningRequest extension), and click Choose File.
Click Generate.
Click Download.
You'll be suggested to create a password which is used when you need to import the key to another computer
Property for assigning a delegate to handle events from the SDK
pushNotificationsOptions
DTDNotificationOptions
Configuring the display of Push Notifications, is an OptionSet, is set by the developer to select the method for notifying the user. May be changed by the end user.
By default it has the following value: [.DTDNotificationOptionBadge, .DTDNotificationOptionSound, .DTDNotificationOptionAlert]
The value that is passed to display a badge on the application icon.
category
String?
Property returning an optional identifier of a push notification category
Property returning the text of the pressed button.
an option specifying that the system should display a button for notification settings in the application. Available since iOS 12.0
DTDNotificationOptionProvisional
pre-send notifications to the Action Center without interrupting work. Available since iOS 12.0
DTDNotificationOptionAnnouncement
for Siri to automatically read messages through AirPods. Available since iOS 13.0
Object
Type
Description
startPushService
Method responsible for activating push notifications:
Requests permission from the user to receive Push Notifications
Sends a pushToken and the current state isAllowed
apnsToken
Data?
Getter giving the current pushToken, represented by a Data
apnsTokenString
String?
Getter giving the current pushToken, represented by a String
delegate
Delegate method
Description
didFailToRegisterForRemoteNotifications(with error: Error)
The method is called when an error occurs at the time of receiving a pushToken, represented by the Error base class.
didOpenRemoteNotification(with message: DTDMessage, and buttonClicked: DTDActionButton?)
The method is called when a remote push notification is opened by an end user. A DTDMessage object and an optional DTDActionButton object are passed.
didReceiveForegroundNotification(with message: DTDMessage)
The method is called when a remote push notification is received when the application is in the Foreground state. The DTDMessage object is passed.
didReceiveInvisibleNotification(with message: DTDMessage)
The method is called when an invisible remote push notification is received. The DTDMessage object is passed.
didRegisterForRemoteNotifications(with deviceToken: Data)
The method is called in case the pushToken successfully arrives; represented by a Data.
Property
Type
Description
payload
[AnyHashable:Any]
Full information sent using remote push notification.
actionType
DTDActionType
Property returning the enum DTDActionType value. Possible values:
App - default value
Url - open an external link
Share - share content
Deeplink - open a link inside the application
actionString
String?
Property returning an optional action identifier.
badge
Property
Type
Description
actionType
DTDActionType
Property returning the enum DTDActionType value. Possible values:
App - default value
Url - open an external link
Share - share content
Deeplink - open a link inside the application
actionString
String?
Property returning an optional action identifier.
buttonId
String
Property returning the identifier of the pressed button.
text
Value
Description
DTDNotificationOptionBadge
display a badge on the application icon
DTDNotificationOptionSound
play sound
DTDNotificationOptionAlert
display an alert
DTDNotificationOptionCarPlay
display push notification in CarPlay
DTDNotificationOptionCriticalAlert
play sound for critical notifications regardless of the “Do Not Disturb” setting (Critical alerts require special permission from Apple.) Available since iOS 12.0

DTDMessagingDelegate?
Int
String
DTDNotificationOptionProvidesSettings
User id is applicable if an internal identifier (cross-platform user identifier) is used in your app.
devtodevId
number
Numeric user identifier in devtodev database.
Optional. Additional text of a notification.
data
object
Optional if notification is not hidden. You can pass custom parameters with messages and use them within an app. For instance, you can activate advertising campaign or any other functionality for user who has received this message.
Example:
"data": {
"my_key": "value",
"my_another_key": "15"
}
icon
string
Optional. To replace the application icon (that shows up on the top left corner of the toast) use the URL or the resource name.
In Windows 10 the image is expressed using the URI of the image source, using one of these protocol handlers:
A web-based image: http:// or https://
An image included in the app package: ms-appx:///
An image saved to local storage: ms-appdata:///local/
image
string
Optional. Image inside the toast body, below the text. Use the URL or the resource name.
sound
string
Optional. The media file to play in place of the default sound. If the option is not used, the notification comes silently. This property can have one of the following string values:
Default IM
Reminder
action
object
Optional. Action after a click on the body of a notification. By default, a click simply opens an app. It is also possible to perform the following actions:
deeplink - Direct the user to a specific resource, either within your app or on the web.
url - Open a web page in a mobile browser, or any valid device-level URL such as Windows Store or app protocol links.
share - The Share Action drives a user to share your message when they interact with your push notification.
interactive
object
Optional. It is possible to specify an array of notification buttons in the “interactive” object. Each button must contain the following properties:
id (string) - Button identifier. It is transferred to an app
text (string) - Text on a button
handling (string) - The type of processing
Optional. You can set a black overlay on your background image using this property, which accepts integers from 0-100 with 0 being no overlay and 100 being full black overlay.
If you don't specify an overlay, the background image opacity defaults to 20% and the peek image opacity defaults to 0%.
Property
Type
Description
token
string
Push token. If you use push token, all fields with other identifiers will be ignored!
advertisingId
string
Advertising ID
serialId
string
Hardware serial number
userId
Property
Type
Description
scenario
string
Optional. Available values: "default", "alarm", "reminder", "incomingCall". Default value is "default". You do not need this unless your scenario is to pop an alarm, reminder, or incoming call. Do not use this just for keeping your notification persistent on screen.
title
string
Required. A short string describing the purpose of a notification.
text
string
Required. Main text of a notification.
text2
Property
Type
Description
content
array
As long as tile’s content is dynamic, it is described by an array, the elements of which can be objects describing either text strings or illustrations.
Text element object properties:
text (string) - Required. The displayed string.
wrap (boolean) - Optional. By default, text doesn't wrap and will continue off the edge of the tile. Set true to set text wrapping on a text element.
style (string ) - Optional. Styles control the font size, color, and weight of text elements. There is a number of available styles including a "subtle" variation of each style that sets the opacity to 60%, which usually makes the text color a shade of light gray. Basic text styles:
caption (12 effective pixels height, regular weight)
body (15 epx, regular)
base (15 epx, semibold)
subtitle (20 epx, regular)
Numeral text style variations: (These variations reduce the line height so that content above and below come much closer to the text.)
titleNumeral
subheaderNumeral
headerNumeral
Subtle text style variations: (Each style has a subtle variation that gives the text a 60% opacity, which usually makes the text color a shade of light gray.)
captionSubtle
bodySubtle
baseSubtle
subtitleSubtle
Image element object properties
image (string) - Required. Image URI
remove_margin (boolean ) - Optional. By default, inline images have an 8-pixel margin between any content above or below the image. Set true to remove margin.
align (string) - Optional. Images can be set to align "left", "center", or "right". This will also cause images to display at their native resolution instead of stretching to fill width.
Group element object properties
group (array) - Required. Array of subgroup elements.
Subgroup element object (used inside groups only)
subgroup (array) - Required. Array of text or/and image elements.
branding
object
You can control the branding on the bottom of a live tile (the display name and corner logo) by using this property. Branding object properties:
type (string) - You can choose to display "none", only the "name", only the "logo", or both with "nameAndLogo". Windows Mobile doesn't support a corner logo, so "logo" and "nameAndLogo" default to"name" on mobile.
display_name (string) - Optional. You can override the display name of a notification by entering the text string of your choice.
v_align
string
You can control the vertical alignment of content on your tile by using this property. By default, everything is vertically aligned to the "top", but you can also align content to the "bottom" or "center".
overlay
Property
Type
Description
data
object
Required. You can pass custom parameters with messages and use them within an app. For instance, you can activate advertising campaign or any other functionality for user who has received this message.
Example:
"data": {
"my_key": "value",
"my_another_key": "15"
}
badge
string
Optional. A number from 1 to 99. A value of 0 is equivalent to the glyph value "none" and will clear a badge.
Instead of a number, a badge can display one of a non-extensible set of status glyphs:
activity
none
alarm
alert
attention
available
away
busy
error
newMessage
paused
playing
unavailable
It is also possible to send values incrementing or decrementing the current value in a “+2”, “-1” format. In case the previous value was the glyph or 0, the value will be increment. Decrement does not influence the zero value and the glyph.
Property
Type
Description
badge
string
A number from 1 to 99. A value of 0 is equivalent to the glyph value "none" and will clear a badge.
Instead of a number a badge can display one of a non-extensible set of status glyphs:
activity
none
alarm
alert
attention
available
away
busy
error
newMessage
paused
playing
unavailable
string
string
number
sudo gem install cocoapodspod initplatform :ios, '9.0'
target 'TargetName' do
use_frameworks!
pod 'DTDAnalytics', '~> 2.0.0'
pod 'DTDMessaging', '~> 2.0.0'
endpod installlet config = DTDAnalyticsConfiguration()
config.logLevel = .error
DTDAnalytics.initialize(applicationKey: "App ID", configuration: config)
DTDMessaging.delegate = self
DTDMessaging.pushNotificationsOptions = [.DTDNotificationOptionAlert,
.DTDNotificationOptionSound,
.DTDNotificationOptionBadge]
DTDMessaging.startPushService()DTDNotificationOptions *options = [[DTDNotificationOptions alloc] initWithRawValue:
[DTDNotificationOptions.DTDNotificationOptionAlert rawValue] |
[DTDNotificationOptions.DTDNotificationOptionSound rawValue] |
[DTDNotificationOptions.DTDNotificationOptionBadge rawValue]];
[DTDMessaging setPushNotificationsOptions:options];
[DTDMessaging startPushService];extension AppDelegate: DTDMessagingDelegate {
func didRegisterForRemoteNotifications(with deviceToken: Data) {
// your code
}
func didFailToRegisterForRemoteNotifications(with error: Error) {
// your code
}
func didReceiveInvisibleNotification(with message: DTDMessage) {
// your code
}
func didReceiveForegroundNotification(with message: DTDMessage) {
// your code
}
func didOpenRemoteNotification(with message: DTDMessage, and buttonClicked: DTDActionButton?) {
// your code
}
}@interface AppDelegate () <DTDMessagingDelegate>
- (void)didRegisterForRemoteNotificationsWith:(NSData *)deviceToken {
// your code
}
- (void)didFailToRegisterForRemoteNotificationsWith:(NSError *)error {
// your code
}
-(void)didReceiveInvisibleNotificationWith:(DTDMessage *)message {
// your code
}
- (void)didReceiveForegroundNotificationWith:(DTDMessage *)message {
// your code
}
-(void)didOpenRemoteNotificationWith:(DTDMessage *)message and:(DTDActionButton *)buttonClicked {
// your code
}import UserNotifications
import DTDMessaging
class NotificationService: DTDMediaAttachmentExtension {
}func userNotificationCenter(_ center: UNUserNotificationCenter,
willPresent notification: UNNotification,
withCompletionHandler completionHandler: @escaping (UNNotificationPresentationOptions) -> Void) {
completionHandler([.alert, .sound])
}@available(iOSApplicationExtension 10.0, *)
class NotificationService: DTDMediaAttachmentExtension {
// nothing
}func application(_ application: UIApplication,
didRegisterForRemoteNotificationsWithDeviceToken deviceToken: Data) {
DTDMessaging.apnsToken = deviceToken
}i- (void)application:(UIApplication *)application didRegisterForRemoteNotificationsWithDeviceToken:(NSData *)deviceToken {
[DTDMessaging setApnsToken:deviceToken];
}func application(_ application: UIApplication,
didReceiveRemoteNotification userInfo: [AnyHashable: Any]) {
DTDMessaging.didReceiveMessage(userInfo: userInfo, actionIdentifier: nil)
}
@available(iOS 10.0, *)
extension AppDelegate: UNUserNotificationCenterDelegate {
func userNotificationCenter(_ center: UNUserNotificationCenter,
didReceive response: UNNotificationResponse,
withCompletionHandler completionHandler: @escaping () -> Void) {
let userInfo = response.notification.request.content.userInfo
let actionIdentifier = response.actionIdentifier
DTDMessaging.didReceiveMessage(userInfo: userInfo, actionIdentifier: actionIdentifier)
}
func userNotificationCenter(_ center: UNUserNotificationCenter,
willPresent notification: UNNotification,
withCompletionHandler completionHandler: @escaping (UNNotificationPresentationOptions) -> Void) {
let userInfo = notification.request.content.userInfo
DTDMessaging.willPresentMessage(userInfo: userInfo)
}
}- (void)application:(UIApplication *)application didReceiveRemoteNotification:(NSDictionary *)userInfo fetchCompletionHandler:(void (^)(UIBackgroundFetchResult))completionHandler {
[DTDMessaging didReceiveMessageWithUserInfo:userInfo actionIdentifier:nil];
}
- (void)userNotificationCenter:(UNUserNotificationCenter *)center willPresentNotification:(UNNotification *)notification withCompletionHandler:(void (^)(UNNotificationPresentationOptions))completionHandler {
NSDictionary *userInfo = notification.request.content.userInfo;
[DTDMessaging willPresentMessageWithUserInfo:userInfo];
}
- (void)userNotificationCenter:(UNUserNotificationCenter *)center didReceiveNotificationResponse:(UNNotificationResponse *)response withCompletionHandler:(void (^)(void))completionHandler {
NSDictionary *userInfo = response.notification.request.content.userInfo;
NSString *actionIdentifier = response.actionIdentifier;
[DTDMessaging didReceiveMessageWithUserInfo:userInfo actionIdentifier:actionIdentifier];
}{
"user_token": "xxxxxxxxxxxxxxxxxxxxxxxxxxxxxxxx",
"app_id": "xxxxxxxx-xxxx-xxxx-xxxx-xxxxxxxxxxxx",
"campaign_tag": "campaign name",
"pack_id": "uniqueid1234",
"audience": [{
"token": "xxxxxxxxxxxxxxxxxxxxxxxxxxxxxxxxxxxxxx",
"advertisingId": "xxxxxxxx-xxxx-xxxx-xxxx-xxxxxxxxxxxx",
"serialId": "xxxxxxxxx",
"customUid": "xxxxxxxxxxxx"
}],
"uwp": {
"toast": {
"scenario": "default",
"title": "Notification title",
"text": "First notification string",
"text2": "Second notification string",
"data": {
"key1": "value",
"key2": "value"
},
"icon": "https://domain.com/pic.png",
"image": ["https://domain.com/pic.png", ""],
"sound": "Default",
"action": {
"url": "http://www.domain.com"
},
"interactive": {
"buttons": [{
"id": "accept",
"text": "Accept",
"handling": "foreground",
"action": {
"url": "http://www.domain.com/accept"
}
}, {
"id": "decline",
"text": "Decline",
"handling": "background"
}]
}
},
"options": {
"expire": 3600
}
}
}{
"user_token": "xxxxxxxxxxxxxxxxxxxxxxxxxxxxxxxx",
"app_id": "xxxxxxxx-xxxx-xxxx-xxxx-xxxxxxxxxxxx",
"campaign_tag": "campaign name",
"pack_id": "uniqueid1234",
"audience": [{
"token": "xxxxxxxxxxxxxxxxxxxxxxxxxxxxxxxxxxxxxx",
"advertisingId": "xxxxxxxx-xxxx-xxxx-xxxx-xxxxxxxxxxxx",
"serialId": "xxxxxxxxx",
"customUid": "xxxxxxxxxxxx"
}],
"uwp": {
"tile": {
"medium": {
"content": [{
"text": "First sting",
"wrap": "true",
"style": "base",
"align": "center"
}, {
"image": "https://domain.com/pic.png",
"remove_margin": "true",
"align": "center",
"crop": "circle",
"placement": "background"
}],
"v_align": "center",
"overlay": "60",
"branding": {
"type": "none"
}
},
"wide": {
"content": [{
"text": "First string",
"wrap": "true",
"style": "base",
"h_align": "center"
}, {
"image": "Assets\\Apps\\Weather\\MostlyCloudy.png",
"remove_margin": "true",
"align": "center",
"crop": "circle",
"placement": "background"
}],
"v_align": "center",
"branding": {
"type": "nameAndLogo",
"display_name": "brandname"
}
}
},
"options": {
"expire": 3600
}
}
}{
"user_token": "xxxxxxxxxxxxxxxxxxxxxxxxxxxxxxxx",
"app_id": "xxxxxxxx-xxxx-xxxx-xxxx-xxxxxxxxxxxx",
"campaign_tag": "campaign name",
"pack_id": "uniqueid1234",
"audience": [{
"token": "xxxxxxxxxxxxxxxxxxxxxxxxxxxxxxxxxxxxxx",
"advertisingId": "xxxxxxxx-xxxx-xxxx-xxxx-xxxxxxxxxxxx",
"serialId": "xxxxxxxxx",
"customUid": "xxxxxxxxxxxx"
}],
"uwp": {
"raw": {
"data": {
"key1": "value",
"key2": "value"
},
"badge": "+1"
}
}
}{
"user_token": "xxxxxxxxxxxxxxxxxxxxxxxxxxxxxxxx",
"app_id": "xxxxxxxx-xxxx-xxxx-xxxx-xxxxxxxxxxxx",
"campaign_tag": "campaign name",
"pack_id": "uniqueid1234",
"audience": [{
"token": "xxxxxxxxxxxxxxxxxxxxxxxxxxxxxxxxxxxxxx",
"advertisingId": "xxxxxxxx-xxxx-xxxx-xxxx-xxxxxxxxxxxx",
"serialId": "xxxxxxxxx",
"customUid": "xxxxxxxxxxxx"
}],
"uwp": {
"badge": {
"badge": "99"
}
}
}title (24 epx, semilight)
subheader (34 epx, light)
header (46 epx, light)
titleSubtle
titleNumeralSubtle
subheaderSubtle
subheaderNumeralSubtle
headerSubtle
headerNumeralSubtle
placement (string) - Optional. You can specify an image that "peeks” in from the top of a tile or set a "background" image.
A local image (Only supported for desktop apps.): file://
SMS
Looping.Alarm
Looping.Alarm2
Looping.Alarm3
Looping.Alarm4
Looping.Alarm5
Looping.Alarm6
Looping.Alarm7
Looping.Alarm8
Looping.Alarm9
Looping.Alarm10
Looping.Call
Looping.Call2
Looping.Call3
Looping.Call4
Looping.Call5
Looping.Call6
Looping.Call7
Looping.Call8
Looping.Call9
Looping.Call10
On mobile platform this property can also contain the path to a local audio file with one of the following prefixes:
ms-appx:///
ms-appdata:///
"action": {
"url": "http://www.domain.com"
}
"action": {
"deeplink": "your-url-scheme://host/path"
}
"action": {
"share": "Happy holidays!"
}
background - A button closes an app. Notification parameters are transferred to an app, but an app doesn’t open. It is impossible to tie an action to a button in this regime.
foreground - A button opens an app. Notification parameters are transferred to an app, but an app doesn’t open. It is possible to tie an action to a button in this regime. The list of actions and the principle is analogical to actions with the body of a message.
Example:
"interactive": {
"buttons": [{
"id": "accept",
"text": "Accept",
"handling":"foreground",
"action": {
"url": "http://www.domain.com/accept"
},
{
"id": "decline",
"text": "Decline",
"handling":"background",
}]
}
Push token. If you use a push token, all fields with other identifiers will be ignored!
idfa
string
Ad identifier IDFA
idfv
string
Device identifier under vendor IDFV
userId
string
User id is applicable if an internal identifier (cross-platform user identifier) is used in your app
devtodevId
number
Numeric user identifier in devtodev database.
The object of a message for the iOS platform contains 2 fields:
payload (object) - describes the main content of a notification
options (object) - describes the optional settings of notification delivery
Property
Type
Description
title
string
Optional. A short string describing the purpose of a notification. Apple Watch displays this string as a part of the notification interface. This string is displayed only briefly and should be crafted so that it can be understood quickly. This key was added in iOS 8.2.
text
string
The text of an alert message. Required if a notification is not hidden.
title-loc-key
string
Optional. The key to a title string in the Localizable.strings file for the current localization. The key string can be formatted with %@ and %n$@ specifiers to take the variables specified in the title-loc-args array. See for more information. This key was added in iOS 8.2.
title-loc-args
Property
Type
Description
sandbox
boolean
Default value is false ("Production" gateway). Set to true if you need to send notification through the "Sandbox" gateway (for builds signed with a developer certificate).
hidden
boolean
Switching a notification to the hidden mode. If “true” - a notification will not be displayed to a user, but will be transferred to an app. Such a message must not contain any properties except “data” in the “payload” object.
Including this key and value means that when your app is launched in the background or resumed, is called
priority
string
Optional. The priority of a notification. Default value is "normal". Specify one of the following values:
"high" – Send a push message immediately. Notifications with this priority must trigger an alert, sound, or badge on a target device. It is an error to use this priority for a push notification that contains only the content-available key.
"normal" — Send a push message at a time that takes into account power considerations for a device. Notifications with this priority might be grouped and delivered in bursts. They are throttled, and in some cases are not delivered.
expire
Name
Description
Template ID
Button 1
Button 2
Label
id
Label
id
The text on the buttons, which are on the list of templates, is translated into N languages and displayed to users individually according to the location of a device.
POST
POST
Property
Type
Description
token
string
https://devtodev.com/api/v1/push/send{
"user_token": "xxxxxxxxxxxxxxxxxxxxxxxxxxxxxxxx",
"app_id": "xxxxxxxx-xxxx-xxxx-xxxx-xxxxxxxxxxxx",
"campaign_tag": "campaign name",
"pack_id": "uniqueid1234",
"audience": [{
"token": "xxxxxxxxxxxxxxxxxxxxxxxxxxxxxxxxxxxxxx",
"idfa": "XXXXX-XXXXX-XXXXXX-XXXXXX",
"idfv": "XXXXX-XXXXX-XXXX-XXXXX-XXXX",
"userId": "xxxxxxxxxxxx"
}],
"ios": {
"payload": {
"title": "Title of the notification",
"text": "Notification content.",
"data": {
"key1": "value",
"key2": "15"
},
"badge": 11,
"sound": "bingbong.aiff",
"attachment": {
"type": "image",
"url": "https://domain.com/pic.png"
},
"action": {
"url": "http://www.domain.com"
},
"interactive": {
"template": "dtd_accept.open_decline.dismiss",
"buttons": [{
"id": "accept",
"action": {
"url": "http://www.domain.com/accept"
}
}]
}
},
"options": {
"hidden": false,
"priority": "normal",
"expire": "36000",
"collapse_key": "qwerqwer"
}
}
}https://devtodev.com/api/v1/push/send{
"user_token": "xxxxxxxxxxxxxxxxxxxxxxxxxxxxxxxx",
"app_id": "xxxxxxxx-xxxx-xxxx-xxxx-xxxxxxxxxxxx",
"campaign_tag": "campaign name",
"pack_id": "uniqueid1234",
"audience": [{
"token": "xxxxxxxxxxxxxxxxxxxxxxxxxxxxxxxxxxxxxx",
"idfa": "XXXXX-XXXXX-XXXXXX-XXXXXX",
"idfv": "XXXXX-XXXXX-XXXX-XXXXX-XXXX",
"userId": "xxxxxxxxxxxx"
}],
"ios": {
"payload": {
"data": {
"key1": "value",
"key2": "15"
},
"badge": "11"
},
"options": {
"hidden": true,
"priority": "normal",
"expire": "36000"
}
}
}string
Optional. Variable string values to appear in place of format specifiers in title-loc-key. See Localized Formatted Strings for more information. This key was added in iOS 8.2.
action-loc-key
string
Optional. If a string is specified, the system displays an alert that includes the “Close” and “View” buttons. The string is used as a key to get a localized string in the current localization to use for the right button’s title instead of “View”. See Localized Formatted Strings for more information.
loc-key
string
Optional. The key to an alert message string in a Localizable.strings file for the current localization (which is set by the user’s language preferences). The key string can be formatted with %@ and %n$@ specifiers to take the variables specified in the loc-args array. See Localized Formatted Strings for more information.
loc-args
array
Optional. Variable string values to appear in place of format specifiers in loc-key. See Localized Formatted Strings for more information.
launch-image
string
Optional. The filename of an image file in the app bundle, with or without the filename extension. The image is used as a launch image when users tap the action button or move the action slider. If this property is not specified, the system either uses the previous snapshot, uses the image identified by the UILaunchImageFile key in the app’s Info.plist file, or falls back to Default.png. This property was added in iOS 4.0.
data
object
Optional if notification is not hidden. You can pass custom parameters with messages and use them within an app. For instance, you can activate advertising campaign or any other functionality for the user who has received this message.
Example:
"data": {
"my_key": "value",
"my_another_key": 15
}
badge
number
Optional. The number to display as the badge of the app icon. If this property is absent, the badge is not changed. To remove the badge, set the value of this property to 0.
sound
string
Optional. The name of a sound file in the app bundle or in the Library/Sounds folder of the app’s data container. The sound in this file is played as an alert. If the sound file doesn’t exist or "default" is specified as the value, the default alert sound is played. The audio must be in one of the audio data formats that are compatible with system sounds; see Preparing Custom Alert Sounds for details.
attachment
object
Optional. Available from devtodev iOS SDK 1.9, Cordova SDK 1.9, Unity SDK 2.3, UE4 SDK 1.9, Air SDK 1.8 Added in iOS 10. The possibility to attach images, videos, audio, and GIFs is available in iOS 10. Specify the type of an attachment ("image", "audio" or "video") and URL that leads to a media file. Attention, iOS uses only “https” protocol.
Example:
"attachment": {
"type": "image",
"url": "https://domain.com/pic.gif"
}
action
object
Optional. Available from devtodev iOS SDK 1.9, Cordova SDK 1.9, Unity SDK 2.3, UE4 SDK 1.9, Air SDK 1.8 The action after a click on the body of a notification. By default, a click simply opens an app. It is also possible to perform the following actions:
deeplink (string) - Direct the user to a specific resource, either within your app or on the web.
url (string) - Open a web page in a mobile browser, or any valid device-level URL such as App Store or app protocol links.
share (string) - The Share Action drives a user to share your message when they interact with your push notification.
Examples:
"action": {
"url": "http://www.domain.com"
}
"action": {
"deeplink": "your-url-scheme://host/path"
}
"action": {
"share": "Happy holidays!"
}
interactive
object
Optional. Available from devtodev iOS SDK 1.9, Cordova SDK 1.9, Unity SDK 2.3, UE4 SDK 1.9, Air SDK 1.8 It is possible to specify one of the existing button templates in an “interactive” object, as well as assign the necessary actions to template buttons. It is possible to assign additional actions only to the button that opens an app. The same set of actions is available: deeplink, url and share. The list of accessible button templates is below in the text.
Example:
"interactive": {
"template": "dtd_accept.open_decline.dismiss",
"buttons": [{
"id": "accept",
"action": { "url": "http://www.domain.com/accept"
}
}]
}
number
This option identifies the date when the notification is no longer valid and can be discarded. It is possible to use either relative time in seconds passed since the moment of sending, or to specify the exact date in UNIX epoch format date expressed in seconds (UTC).
Default value is 7 days (604800 seconds) after sending.
If this value is nonzero, APNs stores a notification and tries to deliver it at least once repeating the attempt as needed if it is unable to deliver a notification for the first time. If the value is 0, APNs treats the notification as if it expires immediately and does not store the notification or attempt to redeliver it.
collapse_key
string
Multiple notifications with the same collapse identifier are displayed to a user as a single notification. The value should not exceed 64 bytes.
Yes or No (Open an app)
Yes option takes user into an app. No dismisses the notification.
dtd_yes.open_no.dismiss
Yes
yes
No
no
Yes or No (Dismiss notification)
Yes and No options dismiss the notification when clicked without taking a user into an app.
dtd_yes.dismiss_no.dismiss
Yes
yes
No
no
Accept or Decline (Open the app)
Accept option takes a user into an app. No dismisses a notification.
dtd_accept.open_decline.dismiss
Accept
accept
Decline
decline
Accept or Decline (Dismiss notification)
Yes and No options dismiss a notification when clicked without taking a user into an app.
dtd_accept.dismiss_decline.dismiss
Accept
accept
Decline
decline
Shop Now
Shop Now takes user into an app. Should be a different location from a notification action.
dtd_shop_now.open
Shop Now
shop_now
Buy Now
Buy Now takes user into an app. Should be a different location from a notification action.
dtd_buy_now.open
Buy Now
buy_now
Tell me more
Deep link to more details about a specific offer or program
dtd_more_info.open
Tell me more
more_info
Download
Download deep links users directly to media e.g. wallpaper images, apps, music downloads, file downloads, etc.
dtd_download.open
Download
download
Share
Pass sharing text through to native OS apps like Facebook and Twitter using the Share action.
dtd_share.open
Share
share
Download or Share
Download deep links users directly to media e.g. wallpaper images, apps, music downloads, file downloads, etc. Share the same media socially.
dtd_download.open_share.open
Download
download
Share
share
Shop Now or Share
Shop Now takes a user into an app; should be a different location from a notification action.
dtd_shop_now.open_share.open
Shop Now
shop_now
Share
share
Buy Now or Share
Buy Now takes a user into an app; should be a different location from a notification action.
dtd_buy_now.open_share.open
Buy Now
buy_now
Share
share
Like or Dislike
Both options take a user into an app.
dtd_like.open_dislike.open
Like
like
Dislike
dislike
Like or Dislike
Like option takes user into an app. Dislike dismisses a notification.
dtd_like.open_dislike.dismiss
Like
like
Dislike
dislike
Like
Option takes a user into an app.
dtd_like.open
Like
like
Like and Share
Capture user sentiment by allowing users to like a message or share it. Both options take user into an app.
dtd_like.open_share.open
Like
like
Share
share
Add
Add an item: most often a wallet pass or card to your digital Wallet.
dtd_add.open
Add
add
Save and No
Save something for future reference.
dtd_save.open
Save
save
Rate now
Drive users to rate an app in the app store by deep linking from this button.
dtd_rate.open
Rate now
rate
Search
Deep link to a search functionality within an app
dtd_search.open
Search
search
Book now
Deep link to booking flow within an app.
dtd_book.open
Book now
book


This generation of SDK is deprecated and is no longer supported. Information about the .
Unfortunately, Apple does not provide any capability to pass a referrer string through to your app from a link to the App Store. But if you have a referral info, you can set it using the method below:
The list of predefined keys:
Unfortunately, Windows Store does not provide any capability to pass a referrer string through to your app from a link to the store. But if you have a referral info, you can set it using the method below:
The list of predefined keys:
Automated referral parameters are available on Android platform. Unfortunately, other platforms do not provide any capability to pass a referrer string through to your app from a link to the store. But if you have a referral info, you can set it using the method below:
The list of predefined keys:
Unfortunately, Apple does not provide any capability to pass a referrer string through to your app from a link to the app store. But if you have a referral info, you can set it using the method below:
The list of predefined keys:
Automated referral parameters is available on Android platform. Unfortunately, other platforms do not provide any capability to pass a referrer string through to your app from a link to the store. But if you have a referral info, you can set it using the method below:
Unfortunately, Apple does not provide any capability to pass a referrer string through to your app from a link to the app store. But if you have a referral info, you can set it using the method below:
Blueprint
Field
Type
Description
Source
FString
To identify a search engine, newsletter name, or other source. (for example 'AdWords', 'Bing', 'E-Mail Newsletter')
Medium
FString
To identify a medium such as email or cost-per-install. (for example 'CPI')
Code
Use the current constants to specify a social network:
Otherwise, create an object with the social network name you need.
Use the current constants to specify a social network:
SocialNetwork.Facebook
SocialNetwork.Twitter
SocialNetwork.GooglePlus
SocialNetwork.Vk
and so on...
Otherwise, create your own social network object.
Example:
Use the current constants to specify social network:
SocialNetwork.Facebook SocialNetwork.Twitter SocialNetwork.GooglePlus SocialNetwork.Vk and so on...
Otherwise, create social network the object of your own:
We recommend using the following values for the most popular social networks:
Use the current constants to specify social network:
Otherwise, create your own social network object.
Use the current constants to specify social network:
Otherwise, create social network the object of your own.
Use the current constants to specify social network:
Otherwise, create your own social network object:
Track publications in social networks and analyze the effectiveness of viral messages. The event is sent after a social network confirms the publication.
As a 'reason' parameter we recommend you indicate actions which encourage users to make a publication.
For example:
Start playing
New level reached
New building
New ability
Asking for help
New Record
Achievement
URL sharing
Otherwise, create an object with the social network name you need.
As a «reason» parameter we recommend that you indicate actions which encourage users to make a publication.
For example:
Start playing
New level reached
New building
New ability
Quest completed
New item
Collection completed
Invitation
Asking for help
New Record
Acheivement
URL sharing
Recommendation
Review
and so on...
Use the current constants to specify a social network:
SocialNetwork.Facebook
SocialNetwork.Twitter
SocialNetwork.GooglePlus
SocialNetwork.Vk
Otherwise, create your own social network object.
The social network ID is the same as with DevToDev.SDK.SocialNetworkConnect(). It is possible to use pre-defined or custom values as the reason (pReason parameter) .
Example:
As a «reason» parameter we recommend that you indicate actions which encourage users to make publication.
For example:
Start playing
New level reached
New building
As a «reason» parameter we recommend that you indicate actions which encourage users to make publication.
As a «reason» parameter we recommend that you indicate actions which encourage users to make publication.
For example:
Start playing
New level reached
New building
As a «reason» parameter we recommend that you indicate actions which encourage users to make publication.
For example:
Start playing
New level reached
New building
As a «reason» parameter we recommend that you indicate actions which encourage users to make publication.
For example:
Start playing
New level reached
New building
Blueprint
Code
As a «reason» parameter we recommend that you indicate actions which encourage users to make publication.
Property allows to get UDID:
Property allows to get ODIN:
Property allows to get UUID:
To enable the debug mode and make SDK notifications displayed in the console use this method:
To send events pack before it is filled or before its formation period, you can use immediate dispatch:
Code
To identify a specific product promotion or strategic campaign. (for example 'Snow Boots')
To get the version of integrated SDK, use the following method:
To set set current application version in WEB and Windows Standalone apps use this property:
The method of limiting the processing of user data. The right to be forgotten.
This method is implemented in accordance with the GDPR requirements.
In case a user doesn’t want their data to be sent and processed in the devtodev system, a developer must send a ’false’ value to this method.
When calling the method setTrackingAvailability with a ‘false’ value, SDK sends a command to the server to delete all user’s personal data that has been collected by devtodev from this app and a command to block the collection of any data of this user in future, and then stops sending any messages to the devtodev system.
The user will remain listed as an impersonal unit in previously aggregated metrics.
When sending a ‘true’ value, the permission to block data collection is removed.
In the case of using TrackingAvailability property with a ‘false’ value, SDK sends a command to the server to delete all user’s personal data that has been collected by devtodev from this app and a command to block the collection of any data of this user in future, and then stops sending any messages to the devtodev system.
The user will remain listed as an impersonal unit in previously aggregated metrics.
In the case of using TrackingAvailability property with a ‘true’ value, the permission to block data collection is removed.
When calling the method setTrackingAvailability with a ‘false’ value, SDK sends a command to the server to delete all user’s personal data that has been collected by devtodev from this app and a command to block the collection of any data of this user in future, and then stops sending any messages to the devtodev system.
The user will remain listed as an impersonal unit in previously aggregated metrics.
When sending a ‘true’ value, the permission to block data collection is removed.
/**
* Tracks user's referral data
* ### Usage:
* [DevToDev referrer:@{
* RFSource: @"adwords",
* RFMedium: @"cpi",
* RFContent: @"Snow Boots",
* RFCampaign: @"Warm Snow Boots",
* RFTerm: @"snow boots"
* }];
*
* @param NSDictionary<ReferralProperty*, NSString*> utm - Dictionary with referrer values
*/
//To identify a search engine, newsletter name, or other source.
// (for example 'AdWords', 'Bing', 'E-Mail Newsletter')
ReferralProperty * RFSource;
//To identify a medium such as email or cost-per-install.
// (for example 'CPI')
ReferralProperty * RFMedium;
//To identify a specific product promotion or strategic campaign.
//(for example 'Snow Boots')
ReferralProperty * RFCampaign;
/**
* ### Usage:
* Dictionary<ReferralProperty, string> referralData = new Dictionary<ReferralProperty, string>();
* referralData.Add(ReferralProperty.Source, "source");
* referralData.Add(ReferralProperty.Medium, "medium");
* referralData.Add(ReferralProperty.Content, "content");
* referralData.Add(ReferralProperty.Campaign, "campaign");
* referralData.Add(ReferralProperty.Term, "term");
* referralData.Add(ReferralProperty.Custom("site"), "site");
* DevToDev.SDK.Referral(referralData);
*
* <param name="referralData">Dictionary with referrer values</param>
*/
DevToDev.SDK.Referral(Dictionary<ReferralProperty, string> referralData);//To identify a search engine, newsletter name, or other source.
// (for example 'AdWords', 'Bing', 'E-Mail Newsletter')
ReferralProperty.Source;
//To identify a medium such as email or cost-per-install.
// (for example 'CPI')
ReferralProperty.Medium;
//To identify a specific product promotion or strategic campaign.
//(for example 'Snow Boots')
ReferralProperty.Campaign;
//To differentiate ads or links that point to the same URL.
//(for example some ads might advertise 'Warm Snow Boots' and others might advertise 'Durable Snow Boots')
ReferralProperty.Content;
//To note the keywords for this ad.
// for example 'shoes+boots')
ReferralProperty.Term;
//To add a custom key
ReferralProperty.Custom("your_key_name");/// <summary> Initial referrer tracking <summary>
/// <example> Usage:
///
/// Dictionary<ReferralProperty, string> referralData = new Dictionary<ReferralProperty, string>();
/// referralData.Add(ReferralProperty.Source, "source");
/// referralData.Add(ReferralProperty.Medium, "medium");
/// referralData.Add(ReferralProperty.Content, "content");
/// referralData.Add(ReferralProperty.Campaign, "campaign");
/// referralData.Add(ReferralProperty.Term, "term");
/// referralData.Add(ReferralProperty.Custom("site"), "site");
/// DevToDev.Analytics.Referral(referralData);
///
/// </example>
/// <param name="referralData"> Dictionary with referrer values </param>
DevToDev.Analytics.Referral(Dictionary<ReferralProperty, string> referralData);// To identify a search engine, newsletter name, or other source.
// (for example 'AdWords', 'Bing', 'E-Mail Newsletter')
ReferralProperty.Source;
// To identify a medium such as email or cost-per-install.
// (for example 'CPI')
ReferralProperty.Medium;
// To identify a specific product promotion or strategic campaign.
// (for example 'Snow Boots')
ReferralProperty.Campaign;
// To differentiate ads or links that point to the same URL.
//(for example some ads might advertise 'Warm Snow Boots' and others might advertise 'Durable Snow Boots')
ReferralProperty.Content;
// To note the keywords for this ad.
// (for example 'shoes+boots')
ReferralProperty.Term;
// To add a custom key
ReferralProperty.Custom("your_key_name");/**
* Tracks user's referral data
* ### Usage:
* [DevToDev referrer:@{
* RFSource: @"adwords",
* RFMedium: @"cpi",
* RFContent: @"Snow Boots",
* RFCampaign: @"Warm Snow Boots",
* RFTerm: @"snow boots"
* }];
*
* @param NSDictionary<ReferralProperty*, NSString*> utm - Dictionary with referrer values
*/
[DevToDev referrer: (NSDictionary<ReferralProperty*, NSString*> *) utm];//To identify a search engine, newsletter name, or other source.
// (for example 'AdWords', 'Bing', 'E-Mail Newsletter')
ReferralProperty * RFSource;
//To identify a medium such as email or cost-per-install.
// (for example 'CPI')
ReferralProperty * RFMedium;
//To identify a specific product promotion or strategic campaign.
//(for example 'Snow Boots')
ReferralProperty * RFCampaign;
//To differentiate ads or links that point to the same URL.
//(for example some ads might advertise 'Warm Snow Boots' and others might advertise 'Durable Snow Boots')
ReferralProperty * RFContent;
//To note the keywords for this ad.
// for example 'shoes+boots')
ReferralProperty * RFTerm;
//To add a custom key
[ReferralProperty Custom:@"your_key_name"];/**
* ### Usage:
* var referralData:Dictionary = new Dictionary();
* referralData[ReferralProperty.Source] = "source";
* referralData[ReferralProperty.Medium] = "medium";
* referralData[ReferralProperty.Content] = "content";
* referralData[ReferralProperty.Campaign] = "campaign";
* referralData[ReferralProperty.Term] = "term";
* referralData[ReferralProperty.Custom("site")] = "site";
* DevToDev.referral(referralData);
*
* @ param referralData - dictionary with referrer values
*/
DevToDev.referral(referralData:Dictionary);The list of predefined keys:// To identify a search engine, newsletter name, or other source.
// (for example 'AdWords', 'Bing', 'E-Mail Newsletter')
ReferralProperty.Source;
// To identify a medium such as email or cost-per-install.
// (for example 'CPI')
ReferralProperty.Medium;
// To identify a specific product promotion or strategic campaign.
// (for example 'Snow Boots')
ReferralProperty.Campaign;
// To differentiate ads or links that point to the same URL.
// (for example some ads might advertise 'Warm Snow Boots' and others might advertise 'Durable Snow Boots')
ReferralProperty.Content;
// To note the keywords for this ad.
// (for example 'shoes+boots')
ReferralProperty.Term;
// To add a custom key
ReferralProperty.Custom("your_key_name");/**
* Tracks the existence of a connection with a social network.
* Use pre-defined or custom values as an identifier.
* @param SocialNetwork socialNetwork - social network id
*/
[DevToDev socialNetworkConnect: (SocialNetwork *) socialNetwork];javascript:void(0)Facebook
Twitter
GooglePlus
VK
//and so on...SocialNetwork socialNetwork = [SocialNetwork Custom: (NSString *) networkName]; (max. 24 symbols)/**
* Tracks the existence of a connection with a social network.
* Use pre-defined or custom values as an identifier.
* @param SocialNetwork socialNetwork - social network id
*/
DevToDev.socialNetworkConnect(SocialNetwork socialNetwork);/**
* Tracks the existence of posts to a social network.
* @param socialNetwork - social network Id
* @param NSString reason - the reason of posting (max. 32 symbols)
*/
[DevToDev socialNetworkPost: (SocialNetwork *) socialNetwork withReason: (NSString *) reason];Facebook
Twitter
GooglePlus
VK
//and so on...SocialNetwork socialNetwork = [SocialNetwork Custom: (NSString *) networkName];
// networkName (max. 24 symbols)/**
* Tracks the existence of posts to a social network.
* @param socialNetwork - social network Id
* @param reason - the reason of posting (max. 32 symbols)
*/
DevToDev.socialNetworkPost(SocialNetwork socialNetwork, String reason);/**
* @return OpenUdid
*/
[DevToDev getOpenUdid];/**
* @return Open Udid
*/
DevToDev.getOpenUdid();DevToDev.SDK.OpenUdidDevToDev.Analytics.OpenUdid/**
* @return Open Udid
*/
[DevToDev getOpenUdid];/**
* @return ODIN1
*/
[DevToDev getOdin1];/**
* @return ODIN1
*/
DevToDev.getOdin1();DevToDev.SDK.ODINDevToDev.Analytics.Odin1/**
* @return ODIN1
*/
[DevToDev getOdin1];/**
* @return ODIN1
*/
DevToDev.getOdin1();/**
* @return UUID
*/
[DevToDev getUUID];/**
* @return UUID
*/
DevToDev.getUUID();/**
* @return UUID
*/
[DevToDev getUUID];/**
* @param BOOL isActive
*/
[DevToDev setActiveLog: (BOOL) isActive];/**
* @param logLevel
*/
DevToDev.setLogLevel(LogLevel logLevel);//to enable logging
DevToDev.SDK.LogEnabled = true;
//to disable loging
DevToDev.SDK.LogEnabled = false;/**
* Activates console log
* @param {boolean} status
*/
devtodev.setDebugLog(status);/// <summary> Enable/Disable log</summary>
/// <param name="isEnabled">Enabled/Disabled log</param>
DevToDev.Analytics.SetActiveLog(bool isEnabled);/**
* @param BOOL isActive
*/
[DevToDev setActiveLog: (BOOL) isActive];/**
* @param logLevel (set logLevel=1 to enable log, 0 to disable)
*/
DevToDev.setLogLevel(logLevel:int);[DevToDev sendBufferedEvents];DevToDev.sendBufferedEvents();DevToDev.SDK.sendBufferedEvents();/**
* Sends event packet immediately
*/
devtodev.sendBufferedEvents();DevToDev.Analytics.SendBufferedEvents();[DevToDev sendBufferedEvents];DevToDev.sendBufferedEvents();// Sends events pack before it is filled or before its formation period
FAnalytics::Get().GetDefaultConfiguredProvider()->FlushEvents();/**
* @return SDKVersion
*/
[DevToDev sdkVersion];/**
* @return SDKVersion
*/
DevToDev.getSdkVersion();DevToDev.SDK.GetSdkVersion();/**
* Returns SDK version
*/
devtodev.getSdkVersion();/**
* @return SDKVersion
*/
[DevToDev sdkVersion];/**
* @return SDKVersion
*/
DevToDev.getSdkVersion();/// <summary> Property allows to set current application version.
/// Attention! This property is necessary for WEB and Windows Standalone apps only.
/// It will be ignored on other platforms.
/// </summary>
/// <param name="version"> Current version of your application </param>
DevToDev.Analytics.ApplicationVersion = version;/**
* The method of limiting the processing of user data. The right to be forgotten.
* @param BOOL trackingAvailable - use 'false' to erase user's personal data and stop collecting data of this user.
* 'true' if you want to resume data collection.
*/
[DevToDev setTrackingAvailability: (BOOL) trackingAvailable];/**
* The method of limiting the processing of user data. The right to be forgotten.
* @param isAvailable - send 'false' to erase user's personal data and stop collecting data of this user.
* Send 'true' if you want to resume data collection.
*/
DevToDev.setTrackingAvailability(boolean isAvailable);gm
Google Mail
tb
Tumblr
gp
Google+
tw
in
vk
VK
ok
Odnoklassniki
vb
Viber
pi
wp
Qzone
We recommend using the following values for the most popular social networks:
Value
Social Network
Value
Social Network
en
Evernote
rt
fb
rr
Renren
gm
New ability
Quest completed
New item
Collection completed
Invitation
Asking for help
New Record
Acheivement
URL sharing
Recommendation
Review
and so on...
Use the current constants to specify social network:
SocialNetwork.Facebook SocialNetwork.Twitter SocialNetwork.GooglePlus SocialNetwork.Vk and so on...
Otherwise, create social network the object of your own:
rr
Renren
gm
Google Mail
tb
Tumblr
gp
Google+
tw
in
vk
VK
ok
Odnoklassniki
vb
Viber
pi
wp
Qzone
Quest completed
New item
Collection completed
Invitation
Asking for help
New Record
Acheivement
URL sharing
Recommendation
Review
and so on...
Use the current constants to specify social network:
Otherwise, create your own social network object.
Quest completed
New item
Collection completed
Invitation
Asking for help
New Record
Achievement
URL sharing
Recommendation
Review
and so on...
Use the current constants to specify social network:
Otherwise, create social network the object of your own.
Quest completed
New item
Collection completed
Invitation
Asking for help
New Record
Acheivement
URL sharing
Recommendation
Review
and so on...
Use the current constants to specify social network:
Otherwise, create your own social network object:
For example:
Start playing
New level reached
New building
New ability
Asking for help
New Record
Achievement
URL sharing
Value
Social Network
Value
Social Network
en
Evernote
rt
fb
rr
Renren
gm
Quest completed
New item
Collection completed
Invitation
Review
and so on...
Campaign
FString
To identify a specific product promotion or strategic campaign. (for example 'Snow Boots')
Content
FString
To differentiate ads or links that point to the same URL. (for example some ads might advertise 'Warm Snow Boots' and others might advertise 'Durable Snow Boots')
Term
FString
To note the keywords for this ad. for example 'shoes+boots')
Value
Social Network
Value
Social Network
en
Evernote
rt
fb
rr
Renren
Field
Type
Description
Social Name
FString
Social network Id
For example:
Start playing
New level reached
New building
New ability
Quest completed
New item
Collection completed
Invitation
Asking for help
New Record
Achiеvement
URL sharing
Recommendation
Review
and so on...
Value
Social Network
Value
Social Network
en
Evernote
rt
Field
Type
Description
Social Name
FString
Social network Id
Reason
FString
The reason of posting (max. 32 symbols)
fb
UDevToDevBlueprintFunctionLibrary::Referrer(const TArray<FAnalyticsEventAttr>& Attributes);/**
* Custom social network object
* @param networkName - social network name (max. 24 symbols)
*/
SocialNetwork socialNetwork = SocialNetwork.Custom(String networkName);/**
* Tracks the existence of a connection with a social network.
* Use pre-defined or custom values as an identifier.
* <param name="socialNetwork"> Social network ID </param>
*/
DevToDev.SDK.SocialNetworkConnect(SocialNetwork socialNetwork);DevToDev.SDK.SocialNetworkConnect(SocialNetwork.Facebook);SocialNetwork socialNetwork = SocialNetwork.Custom(string networkName); //(max. 24 symbols)/**
* Tracks the existence of a connection with a social network.
* Use pre-defined or custom values as an identifier.
* @param {string} socialNetwork - social network id (max. 24 symbols)
**/
devtodev.socialNetworkConnect(socialNetwork);/// <summary> Track the existence of a connection with a social network.
/// Use pre-defined or custom values as an identifier.</summary>
/// <param name="socialNetwork"> Social network ID </param>
DevToDev.Analytics.SocialNetworkConnect(DevToDev.SocialNetwork socialNetwork);DevToDev.SocialNetwork.Facebook
DevToDev.SocialNetwork.Twitter
DevToDev.SocialNetwork.GooglePlus
DevToDev.SocialNetwork.Vk
// and so on...DevToDev.SocialNetwork socialNetwork = DevToDev.SocialNetwork.Custom(string networkName); //(max. 24 symbols)/**
* Tracks the existence of a connection with a social network. Use pre-defined or custom values as an identifier.
* @param SocialNetwork socialNetwork - social network id
*/
[DevToDev socialNetworkConnect: (SocialNetwork *) socialNetwork];Facebook
Twitter
GooglePlus
VK
//and so on...SocialNetwork socialNetwork = [SocialNetwork Custom: (NSString *) networkName]; //max. 24 symbols/**
* Tracks the existence of a connection with a social network.
* Use pre-defined or custom values as an identifier.
* @param socialNetwork - social network id
*/
DevToDev.socialNetworkConnect(socialNetwork:SocialNetwork);SocialNetwork.VK;
SocialNetwork.TWITTER;
SocialNetwork.FACEBOOK;
SocialNetwork.GOOGLE_PLUS;
SocialNetwork.WHATS_APP;
SocialNetwork.VIBER;
SocialNetwork.EVERNOTE;
SocialNetwork.GOOGLE_MAIL;
SocialNetwork.LINKED_IN;
SocialNetwork.PINTEREST;
SocialNetwork.QZONE;
SocialNetwork.REDDIT;
SocialNetwork.RENREN;
SocialNetwork.TUMBLR;/**
* Custom social network object
* @param networkName - social network name (max. 24 symbols)
*/
var socialNetwork:SocialNetwork = SocialNetwork.Custom(networkName:String);/**
* Custom social network object
* @param networkName - social network name (max. 24 symbols)
*/
SocialNetwork socialNetwork = SocialNetwork.Custom(String networkName);/**
* <param name="networkName"> Social network ID </param>
* <param name="reason"> The reason of posting. (max. 32 symbols)</param>
*/
DevToDev.SDK.SocialNetworkPost(SocialNetwork socialNetwork, String reason)DevToDev.SDK.SocialNetworkPost(SocialNetwork.Facebook, "newLevelReached");/**
* Tracks the existence of posts to a social network.
* @param {string} socialNetwork - social network Id (max. 24 symbols)
* @param {string} reason - the reason of posting (max. 32 symbols)
*/
devtodev.socialNetworkPost(socialNetwork, reason);/// <summary> Track the existence of posts to a social network. </summary>
/// <param name="networkName"> Social network ID </param>
/// <param name="reason"> The reason of posting. (max. 32 symbols)</param>
DevToDev.Analytics.SocialNetworkPost(DevToDev.SocialNetwork networkName, string reason);/**
* Tracks the existence of posts to a social network.
* @param socialNetwork - social network Id
* @param reason - the reason of posting (max. 32 symbols)
*/
[DevToDev socialNetworkPost: (SocialNetwork *) socialNetwork withReason: (NSString *) reason];/**
* Tracks the existence of posts to a social network.
* @param socialNetwork - social network Id
* @param reason - the reason of posting (max. 32 symbols)
*/
DevToDev.socialNetworkPost(socialNetwork:SocialNetwork, reason:String);// Tracks the existence of posts to a social network.
// FString socialNetwork - social network Id
// FString reason - the reason of posting (max. 32 symbols)
UDevToDevBlueprintFunctionLibrary::SocialNetworkPost(const FString& socialNetwork, const FString& reason);/// <summary> The Property of limiting the processing of user data. The right to be forgotten.
/// Use 'false' to erase user's personal data and stop collecting data of this user or 'true'
/// if you want to resume data collection.</summary>
DevToDev.SDK.TrackingAvailability = false/true;/**
* The method of limiting the processing of user data. The right to be forgotten.
* @param {boolean} status - send 'false' to erase user's personal data and stop collecting data of this user.
* Send 'true' if you want to resume data collection.
*/
devtodev.setTrackingAvailability(status);/**
* The property of limiting the processing of user data. The right to be forgotten.
* Use 'false' to erase user's personal data and stop collecting data of this user or 'true'
* if you want to resume data collection.</summary>
*/
DevToDev.Analytics.TrackingAvailability = false/true;/**
* The method of limiting the processing of user data. The right to be forgotten.
* @param BOOL trackingAvailable - use 'false' to erase user's personal data and stop collecting data of this user.
* 'true' if you want to resume data collection.
*/
[DevToDev setTrackingAvailability: (BOOL) trackingAvailable];/**
* The method of limiting the processing of user data. The right to be forgotten.
* @param isTrackingAvailable - send 'false' to erase user's personal data and stop collecting data of this user.
* Send 'true' if you want to resume data collection.
*/
DevToDev.setTrackingAvailability(isTrackingAvailable:Boolean)// Tracks the existence of a connection with a social network.
// Use pre-defined or custom values as an identifier.
// FString socialNetwork - social network id (max. 24 symbols)
UDevToDevBlueprintFunctionLibrary::SocialNetworkConnect(const FString& socialNetwork);SocialNetwork socialNetwork = SocialNetwork.Custom(string networkName); //(max. 24 symbols)DevToDev.SocialNetwork.Facebook
DevToDev.SocialNetwork.Twitter
DevToDev.SocialNetwork.GooglePlus
DevToDev.SocialNetwork.Vk
// and so on...DevToDev.SocialNetwork socialNetwork = DevToDev.SocialNetwork.Custom(string networkName); //(max. 24 symbols)Facebook
Twitter
GooglePlus
VK
//and so on...SocialNetwork socialNetwork = [SocialNetwork Custom: (NSString *) networkName]; //max. 24 symbolsSocialNetwork.VK;
SocialNetwork.TWITTER;
SocialNetwork.FACEBOOK;
SocialNetwork.GOOGLE_PLUS;
SocialNetwork.WHATS_APP;
SocialNetwork.VIBER;
SocialNetwork.EVERNOTE;
SocialNetwork.GOOGLE_MAIL;
SocialNetwork.LINKED_IN;
SocialNetwork.PINTEREST;
SocialNetwork.QZONE;
SocialNetwork.REDDIT;
SocialNetwork.RENREN;
SocialNetwork.TUMBLR;/**
* Custom social network object
* @param networkName - social network name (max. 24 symbols)
*/
var socialNetwork:SocialNetwork = SocialNetwork.Custom(networkName:String);Quest completed
New item
Collection completed
Invitation
Review
and so on...
Google Mail
tb
Tumblr
gp
Google+
tw
in
vk
VK
ok
Odnoklassniki
vb
Viber
pi
wp
Qzone
Google Mail
tb
Tumblr
gp
Google+
tw
in
vk
VK
ok
Odnoklassniki
vb
Viber
pi
wp
Qzone


Server API integration manual
This API version is deprecated, please use the latest version.
The request should be sent to:
https://api.devtodev.com/stat/v1/?api=ak-cDNRQl0Lypq4AOUrx8aGGMnmJT1FSebd where:
api - individual devtodev API app key, which can be found on the page of app integration;
v1 - the current version of the API aggregator.
All the transferred data must be in UTF8 encoding.
Contents must be sent as POST in gzip. The archive must contain JSON with one or more events for one or several users.
The size of a package can't exсeed 1 MB before compression. Packages that exсeed this size can't be processed.
If there are several events they must be formed inside a user object by type (name).
(traffic source, referral) It is used when it is necessary to track data about a source of user appearance. The event is sent when an app is first launched by a user if a user came from a tracked source. Maximum of the fields from the following accessible data must be transferred.
It is not sent in case there is some data missing. The event can't be submitted as a package.
Attention! We strongly recommend that you do not use these properties to transfer and store data that fits the definition of !
The recommended interval of sending is not more than once per 24h.
The recommended interval of sending is not more than once per 24h. Information is the most relevant for mobile devices.
In case it is possible to fix the length of a session, it is sent during the end of a session or during the next session. If there is no such possibility, send the date of the start of a session, the length of a session must be placed in the middle in case it is known. The absence of a parameter of a session's length makes it impossible to count some metrics.
In case you transfer data related to several transactions, group them by item name.
The event allows to learn how a user goes through a tutorial. The event is created after every completed step.
If a tutorial that hasn't been completed is programmed to reset to the beginning, the repeated reference of identical steps will be counted and influence the statistical metrics.
Use the following constants for basic actions:
In all other cases use the number of steps above 0.
If it is necessary to count events that are absent from the main types of events, use user events. An event must have a unique name and can include up to 20 parameters. You can use up to 300 unique names.
We strongly recommend that you do not use custom event properties to transfer and store data that fits the definition of !
This event is for games only.
Allows you to analyze players' distribution by game levels. The event is created when a player moves to the next level. In order to track the average state of game currency accounts, the amount of spendings and earnings of a currency, the amount of a game currency bought while completing a level, you can also send this data in this event.
This event is for games only.
It is used to track the ways in which an in-game currency is spent and the popularity of in-game items.
In case one item is sold in several currencies, a purchase is divided into several events, the amount of which corresponds to the number of currencies. Wherein the number of items is specified only in one event.
This event is for games only.
First of all, the event is used for games with short locations (game levels) that are completed during one game session. The event allows to gather data about the success in location completion and receive statistics by parameters that are changeable during location completion.
The event is used for individual tracking of ad revenue.
Example:
Allows you to track existing connections to social networks.
Constants that are supported by the system:
Allows you to track publications in social networks. It also allows you to analyze viral channels to optimize marketing efficiency.
It is sent after a publication has been approved by a social network.
We recommend to specify actions that encourage to make a publication as a reason:
The "Wipe" function can help when you test your app and/or when you need to clear user data as a part of the gameplay.
By default, when you send an event without any parameters, a user-specified will be "forgotten". We will keep user data in the database, but you won’t be able to find them by their main identifier. Respectively, the following event batch with the same identifier will result in creating a new user. Also, in certain circumstances, you can’t just ‘forget’ some of the users. Therefore, we have provided several flags that might be helpful.
This event is implemented in accordance with the GDPR requirements.
A developer must use this event in case a user doesn’t want their data to be sent and processed in the devtodev system.
When calling "ts" event with the parameter "isTrackingAllowed": false, it is a command to the server to delete all user’s personal data that has been collected by devtodev from this app and a command to block the collection of any data of this user in future.
The user will remain listed as an impersonal unit in previously aggregated metrics.
When sending a true value, the permission to block data collection is removed.
'POST' https://api.devtodev.com/stat/v1/?api=ak-npADyEmjxc0usQR52k6it38zUPSloGT7 with gzipped body:
An example of the implementation of a request to PHP with the use of Curl. The sending of real payment.
The error of JSON format
{
"error_message":"Wrong JSON format"
}
200
Package is received
200
The package is received, but there are errors found during the validation of events syntax.
The errors found are specified in an answer in the following format:
1.
{
"errors": {
"rg": {
"expected": "[timestamp]",
"received": [
"[timestamps]",
"[timestaTTmp]"
]
}
}
}
The message indicates that there have been received fields listed under the tag "received", but there are no fields that are listed under the tag "expected" among them. Such an event will not be processed.
2.
{
"errors": {
"rg": {
"expected": "[timestamp]",
"useless": [
"[timestamps]",
"[timestaTTmp]"
]
}
}
}
The message indicates that there have been received extra fields listed under the tag "useless", however, fields listed under the tag "expected" are enough. Such an event will be processed.
TW
IN
VK
VK
OK
Odnoklassniki
VB
Viber
PI
WP
Qzone
HTTP Code
State
413
Wrong size of the data package (exceeds the maximum)
400
API key is absent
401
Wrong API key
403
Administrative restrictions on data received from a client
400
The error of data unpacking
{
"error_message":"Wrong GZIP format"
}
EN
Evernote
RT
FB
RR
Renren
GM
Google Mail
TB
Tumblr
GP
For example:
Start playing
New level reached
New building
New ability
Quest completed
New item
Collection completed
Invitation
Asking for help
New Record
Achievement
URL sharing
Recommendation
Review
and so on...
400
Google+
{
"abcd1234abcd" : { // Main identifier (device or user ID)
"prev" : "asdf2345234asdf", // Previous main identifier (device or user ID)
// in case it has been changed
"userId":"", // Additional identifier (it is used if there is an identifier
// that is different from the main identifier.
// For example, a cross-platform user identifier)
"prevUserId":""; // Previous additional identifier in case it has been changed
"sc" :[ // Event name
{}, // Parameters of the first event
{}, // Parameters of the second event
…
],
"gs" :[ // Event name
{} // Event parameters
],
…
},
"1234abc1234" : { // Unique user ID
"userID":"", // Additional identifier (it is used if there is an identifier
// that is different from the main identifier.
"sc" :[ // Event name
{}, // Parameters of the first event
{}, // Parameters of the second event
…
],
"gs" :[ // Event name
{} // Event parameters
],
},
}"rf" : [
{
"timestamp" : 1386259227, // Required field! The date of registration
"publisher" : "", // Required field! The source from which a user came - the name of
// An advertising platform (advertising network)
"subpublisher" : "", // In case a platform is an aggregator - the name of a platform
// From which a user was resold
"subad" : "", // Specific banner from which a user came (for Facebook)
"subadgroup" : "", // The group of ads(for Facebook)
"subcampaign" : "", // The name of a campaign from which a user came
"subplacement" : "", // Banner placement - its position on a page
"subsite" : "", // Who placed a banner (an app/ a website where a banner is placed)
"country" : "US", // Required field! The country of a user (format ISO 3166-1 alpha-2)
"currencyCode" : "USD", // The currency of referral's cost (format ISO 4217)
"cost" : 9.99, // The cost of a referral in a specified currency
}
]"ui": [{
"timestamp": 1386259227,
"country": "GB", // The country of a user (format ISO 3166-1 alpha-2)
"language": "en", // The language of a user (format ISO 639-1 (1998)
"crossUid": "customuserid", // Custom user ID
"ip": "127.0.0.1", // IP
"carrier": "Beeline", // The name of a network operator
"isRooted": 0, // Rooted (jailbroken) device (1 - rooted)
"userAgent": "a lot of info" // Browser user-agent
}]"pl": [{
"data": {
"age": 21, //Reserved. User's age in years
"cheater": true, //Reserved. True, if a user is a cheater
//In case you have your own methods to detect
//cheaters, you can mark such users.
//Event records made by cheaters will be
//ignored when counting statistical metrics.
"tester": true, //Reserved. True, if a user is a tester
//Attention! This marker cannot be removed
//through the SDK (It can not be set to false
//after true).
//Event records made by testers will be
//ignored when counting statistical metrics.
"gender": 1, //Reserved. User's sex 0-unknown, 1-male, 2-female
"name": "John Doe", //Reserved. User's name
"email": "[email protected]", //Reserved. User's e-mail
"phone": "+15555555555", //Reserved. User's phone number
"photo": "http://google.com/pic.png", //Reserved. User's photo
//Custom characteristics of a user in a key-value format
"key1": "stringValue", //String value
"key2": 1.54, //Number value
"key3": [1, 2, "something"] //Array
},
"timestamp": 12313 //The date of data changes
}]
"pl": [{
"data": {
"key1": null, //Remove user's characteristic key1
"key2": null //Remove user's characteristic key2
},
"timestamp": 12313
}]"ai": [{
"timestamp": 1386259227,
"sdkVersion": "1.1", // Required. In case of communication via API,
// the version of implementation of a communication mechanism
"appVersion": "1.2", // App version
"codeVersion": 14.0, // Version of app's code
"bundleId": "com.myown.app" // App's bundle
}]"di" :[
{
"timestamp" : 1386259227,
"manufacturer" : "Apple", // The manufacturer of a device
"model" : "iPhone 4,1", // uname (iOS), MODEL (Android)
"screenResolution" : "1024x768", // The display's resolution of a device
"screenDpi" : 144, // The density of display's points
"odin" : "klflaiuewfuasydfiasydpf98ay4", // DeviceUniqueId SHA-1 (Windows Phone),
// AndroidId SHA-1 (Android)
"openUdid" : "f;isyofa7w8yp4fapw49", // OpenUDID ((Android, iOS, Windows phone)
"idfa" : "AYTSD-ADSYS-LAUSDY-IUAYSD", // Ad identifier IDFA (iOS)
"idfv" : "87ASD-9A7SD-AD2G-Q26EO-AS7D", // Device identifier within the vendor IDFV (iOS)
"d2dUdid" : "dsufyoa-sfa3wr-ra3rawQ2-AWR3A",// Base64 от DeviceUniqueId (Windows Phone) ,
// random by http:// www.ietf.org/rfc/rfc4122.txt (Android)
"imei" : "w87ea6owe7aow78eaow", // IMEI (Android)
"androidId" : "o8a7d6oa8s7b6doa87sb6d8bs", // AndroidID (Android)
"advertisingId" : "38400000-8cf0-11bd-b23e-10b96e40000d", // Advertising ID (Android, Windows phone 8.1)
"serialId" : "asd76asd9", // Hardware serial number (Android,Windows phone)
"deviceVersion": "8.1", // OS version
"deviceModel": "Windows" // The name of OS family
}
]"gs" : [
{
"timestamp" : 1386259227, // The date of session's start
"length" : 34, // The length of a session in seconds
"level" : 3, // Player's level
"inProgress" : ["village"]
},
…
]"rp": [
{
"name": "inapp_name_1", // The name of a purchase
"entries": [
{
"orderId": "124567.7654321",// Transaction identifier (max. 64 symbols)
"price": 1.99, // The price of a purchase in a transaction currency
"currencyCode": "USD", // Transaction currency(ISO 4217 format)
"timestamp": 1386259227, // The date of a transaction
"level": 3, // Player's level
"inProgress": ["village"] // Location (game level) in which an action has been performed
},{ //If there is one more identical purchase for a report period
"orderId": "1224567.7634327",
"price": 1.99,
"currencyCode": "USD",
"timestamp": 1386259227,
"level": 3,
"inProgress": ["village"]
}
]
},{ //If there are other purchases for a report period
"name": "inapp_name_2",
"entries": [
{
"orderId": "1234567.7654321",
"price": 9.99,
"currencyCode": "USD",
"timestamp": 1386259227,
"level": 3,
"inProgress": ["town"]
}
]
}
]"tr" : [
{
"step" : 1, // the number of a tutorial step that has been completed
"timestamp" : 1386259227, // date
"level" : 3, // player's level
"inProgress" : ["village"],// location (game level) in which an action has been performed
…
}
]"step" : -1 // The beginning of a tutorial(before completing the first step)
"step" : 0 // The tutorial is skipped
"step" : -2 // The tutorial is completed (instead of the last step's number)"ce" : [
{
"name" : "house_purchase", // The name of an event (max. 72 symbols)
"entries" : [
{
"t1" : 1231872631, // The date of an event
"level" : 3, // Player's level
"inProgress" : ["village"], // Location (game level) in which an action has been performed
"p" : {
"t1" : {
// up to 10 parameters grouped by data types
"double" : { // Parameters with values - in numbers
"key1" : 1, // The name of a parameter as a key(max. 32 symbols) and
// the value of a parameter
"key2" : 2.123,
…
},
"string" : { // Parameters with values - in strings
"key3" : "a", // The name of a parameter as a key(max. 32 symbols) and
// the value of a parameter (max. 255 symbols)
"key4" : "abc",
…
}
}
}
},
{ // If there are several events with the same name
"t1" : 1231872638,
"level" : 3,
"inProgress" : ["village"],
"p" : {
"t1" : {
"double" : {
"key1" : 1,
"key2" : 2.123,
…
},
"string" : {
"key3" : "a",
"key4" : "abc",
…
}
}
}
}
},
{ // If one user had several events with different names for
// a reporting period, continue
…
}
]"lu" : [
{
"level" : 10, // Required. The level that a player got
"timestamp" : 1386259227, // Required. The date of moving to the next level
"inProgress" : ["village"],// Location (game level)in which an action has been performed
"balance" : { // Optional. The balances of a game currency at the end of a level
"money1" : 123, // The name of a game currency as a key and its amount
"money2" : 11,
…
},
"spent" : { // Optional. The amount of a currency spent on a level
"money1" : 12, // The name of a game currency as a key and its amount
"money2" : 2,
"wood" : 12,
…
},
"earned" : { // Optional. The in-game currency that was earned on a level
"money1" : 8,
"money2" : 2,
"stone" : 1,
…
},
"bought" : { // Optional. The in-game currency that was bought on a level
"money1" : 10,
"money2" : 2,
…
}
},
…
]"ip" : [
{
"purchaseType" : "Weapon", // The group of an item (max. 96 symbols)
"purchaseId" : "Dagger", // The unique name or ID of an item (max. 32 symbols)
"purchaseAmount" : 1, // The amount of items bought
"purchasePrice" : 1.0, // The price of an item (the overall price of a purchase if there
// are several identical items are bought) in an in-game currency
"purchasePriceCurrency" : "Coins", // The name of an in-game currency that was used to buy
// an item (max. 24 symbols)
"timestamp" : 1231872631, // The date of a purchase
"level" : 3, // Player's level
"inProgress" : ["village"] // Location (game level) in which an action has been performed
},
{
"purchaseType" : "Weapon",
"purchaseId" : "Dagger",
"purchaseAmount" : 0,
"purchasePrice" : 2.0,
"purchasePriceCurrency" : "Gold",
"timestamp" : 1231872631,
"level" : 3,
"inProgress" : ["village"]
},
…
]"pe" : [
{
"id" : "location2", // The name of a location
"level" : 3, // Player's level at the moment of location completion
"params" : { // Event parameters
"source" : "location1", // The name of the previous location of a player
"difficulty" : 1, // Optional. The level of difficulty of location completion
"success" : true, // Success in location completion
"duration" : 180 // Optional. Time in seconds of location completion
},
"spent" : { // Optional. Resources spent during location completion
"money1" : 12, // The record of a resource in the format of
// resource's name - the amount of a resource
"money2" : 2,
"wood" : 12
},
"earned" : { // Optional. Resources that are received during location completion
"money1" : 8,
"money2" : 2,
"stone" : 1
},
"timestamp" : 1234567890 // The time of exit from a location
}
]"adrv": [{
"ad_network": "TestAdNetwork", //Name of the ad network responsible for the impression (from 1 to 100 symbols)
"revenue": 0.3434, //Reward for banner display in USD
"ad_unit": "TestAdUnit", //Banner name (from 1 to 100 symbols,optional)
"placement": "TestPlacement" //Banner placement (from 1 to 100 symbols, optional)
}]"sc" : [
{
"socialNetwork" : "FB", // The name of a social network. The value from the list
// of constants for popular networks or your own string name
"timestamp" : 1386259227, // The date of connection
"level" : 3, // Player's level
"inProgress" : ["village"]// Location (game level) in which an action has been performed
},
...
]"sp" : [
{
"socialNetwork" : "FB", // The name of a social network. The value from the list of
// constants for popular networks or your own string name
"postReason" : "levelup", // The reason of publication (max. 32 symbols). We recommend you
// to group reasons instead of sending such names as "Level 99 reached".
"timestamp" : 1386259227, // The date of publication
"level" : 3, // Player's level
"inProgress" : ["village"]// Location (game level)in which an action has been performed
},
...
]"wipe" : [
{
"saveRegistration": true, // Optional. A new user will inherit registration dates after
// an old user; a new user will not be registered by devtodev as
// the new one. It might be useful when you test your app.
"savePayingStatus": true, // Optional. Old user payment data will be copied into a new
// user card (number of payments, amounts and payment dates).
"saveCheaterTester": true, // Optional. cheater and tester labels will be copied into
// a new user card. It might be useful when you test your app.
"saveCustomProperties": true, // Optional. Old user custom fields and values from those fields
// will be copied into the new user card.
"timestamp" : 1234567890 // Optional. The time of exit from a location
}
]{
"JohnDoe": {
"prev": "LittleJohn",
"ts" : [{
"isTrackingAllowed": false,
"timestamp" : 1386259227
}]
}
}{
"JohnDoe": {
"prev": "LittleJohn",
"tr": [{
"step": 1,
"timestamp": 1386259227,
"level": 1,
"inProgress": ["village"]
}, {
"step": 2,
"timestamp": 1386259236,
"level": 1,
"inProgress": ["village"]
}, {
"step": 3,
"timestamp": 1386259288,
"level": 1,
"inProgress": ["town"]
}],
"gs": [{
"timestamp": 1386259227,
"length": 1250,
"level": 3
}],
"pl": [{
"data": {
"gender": 1
}
}],
"lu": [{
"level": 4,
"inProgress": ["village"],
"timestamp": 1442392006,
"balance": {
"Coins": 1234,
"Gold": 11
}
}],
"ce": [{
"name": "Round_finished",
"entries": [{
"t1": 1442392451,
"level": 4,
"inProgress": ["village"],
"p": {
"t1": {
"double": {
"Round_time": 83,
"Score": 2.123
},
"string": {
"Result": "Victory",
"Type": "Flawless"
}
}
}
}, {
"t1": 1442393455,
"level": 4,
"inProgress": ["town"],
"p": {
"t1": {
"double": {
"Round time": 102,
"Score": 1.5
},
"string": {
"Result": "Defeat",
"Type": "Shameful"
}
}
}
}]
}],
"pe": [{
"id": "town",
"level": 3,
"params": {
"source": "vilage",
"difficulty": 2,
"success": true,
"duration": 180
},
"spent": {
"Turns": 54,
"Boost Bomb": 1,
"Extra 5 Turns": 1
},
"earned": {
"Stars": 3,
"Score": 1200,
"Coins": 5
},
"timestamp": 1234567890
}],
"ip": [{
"purchaseType": "Weapon",
"purchaseId": "Dagger",
"purchaseAmount": 1,
"purchasePrice": 30.0,
"purchasePriceCurrency": "Coins",
"timestamp": 1442393479,
"level": 4,
"inProgress": ["village"]
}],
"rp": [{
"name": "Currency pack 1",
"entries": [{
"orderId": "1234567.7654321",
"inProgress": ["village"],
"level": 4,
"price": 1.99,
"currencyCode": "USD",
"timestamp": 1442393460
}]
}],
"sp": [{
"socialNetwork": "FB",
"postReason": "New level reached",
"level": 4,
"inProgress": ["village"],
"timestamp": 1442392006
}]
}
}$url = 'https://api.devtodev.com/stat/v1/?api='.$api;
$params = [
$uid=>[
'rp' =>[
[
'name' => $name,
'entries' =>[
[
'orderId' => $transactionId,
'price' => 100,
'currencyCode' => 'USD',
'timestamp' => time(),
'level'=> 5,
'inProgress'=> ['village']
]
]
]
]
]
];
$curlHandle = curl_init($url);
curl_setopt($curlHandle, CURLOPT_HTTPHEADER, array('Content-Type: text/plain;charset=UTF-8'));
curl_setopt($curlHandle, CURLOPT_RETURNTRANSFER, 1);
curl_setopt($curlHandle, CURLOPT_POST, TRUE);
curl_setopt($curlHandle, CURLOPT_USERAGENT, "Mozilla/4.0 (compatible;)");
curl_setopt($curlHandle, CURLOPT_POSTFIELDS, gzencode(json_encode($params)));
curl_setopt($curlHandle, CURLOPT_FOLLOWLOCATION, true);
curl_setopt($curlHandle, CURLOPT_ENCODING, 'gzip');
$response = curl_exec($curlHandle);This generation of SDK is deprecated and is no longer supported. Information about the current version can be found here.
In addition to basic methods, you can observe and change the user profiles data. A user profile is the set of properties describing the user, which can be divided into 4 groups:
Cross-platform or custom user identifier. If this identifier is not set by a developer, then the device identifier is used.
Automatically collected properties, including data about user's device, geography, app version, SDK, and some other data which can be received from SDK.
The default set of user properties, which can be set by a developer. The set of this parameters works with separate methods. This set includes the data of the user's name, sex, age, e-mail, phone number and URL of user picture. Also, this set includes the mark of a user as a cheater.
Custom set of user properties. In this case, a developer sets any user data he/she needs to know. The data is set in key-value format and can be numeric, string, array, or boolean. Each project can have up to 30 custom user properties.
Cross-platform or custom user identifier. If this identifier is not set by a developer, then the device identifier is used.
Automatically collected properties, including data about user's device, geography, app version, SDK, and some other data which can be received from SDK.
The default set of user properties, which can be set by a developer. The set of this parameters works with separate methods. This set includes the data of the user's name, sex, age, e-mail, phone number, and URL of user picture. Also, this set includes the mark of a user as a cheater.
Custom set of user properties. In this case, a developer sets any user data he/she needs to know. The data is set in key-value format and can be numeric, string, array, or boolean. Each project can have up to 30 custom user properties.
Cross-platform or custom user identifier. If this identifier is not set by developer, then the device identifier is used.
Automatically collected properties, including data about user's device, geography, app version, SDK, and some other data which can be received from SDK.
Default set of user properties, which can be set by developer. The set of this parameters works with separate methods. This set includes the data of user's name, sex, age, e-mail, phone-number and url of user picture. Also this set includes the mark of user as cheater.
Custom set of user properties. In this case developer sets any user data he/she needs to know. The data is set in key-value format and can be numeric, string, array or boolean. Each project can have up to 30 custom user properties.
Cross-platform or custom user identifier. If this identifier is not set by developer, then the identifier which was set during the initialization is used.
Automatically collected properties, including data about user's device, geography, app version, SDK, and some other data which can be received from SDK.
Basic set of user properties, which can be set by developer. The set of this parameters works with separate methods. This set includes the data of user's name, sex, age, e-mail, phone-number and url of user picture. Also this set includes the mark of user as cheater.
Custom set of user properties. In this case developer sets any user data he/she needs to know. The data is set in key-value format and can be numeric, string, array or boolean. Each project can have up to 30 custom user properties.
Cross-platform or custom user identifier. If this identifier is not set by developer, then the device identifier is used.
Automatically collected properties, including data about user's device, geography, app version, SDK, and some other data which can be received from SDK.
Default set of user properties, which can be set by developer. The set of this parameters works with separate methods. This set includes the data of user's name, sex, age, e-mail, phone-number and url of user picture. Also this set includes the mark of user as cheater.
Custom set of user properties. In this case developer sets any user data he/she needs to know. The data is set in key-value format and can be numeric, string, array or boolean. Each project can have up to 30 custom user properties.
You can segment users by all the properties in My Apps section of an application.
This method is used for user initialization in the applications that are the parts of cross-platform project.
We recommend you to apply this method before the SDK initialization, otherwise the user identifier from the previous session will be used since the SDK initialization moment till the setUserID method call.
If your cross-platform application is supposed to be used without cross-platform authorization, don't use the setUserID method or use the empty string ("") as the user identifier. SDK will assign the unique identifier to user. This identifier will be used until the real cross-platform identifier is assigned to the user.
If your application allows user to re-login (changing the user during the working session of the application), then the setUserID method should be called just after the authorization. You don't need to call the SDK initialization one more time.
To see which identifier is used at the moment:
If it is possible to replace the user identifier in your application (for example, to make changes in the login/user id for a particular user), use this method at the moment of replacing the identifier.
Don't use this method if you're going to perform the user's re-login.
If it is possible to replace the user identifier in your application (say, to make changes in the login/user id for particular user), use this method at the moment of replacing the identifier.
This method is used in cross-platform applications and applications with data synchronization.
This method is required for user's level data initialization. We recommend you to use the setCurrentLevel method just after the user initialization (using the setUserID method).
Don't use the setCurrentLevel method at the moment of user's level up. We recommend you to use the levelUp method in this case.
This method is used in cross-platform applications and applications with data synchronization.
This method is required for user's level data initialization. We recommend you to use the setCurrentLevel method just after the user initialization (using the
In case you have your own methods of determining cheaters in the application, you can have such users marked. Payments made by them will not be taken into account in the statistics.
Blueprint
User's name. Default user profile property.
We strongly recommend not to use this property because it refers to .
Blueprint
--
User's age in years. Default user profile property.
We strongly recommend not to use this property because it refers to .
Blueprint
User's gender. Default user profile property.
We strongly recommend not to use this property because it refers to .
Blueprint
User's e-mail. Default user profile property.
We strongly recommend not to use this property because it refers to .
Blueprint
User's phone. Default user profile property.
We strongly recommend not to use this property because it refers to .
Blueprint
User's photo URL. Default user profile property.
We strongly recommend not to use this property because it refers to .
Blueprint
Each project in devtodev can have up to 30 custom user properties.Here is how you can set properties on the current user profile:
Attention! We strongly recommend that you do not use these properties to transfer and store data that fits the definition of !
Blueprint
Increments the given numeric properties by the given values.
Blueprint
Adds values to a list-valued property. If the property does not currently exist, it will be created with the given list as it's value. If the property exists and is not list-valued, the append will be ignored.
Adds values to a list-valued property only if they are not already present in the list. If the property does not currently exist, it will be created with the given list as it's value. If the property exists and is not list-valued, the union will be ignored.
Removes a property or a list of properties and their values from the current user's profile.
Blueprint
Blueprint
Code
This method is used for user initialization in the applications which are the parts of cross-platform project.
We recommend you to apply this method before the SDK initialization, otherwise the user identifier from the previous session will be used since the SDK initialization moment till the setUserID method call.
If your cross-platform application supposes to be used without cross-platform authorization, don't use the setUserID method or use the empty string ("") as the user identifier. SDK will assign the unique identifier to user. This identifier will we used until the real cross-platform identifier assigns to the user.
If your application allows user to re-login (changing the user during the working session of application), then the setUserID method should be called just after the authorization. You don't need to call the SDK initialization one more time.
/**
* Initializes the user with the specified cross-platform identifier
* @param String userId - unique cross-platform user ID used
* for user identification on your server.
*/
DevToDev.setUserId(String userId);To see which identifier is used at the moment:
/**
* Returns current cross-platform user id
* @return userId - current cross-platform user id (or null, if sdk not initialized)
*/
DevToDev.getUserId();This method is used for user initialization in the applications which are the parts of cross-platform project.
We recommend you to apply this method before the SDK initialization, otherwise the user identiticator from the previous session will be used since the SDK initialization moment till the UserID property call.
If your cross-platform application supposes to be used without cross-platform authorization, don't use the UserID property or use the empty string ("") as the user identifier. SDK will assign the unique identifier to user. This identifier will we used until the real cross-platform identifier assigns to the user.
If your application allows user to re-login (changing the user during the working session of application), then the UserID property should be called just after the authorization. You don't need to call the SDK initialization one more time.
This property also allows you to see which identifier is used at the moment.
This method is used for user initialization in the applications which are the parts of cross-platform project. You also can use this identifier in non-crossplatform projects, but in your app the own unique user identifier is used.
We recommend you to apply this method before the SDK initialization, otherwise the user identifier from the previous session will be used since the SDK initialization moment till the setCrossplatformUserId method call.
If your cross-platform application supposes to be used without cross-platform authorization, don't use the setCrossplatformUserId method or use the empty string ("") as the user identifier. SDK will assign the unique identifier to user. This identifier will be used until the real cross-platform identifier assigns to the user.
If your application allows user to re-login (changing the user during the working session of application), then the setCrossplatformUserId method should be called just after the authorization. You don't need to call the SDK initialization one more time.
To see which identifier is used at the moment:
This method is used for user initialization in the applications which are the parts of cross-platform project.
We recommend you to apply this method before the SDK initialization, otherwise the user identifier from the previous session will be used since the SDK initialization moment till the UserID property call.
If your cross-platform application supposes to be used without cross-platform authorization, don't use the UserID property or use the empty string ("") as the user identifier. SDK will assign the unique identifier to user. This identifier will we used until the real cross-platform identifier assigns to the user.
If your application allows user to re-login (changing the user during the working session of application), then the UserID property should be called just after the authorization. You don't need to call the SDK initialization one more time.
This property also allows you to see which identifier is used at the moment.
This method is used for user initialization in the applications which are the parts of cross-platform project.
We recommend you to apply this method before the SDK initialization, otherwise the user identifier from the previous session will be used since the SDK initialization moment till the setUserID method call.
If your cross-platform application supposes to be used without cross-platform authorization, don't use the setUserID method or use the empty string ("") as the user identifier. SDK will assign the unique identifier to user. This identifier will we used until the real cross-platform identifier assigns to the user.
If your application allows user to re-login (changing the user during the working session of application), then the setUserID method should be called just after the authorization. You don't need to call the SDK initialization one more time.
To see which identifier is used at the moment:
This method is used for user initialization in the applications which are the parts of cross-platform project.
We recommend you to apply this method before the SDK initialization, otherwise the user identifier from the previous session will be used since the SDK initialization moment till the setUserID method call.
If your cross-platform application supposes to be used without cross-platform authorization, don't use the setUserID method or use the empty string ("") as the user identifier. SDK will assign the unique identifier to user. This identifier will we used until the real cross-platform identifier assigns to the user.
If your application allows user to re-login (changing the user during the working session of application), then the setUserID method should be called just after the authorization. You don't need to call the SDK initialization one more time.
Blueprint
Code
To see which identifier is used at the moment:
Blueprint
Code
If it is possible to replace the user identifier in your application (say, to make changes in the login/user id for particular user), use this method at the moment of replacing the identifier.
Don't use this method if you're going to perform the user's re-login.
If it is possible to replace the cross-platform user identifier in your application (say, to make changes in the login/user id for particular user), use this method at the moment of replacing the identifier.
Don't use this method if you're going to perform the user's re-login.
If it is possible to replace the user identifier in your application (say, to make changes in the login/user id for particular user), use this method at the moment of replacing the identifier.
Don't use this method if you're going to perform the user's re-login.
If it is possible to replace the user identifier in your application (say, to make changes in the login/user id for particular user), use this method at the moment of replacing the identifier.
Don't use this method if you're going to perform the user's re-login.
If it is possible to replace the user identifier in your application (say, to make changes in the login/user id for particular user), use this method at the moment of replacing the identifier.
Don't use this method if you're going to perform the user's re-login.
If it is possible to replace the user identifier in your application (say, to make changes in the login/user id for particular user), use this method at the moment of replacing the identifier.
Don't use this method if you're going to perform the user's re-login.
Blueprint
Field
Type
Code
Don't use the setCurrentLevel method at the moment of user's level up. We recommend you to use the levelUp method in this case.
This method is used in cross-platform applications and applications with data synchronization.
This method is required for user's level data initialization. We recommend you to use the SetCurrentLevel method just after the user initialization (using the UserID method).
Don't use the SetCurrentLevel method at the moment of user's level up. We recommend you to use the levelUp method in this case.
If your app uses the user's level mark, we recommend to use this method after every SDK initialization, as soon as data of user's level is available to the application.
This method is used in cross-platform applications and applications with data synchronization.
This method is required for user's level data initialization. We recommend you to use the SetCurrentLevel method just after the user initialization (using the UserID method).
Don't use the SetCurrentLevel method at the moment of user's level up. We recommend you to use the levelUp method in this case.
This method is used in cross-platform applications and applications with data synchronization.
This method is required for user's level data initialization. We recommend you to use the setCurrentLevel method just after the user initialization (using the setUserID method).
Don't use the setCurrentLevel method at the moment of user's level up. We recommend you to use the levelUp method in this case.
This method is used in cross-platform applications and applications with data synchronization.
This method is required for user's level data initialization. We recommend you to use the setCurrentLevel method just after the user initialization (using the setUserID method).
Don't use the setCurrentLevel method at the moment of user's level up. We recommend you to use the levelUp method in this case.
Blueprint
Code
isCheater
bool
True if user is a cheater
Code
FString
User's name
Code
Age
int32
User's age in years
Code
Gender
FString
User's gender ('male', 'female', 'unknown')
Code
FString
User's e-mail
Code
Phone
FString
User's phone
Code
Photo
FString
User's photo URL.
Code
Attributes
TArray<FAnalyticsEventAttr>
Key-value array to set custom property, where key is a user property name, value is a property value
Code
Attributes
TArray<FAnalyticsEventAttr>
Key-value array, where key is a user property name, value is increment step
Code
Attributes
TArray<FString>
An array of property names to be removed.
Code
Field
Type
Description
Field
Type
Description
Field
Type
Description
Field
Type
Description
Field
Type
Description
Field
Type
Description
Field
Type
Description
Field
Type
Description
Field
Type
Description
Field
Type
Description
/**
* Initializes the user with the specified cross-platform identifier
* @param NSString userId - unique cross-platform user ID used
* for user identification on your server.
*/
[DevToDev setUserId: (NSString *) userId];/**
* Returns current cross-platform user id
* @return userId - current cross-platform user id
*/
[DevToDev getUserId];Name
The event is used for individual tracking of ad revenue on user devices. The method is used if there are CPI data available on the client device (they can be obtained from the ad network SDK).
The event is used to track connections to social media channels.
Use the following constants to specify a social network:
.facebook, .vkontakte , .twitter, .googleplus, .whatsapp, .viber, .evernote, .googlemail, .linkedin, .pinterest, .qzone, .reddit, .renren, .tumblr
Or create an object with the desired social media name.
Use the following constants to specify a social network:
.facebook, .vkontakte , .twitter, .googleplus, .whatsapp, .viber, .evernote, .googlemail, .linkedin, .pinterest, .qzone, .reddit, .renren, .tumblr
Or create an object with the desired social media name.
Track social media posts and analyze their effectiveness and virality. Pass the event after the post has been approved by social media.
If you have referral information, you can pass it using the following method:
To send an event packet before it is full (10 events, by default) or before the end of the period of its formation (2 minutes, by default), you can use immediate dispatch.
For example:
This method denies/allows tracking of user data and also implements the right to be forgotten in accordance with the requirements of the GDPR.
When this method is called with the 'false' value, the SDK sends a command to the server to delete all personal user data that was collected by devtodev in this application, blocking further user data collection.
The user will remain in the devtodev system only as an impersonal unit in the previously aggregated metrics.
If it is set to ‘true', tracking can be enabled again. In this case, the user will be considered new.
To enable/disable user tracking by the devtodev system. Bool type.
Get device ID. String type.
Get the version of the integrated devtodev SDK. String type.
Retrieving the saved state of the user tracking permission by the devtodev system. See “Setting User Tracking Status”. Bool type.
devtodev ID is the primary numeric identifier for the device/user account in the devtodev database. Using devtodev ID, you are sure to find the user in devtodev.
The identifier will be received from the server some time after the initialization of the SDK.
If you have set counting by users, a separate devtodev id will be issued for each device user.
To obtain the devtodev ID, you need to pass the listener to DTDAnalytics:
The delegate must implement the func didReceiveDevtodevId(with devtodevId: Int)
The didReceiveDevtodevId method will be called with every ID change on the server side.
To obtain the devtodev ID, you need to pass the listener to DTDAnalytics:
The delegate must implement the
To receive a callback when the SDK initialization is complete, you can use a method that will implement the initialization callback. When the SDK completes the initialization, the callback will be called on the main application thread.
/**
* Initializes the user with the specified cross-platform identifier
* property allows to get and to set unique cross-platform user ID used
* for user identification on your server.
*/
DevToDev.SDK.UserId = userId;/**
* Initializes the user with the specified cross-platform identifier
* @param {string} crossplatformUserId - unique cross-platform user ID used
* for user identification on your server.
*/
devtodev.setCrossplatformUserId(crossplatformUserId);/**
* Returns current cross-platform user id
* @return crossPlatformUserId - current cross-platform user id
*/
devtodev.getCrossplatformUserId();/// <summary>
/// Initializes the user with the specified cross-platform identifier
/// property allows to get and to set unique cross-platform user ID used
/// for user identification on your server.</summary>
DevToDev.Analytics.UserId = userId;/**
* Initializes the user with the specified cross-platform identifier
* @param NSString userId - unique cross-platform user ID used
* for user identification on your server.
*/
[DevToDev setUserId: (NSString *) userId];/**
* Returns current cross-platform user id
* @return userId - current cross-platform user id
*/
[DevToDev getUserId];/**
* Initializes the user with the specified cross-platform identifier
* @param userId - unique cross-platform user ID used for user identification on your server.
*/
DevToDev.setUserId(userId:String);/**
* Returns current cross-platform user id
* @return userId - current cross-platform user id (string or null, if sdk not initialized)
*/
DevToDev.getUserId();/**
* Replaces current cross-platform user id
* Attention! Don't use this method if you're going to perform the user's relogin.
* <param name="prevUserId">Old user identifier</param>
* <param name="userId">New user identifier</param>
*/
DevToDev.SDK.ReplaceUserId(string prevUserId, string userId);/**
* Replaces current cross-platform user id
* Attention! Don't use this method if you're going to perform the user's relogin.
* @param {string} newCrossPlatformID - new cross-platform user ID
*/
devtodev.replaceCrossplatformUserId(newCrossPlatformID);/// <summary> Replaces current cross-platform user id.
/// Attention! Don't use this method if you're going to perform the user's relogin.</summary>
/// <param name="prevUserId"> Old user identifier </param>
/// <param name="userId"> New user identifier </param>
DevToDev.Analytics.ReplaceUserId(string prevUserId, string userId);/**
* Replaces current cross-platform user id
* Attention! Don't use this method if you're going to perform the user's relogin.
* @param NSString prevUserId - previous cross-platform user ID
* @param NSString userId - new cross-platform user ID
*/
[DevToDev replaceUserId: (NSString *) prevUserId to: (NSString *) userId];/**
* Replaces current cross-platform user id
* Attention! Don't use this method if you're going to perform the user's relogin.
* @param prevUserId - previous cross-platform user ID
* @param userId - new cross-platform user ID
*/
DevToDev.replaceUserId(prevUserId:String, userId:String);/**
* Initializes the current user level. Required if level feature used in the app.
* <param name="level">Current game level of the player</param>
*/
DevToDev.SDK.SetCurrentLevel(int level);/**
* Initializes the current user level. Required if level feature used in the app.
* @param {number} currentUserLevel - current game level of the player.
*/
devtodev.setCurrentLevel(currentUserLevel);/// <summary> Initializes the current user level. Required if level feature used in the app. </summary>
/// <param name="level"> current game level of the player </param>
DevToDev.Analytics.SetCurrentLevel(int level);/**
* Initializes the current user level. Required if level feature used in the app.
* @param NSUInteger level - current game level of the player.
*/
[DevToDev setCurrentLevel: (NSUInteger) level];/**
* Initializes the current user level. Required if level feature used in the app.
* @param level - current game level of the player.
*/
DevToDev.setCurrentLevel(level:int);/**
* Replaces current cross-platform user id
* Attention! Don't use this method if you're going to perform the user's relogin.
* @param NSString prevUserId - previous cross-platform user ID
* @param NSString userId - new cross-platform user ID
*/
[DevToDev replaceUserId: (NSString *) prevUserId to: (NSString *) userId];/**
* Initializes the current user level. Required if level feature used in the app.
* @param NSUInteger level - current game level of the player.
*/
[DevToDev setCurrentLevel: (NSUInteger) level];/**
* Mark user if it's cheater.
* @param BOOL isCheater - true if user is a cheater
*/
DevToDev.activeUser.cheater = isCheater;/**
* Mark user if it's cheater.
* @param boolean isCheater - true if user is a cheater
*/
DevToDev.getActivePlayer().setCheater(boolean isCheater);/**
* Mark user if it's cheater.
* <param name="isCheater">true if user is a cheater</param>
*/
DevToDev.SDK.ActiveUser.SetCheater(boolean isCheater);/**
* Mark user if it's cheater.
* @param {boolean} isCheater - true if user is a cheater
*/
devtodev.user.cheater(isCheater);/// <summary> Mark user if it's cheater. </summary>
/// <param name="isCheater"> true if user is a cheater </param>
DevToDev.Analytics.ActiveUser.Cheater = isCheater;/**
* Mark user if it's cheater.
* @param BOOL isCheater - true if user is a cheater
*/
DevToDev.activeUser.cheater = isCheater;/**
* Mark user if it's cheater.
* @param isCheater - true if user is a cheater
*/
DevToDev.getActiveUser().SetCheater(isCheater:Boolean);/**
* Track user's name
* @param NSString name - User's name.
*/
DevToDev.activeUser.name = name;/**
* Track user's name
* @param String name - User's name
*/
DevToDev.getActivePlayer().setName(String name);/**
* Track user's name
* <param name="name">User's name</param>
*/
DevToDev.SDK.ActiveUser.SetName(string name);/**
* Track user's name
* @param {string} name - User's name.
*/
devtodev.user.name(name);/// <summary> Track user's name </summary>
/// <param name="name"> User's name </param>
DevToDev.Analytics.ActiveUser.Name = name;/**
* Track user's name
* @param NSString name - User's name.
*/
DevToDev.activeUser.name = name;/**
* Track user's name
* @param name - User's name.
*/
DevToDev.getActiveUser().SetName(name:String);/**
* Track user's age
* @param NSNumber age - User's age
*/
DevToDev.activeUser.age = age;/**
* Track user's age
* @param int age - User's age
*/
DevToDev.getActivePlayer().setAge(int age);/**
* Track user's age
* <param name="age">User's age</param>
*/
DevToDev.SDK.ActiveUser.SetAge(int age);/**
* Track user's age
* @param {number} age - User's age.
*/
devtodev.user.age(age);/// <summary> Track user's age </summary>
/// <param name="age"> User's age </param>
DevToDev.Analytics.ActiveUser.Age = age;/**
* Track user's age
* @param NSNumber age - User's age
*/
DevToDev.activeUser.age = age;/**
* Track user's age
* @param age - User's age in years
*/
DevToDev.getActiveUser().SetAge(age:int);/**
* Track user's
* @param DTDGender gender - User's gender. (Unknown, Male, Female).
*/
DevToDev.activeUser.gender = gender;/**
* Track user's gender
* @param Gender gender - User's gender. (Unknown, Male, Female).
*/
DevToDev.getActivePlayer().setGender(Gender gender);/**
* Track user's gender.
* <param name="gender">User's gender. (Unknown, Male, Female)</param>
*/
DevToDev.SDK.ActiveUser.SetGender(DevToDev.Gender gender);/**
* Track user's gender
* @param {number} gender - User's gender. (0 - Unknown, 1 - Male, 2 - Female).
*/
devtodev.user.gender(gender);/// <summary> Track user's gender </summary>
/// <param name="gender"> User's gender. (Unknown, Male, Female) </param>
DevToDev.Analytics.ActiveUser.Gender = gender;/**
* Track user's
* @param DTDGender gender - User's gender. (Unknown, Male, Female).
*/
DevToDev.activeUser.gender = gender;/**
* Track user's
* @param gender - User's gender. (Unknown == 0, Male == 1, Female == 2).
*/
DevToDev.getActiveUser().SetGender(gender:int);/**
* Track user's e-mail
* @param NSString email - User's e-mail.
*/
DevToDev.activeUser.email = email;/**
* Track user's e-mail
* @param String email - User's e-mail.
*/
DevToDev.getActivePlayer().setEmail(String email);/**
* Track user's e-mail
* <param name="email">User's e-mail</param>
*/
DevToDev.SDK.ActiveUser.SetEmail(string email);/**
* Track user's e-mail
* @param {string} email - User's e-mail.
*/
devtodev.user.email(email);/// <summary> Track user's e-mail </summary>
/// <param name="email"> User's e-mail </param>
DevToDev.Analytics.ActiveUser.Email = email;/**
* Track user's e-mail
* @param NSString email - User's e-mail.
*/
DevToDev.activeUser.email = email;/**
* Track user's e-mail
* @param email - User's e-mail.
*/
DevToDev.getActiveUser().SetEmail(email:String);/**
* Track user's phone number
* @param NSString phoneNumber - User's phone number.
*/
DevToDev.activeUser.phone = phoneNumber;/**
* Track user's phone number
* @param String phoneNumber - User's phone number.
*/
DevToDev.getActivePlayer().setPhone(String phoneNumber);/**
* Track user's phone number
* <param name="phoneNumber">User's phone number</param>
*/
DevToDev.SDK.ActiveUser.SetPhone(string phoneNumber);/**
* Track user's phone number
* @param {string} phone_number - User's phone number.
*/
devtodev.user.phone(phone_number);/// <summary> Track user's phone number </summary>
/// <param name="phoneNumber"> User's phone number </param>
DevToDev.Analytics.ActiveUser.Phone = phoneNumber;/**
* Track user's phone number
* @param NSString phoneNumber - User's phone number.
*/
DevToDev.activeUser.phone = phoneNumber;/**
* Track user's phone number
* @param phoneNumber - User's phone number.
*/
DevToDev.getActiveUser().SetPhone(phoneNumber:String);/**
* Track user's photo URL
* @param NSString photoUrl - User's photo URL.
*/
DevToDev.activeUser.photo = photoUrl;/**
* Track user's photo URL
* @param String photoUrl - User's photo url.
*/
DevToDev.getActivePlayer().setPhoto(String photoUrl);/**
* Track user's photo URL
* <param name="photoUrl">User's photo url</param>
*/
DevToDev.SDK.ActiveUser.SetPhoto(string photoUrl);/**
* Track user's photo URL
* @param {string} photo_url - User's phone number.
*/
devtodev.user.photo(photo_url);/// <summary> Track user's photo URL </summary>
/// <param name="photoUrl"> User's photo url </param>
DevToDev.Analytics.ActiveUser.Photo = photoUrl;/**
* Track user's photo URL
* @param NSString photoUrl - User's photo URL.
*/
DevToDev.activeUser.photo = photoUrl;/**
* Track user's photo URL
* @param photoUrl - User's photo url.
*/
DevToDev.getActiveUser().SetPhoto(photoUrl:String);/**
* Set properties on a user data.
*
* ### Usage:
* [DevToDev.activeUser setUserDataWithKey:@"Hair color" andValue: @"copper red"];
* properties can have string, integer, date or list type
*
* @param NSString key - the name of the property
* @param {*} value - a value to set on the given property
*/
[DevToDev.activeUser setUserDataWithKey: (NSString *) key andValue: (id) value];
/**
* Set multiple properties at once
*
* ### Usage:
* [DevToDev.activeUser setUserData:@{
* @"Hair color" : @"blonde",
* @"Last payment" : 100,
* @"Last order" : @[
* @"Coloring",
* @"Hair Straightening"
* ],
* @"Order date" : [NSDate date]
* }];
* properties can have string, integer, date or list type
*
* @param NSDictionary userData - an associative array of names and values.
*/
[DevToDev.activeUser setUserData: (NSDictionary *) userData];/**
* Set properties on a user data.
*
* ### Usage:
* DevToDev.getActivePlayer().setUserData("Hair color", "copper red");
* properties can have String, Number or Collection type
*
* @param String key - the name of the property
* @param {*} value - a value to set on the given property
*/
DevToDev.getActivePlayer().setUserData(String key, Object value);
/**
* Set multiple properties at once
*
* ### Usage:
* final Map<String, Object> userData = new HashMap<String, Object>();
* userData.put("Hair color", "blonde");
* userData.put("Last payment", 100);
* final List<Object> lastOrder = new ArrayList<Object>();
* lastOrder.add("Coloring");
* lastOrder.add("Hair Straightening");
* userData.put("Last order", lastOrder);
* DevToDev.getActivePlayer().setUserData(userData);
* properties can have String, Number or Collection type
*
* @param Map<String, Object> userData - an associative array of names and values.
*/
DevToDev.getActivePlayer().setUserData(final Map<String, Object> userData);/**
* Set properties on a user data.
*
* ### Usage:
* DevToDev.SDK.ActiveUser.SetUserData("Hair color", "copper red");
* properties can have string, int, double or List<object> type
*
* <param name="key">property name</param>
* <param name="value">a value to set on the given property</param>
*/
DevToDev.SDK.ActiveUser.SetUserData(string key, object value);
/**
* Set multiple properties at once
*
* ### Usage:
* Dictionary<string, object> userData = new Dictionary<string, object>();
* userData.Add("Hair color", "blonde");
* userData.Add("Last payment", 100);
* List<object> lastOrder = List<object>();
* lastOrder.Add("Coloring");
* lastOrder.Add("Hair Straightening");
* userData.Add("Last order", lastOrder);
* DevToDev.SDK.ActiveUser.SetUserData(userData);
* properties can have string, int, double or List<object> type
*
* <param name="userData">an associative array of names and values</param>
*/
DevToDev.SDK.ActiveUser.SetUserData(Dictionary<string, object> userData);/*
* Set properties on a user data.
*
* ### Usage:
* devtodev.user.set('Hair color', 'copper red');
*
* // to set multiple properties at once
* devtodev.user.set({
* 'Hair color': 'blonde',
* 'Last payment': 100,
* 'Last order': ['Coloring','Hair Straightening'],
* 'Order date': new Date()
* });
* // properties can be strings, integers, dates, or lists
*
* @param {Object|String} prop If a string, this is the name of the property. If an object, this is an associative array of names and values.
* @param {*} [val] A value to set on the given property
*/
devtodev.user.set(prop, val);/// <summary> Set properties on a user data. </summary>
/// <example> Usage:
///
/// DevToDev.Analytics.ActiveUser.SetUserData("Hair color", "copper red");
/// //properties can have string, int, double or List<object> type
///
/// </example>
/// <param name="key">property name</param>
/// <param name="value">a value to set on the given property</param>
DevToDev.Analytics.ActiveUser.SetUserData(string key, object value);
/// <summary> Set multiple properties at once. </summary>
/// <example> Usage:
///
/// Dictionary<string, object> userData = new Dictionary<string, object>();
/// userData.Add("Hair color", "blonde");
/// userData.Add("Last payment", 100);
/// List<object> lastOrder = List<object>();
/// lastOrder.Add("Coloring");
/// lastOrder.Add("Hair Straightening");
/// userData.Add("Last order", lastOrder);
/// DevToDev.Analytics.ActiveUser.SetUserData(userData);
/// //properties can have string, int, double or List<object> type
///
/// </example>
/// <param name="userData">an associative array of names and values</param>
DevToDev.Analytics.ActiveUser.SetUserData(Dictionary<string, object> userData);/**
* Set properties on a user data.
*
* ### Usage:
* [DevToDev.activeUser setUserDataWithKey:@"Hair color" andValue: @"copper red"];
* properties can have string, integer, date or list type
*
* @param NSString key - the name of the property
* @param {*} value - a value to set on the given property
*/
[DevToDev.activeUser setUserDataWithKey: (NSString *) key andValue: (id) value];
/**
* Set multiple properties at once
*
* ### Usage:
* [DevToDev.activeUser setUserData:@{
* @"Hair color" : @"blonde",
* @"Last payment" : 100,
* @"Last order" : @[
* @"Coloring",
* @"Hair Straightening"
* ],
* @"Order date" : [NSDate date]
* }];
* properties can have string, integer, date or list type
*
* @param NSDictionary userData - an associative array of names and values.
*/
[DevToDev.activeUser setUserData: (NSDictionary *) userData];/**
* Set properties on a user data.
* ### Usage:
* DevToDev.getActiveUser().SetUserData("Hair color", "copper red");
* properties can have String, Number or Array type
*
* @param key - the name of the property
* @param value - a value to set on the given property
*/
DevToDev.getActiveUser().SetUserData(key:String, value:Object);
/**
* Set multiple properties at once
*
* ### Usage:
* var userData:Dictionary = new Dictionary();
* userData["Hair color"] = "blonde";
* userData["Last payment"] = 100;
* var lastOrder:Array = new Array();
* lastOrder.push("Coloring");
* lastOrder.push("Hair Straightening");
* userData["Last order"] = lastOrder;
* DevToDev.getActiveUser().SetUserDataMany(userData);
* properties can have String, Number or Collection type
*
* @param userData - an associative array of names and values.
*/
DevToDev.getActiveUser().SetUserDataMany(userData:Dictionary);/**
* Increments or decrements numeric user's properties.
* ### Usage:
* [DevToDev.activeUser incrementWithKey: @"Rounds played" andValue: 1];
*
* // to decrement a counter, pass a negative number
* [DevToDev.activeUser incrementWithKey: @"Rounds played" andValue: -1];
*
* @param NSString key - the name of the property
* @param NSNumber value - an amount to increment the given property
*/
[DevToDev.activeUser incrementWithKey: (NSString *) key andValue: (id) value];
/**
* Increments or decrements multiple numeric user's properties at once.
* ### Usage:
* [DevToDev.activeUser increment: @{
* @"Rounds played" : 1,
* @"Enemies killed" : 6
* }];
*
* @param NSDictionary values - an associative array of property names and numeric values.
*/
[DevToDev.activeUser increment: (NSDictionary *) values];/**
* Increments or decrements numeric user's properties.
* ### Usage:
* DevToDev.getActivePlayer().increment("Rounds played", 1);
*
* // to decrement a counter, pass a negative number
* DevToDev.getActivePlayer().increment("Rounds played", -1);
*
* @param String key - the name of the property
* @param Number value - an amount to increment the given property
*/
DevToDev.getActivePlayer().increment(String key, Number value);
/**
* Increments or decrements multiple numeric user's properties at once.
* ### Usage:
* final Map<String, Number> data = new HashMap<String, Number>();
* data.put("Rounds played", 1);
* data.put("Enemies killed", 6);
* DevToDev.getActivePlayer().increment(data);
*
* @param Map<String, Number> values - an associative array of property names and numeric values.
*/
DevToDev.getActivePlayer().increment(final Map<String, Number> data);/**
* Increments or decrements numeric user's properties.
* ### Usage:
* DevToDev.SDK.ActiveUser.Increment("Rounds played", 1);
*
* // to decrement a counter, pass a negative number
* DevToDev.SDK.ActiveUser.Increment("Rounds played", -1);
*
* <param name="key">property name</param>
* <param name="value">an amount to increment the given property(int or double)</param>
*/
DevToDev.SDK.ActiveUser.Increment(string key, object value);
/**
* Increments or decrements multiple numeric user's properties at once.
* ### Usage:
* Dictionary<string, object> data = new Dictionary<string, object>();
* data.Add("Rounds played", 1);
* data.Add("Enemies killed", 6);
* DevToDev.SDK.ActiveUser.Increment(data);
*
* <param name="values">an associative array of property names and numeric(int, double) values</param>
*/
DevToDev.SDK.ActiveUser.Increment(Dictionary<string, object> values);/*
* Increments or decrements numeric user's properties.
* ### Usage:
* devtodev.user.increment('Rounds played', 1);
* // or if you're just incrementing a counter by 1, you can simply do
* devtodev.user.increment('Rounds played');
*
* // to decrement a counter, pass a negative number
* devtodev.user.increment('Rounds played', -1);
*
* // you can increment multiple properties at once:
* devtodev.user.increment({
* 'Rounds played': 1,
* 'Enemies killed': 6
* });
* @param {Object|String} prop If a string, this is the name of the property. If an object, this is an associative array of names and numeric values.
* @param {Number} [val] An amount to increment the given property
*/
devtodev.user.increment(prop, val);/// <summary> Increments or decrements numeric user's properties.</summary>
/// <example> Usage:
///
/// DevToDev.Analytics.ActiveUser.Increment("Rounds played", 1);
/// //to decrement a counter, pass a negative number
/// DevToDev.Analytics.ActiveUser.Increment("Rounds played", -1);
///
/// </example>
/// <param name="key">property name</param>
/// <param name="value">an amount to increment the given property(int or double)</param>
DevToDev.Analytics.ActiveUser.Increment(string key, object value);
/// <summary> Increments or decrements multiple numeric user's properties at once.</summary>
/// <example> Usage:
///
/// Dictionary<string, object> data = new Dictionary<string, object>();
/// data.Add("Rounds played", 1);
/// data.Add("Enemies killed", 6);
/// DevToDev.Analytics.ActiveUser.Increment(data);
///
/// </example>
/// <param name="values">an associative array of property names and numeric(int, double) values</param>
DevToDev.Analytics.ActiveUser.Increment(Dictionary<string, object> values);/**
* Increments or decrements numeric user's properties.
* ### Usage:
* [DevToDev.activeUser incrementWithKey: @"Rounds played" andValue: 1];
*
* // to decrement a counter, pass a negative number
* [DevToDev.activeUser incrementWithKey: @"Rounds played" andValue: -1];
*
* @param NSString key - the name of the property
* @param NSNumber value - an amount to increment the given property
*/
[DevToDev.activeUser incrementWithKey: (NSString *) key andValue: (id) value];
/**
* Increments or decrements multiple numeric user's properties at once.
* ### Usage:
* [DevToDev.activeUser increment: @{
* @"Rounds played" : 1,
* @"Enemies killed" : 6
* }];
*
* @param NSDictionary values - an associative array of property names and numeric values.
*/
[DevToDev.activeUser increment: (NSDictionary *) values];/**
* Increments or decrements numeric user's properties.
* ### Usage:
* DevToDev.getActiveUser().Increment("Rounds played", 1);
*
* // to decrement a counter, pass a negative number
* DevToDev.getActiveUser().Increment("Rounds played", -1);
*
* @param key - the name of the property
* @param value - an amount to increment the given property
*/
DevToDev.getActiveUser().Increment(key:String, value:Number);
/**
* Increments or decrements multiple numeric user's properties at once.
* ### Usage:
* var data:Dictionary = new Dictionary();
* data["Rounds played"] = 1;
* data["Enemies killed"] 6;
* DevToDev.getActivePlayer().IncrementMany(data);
*
* @param values - an associative array of property names and numeric values.
*/
DevToDev.getActiveUser().IncrementMany(data:Dictionary);/**
* Append values to list properties.
* @param NSString key - property name
* @param {NSString|NSNumber|NSNull|NSDictionary|NSDate|NSURL} value - appending value
*/
[DevToDev.activeUser appendWithKey: (NSString *) key andValue: (id) value];
/**
* Multiple append list-valued properties at once
* @param NSDictionary values - an associative array of property names and values.
*/
[DevToDev.activeUser append: (NSDictionary *) values];/**
* Append values to list properties.
* @param String key - property name
* @param {String|Number|null|Collection|Map|Date|Url} value - appending value
*/
DevToDev.getActivePlayer().append(String key, Object value);
/**
* Multiple append list-valued properties at once
* @param Map<String, Object> values - an associative array of property names and values.
*/
DevToDev.getActivePlayer().append(final Map<String, Object> data);/**
* Append values to list properties.
* <param name="key">property name</param>
* <param name="value">appending value of type {string|int|double|List}</param>
*/
DevToDev.SDK.ActiveUser.Append(string key, object value);
/**
* Multiple append list-valued properties at once
* <param name="values">an associative array of property names and values</param>
*/
DevToDev.SDK.ActiveUser.Append(Dictionary<string, object> values);/// <summary> Append values to list properties. </summary>
/// <param name="key"> Property name </param>
/// <param name="value"> Appending value of type {string|int|double|List} </param>
DevToDev.Analytics.ActiveUser.AppendUserData(string key, object value);
/// <summary> Multiple append list-valued properties at once </summary>
/// <param name="values"> An associative array of property names and values </param>
DevToDev.Analytics.ActiveUser.AppendUserData(Dictionary<string, object> values);/**
* Append values to list properties.
* @param NSString key - property name
* @param {NSString|NSNumber|NSNull|NSArray|NSDictionary|NSDate|NSURL} value - appending value
*/
[DevToDev.activeUser appendWithKey: (NSString *) key andValue: (id) value];
/**
* Multiple append list-valued properties at once
* @param NSDictionary values - an associative array of property names and values.
*/
[DevToDev.activeUser append: (NSDictionary *) values];/**
* Append values to list properties.
* @param key - property name
* @param value - appending value (String|Number|Array)
*/
DevToDev.getActiveUser().AppendUserData(key:String, value:Object);
/**
* Multiple append list-valued properties at once
* @param values - an associative array of property names and values.
*/
DevToDev.getActiveUser().AppendUserDataMany(data:Dictionary);/**
* Union a given list with a list-valued property, excluding duplicate values.
* @param NSString key - property name
* @param {NSString|NSNumber|NSNull|NSDictionary|NSDate|NSURL} value - appending value
*/
[DevToDev.activeUser unionWithKey: (NSString *) key andValue: (id) value];
/**
* Multiple union of a given lists with a list-valued properties at once
* @param NSDictionary values - an associative array of property names and values.
*/
[DevToDev.activeUser unionWithData: (NSDictionary *) values];/**
* Union a given list with a list-valued property, excluding duplicate values.
* @param String key - property name
* @param {String|Number|null|Collection|Map|Date|Url} value - appending value
*/
DevToDev.getActivePlayer().union(String key, Object value);
/**
* Multiple union of a given lists with a list-valued properties at once
* @param Map values - an associative array of property names and values.
*//**
* Union a given list with a list-valued property, excluding duplicate values.
* <param name="key">property name</param>
* <param name="value">appending value of type {string|int|double|List}</param>
*/
DevToDev.SDK.ActiveUser.Union(string key, object value);
/**
* Multiple union of a given lists with a list-valued properties at once
* <param name="values">an associative array of property names and values</param>
*/
DevToDev.SDK.ActiveUser.Union(Dictionary<string, object> values);/// <summary> Union a given list with a list-valued property, excluding duplicate values. </summary>
/// <param name="key"> Property name </param>
/// <param name="value"> Appending value of type {string|int|double|List} </param>
DevToDev.Analytics.ActiveUser.AppendUserData(string key, object value);
/// <summary> Multiple union of a given lists with a list-valued properties at once </summary>
/// <param name="values"> An associative array of property names and values </param>
DevToDev.Analytics.ActiveUser.AppendUserData(Dictionary<string, object> values);/**
* Union a given list with a list-valued property, excluding duplicate values.
* @param NSString key - property name
* @param {NSString|NSNumber|NSNull|NSArray|NSDictionary|NSDate|NSURL} value - appending value
*/
[DevToDev.activeUser unionWithKey: (NSString *) key andValue: (id) value];
/**
* Multiple union of a given lists with a list-valued properties at once
* @param NSDictionary values - an associative array of property names and values.
*/
[DevToDev.activeUser unionWithData: (NSDictionary *) values];/**
* Union a given list with a list-valued property, excluding duplicate values.
* @param key - property name
* @param value - appending value (String|Number|Array)
*/
DevToDev.getActiveUser().UnionUserData(key:String, value:Object);
/**
* Multiple union of a given lists with a list-valued properties at once
* @param values - an associative array of property names and values.
*/
DevToDev.getActiveUser().UnionUserDataMany(data:Dictionary);/**
* Removes property from user data.
*
* ### Usage:
* [DevToDev.activeUser unsetUserDataWithKey: @"Hair color"];
*
* @param NSString key - the name of the property
*/
[DevToDev.activeUser unsetUserDataWithKey: (NSString *) key];
/**
* Removes multiple properties from user data at once.
*
* ### Usage:
* [DevToDev.activeUser unsetUserData: @[ @"Hair color", @"blonde", @"Last payment" ]];
*
* @param NSArray keys - an array of property names.
*/
[DevToDev.activeUser unsetUserData: (NSArray *) keys];/**
* Removes property from user data.
*
* ### Usage:
* DevToDev.getActivePlayer().unsetUserData("Hair color");
*
* @param String key - the name of the property
*/
DevToDev.getActivePlayer().unsetUserData(String key);
/**
* Removes multiple properties from user data at once.
*
* ### Usage:
* final List<String> unsetData = new ArrayList<String>();
* unsetData.add("Hair color");
* unsetData.add("Last payment");
* DevToDev.getActivePlayer().unsetUserData(unsetData);
*
* @param List keys - an array of property names.
*/
DevToDev.getActivePlayer().unsetUserData(final List<String> keys);/**
* Removes property from user data.
*
* ### Usage:
* DevToDev.SDK.ActiveUser.UnsetUserData("Hair color");
*
* <param name="key">the name of the property</param>
*/
DevToDev.SDK.ActiveUser.UnsetUserData(string key);
/**
* Removes multiple properties from user data at once.
*
* ### Usage:
* List<string> unsetData = new List<string>();
* unsetData.add("Hair color");
* unsetData.add("Last payment");
* DevToDev.SDK.ActiveUser.UnsetUserData(unsetData);
*
* <param name="keys">an array of property names</param>
*/
DevToDev.SDK.ActiveUser.UnsetUserData(List<string> keys);/*
* Removes properties from a user data.
*
* ### Usage:
* devtodev.user.remove('Hair color');
*
* // to set multiple properties at once
* devtodev.user.remove(['Hair color', 'blonde', 'Last payment']);
*
* @param {Array|String} prop If a string, this is the name of the property. If an array, this is an array of names.
*/
devtodev.user.remove(prop);/// <summary> Removes property from user data. </summary>
/// <example> Usage:
///
/// DevToDev.Analytics.ActiveUser.UnsetUserData("Hair color");
///
/// </example>
/// <param name="key"> The name of the property </param>
DevToDev.Analytics.ActiveUser.UnsetUserData(string key);
/// <summary> Removes multiple properties from user data at once. </summary>
/// <example> Usage:
///
/// List<string> unsetData = new List<string>();
/// unsetData.add("Hair color");
/// unsetData.add("Last payment");
/// DevToDev.Analytics.ActiveUser.UnsetUserData(unsetData);
///
/// </example>
/// <param name="keys"> An array of property names </param>
DevToDev.Analytics.ActiveUser.UnsetUserData(List<string> keys);/**
* Removes property from user data.
*
* ### Usage:
* [DevToDev.activeUser unsetUserDataWithKey: @"Hair color"];
*
* @param NSString key - the name of the property
*/
[DevToDev.activeUser unsetUserDataWithKey: (NSString *) key];
/**
* Removes multiple properties from user data at once.
*
* ### Usage:
* [DevToDev.activeUser unsetUserData: @[ @"Hair color", @"blonde", @"Last payment" ]];
*
* @param NSArray keys - an array of property names.
*/
[DevToDev.activeUser unsetUserData: (NSArray *) keys];/**
* Removes property from user data.
* ### Usage:
* DevToDev.getActiveUser().UnsetUserData("Hair color");
*
* @param key - the name of the property
*/
DevToDev.getActiveUser().UnsetUserData(key:String);
/**
* Removes multiple properties from user data at once.
* ### Usage:
* var unsetData:Array = new Array();
* unsetData.push("Hair color");
* unsetData.push("Last payment");
* DevToDev.getActiveUser().UnsetUserDataMany(unsetData);
*
* @param keys - an array of property names.
*/
DevToDev.getActiveUser().UnsetUserDataMany(keys:Array);/**
* Removes all user's custom personal data from devtodev data base.
*/
[DevToDev.activeUser clearUserData];/**
* Removes all user's custom personal data from devtodev data base.
*/
DevToDev.getActivePlayer().clearUserData();/**
* Removes all user's custom personal data from devtodev data base.
*/
DevToDev.SDK.ActiveUser.ClearUserData();/*
* Removes all user's custom personal data from devtodev data base.
*/
devtodev.user.clearUser();/// <summary> Removes all user's custom personal data from devtodev data base.</summary>
DevToDev.Analytics.ActiveUser.ClearUserData();/**
* Removes all user's custom personal data from devtodev data base.
*/
[DevToDev.activeUser clearUserData];/**
* Removes all user's custom personal data from devtodev data base.
*/
DevToDev.getActiveUser().ClearUserData();UPeopleLibrary::ClearUserData();/**
* Replaces current cross-platform user id
* Attention! Don't use this method if you're going to perform the user's relogin.
* @param String prevUserId - previous cross-platform user ID
* @param String userId - new cross-platform user ID
*/
DevToDev.replaceUserId(String prevUserId, String userId);/**
* Initializes the current user level. Required if level feature used in the app.
* @param int level - current game level of the player.
*/
DevToDev.setCurrentLevel(int level);UPeopleLibrary::Cheater(bool cheater);UPeopleLibrary::Name(const FString& name);UPeopleLibrary::Age(int32 age);UPeopleLibrary::Gender(const FString& InGender);UPeopleLibrary::Email(const FString& email);UPeopleLibrary::Phone(const FString& phone);UPeopleLibrary::Photo(const FString& photo);UPeopleLibrary::SetUserData(const TArray<FAnalyticsEventAttr>& Attributes);UPeopleLibrary::IncrementUserData(const TArray<FAnalyticsEventAttr>& Attributes);UPeopleLibrary::UnsetUserData(const TArray<FString>& Attributes);placement
String?
from 1 to 100 symbols, optional
Banner placement
unit
String?
from 1 to 100 symbols, optional
Banner name
network
NSString
from 1 to 100 symbols
Name of the ad network responsible for the impression
revenue
double
from 0,0 to Double.max
Reward for banner display in USD
network
String
from 1 to 100 symbols
Name of the ad network responsible for the impression
revenue
Double
from 0,0 to Double.max
Reward for banner display in USD
network
String
from 1 to 100 symbols
Name of the ad network responsible for the impression
revenue
Double
from 0,0 to Double.max
Reward for banner display in USD
network
String
from 1 to 100 symbols
Name of the ad network responsible for the impression
revenue
Double
from 0,0 to Double.max
Reward for banner display in USD
network
String
from 1 to 100 symbols
Name of the ad network responsible for the impression
revenue
Double
from 0,0 to Double.max
Reward for banner display in USD
Parameter
Type
Restrictions
Description
socialNetwork
FString
from 1 to 100 symbols
The name of the ad network that delivered the impression.
revenue
float
network
String
from 1 to 100 symbols
Name of the ad network responsible for the impression
revenue
Float
from 0,0 to Double.max
Reward for banner display in USD
Use the following constants to specify a social network:
DTDSocialNetwork.facebook, DTDSocialNetwork.vkontakte , DTDSocialNetwork.twitter, DTDSocialNetwork.googleplus, DTDSocialNetwork.whatsapp, DTDSocialNetwork.viber, DTDSocialNetwork.evernote, DTDSocialNetwork.googlemail, DTDSocialNetwork.linkedin, DTDSocialNetwork.pinterest, DTDSocialNetwork.qzone, DTDSocialNetwork.reddit, DTDSocialNetwork.renren, DTDSocialNetwork.tumblr
Or create an object with the desired social media name.
DTDAnalytics.socialNetworkPost(
socialNetwork = DTDSocialNetwork.facebook
)Use the following constants to specify a social network:
DTDSocialNetwork.Companion.getFacebook(), DTDSocialNetwork.Companion.getVkontakte(), DTDSocialNetwork.Companion.getTwitter(), DTDSocialNetwork.Companion.getGoogleplus(), DTDSocialNetwork.Companion.Whatsapp(), DTDSocialNetwork.Companion.getViber(), DTDSocialNetwork.Companion.getEvernote(), DTDSocialNetwork.Companion.getGooglemail(), DTDSocialNetwork.Companion.getLinkedin(), DTDSocialNetwork.Companion.getPinterest(), DTDSocialNetwork.Companion.getQzone(), DTDSocialNetwork.Companion.getReddit(), DTDSocialNetwork.Companion.getRenren(), DTDSocialNetwork.Companion.getTumblr()
Or create an object with the desired social media name.
DTDAnalytics.INSTANCE.socialNetworkConnect(DTDSocialNetwork.Companion.getFacebook());Use the following constants to specify a social network:
DTDSocialNetwork.facebook, DTDSocialNetwork.vkontakte , DTDSocialNetwork.twitter, DTDSocialNetwork.googleplus, DTDSocialNetwork.whatsapp, DTDSocialNetwork.viber, DTDSocialNetwork.evernote, DTDSocialNetwork.googlemail, DTDSocialNetwork.linkedin, DTDSocialNetwork.pinterest, DTDSocialNetwork.qzone, DTDSocialNetwork.reddit, DTDSocialNetwork.renren, DTDSocialNetwork.tumblr
Or create an object with the desired social media name:
Use the following constants to specify a social network:
DTDSocialNetwork.facebook, DTDSocialNetwork.vkontakte , DTDSocialNetwork.twitter, DTDSocialNetwork.googleplus, DTDSocialNetwork.whatsapp, DTDSocialNetwork.viber, DTDSocialNetwork.evernote, DTDSocialNetwork.googlemail, DTDSocialNetwork.linkedin, DTDSocialNetwork.pinterest, DTDSocialNetwork.qzone, DTDSocialNetwork.reddit, DTDSocialNetwork.renren, DTDSocialNetwork.tumblr
Or create an object with the desired social media name:
Argument
Type
Description
socialNetwork
EDTDSocialNetwork
Predefined social network.
Or use special method for custom social network:
Argument
Use the following constants to specify a social network:
.facebook, .vkontakte , .twitter, .googleplus, .whatsapp, .viber, .evernote, .googlemail, .linkedin, .pinterest, .qzone, .reddit, .renren, .tumblr
Or create an object with the desired social media name.
Description
socialNetwork
EDTDSocialNetwork
Predefined social network.
Argument
Type
Description
socialNetwork
FString
Custom social network.
Description
utmData
TMap<EDTDReferralProperty, FString>
UTM data.
onResult
FAnalyticsDynamicGetterStringDelegate
FDTDGetterStringDelegate
Callback.
Description
onResult
FAnalyticsDynamicGetterStringDelegate
FDTDGetterStringDelegate
Callback.
Description
onResult
FAnalyticsDynamicGetterStringDelegate
FDTDGetterStringDelegate
Callback.
Description
onResult
FAnalyticsDynamicGetterBoolDelegate
FDTDGetterBoolDelegate
Callback.
The didReceiveDevtodevId method will be called with every ID change on the server side.
To obtain the devtodev ID, you need to pass the DTDIdentifiersListener listener to DTDAnalytics:
The didReceiveDevtodevId method will be called with every ID change on the server side.
To obtain the devtodev ID, you need to pass the DTDIdentifiersListener listener to DTDAnalytics:
The didReceiveDevtodevId method will be called with every ID change on the server side.
To obtain the devtodev ID, you need to pass the DTDIdentifiersListener listener delegate to DTDAnalytics:
The delegate method will be called with every ID change on the server side.
To obtain the devtodev ID, you need to pass the DTDIdentifiersListener listener delegate to DTDAnalytics:
The delegate method will be called with every ID change on the server side.
Argument
Type
Description
listener
FAnalyticsDynamicGetterLongDelegate
FDTDGetterLongDelegate
devtodev ID Listener.
To obtain the devtodev ID, you need to pass the Callable to DTDAnalytics:
The didReceiveDevtodevId method will be called with every ID change on the server side.
network
String
from 1 to 100 symbols
Name of the ad network responsible for the impression
revenue
Double
from 0,0 to Double.max
Reward for banner display in USD
Argument
Argument
Argument
Type
Argument
Argument
Argument


let network = DTDSocialNetwork(name: "NetworkName")
DTDAnalytics.socialNetworkConnect(socialNetwork: network)DTDSocialNetwork *network = [[DTDSocialNetwork alloc] initWithName:@"NetworkName"];
[DTDAnalytics socialNetworkConnect:network];Type
Type
Description
Type
Type
Type
DTDAnalytics.adImpression(network: "Network name",
revenue: 0.15,
placement: "Placement of the banner",
unit: "Banner title")Field
Type
Description
User Id
FString
Unique cross-platform user id
Description
From
FString
Current user Id
To
FString
New user Id
Field
Type
Description
Level
int32
Current user level
var network = new DTDSocialNetwork(name: "NetworkName");
DTDAnalytics.SocialNetworkConnect(socialNetwork: network);var network = new DTDSocialNetwork(name: "NetworkName");
DTDAnalytics.SocialNetworkConnect(socialNetwork: network);window.devtodev.socialNetworkConnect('NetworkName')UDTDAnalyticsBPLibrary::SocialNetworkConnect(EDTDSocialNetwork::Linkedin);UDTDAnalyticsBPLibrary::SocialNetworkConnectCustom("SocialNetworkName");DTDAnalytics.SocialNetworkConnect(GDDTDSocialNetwork.Facebook())let network = GDDTDSocialNetwork(name: "NetworkName")
DTDAnalytics.SocialNetworkConnect(network)DTDAnalytics.SocialNetworkPost(GDDTDSocialNetwork.Facebook(), "New level reached")var reffer = GDDTDReferralProperty.new()
reffer.AddCampaign("Warm Snow Boots")
reffer.AddContent("Snow Boots")
reffer.AddMedium("CPI")
reffer.AddSource("AdWords")
reffer.AddTerm("shoes+boots")
DTDAnalytics.Referrer(reffer)DTDAnalytics.GetDeviceId(getDeviceHandler)
func getDeviceHandler(deviceId: String):
print(deviceId)DTDAnalytics.GetSdkVersion(getSdkVersionHandler)
func getSdkVersionHandler(sdkVersion: String):
print(sdkVersion)DTDAnalytics.GetTrackingAvailability(getTrackingAvailabilityHandler)
func getTrackingAvailabilityHandler(trackingAvailability: bool):
print(str(trackingAvailability))DTDAnalytics.setIdentifiersListener(object : DTDIdentifiersListener {
override fun didReceiveDevtodevId(devtodevId: Long) {
/// your code
}
})DTDAnalytics.INSTANCE.setIdentifiersListener(new DTDIdentifiersListener() {
@Override
public void didReceiveDevtodevId(long devtodevId) {
// your code
}
});DTDAnalytics.SetIdentifiersListener(devtodevId =>
{
// Your code...
});DTDAnalytics.SetIdentifiersListener(devtodevId =>
{
// Your code...
});window.devtodev.setIdentifiersListener((devtodevId) =>
{
// Your code...
})auto listener = new FDTDGetterLongDelegate();
listener->BindLambda([](int64 value)
{
// Your code...
});
UDTDAnalyticsBPLibrary::SetIdentifiersListener(*listener);DTDAnalytics.SetIdentifiersCallback(identifiersUpdated)
func identifiersUpdated(devtodevID: int):
print("SetIdentifiersCallback DevtodevID is " + str(devtodevID))DTDAnalytics.socialNetworkPost(socialNetwork: .facebook,
reason: "New level reached")[DTDAnalytics socialNetworkPost:DTDSocialNetwork.facebook withReason:@"New level reached"];DTDAnalytics.socialNetworkPost(
socialNetwork = DTDSocialNetwork.facebook,
reason = "New level reached"
) DTDAnalytics.INSTANCE.socialNetworkPost(
DTDSocialNetwork.Companion.getFacebook(),
"New level reached"
)DTDAnalytics.SocialNetworkPost(
socialNetwork: DTDSocialNetwork.facebook,
reason: "New level reached");DTDAnalytics.SocialNetworkPost(
socialNetwork: DTDSocialNetwork.Facebook,
reason: "New level reached");window.devtodev.socialNetworkPost("NetworkName", "New level reached")let referrerData = [DTDReferralProperty.source: "AdWords",
DTDReferralProperty.medium: "CPI",
DTDReferralProperty.content: "Snow Boots",
DTDReferralProperty.campaign: "Warm Snow Boots",
DTDReferralProperty.term: "shoes+boots"]
DTDAnalytics.referrer(utmData: referrerData)NSDictionary <DTDReferralProperty *, NSString *> * referrerData = @{
DTDReferralProperty.source: @"AdWords",
DTDReferralProperty.medium: @"CPI",
DTDReferralProperty.content: @"Snow Boots",
DTDReferralProperty.campaign: @"Warm Snow Boots",
DTDReferralProperty.term: @"shoes+boots",
};
[DTDAnalytics referrer:referrerData];enum class DTDReferralProperty {
Source,
Campaign,
Content,
Medium,
Term;
}
val referrer = mapOf(
DTDReferralProperty.Medium to "some value",
DTDReferralProperty.Campaign to "some value"
)
DTDAnalytics.referrer(utmData = referrer)public final enum class DTDReferralProperty {
Source,
Campaign,
Content,
Medium,
Term;
}
Map<DTDReferralProperty, String> propertyStringHashMap = new HashMap<>();
propertyStringHashMap.put(DTDReferralProperty.Medium, "some value");
propertyStringHashMap.put(DTDReferralProperty.Campaign, "some value");
DTDAnalytics.INSTANCE.referrer(propertyStringHashMap);var referrer = new Dictionary<DTDReferralProperty, string>
{
[DTDReferralProperty.Medium] = "some value",
[DTDReferralProperty.Campaign] = "some value"
};
DTDAnalytics.Referrer(referrer: referrer);var referrer = new Dictionary<DTDReferralProperty, string>
{
[DTDReferralProperty.Medium] = "some value",
[DTDReferralProperty.Campaign] = "some value"
};
DTDAnalytics.Referrer(referrer: referrer);var referrer = {
source: "some source",
term: "some term",
medium: "some medium",
source: "some source",
content: "some content",
campaign: "some campaign",
};
window.devtodev.referrer(referrer)DTDAnalytics.sendBufferedEvents()[DTDAnalytics sendBufferedEvents];DTDAnalytics.sendBufferedEvents()DTDAnalytics.INSTANCE.sendBufferedEvents();DTDAnalytics.SendBufferedEvents();DTDAnalytics.SendBufferedEvents();window.devtodev.sendBufferedEvents()UDTDAnalyticsBPLibrary::SendBufferedEvents();DTDAnalytics.SendBufferedEvents()DispatchQueue.main.async{}dispatch_async(dispatch_get_main_queue(), ^{ });Handler(Looper.getMainLooper()).post{}ContextCompat.getMainExecutor(context).execute(() -> {
// This is where your UI code goes.
});var result = await DTDAnalytics.GetUserId();DTDAnalytics.GetUserId( id => {
//your code
});DTDAnalytics.setTrackingAvailability(value: true)[DTDAnalytics trackingAvailability:true];DTDAnalytics.setTrackingAvailability(value = true)DTDAnalytics.INSTANCE.setTrackingAvailability(true);DTDAnalytics.SetTrackingAvailability(trackingValue: true);DTDAnalytics.SetTrackingAvailability(trackingValue: true);window.devtodev.setTrackingAvailability(true)UDTDAnalyticsBPLibrary::SetTrackingAvailability(true);DTDAnalytics.SetTrackingAvailability(true)DTDAnalytics.getDeviceId { deviceId in
// your code
}[DTDAnalytics deviceIdHandler:^(NSString * _Nonnull deviceId) {
// your code
}];DTDAnalytics.getDeviceId { deviceId ->
// your code
}DTDAnalytics.INSTANCE.getDeviceId(deviceId ->
// your code
null
);var devideId = await DTDAnalytics.GetDeviceId();DTDAnalytics.GetDeviceId( id => {
//your code
});var devideId = window.devtodev.getDeviceId()DTDAnalytics.getSDKVersion { sdkVersion in
// your code
}[DTDAnalytics sdkVersionHandler:^(NSString * _Nonnull sdkVersion) {
// your code
}];DTDAnalytics.getSDKVersion { sdkVersion ->
// your code
}DTDAnalytics.INSTANCE.getSdkVersion ( sdkVersion ->
// your code
null
);var sdkVersion = DTDAnalytics.GetSdkVersion();DTDAnalytics.GetSdkVersion( version => {
//your code
});var sdkVersion = window.devtodev.getSDKVersion()DTDAnalytics.getTrackingAvailability { trackingAvailability in
// your code
}[DTDAnalytics trackingAvailabilityHandler:^(BOOL trackingAvailability) {
// your code
}];
DTDAnalytics.getTrackingAvailability { trackingAvailability ->
// your code
}DTDAnalytics.INSTANCE.getTrackingAvailability( trackingAvailability ->
// your code
null
);var trackingAvailability = await DTDAnalytics.GetTrackingAvailability();DTDAnalytics.GetTrackingAvailability( tracking => {
//your code
});var trackingAvailability = window.devtodev.getTrackingAvailability()DTDAnalytics.setIdentifiersListener(listener: self)func didReceiveDevtodevId(with devtodevId: Int) {
/// your code
}@interface Controller () <DTDIdentifiersListener>
[DTDAnalytics setIdentifiersListenerWithListener:self];DTDAnalytics.setInitializationCompleteCallback {
print("Initialized has been finished.")
}
let config = DTDAnalyticsConfiguration()
config.logLevel = .error
DTDAnalytics.initialize(applicationKey: "App ID", configuration: config)[DTDAnalytics setInitializationCompleteCallback:^{
NSLog(@"%@", @"Initialized has been finished.");
}];
DTDAnalyticsConfiguration *config = [[DTDAnalyticsConfiguration alloc] init];
config.logLevel = DTDLogLevelError;
[DTDAnalytics applicationKey:@"App ID" configuration:config];DTDAnalytics.setInitializationCompleteCallback {
Log.d("TAG", "Initialized has been finished.")
}
val config = DTDAnalyticsConfiguration()
config.logLevel = DTDLogLevel.Error
DTDAnalytics.initialize(appKey = "App ID", analyticsConfiguration = config, context = this)DTDAnalytics.INSTANCE.setInitializationCompleteCallback(() -> {
Log.d("TAG", "Initialized has been finished.");
return null;
});
DTDAnalyticsConfiguration config = new DTDAnalyticsConfiguration();
config.setLogLevel(DTDLogLevel.Error);
DTDAnalytics.INSTANCE.initialize("App ID", config, this);DTDAnalytics.LogLevel = DTDLogLevel.Error;
DTDAnalytics.SetInitializationCompleteCallback(()=>Console.WriteLine($"Initialization has been finished"));
DTDAnalytics.Initialize("APP_KEY");DTDAnalytics.SetInitializationCompleteCallback(() =>
{
Debug.Log("Initialized has been finished.");
});
DTDAnalytics.SetLogLevel(DTDLogLevel.Error);
DTDAnalytics.Initialize("APP_KEY");window.devtodev.setInitializationCompleteCallback(() =>
{
// Your code...
})func initCompleteCallback():
print("Initialized has been finished.")
func _ready():
DTDAnalytics.SetInitializationCompleteCallback(initCompleteCallback)
var config = GDDTDAnalyticsConfiguration.new()
config.logLevel = GDDTDLogLevel.Error
DTDAnalytics.InitializeWithConfig(appKey, config)UDTDAnalyticsBPLibrary::SocialNetworkPost(EDTDSocialNetwork::Linkedin, "PostReason");UDTDAnalyticsBPLibrary::SocialNetworkPostCustom("SocialNetworkName", "PostReason");TMap<EDTDReferralProperty, FString> referrer;
referrer.Add(EDTDReferralProperty::Source, "Source");
referrer.Add(EDTDReferralProperty::Medium, "Medium ");
referrer.Add(EDTDReferralProperty::Content, "Content ");
referrer.Add(EDTDReferralProperty::Campaign, "Campaign ");
referrer.Add(EDTDReferralProperty::Term, "Term ");
UDTDAnalyticsBPLibrary::Referrer(referrer);auto onResult = new FDTDGetterStringDelegate();
onResult->BindLambda([](const FString& value)
{
// Your code...
});
UDTDAnalyticsBPLibrary::GetUserId(*onResult);auto onResult = new FDTDGetterStringDelegate();
onResult->BindLambda([](const FString& value)
{
// Your code...
});
UDTDAnalyticsBPLibrary::GetDeviceId(*onResult);// Some codecauto onResult = new FDTDGetterStringDelegate();
onResult->BindLambda([](const FString& value)
{
// Your code...
});
UDTDAnalyticsBPLibrary::GetSdkVersion(*onResult);auto onResult = new FDTDGetterBoolDelegate();
onResult->BindLambda([](bool value)
{
// Your code...
});
UDTDAnalyticsBPLibrary::GetTrackingAvailability(*onResult);- (void)didReceiveDevtodevIdWith:(NSInteger)devtodevId {
// your code
}// Initializes the user with the specified cross-platform identifier
// FString activeUserId - unique cross-platform user id
FAnalytics::Get().GetDefaultConfiguredProvider()->SetUserID(FString activeUserId);// Returns current cross-platform user id
FAnalytics::Get().GetDefaultConfiguredProvider()->GetUserID();// Replaces cross-platform user id
// FString from - current user id
// FString to - new user id
UDevToDevBlueprintFunctionLibrary::ReplaceUserId(const FString& from, const FString& to);// Initializes the current user level
// int32 level - current user level
UDevToDevBlueprintFunctionLibrary::SetCurrentLevel(int32 level)placement
NSString _Nullable
from 1 to 100 symbols, optional
Banner placement
unit
NSString _Nullable
from 1 to 100 symbols, optional
Banner name
placement
String?
from 1 to 100 symbols, optional
Banner placement
unit
String?
from 1 to 100 symbols, optional
Banner name
placement
String?
from 1 to 100 symbols, optional
Banner placement
unit
String?
from 1 to 100 symbols, optional
Banner name
placement
String?
from 1 to 100 symbols, optional
Banner placement
unit
String?
from 1 to 100 symbols, optional
Banner name
placement
String?
from 1 to 100 symbols, optional
Banner placement
unit
String?
from 1 to 100 symbols, optional
Banner name
form 0.0 to float.MaxValue
Reward for displaying a banner in USD.
placement
FString
from 1 to 100 symbols
Placement of the banner.
unit
FString
from 1 to 100 symbols
Banner title.
placement
String
from 1 to 100 symbols, optional
Banner placement
unit
String
from 1 to 100 symbols, optional
Banner name
Type
Description
socialNetwork
FString
Custom social network.


[DTDAnalytics adImpressionWithNetwork:@"Network name"
revenue:0.15f
placement:@"Placement of the banner"
unit:@"Banner title"];DTDAnalytics.adImpression(
network = "Network name",
revenue = 0.45,
placement = "Placement of the banner",
unit = "Banner title"
)DTDAnalytics.INSTANCE.adImpression(
"Network name",
0.45,
"Placement of the banner",
"Banner title"
);var network = "Network name";
var revenue = 0.15;
var placement = "Placement of the banner";
var unit = "Banner title";
DTDAnalytics.AdImpression(network, revenue, placement, unit);var network = "Network name";
var revenue = 0.15;
var placement = "Placement of the banner";
var unit = "Banner title";
DTDAnalytics.AdImpression(network, revenue, placement, unit);UDTDAnalyticsBPLibrary::AdImpression("NetworkName", 0.36, "BannerPlacement", "BannerTitle");DTDAnalytics.AdImpression("Network name", 0.15, "Placement of the banner", "Banner title")


This generation of SDK is deprecated and is no longer supported. Information about the current version can be found here.
Expert tips before integrating the events.
The Tutorial steps event allows you to evaluate the effectiveness of the tutorial steps system. The event should be sent at the end of each tutorial step indicating the number of every passed step as a parameter.
Use the following constants to specify basic events of tutorial steps:
Start or -1 - at the beginning, before the first step is completed;
Finish or -2 - instead of the final step number;
Skipped or 0 - in case а user skipped the tutorial.
In other cases use step numbers. Make sure you use numbers above 0 to enumerate the steps.
The logic of the use of the Skipped constant in the Tutorial steps event is provided only in case a user has completely refused to pass the tutorial. After Skipped is used, no other values of the Tutorial steps event must be received.
Blueprint
This event is for games only.
You can analyze the distribution of the players over the levels. The event should be sent right after the player reached the next level. You can find more information on what is the right moment to use LevelUp event .
To track the average account balance of in-game currency by the end of each level, please provide the list of currency names and amounts.
Blueprint
To track the average amount of in-game currency earned during a level, it is necessary to send a special event after each time an in-game account is replenished.
AccrualType can take one of the following values:
To track payments, add this event right after the platform confirms that a payment went through.
A unique order identifier is a value of a transactionIdentifier property in SKPaymentTransaction object inside the receipt of completed transaction.
devtodev server does not process transactions with previously used transaction IDs. Also, the server validates identifiers in appearance to avoid evident cheat transactions. To avoid adding cheat payments into reports completely, use devtodev anti-cheat service before creating a realPayment event.
How to find the transaction ID in GooglePlay transaction?
Find the INAPP_PURCHASE_DATA object In the JSON fields that are returned in the response data for a purchase order. A unique transaction identifier is the value of orderId property in INAPP_PURCHASE_DATA object. If the order is a test purchase made via the In-app Billing Sandbox,
This event is for games only.
To track expenditures of in-game currency and popularity of products, add this event right after the purchase.
In case a product is bought for several game currencies at once, it is necessary to make a dictionary that includes the names and amounts of the paid currencies.
In case a product was bought for several game currencies at once, it is necessary to make a hashmap that includes the names and amounts of the paid currencies.
…and so on…
Example:
In case a product was bought for several game currencies at once, it is necessary to make a hashmap including the names and amounts of the paid currencies.
Example:
In case a product was bought for several game currencies at once, it is necessary to make a dictionary including the names and amounts of the paid currencies.
Please keep in mind that there is a limit for the number of unique values of the "purchaseCurrency" parameter - 30 currencies per project. Currencies cannot be deleted or renamed.
If you want to count the events that are not among basic, use custom events.
Attention! We strongly recommend that you do not use custom event properties to transfer and store data that fits the definition of !
The event must have a unique name and can include up to 20 parameters. The maximum length of the event name is 72 symbols.
Every parameter inside one event must have a unique name. The maximum length of the parameter name is 32 symbols.
The values of parameters can be string or number type (int, long, float, double). The maximum length of the parameter value is 255 symbols.
No more than 300 variants of custom event names can be used for one project. Try to enlarge events in meaning by using event parameters. Events that didn't get into the limit of unique event names will be discarded.
For a string parameter, it is acceptable to use not more than 50,000 unique values for the whole event history. In case the limit of unique values is exceeded, the parameter is ignored.
Therefore, we recommend not to set user IDs and Unix time as parameter values of custom events. Try to integrate parameter values if they have a very large variability. Otherwise, it will be very difficult to analyze the data or after some time it may be even ignored.
We strongly recommend not to change the type of data transferred in the parameter over time. In case you change the data type in parameter, it will be duplicated with the same name and different data types in devtodev database which will result in more complicated report building.
20 parameter names may be associated with any event:
Then use method:
20 parameter names may be associated with any event:
Then use method:
Example:
20 parameter names may be associated with any event:
Example:
20 parameter names may be associated with any event:
Then use method:
Example:
This event is for games only.
First of all, a Progression event is used for games with short (within one game session) locations/game levels. The event allows you to gather data on passing the locations and get statistics on parameters that vary during the location passing.
Developer must use the following two methods:
Method startProgressionEvent when entering the location:
Method endProgressionEvent when exiting (no matter if completed or not) the location:
LocationEventParams class methods:
The user can be only in one location at the same time. When moving to another location (including embedded), the previous location must be completed. Information on locations, the passing of which was not completed by calling endProgressionEvent method during the game session (the call of endProgressionEvent method is not integrated; user unloaded the application from the device memory; there was an application crash), do not fall in the statistics.
DevToDev.TutorialState.Start or -1 - at the beginning, before the first step is completed;
DevToDev.TutorialState.Finish or -2 - instead of the last step number;
DevToDev.TutorialState.Skipped or 0 - if a user skipped the tutorial.
DevToDev.TutorialState.Start or -1 - at the beginning, before the first step is completed;
DevToDev.TutorialState.Finish or -2 - instead of the last step number;
DevToDev.TutorialState.Skipped or 0 - if a user skipped the tutorial.
-1 - Start the tutorial (at the beginning, before the first step is completed)
-2 - Tutorial finished (instead of the last step number)
0 - Tutorial skipped (if a user skipped the tutorial).
DevToDev.TutorialState.Start or -1 - at the beginning, before the first step is completed;
DevToDev.TutorialState.Finish or -2 - instead of the last step number;
DevToDev.TutorialState.Skipped or 0 - if a user skipped the tutorial.
Start or -1 - at the beginning, before the first step is completed;
Finish or -2 - instead of the final step number;
Skipped or 0 - in case a user skipped the tutorial.
TutorialState.START or -1 - at the beginning, before the first step is completed;
TutorialState.FINISH or -2 - instead of the last step number;
TutorialState.SKIPPED or 0 - if a user skipped the tutorial.
-1 (Start) - at the beginning, before the first step is completed;
-2 (Finish) - instead of the number of the last step;
0 (Skipped) - in case a user skipped the tutorial.
Step
int32
The latest successfully completed tutorial step
Code
Field
Type
Description
Level
int32
level reached by the player
Code
Level
int32
level reached by the player
Field
Type
Description
Game Currency Type
FString
Currency name (max. 24 symbols)
Game Currency Amount
int32
The amount an account has been credited with.
accrualType
Enum
Can take one of following values: "Earned" or "Purchased"
Code
devtodev server does not process transactions with previously used transaction IDs. Also, the server validates the identifiers in appearance to avoid evident cheat transactions. To avoid completely the entering of cheat payments from GooglePlay in reports, use devtodev anticheat service before creating realPayment event.
Example:
Example:
How to find the transaction ID in iTunes transaction?
Unique order identifier is a value of "transactionIdentifier" property in SKPaymentTransaction object inside the receipt of completed transaction.
How to find the transaction ID in GooglePlay transaction?
Find the INAPP_PURCHASE_DATA object In the JSON fields that are returned in the response data for a purchase order. A unique transaction identifier is the value of orderId property in INAPP_PURCHASE_DATA object. If the order is a test purchase made via the In-app Billing Sandbox, orderId property will be empty.
devtodev server does not process transactions with previously used transaction IDs. Also the server validates the identifiers in appearance, to avoid evident cheat transactions. To avoid the entering of cheat payments in reports completely, use devtodev anticheat service before creating realPayment event.
Blueprint
Field
type
Description
Transaction Id
FString
Unique transaction ID
In AppPrice
float
Product price (in user's currency)
In App Name
Code
In case a product was bought for several game currencies at once, it is necessary to make a dictionary including the names and amounts of the paid currencies.
In case a product was bought for several game currencies at once, it is necessary to make a hashmap including the names and amounts of the paid currencies.
Blueprint
Notice! If the purchase is done by more than one currency, then the method should be called as many times as many currencies were used, but the amount of purchase should be set only in one of the times.
Use the method “Record Simple Item Purchase with Attributes” from Analytics Blueprint Library.
Field
Type
Description
Item Id
FString
Unique purchase Id or name (max. 32 symbols)
Item Quantity
Item Id field is the identifier of purchased item, Item Quantity is the amount of purchased item. Attributes array should contain the following obligatory information:
Code
20 parameter names may be associated with any event:
Then use method:
20 parameter names may be associated with any event:
Then use method:
20 parameter names may be associated with any event:
Then use method:
Field
Type
Description
Event Name
FString
Custom event name
20 parameter names may be associated with any event. Use "Record Event With Attributes".
Code
Let’s look at the example of event integration for a match3 game with a location map:
Method startProgressionEvent when enetring the location
Method endProgressionEvent when exiting (no matter if completed or not) the location
LocationEventParams class methods:
The user can be only in one location at the same time. When moving to another location (including embedded), the previous location must be completed. Information on locations, the passing of which was not completed by calling endProgressionEvent method during the game session (the call of endProgressionEvent method is not integrated; user unloaded the application from the device memory; there was an application crash) do not fall in the statistics.
Let’s analyse the example of event integration on match3 game with location map:
Method StartProgressionEvent when enetring the location
Method EndProgressionEvent when exiting (no matter if completed or not) the location
LocationEventParams class methods:
The user can be only in one location at the same time. When moving to another location (including embedded), the previous location must be completed. Information on locations, the passing of which was not completed by calling EndProgressionEvent method during the game session (the call of EndProgressionEvent method is not integrated; user unloaded the application from the device memory; there was an application crash) do not fall in the statistics.
Let’s analyse the example of event integration on match3 game with location map:
Method startProgressionEvent when enetring the location
Method endProgressionEvent when exiting (no matter if completed or not) the location
Location parameters object contains:
The user can be only in one location at the same time. When moving to another location (including embedded), the previous location must be completed. Information on locations, the passing of which was not completed by calling endProgressionEvent method during the game session (the call of endProgressionEvent method is not integrated; user unloaded the application from the device memory; there was an application crash) do not fall in the statistics.
Let’s analyse the example of event integration on match3 game with location map:
Method StartProgressionEvent when enetring the location
Method EndProgressionEvent when exiting (no matter if completed or not) the location
ProgressionEventParams class methods:
The user can be only in one location at the same time. When moving to another location (including embedded), the previous location must be completed. Information on locations, the passing of which was not completed by calling EndProgressionEvent method during the game session (the call of EndProgressionEvent method is not integrated; user unloaded the application from the device memory; there was an application crash) do not fall in the statistics.
Let’s analyse the example of event integration on match3 game with location map:
Method startProgressionEvent when enetring the location
Method endProgressionEvent when exiting (no matter if completed or not) the location
LocationEventParams class methods:
The user can be only in one location at the same time. When moving to another location (including embedded), the previous location must be completed. Information on locations, the passing of which was not completed by calling endProgressionEvent method during the game session (the call of endProgressionEvent method is not integrated; user unloaded the application from the device memory; there was an application crash) do not fall in the statistics.
Let’s analyse the example of event integration on match3 game with location map:
Method StartProgressionEvent when enetring the location
Method EndProgressionEvent when exiting (no matter if completed or not) the location
LocationEventParams class methods:
The user can be only in one location at the same time. When moving to another location (including embedded), the previous location must be completed. Information on locations, the passing of which was not completed by calling EndProgressionEvent method during the game session (the call of EndProgressionEvent method is not integrated; user unloaded the application from the device memory; there was an application crash) do not fall in the statistics.
Let’s analyse the example of event integration on match3 game with location map:
Method StartProgressionEvent when enetring the location
Blueprint
Field
Type
Description
locationName
FString
The name of location user entered
Attributes
Code
Method EndProgressionEvent when exiting (no matter if completed or not) the locationBlueprint
The user can be only in one location at the same time. When moving to another location (including embedded), the previous location must be completed. Information on locations, the passing of which was not completed by calling endProgressionEvent method during the game session (the call of endProgressionEvent method is not integrated; user unloaded the application from the device memory; there was an application crash) do not fall in the statistics.
Let’s analyse the example of event integration on match3 game with location map:
Player comes to the third location on the map “Village” while following the game map. Passing on the first level of difficulty. Before entering this location gamer passed the third location on the map “City”. .. Player passing the location. Player finishes passing of the third location on the map “Village”. The location is passed successfully. The passing took 389 seconds. Gamer finished the passing with 3 stars and gained 70 coins. While the passing gamer used boost and bought extra 5 turns.
Field
Type
Description
Field
Type
Description
/**
* The event allowing to track the stage of tutorial a player is on.
* @param NSUInteger tutorialStep - the latest successfully completed tutorial step.
*/
[DevToDev tutorialCompleted: (NSUInteger) tutorialStep];/**
* The event allowing to track the stage of tutorial a player is on.
* @param int tutorialStep - the latest successfully completed tutorial step.
*/
DevToDev.tutorialCompleted(int tutorialStep);/**
* <param name="state"> The latest successfully completed tutorial step </param>
*/
DevToDev.SDK.Tutorial(int state)/**
* The event allowing to track the stage of tutorial a player is on.
* @param {number} tutorialStep - the latest successfully completed tutorial step.
*/
devtodev.tutorialCompleted(tutorialStep);/// <summary> The event allowing to track the stage of tutorial a player is on. </summary>
/// <param name="tutorialStep"> The latest successfully completed tutorial step </param>
DevToDev.Analytics.Tutorial(int tutorialStep);

This method is used to initialize the user in applications where you have set calculation by user ID specified by the developer.
You can also use this method when calculating by device ID (by default) to pass in the user ID used on your servers so that you can easily find the user on devtodev.
To set a new value as the user ID, use the setUserId method.
To get the current value of the user ID, use the asynchronous method
getDeviceId(_ completionHandler: @escaping (String) -> Void)
To set a new value as the user ID, use the
To set a new value as the user ID, use the
To set a new value as the user ID, use the
To set a new value as the user ID, use the
To set a new value as the user ID, use the
To set a new value as the user ID, use the setUserId method.
To set a new value as the user ID, use method:
To set a new value as the user ID, use the SetUserId method.
To get the current value of the user ID, use the asynchronous method
In order to track a user on several devices you can switch the identification method to identification by Custom User Id. This switch can be done only by devtodev – you just need to write a request to the support (use the Contact Us form), specifying the space name and project name. You must set the user IDs for all users before changing the identification method.
Please note: changing the idetification method is irreversible and you will not be able to switch back to the device identifiers in the future!
This method is used in very rare cases. It is applicable in the case when the calculation of users in the project is carried out by the user ID specified by the developer. In this case, the application can change this identifier. For example, calculation in the application is carried out by user emails and in the application, it is possible to change this email to another one. At the time of replacement, you need to call this method, specifying the user's previous email and the one with which it was replaced.
Do not use this method to re-login as a different user! The setUserId method is used for relogging.
This method is used in cross-platform and data synchronized applications. The method is required to update user level data.
To set the current value to the user level, use setCurrentLevel(currentLevel: Int) method:
We recommend that you use the setCurrentLevel method immediately after using the method or specify the current user level in the initialization configuration (the level property of an instance of the DTDAnalyticsConfiguration).
Do not use the setCurrentLevel
If you have your own methods for detecting cheaters in the application, you can tag such users. Actions taken by these users will not be counted in statistics.
Use this method to tag a user as a tester. Events performed by testers will not be included in statistics.
Attention! These properties have been removed since the devtodev SDK versions: iOS & macOS 2.4.0, Android 2.5.0, Unity SDK 3.8.0, Godot 1.0.0, Web 2.1
We strongly recommend not to use these properties because they refer to .
Attention! We strongly discourage the storage of personal user data! If you plan to pass this data, be sure to indicate this in the ‘Nutrition label’ when submitting the application to the App Store review.
Each devtodev project can have up to 30 custom user properties. User custom property values can be a number, a string (up to 500 symbols), or a boolean value.
Attention! We strongly recommend that you do not use these properties to transfer and store data that fits the definition of !
This is how you can set properties on the current user profile:
To get the current value stored in the user profile on the SDK, you need to use the method:
getValue(key: String, _completionHandler: @escaping (Any) -> Void)
It removes a property or a list of properties and their values from the current user profile.
To remove all properties from the user card, use:
/**
* Register transactions made through the platform's payment system.
* <param name="orderId"> Transaction id </param>
* <param name="price"> Product price (in user's currency) </param>
* <param name="productId"> Product id (product name) </param>
* <param name="currencyCode"> Transaction currency (ISO 4217 format)</param>
*/
DevToDev.SDK.RealPayment(string orderId, float price, string productId, string currencyCode)DevToDev.SDK.RealPayment("1836535032137741465" , 2.99f , "productId" , "USD" );/**
* Register transactions made through the platform's payment system.
*
* @param {string} transactionId - transaction ID
* @param {number} productPrice - product price (in user's currency)
* @param {string} productName - product name
* @param {string} transactionCurrencyISOCode - transaction currency (ISO 4217 format)
*/
devtodev.realPayment(transactionId, productPrice, productName, transactionCurrencyISOCode);devtodev.realPayment("12345", 9.99, "Currency pack 2", "USD");/// <summary> Register transactions made through the platform's payment system. </summary>
/// <param name="paymentId"> Transaction id </param>
/// <param name="inAppPrice"> Product price (in user's currency) </param>
/// <param name="inAppName"> Product id (product name) </param>
/// <param name="inAppCurrencyISOCode"> Transaction currency (ISO 4217 format)</param>
DevToDev.Analytics.RealPayment(string paymentId, float inAppPrice, string inAppName,
string inAppCurrencyISOCode);/**
* Register transactions made through the platform's payment system.
*
* @param NSString * paymentId - transaction ID
* @param float inAppPrice - product price (in user's currency)
* @param NSString * inAppName - product name
* @param NSString * inAppCurrencyISOCode - transaction currency (ISO 4217 format)
*/
[DevToDev realPayment: (NSString *) transactionId withInAppPrice:(float) inAppPrice
andInAppName: (NSString *) inAppName andInAppCurrencyISOCode: (NSString *) inAppCurrencyISOCode];/**
* Register transactions made through the platform's payment system.
* @param paymentId - transaction ID
* @param inAppPrice - product price (in user's currency)
* @param inAppName - product name
* @param inAppCurrencyISOCode - transaction currency (ISO 4217 format)
*/
DevToDev.realPayment(paymentId:String, inAppPrice:Number, inAppName:String,
inAppCurrencyISOCode:String);/**
* In-app purchase with a definite article ID.
*
* @param purchaseId - unique purchase Id or name (max. 32 symbols)
* @param purchaseType - purchase type or group (max. 96 symbols)
* @param purchaseAmount - count of purchased goods
* @param purchasePrice - cost of purchased goods (total cost -if several goods were purchased)
* @param purchaseCurrency - currency name (max. 24 symbols)
*/
[DevToDev inAppPurchase: (NSString *) purchaseId withPurchaseType: (NSString *) purchaseType
andPurchaseAmount: (NSInteger) purchase Amount andPurchasePrice: (NSInteger) purchaseprice
andPurchaseCurrency: (NSString *) purchaseCurrency];NSMutableDictionary * resources = [[NSMutableDictionary alloc] init];
[resources setObject:@100 forKey:@"currency1"];
[resources setObject:@10 forKey:@"currency2"];
//...and so on...
[DevToDev inAppPurchase:(NSString )purchaseId withPurchaseType:(NSString )purchaseType
andPurchaseAmount:(NSInteger)purchaseAmount andResources: (NSDictionary *) resources];/**
* In-app purchase with a definite article ID.
* @param purchaseId - unique purchase Id or name (max. 32 symbols)
* @param purchaseType - purchase type or group (max. 96 symbols)
* @param purchaseAmount - count of purchased goods
* @param purchasePrice - cost of purchased goods (total cost - if several goods were purchased)
* @param purchaseCurrency - currency name (max. 24 symbols)
*/
DevToDev.inAppPurchase(purchaseId:String, purchaseType:String, purchaseAmount:int, purchasePrice:int,
purchaseCurrency:String);var resources: Dictionary = new Dictionary();
resources["currency_1"] = 120;
resources["currency_2"] = 29;
//...and so on...
DevToDev.inAppPurchaseWithResources(purchaseId:String, purchaseType:String, purchaseAmount:int,
resources:Dictionary);/// <param name="eventName"> Event name </param>
DevToDev.Analytics.CustomEvent(string eventName);DevToDev.CustomEventParams customEventParams = new DevToDev.CustomEventParams();
customEventParams.AddParam("double", 1.12);
customEventParams.AddParam("int", 145);
customEventParams.AddParam("long", 123L);
customEventParams.AddParam("string","start");/// <param name="eventName">Event name</param>
/// <param name="eventParams">Event parameters</param>
DevToDev.Analytics.CustomEvent(string eventName, DevToDev.CustomEventParams eventParams);/**
* @param String eventName - event name
*/
[DevToDev customEvent: (NSString *) eventName];CustomEventParams * params_1 = [[CustomEventParams alloc] init];
[params_1 putParam:@"date" withDate:[NSDate date]];
[params_1 putParam:@"double" withDouble:123.1231231231231];
[params_1 putParam:@"float" withFloat:123.123123f];
[params_1 putParam:@"int" withInt:123];
[params_1 putParam:@"long" withLong:6152437L];
[param_1 putParam:@"string" withString:@"string"];/**
* @param String eventName - event name
* @param CustomEventParams params - event parameters
*/
[DevToDev customEvent: (NSString *) eventName withParams: (CustomEventParams *) params];/**
* Simple custom event
* @param String eventName - event name
*/
DevToDev.customEvent(eventName:String);var params:CustomEventParams = new CustomEventParams();
/**
* String type custom event parameter
* @param paramName - parameter name
* @param value - parameter value
*/
params.putString(paramName:String , value:String);
//Integer type custom event parameter
params.putInt(paramName:String, 145:int);
//Number type custom event parameter
params.putFloat(paramName:String, 9.99:Number);/**
* Custom event with params
* @param eventName - event name
* @param params - event parameters
*/
DevToDev.customEventsWithParams(eventName:String, params:CustomEventParams);FAnalytics::Get().GetDefaultConfiguredProvider()->RecordEvent(const FString& EventName,
const TArray<FAnalyticsEventAttribute>& Attributes);/**
* The method have to be used when entering the location.
* @param String locationName - the name of location user entered.
* @param LocationEventParams params - instance of location parameters class
*/
DevToDev.startProgressionEvent(locationName, params);/**
* The method have to be used when the location passing is over.
* @param String locationName - the name of location user left.
* @param LocationEventParams params - instance of location parameters class
*/
DevToDev.endProgressionEvent(locationName, params);/**
* Location level of difficulty (optional).
* @param int difficultyLevel - level of difficulty
*/
setDifficulty(difficultyLevel);
/**
* Previously visited location (optional).
* @param String locationName - previously visited location name
*/
setSource(locationName);
/**
* State/result of the location passing (required).
* @param boolean isCompleted - true if location is successfuly passed
*/
setSuccessfulCompletion(isCompleted);
/**
* Time spent in the location (optional).
* In case the parameter is not specified by the developer, it will be automatically calculated
* as the date difference between startProgressionEvent and endProgressionEvent method calls.
* @param int duration - time in seconds
*/
setDuration(duration);
/**
* User spendings within the location passing (optional).
* @ param HashMap<String, Number> spent - user spendings. Key length max. 24 symbols.
*/
setSpent(spent);
/**
* User earnings within the location passing (optional).
* @param HashMap<String, Number> earned - user earnings. Key length max. 24 symbols.
*/
setEarned(earned);/**
* <param name="locationName">The name of location user entered</param>
* <param name="locationParams">Instance of location parameters class</param>
*/
DevToDev.SDK.StartProgressionEvent(string locationName, LocationEventParams locationParams);/**
* <param name="locationName">The name of location user entered</param>
* <param name="locationParams">Instance of location parameters class</param>
*/
DevToDev.SDK.EndProgressionEvent(string locationName, LocationEventParams locationParams); /**
* Location level of difficulty (optional).
* <param name="difficultyLevel">Level of difficulty</param>
*/
SetDifficulty(int difficultyLevel);
/**
* Previously visited location (optional).
* <param name="locationName">Previously visited location name</param>
*/
SetSource(string locationName);
/**
* State/result of the location passing (required).
* <param name="isCompleted">True if location is successfuly passed</param>
*/
SetSuccessfulCompletion(bool isCompleted);
/**
* Time spent in the location (optional).
* In case the parameter is not specified by the developer, it will be automatically calculated
* as the date difference between StartProgressionEvent and EndProgressionEvent method calls.
* <param name="duration">Time in seconds</param>
*/
SetDuration(long duration);
/**
* User spendings within the location passing (optional). Key (currency name) length max. 24 symbols.
* <param name="spent">User spendings</param>
*/
SetSpent(Dictionary<string, int> spent);
/**
* User earnings within the location passing (optional). Key (currency name) length max. 24 symbols.
* <param name="earned">User earnings</param>
*/
SetEarned(Dictionary<string, int> earned);/**
* The method have to be used when entering the location.
* @param {string} locationName - the name of location user entered.
* @param {Object} startParams - location parameters object
*/
devtodev.startProgressionEvent(locationName, startParams);/**
* The method have to be used when the location passing is over.
* @param {string} locationName - the name of location user left.
* @param {Object} endParams - location parameters object
*/
devtodev.endProgressionEvent(locationName, endParams); var params = {
// Previously visited location (optional).
"source" : "locationSource",
// Location level of difficulty (optional).
"difficulty" : 1,
// Time spent in the location (optional).
// In case the parameter is not specified by the developer, it will be automatically calculated
// as the date difference between startProgressionEvent and endProgressionEvent method calls.
"duration" : 80,
// State/result of the location passing (required).
"success" : true,
//User spendings within the location passing (optional).
"spent" : [
{
"currency": "currency 1 name", // Currency name length max. 24 symbols.
"amount": 1 // objects with amount value less than 1 are ignored
},
{
"currency": "currency 2 name",
"amount": 2
}
],
// User earnings within the location passing (optional).
"earned" : [
{
"currency": "currency 1 name",
"amount": 1 // objects with amount value less than 1 are ignored
},
{
"currency": "currency 2 name",
"amount": 2
}
]
};/// <param name="eventId"> The name of location user entered </param>
/// <param name="eventParams"> Instance of progression parameters class </param>
DevToDev.Analytics.StartProgressionEvent(string eventId, ProgressionEventParams eventParams);/// <param name="eventId"> The name of location user left </param>
/// <param name="eventParams"> Instance of progression parameters class </param>
DevToDev.Analytics.EndProgressionEvent(string eventId, ProgressionEventParams eventParams); /// <summary> Location level of difficulty (optional). </summary>
/// <param name="difficultyLevel"> Level of difficulty </param>
SetDifficulty(int difficultyLevel);
/// <summary> Previously visited location (optional). </summary>
/// <param name="locationName"> Previously visited location name </param>
SetSource(string locationName);
/// <summary> State/result of the location passing (required). </summary>
/// <param name="isCompleted"> True if location is successfuly passed </param>
SetSuccessfulCompletion(bool isCompleted);
/// <summary>Time spent in the location (optional).
/// <para>In case the parameter is not specified by the developer, it will be automatically calculated
/// as the date difference between StartProgressionEvent and EndProgressionEvent method calls.</para>
/// </summary>
/// <param name="duration"> Time in seconds </param>
SetDuration(long duration);
/// <summary> User spendings within the location passing (optional). Dictionary key max.length is 24 symbols.</summary>
/// <param name="spent"> User spendings </param>
SetSpent(Dictionary<string, int> spent);
/// <summary> User earnings within the location passing (optional). </summary>
/// <param name="earned"> User earnings </param>
SetEarned(Dictionary<string, int> earned);/**
* The method have to be used when entering the location.
* @param String locationName - the name of location user entered.
* @param LocationEventParams params - instance of location parameters class
*/
[DevToDev startProgressionEvent: locationName withParameters: params];/**
* The method have to be used when the location passing is over.
* @param String locationName - the name of location user left.
* @param LocationEventParams params - instance of location parameters class
*/
[DevToDev endProgressionEvent: locationName withParameters: params];/**
* Location level of difficulty (optional).
* @param NSInteger difficultyLevel - level of difficulty
*/
[params setDifficulty: difficultyLevel];
/**
* Previously visited location (optional).
* @param NSString* locationName - previously visited location name
*/
[params setSource: locationName];
/**
* State/result of the location passing (required).
* @param BOOL isCompleted - true if location is successfuly passed
*/
[params setIsSuccess: isCompleted];
/**
* Time spent in the location (optional).
* In case the parameter is not specified by the developer, it will be automatically calculated
* as the date difference between startProgressionEvent and endProgressionEvent method calls.
* @param NSNumber* duration - time in seconds
*/
[params setDuration: duration];
/**
* User spendings within the location passing (optional).
* @ param NSDictionary* spent - user spendings. Key max.length is 24 symbols.
*/
[params setSpent: spent];
/**
* User earnings within the location passing (optional).
* @param NSDictionary* earned - user earnings. Key max.length is 24 symbols.
*/
[params setEarned: earned];/**
* The method have to be used when entering the location.
* @param locationName - the name of location user entered.
* @param params - instance of location parameters class
*/
DevToDev.StartProgressionEvent(locationName:String, params:LocationEventParams);/**
* The method have to be used when the location passing is over.
* @param locationName - the name of location user left.
* @param params - instance of location parameters class
*/
DevToDev.EndProgressionEvent(locationName:String, params:LocationEventParams); /**
* Location level of difficulty (optional).
* @param difficultyLevel - level of difficulty
*/
SetDifficulty(difficultyLevel:int);
/**
* Previously visited location (optional).
* @param locationName - previously visited location name
*/
SetSource(locationName:String);
/**
* State/result of the location passing (required).
* @param isCompleted - true if location is successfuly passed
*/
SetSuccessfulCompletion(isCompleted:Boolean);
/**
* Time spent in the location (optional).
* In case the parameter is not specified by the developer, it will be automatically calculated
* as the date difference between StartProgressionEvent and EndProgressionEvent method calls.
* @param duration - time in seconds
*/
SetDuration(duration:int);
/**
* User spendings within the location passing (optional).
* @ param spent - user spendings. Key max.length is 24 symbols.
*/
SetSpent(spent:Dictionary);
/**
* User earnings within the location passing (optional).
* @param earned - user earnings. Key max.length is 24 symbols.
*/
SetEarned(earned:Dictionary);/**
* The event allowing to track the stage of tutorial a player is on.
* @param NSUInteger tutorialStep - the latest successfully completed tutorial step.
*/
[DevToDev tutorialCompleted: (NSUInteger) tutorialStep];/**
* The event allowing to track the stage of tutorial a player is on.
* @param tutorialStep - the latest successfully completed tutorial step.
*/
DevToDev.tutorialCompleted(tutorialStep:int);/**
* Player has reached a new level
* @param NSInteger level - level reached by the player.
*/
[DevToDev levelUp: (NSInteger) level];/**
* Player has reached a new level
* @param int level - level reached by the player.
*/
DevToDev.levelUp(int level);/**
* <param name="level"> Level reached by the player </param>
*/
DevToDev.SDK.Level(int level);/**
* Player has reached a new level
* @param {number} level - level reached by the player.
*/
devtodev.levelUp(level);/// <summary> Player has reached a new level </summary>
/// <param name="level"> Level reached by the player </param>
DevToDev.Analytics.LevelUp(int level);/**
* Player has reached a new level
* @param NSUInteger level - level reached by the player.
*/
[DevToDev levelUp: (NSUInteger) level];/**
* Player has reached a new level
* @param level - level reached by the player.
*/
DevToDev.levelUp(level:int);/**
* Player has reached a new level
* @param NSInteger level - level reached by the player.
* @param NSDictionary resources - dictionary with the currency names and amounts
*/
NSDictionary * resources = @{@"Currency name 1" : @100, @"Currency name 2" : @10};
[DevToDev levelUp: (NSUInteger) level withResources: withResources: (NSDictionary *) resources];/**
* @param int level - level reached by the player
* @param HashMap resources - hashmap with the currency names and amounts
*/
HashMap resources = new HashMap<String, Integer>();
resources.put("Currency name 1", 1000);
resources.put("Currency name 2", 10);
DevToDev.levelUp(level, resources);/**
* <param name="level"> Player level </param>
* <param name="resources">Dictionary with the currency names and amounts</param>
*/
Dictionary<string, int> resources = new Dictionary<string, int>();
resources.Add("Currency name 1", 1000);
resources.Add("Currency name 2", 10);
DevToDev.SDK.Level(level, resources);/**
* @param {number} level - player/character's "level"
* @param {Object} resources - Object with data about currencies. Optional.
* @param {Object[]} resources.balance - Account balance of in-game currency by the end of level. * Optional.
* @param {Object[]} resources.balance[].currency - Game currency name
* @param {Object[]} resources.balance[].amount - Game currency amount
* @param {Object[]} resources.earned - Game currency earned during the level. Optional.
* @param {Object[]} resources.earned[].currency - Game currency name
* @param {Object[]} resources.earned[].amount - Game currency amount
* @param {Object[]} resources.spent - Game currency amount spent during the level. Optional.
* @param {Object[]} resources.spent[].currency - Game currency name
* @param {Object[]} resources.spent[].amount - Game currency amount
* @param {Object[]} resources.bought - Game currency amount bought during the level. Optional.
* @param {Object[]} resources.bought[].currency - Game currency name
* @param {Object[]} resources.bought[].amount - Game currency amount
*/
devtodev.levelUp(level, resources);/// <summary> Player has reached a new level</summary>
/// <param name="level"> Player level </param>
/// <param name="resources"> Dictionary with the currency names and amounts </param>
/// <example>
///
/// Dictionary<string, int> resources = new Dictionary<string, int>();
/// resources.Add("Currency name 1", 1000);
/// resources.Add("Currency name 2", 10);
///
/// </example>
DevToDev.Analytics.LevelUp(level, resources);/**
* Player has reached a new level
* @param NSInteger level - level reached by the player.
* @param NSDictionary resources - dictionary with the currency names and amounts
*/
NSDictionary * resources = @{@"Currency name 1" : @100, @"Currency name 2" : @10};
[DevToDev levelUp: (NSUInteger) level withResources: withResources: (NSDictionary *) resources];/**
* Player has reached a new level
* @param level - level reached by the player.
* @param resources - dictionary with the currency names and amounts
*/
var resources: Dictionary = new Dictionary();
resources["Currency name 1"] = 1000;
resources["Currency name 2"] = 10;
DevToDev.levelUpWithResources(level:int, resources:Dictionary);/* *
* @param NSString * currencyName - currency name (max. 24 symbols)
* @param NSInteger amount - the amount an account has been credited with.
* @param AccrualType accrualType - the way the currency was obtained: earned or purchased
*/
[DevToDev currencyAccrual: (NSInteger) amount withCurrencyName: (nonnull NSString *) currencyName
andCurrencyType: (AccrualType) accrualType];/**
* @param String currencyName - currency name (max. 24 symbols)
* @param float currencyAmount - the amount an account has been credited with
* @param AccrualType accrualType - the way the currency was obtained: earned or purchased
*/
DevToDev.currencyAccrual(currencyName, currencyAmount, accrualType);/**
* <param name="currencyName">Currency name (max. 24 symbols)</param>
* <param name="currencyAmount ">The amount an account has been credited with</param>
* <param name="accrualType">The way the currency was obtained: earned or purchased</param>
*/
DevToDev.SDK.CurrencyAccrual(string currencyName, float currencyAmount, AccrualType accrualType);/// <param name="currencyName"> Currency name (max. 24 symbols) </param>
/// <param name="currencyAmount "> The amount an account has been credited with </param>
/// <param name="accrualType"> The way the currency was obtained: earned or purchased </param>
DevToDev.Analytics.CurrencyAccrual(int amount, string currencyName, AccrualType accrualType);/**
* @param NSString * currencyName - currency name (max. 24 symbols)
* @param float amount - the amount an account has been credited with.
* @param AccrualType accrualType - the way the currency was obtained: earned or purchased
*/
/* *
* @param NSString * currencyName - currency name (max. 24 symbols)
* @param NSInteger amount - the amount an account has been credited with.
* @param AccrualType accrualType - the way the currency was obtained: earned or purchased
*/
[DevToDev currencyAccrual: (NSInteger) amount withCurrencyName: (nonnull NSString *) currencyName
andCurrencyType: (AccrualType) accrualType];/**
* @param currencyName - currency name (max. 24 symbols)
* @param currencyAmount - the amount an account has been credited with
* @param accrualType - the way the currency was obtained: earned or purchased
*/
DevToDev.currencyAccrual(currencyName:String, currencyAmount:Number, accrualType:AccrualType);typedef enum {
Earned,
Purchased
} AccrualType ;public enum AccrualType {
Earned,
Purchased
};public enum AccrualType {
Earned,
Purchased
};public enum AccrualType {
Earned,
Purchased
};typedef enum {
Earned,
Purchased
} AccrualType;AccrualType.EARNED;
AccrualType.PURCHASED;/**
* Register transactions made through the platform's payment system.
*
* @param NSString * paymentId - transaction ID (max. 64 symbols)
* @param float inAppPrice - product price (in user's currency)
* @param NSString * inAppName - product name
* @param NSString * inAppCurrencyISOCode - transaction currency (ISO 4217 format)
*/
[DevToDev realPayment: (NSString *) transactionId withInAppPrice:(float) inAppPrice
andInAppName: (NSString *) inAppName andInAppCurrencyISOCode: (NSString *) inAppCurrencyISOCode];/**
* Register transactions made through the platform's payment system.
*
* @param String paymentId - transaction ID (max. 64 symbols)
* @param float inAppPrice - product price (in user's currency)
* @param String inAppName - product name
* @param String inAppCurrencyISOCode - transaction currency
* (ISO 4217 format http://www.iso.org/iso/home/standards/currency_codes.htm Exapmle: "USD")
*/
DevToDev.realPayment(String paymentId, float inAppPrice, String inAppName,
String inAppCurrencyISOCode);/**
* In-app purchase with a definite article ID.
*
* @param NSString purchaseId - unique purchase Id or name (max. 32 symbols)
* @param NSString purchaseType - purchase type or group (max. 96 symbols)
* @param NSInteger purchaseAmount - count of purchased goods
* @param NSInteger purchasePrice - cost of purchased goods (total cost -if several goods were purchased)
* @param NSString purchaseCurrency - currency name (max. 24 symbols)
*/
[DevToDev inAppPurchase: (NSString *) purchaseId withPurchaseType: (NSString *) purchaseType
andPurchaseAmount: (NSInteger) purchase Amount andPurchasePrice: (NSInteger) purchaseprice
andPurchaseCurrency: (NSString *) purchaseCurrency];NSMutableDictionary * resources = [[NSMutableDictionary alloc] init];
[resources setObject:@100 forKey:@"currency1"];
[resources setObject:@10 forKey:@"currency2"];
//...and so on...
[DevToDev inAppPurchase:(NSString )purchaseId withPurchaseType:(NSString )purchaseType
andPurchaseAmount:(NSInteger)purchaseAmount andResources: (NSDictionary *) resources];/**
* In-app purchase with a definite article ID.
*
* @param purchaseId - unique purchase Id or name (max. 32 symbols)
* @param purchaseType - purchase type or group (max. 96 symbols)
* @param purchaseAmount - count of purchased goods
* @param purchasePrice - cost of purchased goods (total cost - if several goods were purchased)
* @param purchaseCurrency - currency name (max. 24 symbols)
*/
DevToDev.inAppPurchase(String purchaseId, String purchaseType, int purchaseAmount,
int purchasePrice, String purchaseCurrency);HashMap resources = new HashMap();
resources.put("currency_1", 120);
resources.put("currency_2", 29);DevToDev.inAppPurchase(String purchaseId, String purchaseType, int purchaseAmount, HashMap resources);/**
* <param name="purchaseId"> Unique purchase ID or name (max. 32 symbols)</param>
* <param name="purchaseType"> Purchase type or group (max. 96 symbols)</param>
* <param name="purchaseAmount"> Number of purchased goods </param>
* <param name="purchasePrice"> Cost of purchased goods (total cost - if several goods were purchased)</param>
* <param name="purchasePriceCurrency"> Currency name (max. 24 symbols)</param>
*/
DevToDev.SDK.InAppPurchase(string purchaseId, string purchaseType, int purchaseAmount,
int purchasePrice, string purchasePriceCurrency)DevToDev.SDK.InAppPurchase("sword", "weapons", 1, 200, "coins");Dictionary<string, int> resources = new Dictionary<string, int>();
resources.Add("currency_1", 120);
resources.Add("currency_2", 29);
//...and so on...
DevToDev.SDK.InAppPurchase(string purchaseId, string purchaseType, int purchaseAmount,
Dictionary<string, int> resources);/**
* Tracks in-app purchases.
*
* @param {string} purchaseId - unique purchase Id or name (max. 32 symbols)
* @param {string} purchaseType - purchase type or group (max. 96 symbols)
* @param {number} purchaseAmount - count of purchased goods
* @param {Object[]} purchasePrice - array including the names and amounts of
* the paid currencies (total cost - if several goods were purchased)
* @param {string} purchasePrice[].currency - game currency name
* @param {number} purchasePrice[].amount - currency amount
*/
devtodev.inAppPurchase(purchaseId, purchaseType, purchaseAmount, purchasePrice);var purchasePrice = [
{
“currency” : "coins", //game currency name
“amount” : 1000 //game currency amount
},
{
“currency” : "gold", //game currency name
“amount” : 10 //game currency amount
}
];
devtodev.inAppPurchase(“cloak”, “clothes”, 1, purchasePrice);/// <summary> In-app purchase with a definite ID. </summary>
/// <param name="purchaseId"> Unique purchase ID or name (max. 32 symbols)</param>
/// <param name="purchaseType"> Purchase type or group (max. 96 symbols)</param>
/// <param name="purchaseAmount"> Number of purchased goods </param>
/// <param name="purchasePrice"> Cost of purchased goods (total cost - if several goods were purchased)</param>
/// <param name="purchasePriceCurrency"> Currency name (max. 24 symbols)</param>
DevToDev.Analytics.InAppPurchase(string purchaseId, string purchaseType, int purchaseAmount,
int purchasePrice, string purchaseCurrency);Dictionary<string, int> resources = new Dictionary<string, int>();
resources.Add("currency_1", 120);
resources.Add("currency_2", 29);
//...and so on...
DevToDev.Analytics.InAppPurchase(string purchaseId, string purchaseType, int purchaseAmount,
Dictionary<string, int> resources);/**
* @param NSString eventName - event name
*/
[DevToDev customEvent: (NSString *) eventName];CustomEventParams * params_1 = [[CustomEventParams alloc] init];
[params_1 putParam:@"double" withDouble:123.1231231231231];
[params_1 putParam:@"float" withFloat:123.123123f];
[params_1 putParam:@"int" withInt:123];
[params_1 putParam:@"long" withLong:6152437L];
[param_1 putParam:@"string" withString:@"string"];/**
* @param NSString eventName - event name
* @param CustomEventParams params - event parameters
*/
[DevToDev customEvent: (NSString *) eventName withParams: (CustomEventParams *) params];/**
* Simple custom event
* @param String eventName - event name
*/
DevToDev.customEvent(eventName);CustomEventParams params = new CustomEventParams();
params.putDouble("double", 1.12);
params.putFloat("float", 9.99f);
params.putInteger("int", 145);
params.putLong("long", 123L);
params.putString("string","start");/**
* Custom event with params
* @param String eventName - event name
* @param CustomEventParams params - event parameters
*/
DevToDev.customEvent(eventName, params);/**
* <param name="eventName"> Event name </param>
*/
DevToDev.SDK.CustomEvent(string eventName);DevToDev.SDK.CustomEvent("bonus_used");/**
* <param name="eventName">Event name</param>
* <param name="eventParams">Event parameters</param>
*/
DevToDev.SDK.CustomEvent(string eventName, CustomEventParams eventParams)var cep = new CustomEventParams();
cep.AddParam("bonus_name", "your_awesome_bonus");
DevToDev.SDK.CustomEvent("bonus_used", cep);/**
* Tracks custom events.
* @param {string} eventName - event name
**/
devtodev.customEvent(eventName);/**
* Tracks custom events.
* @param {string} eventName - event name (max. 72 symbols)
* @param {Object[]} params - array of event parameters. Up to 20 params.
* @param {string} params[].name - parameter name (max. 32 symbols)
* @param {string} params[].type - parameter value type. Can be "double" or "string".
* @param {string|number} params[].value - parameter value. (max. 255 symbols)
**/
devtodev.customEvent(eventName, params);var params = [
{
"name": "score",
"type": "double",
"value": 100500,
},
{
"name": "type",
"type": "string",
"value": "fatality",
},
… //up to 10 parameters.
];
devtodev.customEvent("win", params);/**
* The method have to be used when entering the location.
* @param String locationName - the name of location user entered.
* @param LocationEventParams params - instance of location parameters class
*/
[DevToDev startProgressionEvent: locationName withParameters: params];/**
* The method have to be used when the location passing is over.
* @param String locationName - the name of location user left.
* @param LocationEventParams params - instance of location parameters class
*/
[DevToDev endProgressionEvent: locationName withParameters: params]; /**
* Location level of difficulty (optional).
* @param NSInteger difficultyLevel - level of difficulty
*/
[params setDifficulty: difficultyLevel];
/**
* Previously visited location (optional).
* @param NSString* locationName - previously visited location name
*/
[params setSource: locationName];
/**
* State/result of the location passing (required).
* @param BOOL isCompleted - true if location is successfuly passed
*/
[params setIsSuccess: isCompleted];
/**
* Time spent in the location (optional).
* In case the parameter is not specified by the developer, it will be automatically calculated
* as the date difference between startProgressionEvent and endProgressionEvent method calls.
* @param NSNumber* duration - time in seconds
*/
[params setDuration: duration];
/**
* User spendings within the location passing (optional).
* @ param NSDictionary* spent - user spendings. Key length max. 24 symbols.
*/
[params setSpent: spent];
/**
* User earnings within the location passing (optional).
* @param NSDictionary* earned - user earnings. Key length max. 24 symbols.
*/
[params setEarned: earned];// The event allowing to track the stage of tutorial a player is on.
// int32 step - the latest successfully completed tutorial step.
UDevToDevBlueprintFunctionLibrary::TutorialCompleted(int32 step);// Player has reached a new level
// int32 level - level reached by the player.
UDevToDevBlueprintFunctionLibrary::LevelUp(int32 level);// Player has reached a new level
// int32 level - level reached by the player.
// TArray<FAnalyticsEventAttr> Attributes - dictionary with the currency names and amounts
UDevToDevBlueprintFunctionLibrary::LevelUpWithAttributes(int32 level,
const TArray<FAnalyticsEventAttr>& Attributes);FAnalytics::Get().GetDefaultConfiguredProvider()->RecordCurrencyGiven(const FString& GameCurrencyType,
int GameCurrencyAmount,
const TArray<FAnalyticsEventAttribute>& EventAttrs);// Player comes to the third location on the map "Village" while following the game map.
// Create a parameters object
LocationEventParams* params = [[LocationEventParams alloc] init];
// Specify the known location parameters:
// Passing on the first level of difficulty.
[params setDifficulty:1];
// Before entering this location gamer passed the third location on the map “Village” (optional).
[params setSource: @"Vilage step 02"];
//The location passing starts (required).
[DevToDev startProgressionEvent:@"Vilage step 03" withParameters:params];
// ... Player passing the location.
// Player finishes passing of the third location on the map “Village”
// The location is passed successfully (required).
[params setIsSuccess: YES];
// The passing took 189 seconds.
[params setDuration:@189];
// Location is passed for 54 turns. While the passing gamer used boost and bought extra 5 turns.
NSDictionary* spent = @{
@"Turns" : @54,
@"Boost Bomb" : @1,
@"Extra 5 Turns" : @1
};
[params setSpent: spent];
// Gamer finished the passing with 3 stars and gained 5 coins and 1200 score.
NSDictionary* earned = @{
@"Stars" : @3,
@"Score" : @1200,
@"Coins" : @5
};
[params setEarned: earned];
// The location passing is over (required).
[DevToDev endProgressionEvent: @"Vilage step 03" withParameters: params];
Earned
TArray<FAnalyticsEventAttr>
User earnings within the location passing (optional). Key max. length is 24 symbols.
Spent
TArray<FAnalyticsEventAttr>
User spendings within the location passing (optional). Key max. length is 24 symbols.
Location parameters
Key
Type
Description
success
bool
State/result of the location passing (required).
source
FString
Previously visited location (optional).
difficulty
int32
Location level of difficulty (optional).
duration
Code
FString
Product name
In App Currency ISOCode
FString
Transaction currency (ISO 4217 format)
int32
Count of purchased goods
Field
Type
Description
purchaseType
FString
Purchase type or group (max. 96 symbols)
purchasePrice
int32
Cost of purchased goods (total cost -if several goods were purchased)
purchaseCurrency
FString
Currency name (max. 24 symbols)
TArray<FAnalyticsEventAttr>
Location parameters
Field
Type
Description
locationName
FString
The name of location user left
Attributes
TArray<FAnalyticsEventAttr>
Location parameters
To get the current value of the user ID, use the asynchronous method
(void)deviceIdHandler:( void (^ _Nonnull)(NSString * _Nonnull))completion-Handler;
To get the current value of the user ID, use the asynchronous method
getDeviceId(block: (String) -> Unit)
To get the current value of the user ID, use the asynchronous method
getDeviceId(block: (String) -> Unit)
To get the current value of the user ID, use the asynchronous method:
To get the current value of the user ID, use the asynchronous method:
getUserIdmethod userId
FString
User ID.
To get the current value of the user ID, use the asynchronous method:
onResult
FAnalyticsDynamicGetterStringDelegate
FDTDGetterStringDelegate
Callback
DTDAnalytics.GetUserId(Callable)fromUserId
FString
From user ID
toUserId
FString
To user ID
To get the user-level value stored by the SDK, use getCurrentLevel(completionHandler: @escaping (Int) -> Void) method
To set the current value to the user level, use (void)currentLevel:(NSInteger)currentLevel; method:
We recommend that you use the setCurrentLevel method immediately after using the setUserID method or specify the current user level in the initialization configuration (the level property of an instance of the DTDAnalyticsConfiguration).
Do not use the setCurrentLevel method when the user reaches a new level. In this case, you must use the method.
To get the user-level value stored by the SDK, use (void)currentLevelHandler:( void (^ _Nonnull)(NSInteger))completionHandler; method
To set the current value to the user level, use method:
We recommend that you use the setCurrentLevel method immediately after using the setUserID method or specify the current user level in the initialization configuration (the level property of an instance of the DTDAnalyticsConfiguration).
Do not use the setCurrentLevel method when the user reaches a new level. In this case, you must use the levelUp method.
To get the user-level value stored by the SDK, use getCurrentLevel(completionHandler: @escaping (Int) -> Void) method
To set the current value to the user level, use method:
We recommend that you use the SetCurrentLevel method immediately after using the SetUserID method or specify the current user level in the initialization configuration (the level property of an instance of the DTDAnalyticsConfiguration).
Do not use the SetCurrentLevel method when the user reaches a new level. In this case, you must use the LevelUp method.
To get the user-level value stored by the SDK, use GetCurrentLevel method:
To set the current value to the user level, use method:
We recommend that you use the setCurrentLevel method immediately after using the setUserID method or specify the current user level in the initialization configuration (the level property of an instance of the DTDAnalyticsConfiguration).
Do not use the setCurrentLevel method when the user reaches a new level. In this case, you must use the levelUp method.
To get the user-level value stored by the SDK, use getCurrentLevel method.
To set the current value to the user level, use method:
level
int32
Current level.
We recommend that you use the SetCurrentLevel method immediately after using the method or specify the current user level in the initialization configuration (the level property of an instance of the EDTDAnalyticsConfiguration).
Do not use the SetCurrentLevel method when the user reaches a new level. In this case, you must use the method.
To get the user-level value stored by the SDK, use method:
To set the current value to the user level, use SetCurrentLevel(level: int) method:
We recommend that you use the SetCurrentLevel method immediately after using the SetUserID method or specify the current user level in the initialization configuration (the level property of an instance of the GDDTDAnalyticsConfiguration).
Do not use the SetCurrentLevel method when the user reaches a new level. In this case, you must use the LevelUp method.
To get the user-level value stored by the SDK, use GetCurrentLevel(onResult: Callable) method
cheater
bool
Cheater flag
tester
bool
Tester flag
setEmail(email: String)
getEmail(completionHandler: @escaping (String?) -> Void)
Phone
setPhone(phone: String)
getPhone(completionHandler: @escaping (String?) -> Void)
Photo
setPhoto(photo: String)
getPhoto(completionHandler: @escaping (String?) -> Void)
Gender
setGender(gender: DTDGender)
getGender(completionHandler: @escaping (DTDGender) -> Void)
Age
setAge(age: Int)
getAge(completionHandler: @escaping (Int) -> Void
Attention! We strongly discourage the storage of personal user data! If you plan to pass this data, be sure to indicate this in the ‘Nutrition label’ when submitting the application to the App Store review.
Property
Setter
Getter
Age
[DTDUserCard setAge:(NSInteger)];
[DTDUserCard getAgeHandler:^(NSInteger age) { }]
Property
Getter
Setter
Name
setName(name: String)
getName(handler: (String) -> Unit)
setEmail(email: String)
getEmail(handler: (String) -> Unit)
Phone
setPhone(phone: String)
getPhone(handler: (String) -> Unit)
Property
Getter
Setter
Name
setName(name: String)
getName(handler: (String) -> Unit)
setEmail(email: String)
getEmail(handler: (String) -> Unit)
Phone
setPhone(phone: String)
Property
Getter
Setter
Name
SetName(name: string)
Task<string> GetName();
SetEmail(email: string)
Task<string> GetEmail()
Phone
SetPhone(phone: string)
Task<string> GetPhone()
Attention! We strongly discourage the storage of personal user data! If you plan to pass this data, be sure to indicate this in the ‘Nutrition label’ when submitting the application to the App Store review.
Property
Getter
Setter
Name
SetName(name: string)
GetName(Action<string> onGetName)
Property
Getter
Setter
Type
Name
getName()
setName("John Doe")
String
Phone
Attention! We strongly discourage the storage of personal user data! If you plan to pass this data, be sure to indicate this in the ‘Nutrition label’ when submitting the application to the App Store review.
Name
SetName(name: FString)
Example:
When using the getValue method, note that the Any return type will need to be cast to the data type you want.
This is how you can set properties on the current user profile:
To get the current value stored in the user profile on the SDK, you need to use the method:
(void)getValueWithKey:(NSString * _Nonnull)key :(void (^ _Nonnull)(id _Nullable))completionHandler;
This is how you can set properties on the current user profile:
To get the current value stored in the user profile on the SDK, you need to use the method:
getValue(key: String, handler: (Any?) -> Unit)
This is how you can set properties on the current user profile:
To get the current value stored in the user profile on the SDK, you need to use the method:
getValue(key: String, handler: (Any?) -> Unit)
This is how you can set properties on the current user profile:
To get the current value stored in the user profile on the SDK, you need to use the method:
This is how you can set properties on the current user profile:
To get the current value stored in the user profile on the SDK, you need to use the method:
This is how you can set properties on the current user profile:
To get the current value stored in the user profile on the SDK, you need to use the method:
This is how you can set properties on the current user profile:
key
FString
Parameter key.
value
bool
Parameter value.
To get the current value stored in the user profile on the SDK, you need to use methods:
This is how you can set properties on the current user profile:
To get the current values stored in the user profile on the SDK, you need to use the methods:
TryGetBool(key: String, callback: Callable)
TryGetFloat(key: String, callback: Callable)
TryGetInt(key: String, callback: Callable)
TryGetString(key: String, callback: Callable
key
FString
Parameter key.
keys
TArray<FString>
Parameter keys.
Property
Getter
Setter
Name
setName(name: String)
getName(completionHandler: @escaping (String?) -> Void)


DTDAnalytics.setUserId(userId: "Custom User ID")DTDAnalytics.getUserId { userId in
// your code
}DTDAnalytics.replace(fromUserId: "Old user id", toUserId: "New user id")[DTDAnalytics replaceFromUserId:@"Old user id" toUserId:@"New user id"];DTDAnalytics.replaceUserId(
fromUserId = "Old user id",
toUserId = "New user id"
)DTDAnalytics.INSTANCE.replaceUserId("Old user id", "New user id");DTDAnalytics.Replace(fromUserId: "Old user id", toUserId: "New user id");DTDAnalytics.Replace(fromUserId: "Old user id", toUserId: "New user id");window.devtodev.replace( "Old user id", "New user id")[DTDAnalytics userId:@"Custom User ID"];[DTDAnalytics userIdHandler:^(NSString * _Nonnull userId) {
// your code
}];DTDAnalytics.setUserId(userId = "Custom User ID")DTDAnalytics.getUserId { userId ->
// your code
}// Register transactions made through the platform's payment system.
// FString transactionId - transaction ID
// float inAppPrice - product price (in user's currency)
// FString inAppName - product name
// FString inAppCurrencyISOCode - transaction currency (ISO 4217 format)
UDevToDevBlueprintFunctionLibrary::RealPayment(const FString& transactionId,
float inAppPrice,
const FString& inAppName,
const FString& inAppCurrencyISOCode);// In-app purchase with a definite article ID.
// FString ItemId - unique purchase Id or name (max. 32 symbols)
// int32 ItemQuantity - count of purchased goods
//
// FString purchaseType - purchase type or group (max. 96 symbols)
// int32 purchasePrice - cost of purchased goods (total cost -if several goods were purchased)
// FString purchaseCurrency - currency name (max. 24 symbols)
FAnalytics::Get().GetDefaultConfiguredProvider()->RecordItemPurchase(const FString& ItemId,
int ItemQuantity,
const TArray<FAnalyticsEventAttribute>& Attributes);// Player comes to the third location on the map "Village" while following the game map.
// Create a parameters object
LocationEventParams params = new LocationEventParams();
// Specify the known location parameters:
// Passing on the first level of difficulty.
params.setDifficulty(1);
// Before entering this location gamer passed the third location on the map “Village” (optional).
params.setSource("Vilage step 02");
//The location passing starts (required).
DevToDev.startProgressionEvent("Vilage step 03", params);
// ... Player passing the location.
// Player finishes passing of the third location on the map “Village”
// The location is passed successfully (required).
params.setSuccessfulCompletion(true);
// The passing took 189 seconds.
params.setDuration(189);
// Location is passed for 54 turns. While the passing gamer used boost and bought extra 5 turns.
HashMap<String, Number> spent = new HashMap<String, Number>();
spent.put("Turns", 54);
spent.put("Boost Bomb", 1);
spent.put("Extra 5 Turns", 1);
params.setSpent(spent);
// Gamer finished the passing with 3 stars and gained 5 coins and 1200 score.
HashMap<String, Number> earned = new HashMap<String, Number>();
earned.put("Stars", 3);
earned.put("Score", 1200 );
earned.put("Coins", 5);
params.setEarned(earned);
// The location passing is over (required).
DevToDev.endProgressionEvent("Vilage step 03", params);// Player comes to the third location on the map "Village" while following the game map.
// Create a parameters object
LocationEventParams locationParams = new LocationEventParams();
// Specify the known location parameters:
// Passing on the first level of difficulty.
locationParams.SetDifficulty(1);
// Before entering this location gamer passed the third location on the map “Village” (optional).
locationParams.SetSource("Vilage step 02");
//The location passing starts (required).
DevToDev.SDK.StartProgressionEvent("Vilage step 03", locationParams);
// ... Player passing the location.
// Player finishes passing of the third location on the map “Village”
LocationEventParams locationParams = new LocationEventParams();
// The location is passed successfully (required).
locationParams.SetSuccessfulCompletion(true);
// The passing took 189 seconds.
locationParams.SetDuration(189);
// Location is passed for 54 turns. While the passing gamer used boost and bought extra 5 turns.
Dictionary<string, int> spent = new Dictionary<string, int>();
spent["Turns"] = 54;
spent["Boost Bomb"] = 1;
spent["Extra 5 Turns"] = 1;
locationParams.SetSpent(spent);
// Gamer finished the passing with 3 stars and gained 5 coins and 1200 score.
Dictionary<string, int> earned = new Dictionary<string, int>();
earned["Stars"] = 3;
earned["Score"] = 1200;
earned["Coins"] = 5;
locationParams.SetEarned(earned);
// The location passing is over (required).
DevToDev.SDK.EndProgressionEvent("Vilage step 03", locationParams);// Player comes to the third location on the map "Village" while following the game map.
// Create a parameters object
var params = {};
// Specify the known location parameters:
// Passing on the first level of difficulty.
params["difficulty"] = 1;
// Before entering this location gamer passed the third location on the map “Village” (optional).
params["source"] = "Vilage step 02";
//The location passing starts (required).
devtodev.startProgressionEvent("Vilage step 03", params);
// ... Player passing the location.
// Player finishes passing of the third location on the map “Village”
// The location is passed successfully (required).
params["success"] = true;
// The passing took 189 seconds.
params["duration"] = 189;
// Location is passed for 54 turns. While the passing gamer used boost and bought extra 5 turns.
params["spent"] = [
{
"currency": "Turns",
"amount": 54
},
{
"currency": "Boost Bomb",
"amount": 1
},
{
"currency": "Extra 5 Turns",
"amount": 1
}
];
// Gamer finished the passing with 3 stars and gained 5 coins and 1200 score.
params["earned"] = [
{
"currency": "Stars",
"amount": 3
},
{
"currency": "Score",
"amount": 1200
},
{
"currency": "Coins",
"amount": 5
}
];
// The location passing is over (required).
devtodev.endProgressionEvent("Vilage step 03", params);// Player comes to the third location on the map "Village" while following the game map.
// Create a parameters object
ProgressionEventParams locationParams = new ProgressionEventParams();
// Specify the known location parameters:
// Passing on the first level of difficulty.
locationParams.SetDifficulty(1);
// Before entering this location gamer passed the third location on the map “Village” (optional).
locationParams.SetSource("Vilage step 02");
//The location passing starts (required).
DevToDev.Analytics.StartProgressionEvent("Vilage step 03", locationParams);
// ... Player passing the location.
// Player finishes passing of the third location on the map “Village”
// Create a parameters object
ProgressionEventParams locationParams = new ProgressionEventParams();
// The location is passed successfully (required).
locationParams.SetSuccessfulCompletion(true);
// The passing took 189 seconds.
locationParams.SetDuration(189);
// Location is passed for 54 turns. While the passing gamer used boost and bought extra 5 turns.
Dictionary<string, int> spent = new Dictionary<string, int>();
spent["Turns"] = 54;
spent["Boost Bomb"] = 1;
spent["Extra 5 Turns"] = 1;
locationParams.SetSpent(spent);
// Gamer finished the passing with 3 stars and gained 5 coins and 1200 score.
Dictionary<string, int> earned = new Dictionary<string, int>();
earned["Stars"] = 3;
earned["Score"] = 1200;
earned["Coins"] = 5;
locationParams.SetEarned(earned);
// The location passing is over (required).
DevToDev.Analytics.EndProgressionEvent("Vilage step 03", locationParams);// Player comes to the third location on the map "Village" while following the game map.
// Create a parameters object
LocationEventParams* params = [[LocationEventParams alloc] init];
// Specify the known location parameters:
// Passing on the first level of difficulty.
[params setDifficulty:1];
// Before entering this location gamer passed the third location on the map “Village” (optional).
[params setSource: @"Vilage step 02"];
//The location passing starts (required).
[DevToDev startProgressionEvent:@"Vilage step 03" withParameters:params];
// ... Player passing the location.
// Player finishes passing of the third location on the map “Village”
// The location is passed successfully (required).
[params setIsSuccess: YES];
// The passing took 189 seconds.
[params setDuration:@189];
// Location is passed for 54 turns. While the passing gamer used boost and bought extra 5 turns.
NSDictionary* spent = @{
@"Turns" : @54,
@"Boost Bomb" : @1,
@"Extra 5 Turns" : @1
};
[params setSpent: spent];
// Gamer finished the passing with 3 stars and gained 5 coins and 1200 score.
NSDictionary* earned = @{
@"Stars" : @3,
@"Score" : @1200,
@"Coins" : @5
};
[params setEarned: earned];
// The location passing is over (required).
[DevToDev endProgressionEvent: @"Vilage step 03" withParameters: params];// Player comes to the third location on the map "Village" while following the game map.
// Create a parameters object
var params:LocationEventParams = new LocationEventParams();
// Specify the known location parameters:
// Passing on the first level of difficulty.
params.SetDifficulty(1);
// Before entering this location gamer passed the third location on the map “Village” (optional).
params.SetSource("Vilage step 02");
//The location passing starts (required).
DevToDev.StartProgressionEvent("Vilage step 03", params);
// ... Player passing the location.
// Player finishes passing of the third location on the map “Village”
var params:LocationEventParams = new LocationEventParams();
// The location is passed successfully (required).
params.SetSuccessfulCompletion(true);
// The passing took 189 seconds.
params.SetDuration(189);
// Location is passed for 54 turns. While the passing gamer used boost and bought extra 5 turns.
var spent:Dictionary = new Dictionary();
spent["Turns"] = 54;
spent["Boost Bomb"] = 1;
spent["Extra 5 Turns"] = 1;
params.SetSpent(spent);
// Gamer finished the passing with 3 stars and gained 5 coins and 1200 score.
var earned:Dictionary = new Dictionary();
earned["Stars"] = 3;
earned["Score"] = 1200;
earned["Coins"] = 5;
params.SetEarned(earned);
// The location passing is over (required).
DevToDev.EndProgressionEvent("Vilage step 03", params);// The method have to be used when entering the location.
// FString locationName - the name of location user entered.
// TArray<FAnalyticsEventAttr> Attributes - location parameters
UDevToDevBlueprintFunctionLibrary::StartProgressionEvent(const FString& locationName,
const TArray<FAnalyticsEventAttr>& Attributes);// The method have to be used when the location passing is over.
// FString locationName - the name of location user left.
// TArray<FAnalyticsEventAttr> Attributes - location parameters
// TArray<FAnalyticsEventAttr> Earned - user earnings within the location passing (optional)
// TArray<FAnalyticsEventAttr> Spent - user spendings within the location passing (optional).
UDevToDevBlueprintFunctionLibrary::EndProgressionEvent(const FString& locationName,
const TArray<FAnalyticsEventAttr>& Attributes,
const TArray<FAnalyticsEventAttr>& Earned,
const TArray<FAnalyticsEventAttr>& Spent);DTDAnalytics.ReplaceUserId("Old user id", "New user id")[DTDAnalytics currentLevel:2];DTDAnalytics.setCurrentLevel(currentLevel = 2)DTDAnalytics.INSTANCE.setCurrentLevel(2);DTDAnalytics.SetCurrentLevel(level: 3);DTDAnalytics.SetCurrentLevel(level: 3);window.devtodev.setCurrentLevel(2)UDTDAnalyticsBPLibrary::SetCurrentLevel(7);DTDAnalytics.SetCurrentLevel(2)DTDUserCard.SetCheater(true)DTDUserCard.SetTester(true)[DTDUserCard setString:@"key for string value" value:@"string value"];
[DTDUserCard setInt:@"key for int value" value:10];
[DTDUserCard setDouble:@"key for double value" value:12.5];
[DTDUserCard setBool:@"key for bool value" value:true];[DTDUserCard getValueWithKey:@"key for value" :^(id object) {
// your code
}];DTDUserCard.set(key = "key for string value", value = "string value")
DTDUserCard.set(key = "key for int value", value = 10)
DTDUserCard.set(key = "key for double value", value = 12.5)
DTDUserCard.set(key = "key for bool value", value = true)DTDUserCard.getValue(key = "key for value") { value ->
// your code
}DTDUserCard.INSTANCE.set("key for string value", "string value");
DTDUserCard.INSTANCE.set("key for int value", 10);
DTDUserCard.INSTANCE.set("key for double value", 12.5);
DTDUserCard.INSTANCE.set("key for bool value", true);DTDUserCard.INSTANCE.getValue("key for value", value ->
// your code
null
);jDTDUserCard.Set(key: "key for string value", value: "string value");
DTDUserCard.Set(key: "key for int value", value: 10);
DTDUserCard.Set(key: "key for double value", value: 12.5);
DTDUserCard.Set(key: "key for bool value", value: true);var value = await DTDUserCard.Get(key: "key for value");
switch (value)
{
case bool boolValue:
break;
case long longValue:
break;
case double doubleValue:
break;
case string stringValue:
break;
}DTDUserCard.Set(key: "key for string value", value: "string value");
DTDUserCard.Set(key: "key for int value", value: 10);
DTDUserCard.Set(key: "key for double value", value: 12.5);
DTDUserCard.Set(key: "key for bool value", value: true);DTDUserCard.GetValue("key", value =>
{
switch (value)
{
case bool boolValue:
break;
case long longValue:
break;
case double doubleValue:
break;
case string stringValue:
break;
}
})
DTDUserCard.Get(key: "key for value");window.devtodev.user.set("key for string value", "string value")
window.devtodev.user.set("key for int value", 10)
window.devtodev.user.set("key for double value", 12.5)
window.devtodev.user.set("key for bool value", true)window.devtodev.user.getValue("key for value") UDTDUserCardBPLibrary::SetBool("BoolKey", true);DTDUserCard.SetString("key for string value", "string value")
DTDUserCard.SetInt("key for int value", 10)
DTDUserCard.SetFloat("key for double value", 12.5)
DTDUserCard.SetBool("key for bool value", true)DTDUserCard.Unset("intKey")
var arrayOfKeys = ["floatKey", "boolKey"]
DTDUserCard.UnsetArray(arrayOfKeys)DTDUserCard.clearUser()DTDUserCard.INSTANCE.clearUser();DTDUserCard.ClearUser();DTDUserCard.ClearUser();window.devtodev.user.clearUser()UDTDUserCardBPLibrary::ClearUser();DTDUserCard.ClearUser()window.devtodev.setUserId("Custom User ID")DTDAnalytics.SetUserId("Custom User ID")DTDAnalytics.setCurrentLevel(value: 2)DTDUserCard.setCheater(cheater: true)[DTDUserCard setCheater:true];DTDUserCard.setCheater(cheater = true)DTDUserCard.INSTANCE.setCheater(true);DTDUserCard.SetCheater(cheater: true);DTDUserCard.SetCheater(cheater: true);window.devtodev.user.setCheater(true)DTDUserCard.setTester(tester: true)[DTDUserCard setTester:true];DTDUserCard.setTester(tester = true)DTDUserCard.INSTANCE.setTester(true);DTDUserCard.SetTester(tester: true);DTDUserCard.SetTester(tester: true);window.devtodev.user.setTester(true)DTDUserCard.set(key: "key for string value", value: "string value")
DTDUserCard.set(key: "key for int value", value: 10)
DTDUserCard.set(key: "key for double value", value: 12.5)
DTDUserCard.set(key: "key for bool value", value: true)DTDUserCard.getValue(key: "key for value") { value in
// your code
}DTDUserCard.unset(property: "key for string value")
DTDUserCard.unset(properties: ["key for string value",
"key for int value"])[DTDUserCard unsetProperty:@"key for string value"];
[DTDUserCard unset:@[@"key for string value",
@"key for int value"]];DTDUserCard.unset(property = "key for string value")
DTDUserCard.unset(property = listOf("key for string value", "key for int value"))DTDUserCard.INSTANCE.unset( "key for string value");
ArrayList<String> properties = new ArrayList<>();
properties.add("key for string value");
properties.add("key for int value");
DTDUserCard.INSTANCE.unset(properties);DTDUserCard.Unset(keys: "key 1");
DTDUserCard.Unset(keys: "key 1", "key 2", "key 3");DTDUserCard.Unset(keys: "key 1");
DTDUserCard.Unset(keys: "key 1", "key 2", "key 3");window.devtodev.user.unset("key for string value")
window.devtodev.user.unset(["key for string value", "key for int value"])DTDUserCard.clearUser()[DTDUserCard clearUser];DTDAnalytics.INSTANCE.setUserId("Custom User ID");DTDAnalytics.INSTANCE.getUserId(userID ->
// your code
null
);DTDAnalytics.SetUserId(userId: "Custom User ID")var userId = await DTDAnalytics.GetUserId();DTDAnalytics.SetUserId(userId: "Custom User ID")DTDAnalytics.GetUserId(id =>
{
//your code
});var userId = window.devtodev.getUserId()UDTDAnalyticsBPLibrary::SetUserId("Name");auto onResult = new FDTDGetterStringDelegate();
onResult->BindLambda([](const FString& value)
{
// Your code...
});
UDTDAnalyticsBPLibrary::GetUserId(*onResult);DTDAnalytics.GetUserId(getUserIdHandler)
func getUserIdHandler(userId: String):
print(userId)UDTDAnalyticsBPLibrary::ReplaceUserId("UserIdBefore", "UserIdAfter");DTDAnalytics.getCurrentLevel { level in
// your code
}UDTDUserCardBPLibrary::SetCheater(true);UDTDUserCardBPLibrary::SetTester(true);UDTDUserCardBPLibrary::Unset("Key");TArray<FString> keys;
keys.Add("Key1");
keys.Add("Key2");
UDTDUserCardBPLibrary::UnsetArray(keys);int32
Time spent in the location (optional). In case the parameter is not specified by the developer, it will be automatically сalculated as the date difference between Start Progression Event and End Progression Event method calls.


onResult
FAnalyticsDynamicGetterIntDelegate
FDTDGetterIntDelegate
Callback
[DTDUserCard setEmail:(NSString * _Nonnull)];
[DTDUserCard getEmailHandler:^(NSString * email) { }];
Gender
[DTDUserCard setGender:(enum Gender)];
[DTDUserCard getGenderHandler:^(enum Gender gender) { }];
Name
[DTDUserCard setName:(NSString * _Nonnull)];
[DTDUserCard getNameHandler:^(NSString * name) { }];
Phone
[DTDUserCard setPhone:(NSString * _Nonnull)];
[DTDUserCard getPhoneHandler:^(NSString * phone) { }];
Photo
[DTDUserCard setPhoto:(NSString * _Nonnull)];
[DTDUserCard getPhotoHandler:^(NSString * photo) { }];
Photo
setPhoto(photo: String)
getPhoto(handler: (String) -> Unit)
Gender
setGender(gender: DTDGender)
getGender(handler: (DTDGender) -> Void)
Age
setAge(age: Int)
getAge(handler: (String) -> Unit)
getPhone(handler: (String) -> Unit)
Photo
setPhoto(photo: String)
getPhoto(handler: (String) -> Unit)
Gender
setGender(gender: DTDGender)
getGender(handler: (DTDGender) -> Void)
Age
setAge(age: Int)
getAge(handler: (String) -> Unit)
Photo
SetPhoto(photo: string)
Task<string> GetPhoto()
Gender
SetGender(gender: DTDGender)
Task<DTDGender> GetGender()
Age
SetAge(age: long)
Task<long> GetAge()
SetEmail(email: string)
GetEmail(Action<string> onGetEmail)
Phone
SetPhone(phone: string)
GetPhone(Action<string> onGetPhone)
Photo
SetPhoto(photo: string)
GetPhoto(Action<string> onGetPhoto)
Gender
SetGender(gender: DTDGender)
GetGender(Action<DTDGender> onGetGender)
Age
SetAge(age: long)
GetAge(Action<string> onGetAge)
getPhone()
setPhone("+15555555555")
String
Photo
getPhoto()
setPhoto("https://domain.com/photo.jpg")
String
Gender
getGender()
setGender(gender)
Age
getAge()
setAge(age)
Int
GetName(delegate: FUserCardDynamicGetterStringDelegate)
GetName(delegate: FDTDGetterStringDelegate)
Email
SetEmail(email: FString)
GetEmail(delegate: FUserCardDynamicGetterStringDelegate)
GetEmail(delegate: FDTDGetterStringDelegate)
Phone
SetPhone(phone: FString)
GetPhone(delegate: FUserCardDynamicGetterStringDelegate)
GetPhone(delegate: FDTDGetterStringDelegate)
Photo
SetPhoto(photo: FString)
GetPhoto(delegate: FUserCardDynamicGetterStringDelegate)
GetPhoto(delegate: FDTDGetterStringDelegate)
Gender
SetGender(gender: EDTDGender)
GetGender(delegate: FUserCardDynamicGetterGenderDelegate)
GetGender(delegate: FDTDGetterGenderDelegate)
Age
SetAge(age: int64)
GetAge(delegate: FUserCardDynamicGetterLongDelegate)
GetAge(delegate: FDTDGetterLongDelegate)
key
FString
Parameter key.
value
float
Parameter value.
key
FString
Parameter key.
value
int64
Parameter value.
key
FString
Parameter key.
value
FString
Parameter value.
key
FString
Parameter key.
onResult
FUserCardDynamicGetterOptionalBoolDelegate
FDTDGetterOptionalBoolWithKeyDelegate
Callback.
key
FString
Parameter key.
onResult
FUserCardDynamicGetterOptionalFloatDelegate
FDTDGetterOptionalFloatWithKeyDelegate
Callback.
key
FString
Parameter key.
onResult
FUserCardDynamicGetterOptionalLongDelegate
FDTDGetterOptionalLongWithKeyDelegate
Callback.
key
FString
Parameter key.
onResult
FUserCardDynamicGetterOptionalStringDelegate
FDTDGetterOptionalStringWithKeyDelegate
Callback.
Blueprint


[DTDAnalytics currentLevelHandler:^(NSInteger level) {
// your code
}];DTDAnalytics.getCurrentLevel { level ->
// your code
}DTDAnalytics.INSTANCE.getCurrentLevel ( currentLevel ->
// your code
null
);var currentLevel = await DTDAnalytics.GetCurrentLevel();DTDAnalytics.GetCurrentLevel(level =>
{
//your code
});var currentLevel = window.devtodev.getCurrentLevel()auto onResult = new FDTDGetterIntDelegate();
onResult->BindLambda([](int32 value)
{
// Your code...
});
UDTDAnalyticsBPLibrary::GetCurrentLevel(*onResult);DTDAnalytics.GetCurrentLevel(getCurrentLevelHandler)
func getCurrentLevelHandler(level: int):
print("result is: " + str(level))UDTDUserCardBPLibrary::SetEmail("Email");auto onResult = new FDTDGetterStringDelegate();
onResult->BindLambda([](const FString& value)
{
// Your code...
});
UDTDUserCardBPLibrary::GetEmail(*onResult);UUDTDUserCardBPLibrary::SetFloat("FloatKey", 3.333);UDTDUserCardBPLibrary::SetLong("LongKey", 1000);UDTDUserCardBPLibrary::SetString("StringKey", "StringValue");FString key = FString(TEXT("Key"));
auto onResult = new FDTDGetterOptionalBoolWithKeyDelegate();
onResult->BindLambda([](bool success, const FString& key, bool value)
{
// Your code...
});
UDTDUserCardBPLibrary::TryGetBool(key, *onResult);FString key = FString(TEXT("Key"));
auto onResult = new FDTDGetterOptionalFloatWithKeyDelegate();
onResult->BindLambda([](bool success, const FString& key, float value)
{
// Your code...
});
UDTDUserCardBPLibrary::TryGetFloat(key, *onResult);FString key = FString(TEXT("Key"));
auto onResult = new FDTDGetterOptionalIntWithKeyDelegate();
onResult->BindLambda([](bool success, const FString& key, int64 value)
{
// Your code...
});
UDTDUserCardBPLibrary::TryGetLong(key, *onResult);FString key = FString(TEXT("Key"));
auto onResult = new FDTDGetterOptionalStringWithKeyDelegate();
onResult->BindLambda([](bool success, const FString& key, const FString& value)
{
// Your code...
});
UDTDUserCardBPLibrary::TryGetString(key, *onResult);DTDUserCard.TryGetInt("intKey", getIntHandler)
DTDUserCard.TryGetString("intKey", getStringHandler)
DTDUserCard.TryGetFloat("intKey", getFloatHandler)
DTDUserCard.TryGetBool("intKey", getBoolHandler)
func getIntHandler(isValid: bool, value: int):
print("isValid = " + str(isValid) + " integer = " + str(value))
func getStringHandler(isValid: bool, value: String):
print("isValid = " + str(isValid) + " string = " + value)
func getFloatHandler(isValid: bool, value: float):
print("isValid = " + str(isValid) + " float = " + str(value))
func getBoolHandler(isValid: bool, value: bool):
print("isValid = " + str(isValid) + " bool = " + str(value))


If you need to exclude transactions from such users from statistics, go to Users & Segments section in devtodev interface and mark the user manually. When you mark the user in devtodev interface, the system removes their transactions for the last 7 days the reports and recalculates the metrics.
If you need to exclude transactions from such users from statistics, go to Users & Segments section in devtodev interface and mark the user manually. When you mark the user in devtodev interface, the system removes their transactions for the last 7 days the reports and recalculates the metrics.


Some operations can take a while because the SDK operates asynchronously. These operations are:
After you’ve created an A/B test in the web interface, the SDK will receive its configuration via the network. Use the remoteConfigWaiting property in the DTDRemoteConfig class to set the maximum time allowed for waiting for the A/B test configuration.
By default, the remoteConfigWaiting value is equal to null. This means that the test configuration waiting time is unlimited. The limitation is important in case the test that you are about to execute can influence your app functioning.
Example: DTDRemoteConfig.remoteConfigWaiting = 10
In this case, the SDK will wait for the A/B test configuration for 10 seconds. If it won’t receive the config during the allocated time, it will notify the developer by using the onReceived(result: DTDRemoteConfigReceiveResult) method with Failure value and disable the A/B testing until the next SDK initialization.
After the SDK finds a test, it will wait for a suitable group to include the user into and start the experiment.
You can change this value up or down.
Example: DTDRemoteConfig.groupDefinitionWaiting = 15
In this case, the SDK will wait for a group for no more than 15 seconds. If It can't find a suitable test for 15 seconds, it will be cancelled and its activation will be impossible. After the next SDK initialization (app restart), the user will have another chance to participate in the test.
The DTDRemoteConfig.remoteConfigWaiting and DTDRemoteConfig.groupDefinitionWaitingvalues can be set only prior to SDK initialization!
In the DTDRemoteConfig class you need to set the default variables and their values using the DTDRemoteConfig.defaults property.
After setting up DTDRemoteConfig.defaults, you can receive the variable values by using the DTDRemoteConfig.config property.
When working with A/B tests, always use the config property to receive the actual variables and their values!
To work with A/B testing, use the DTDAnalytics.initializeWithAbTest initialization method.
The DTDRemoteConfigListener interface is added to the initializeWithAbTest method. It implements three methods:
Methods implementation for working with A/B tests. When suitable conditions for the test occur, the following chain of events gets initiated:
Calling onReceived method
Calling onPrepareToChange method
Calling onChanged method
The onReceived method is triggered every time when the SDK loads A/B test configuration. The result argument returns the following:
Success if the configuration was loaded in the time provided. Time is set by the user in DTDRemoteConfig.remoteConfigWaiting.
Failure if the config wasn’t received during the provided time defined by the user in DTDRemoteConfig.remoteConfigWaiting.
Empty if the configuration was loaded in the time provided, but the list of experiments is empty. Time is set by the user in
If the DTDRemoteConfig.remoteConfigWaiting’s default value is equal to null, the OnReceived method and DTDRemoteConfigReceiveResult.Success are called when the config is received. The time of the OnReceived call depends on the network speed.
The onPrepareToChange() method is designed to notify the developer that the configuration of the A/B tests will be changed (the test is found or canceled, switch to a user who is not participating in the experiment, etc. (see Some features in the behavior of interfaces)).
onChanged (see onChanged description) and a decision on test participation with a new config is made (see applyConfig description).
A timer on the developer’s side. The timer defines the time allocated for new config waiting. After the time has run out, waiting for the config should be canceled.
See the implementation example (Scenario 1)
After calling onPrepareToChange, the SDK executes an asynchronous request for entering the test. That will result in calling onChanged.
The onChanged method is triggered in one of the following cases:
The DevToDev server offers to enroll in a test.
onChanged() with DTDRemoteConfigChangeResult.success is called
The DevToDev server refuses to execute the test.
onChanged() with DTDRemoteConfigChangeResult.failure is called
If the onChanged method is triggered with status == DTDRemoteConfigChangeResult.success value, the possible options are:
Accept the configuration by calling the DTDRemoteConfig.applyConfig() method
If the configuration is accepted, the default parameters and group parameters (issued by the server) will overlap. After that, the parameters of the new configuration will be available in DTDRemoteConfig.config (you can use them to change the behavior or the interface of the app).
Refuse enrollment in the test DTDRemoteConfig.resetConfig()
If the test enrollment is refused or the time for decision making is up, the SDK will temporarily flag the test and it will become unavailable until the next initialization. After the next initialization, the test will be available for participation when its requirements are fulfilled.
In the cases where status == DTDRemoteConfigChangeResult.failure, the DTDRemoteConfig.applyConfig() method will be triggered and the default configuration will stay in place.
Set the default values DTDRemoteConfig.defaults = ["button_color": "green", "button_size": "8"]
Variable names have to be the same as in the ‘Group settings’ section of the web interface (see ‘web’ above). When the SDK gets included in the A/B test, the devtodev server automatically assigns it to a group.
SDK will not use new variable values that are not set in DTDRemoteConfig.defaults
Example of the DTDRemoteConfig.configvalue variants:
When the SDK finds a suitable test(s), it calls the onPrepareToChange method and reports it. Then the SDK starts a timer for 30 seconds and sends a request to the devtodev server. The server returns an experiment number and information about a group. Or the server answers that the user can not participate in the test. This process takes some time. The request and answer can take as little as milliseconds, or much longer (30 seconds maximum) if, for example, the device’s internet connection is bad. Below, you can find several use cases that may help you to solve this problem if your app’s interface is sensitive to waiting for the config from devtodev.
When working with this class, the SDK provides synchronization of threads that aims at providing safe operation taking into account the asynchrony of the SDK.
Wrapper for remote parameters collection. Enables access to configuration values by using subscripting syntax.
Wrapper for working with remote configuration variables. It represents a method for data source identification, as well as methods for presenting values in the form of various data types.
Not applied to Web SDK
It implements methods that report the status of A/B tests.
It is triggered every time the SDK loads the configuration of A/B tests.
Notifies whether the configuration of the A/B test has been changed.
Data options returned by the configChanged method signature
devtodev RAW export API
To use RAW data export API you need to have an individual User API token, which can be found in the settings of space.
You’ll see the block with User API token on the space settings page only in case if your tariff plan and access rights allow to use devtodev API. You can reset User API token or create it again on the same page.
If some applications of the space are inaccessible to the owner of User API token, then the owner can’t get access to the export of data of these applications. But the access to specific metrics it not extended to the access of raw data.
Server API integration manual
If, for some reason, you cannot use the devtodev SDK, or some events cannot be tracked on the client side, you can use the devtodev data API. Using the API, you can send a set of events that almost completely replicates the capabilities of the SDK. However, you will need to independently prepare data about the device/user and also independently track the start and duration of sessions.
onReceived(result: DTDRemoteConfigReceiveResult)
onPrepareToChange()
onChanged(result: DTDRemoteConfigChangeResult, error: Error?)
The DTDRemoteConfigListenermethods are not called in the main thread - you need to keep this in mind when interacting with UI elements of the app. Also, do not execute operations that block the thread in the DTDRemoteConfigListener methods, because this will disable the SDK operation (see examples).
To work with A/B testing, use the [DTDAnalytics applicationKey:* abConfigListener:*] initialization method.
The DTDRemoteConfigListener interface is added to the [DTDAnalytics applicationKey:* abConfigListener:*] method. It implements three methods:
-(void)onReceivedResult:(enum DTDRemoteConfigReceiveResult)result
-(void)onPrepareToChange
-(void)onChangedResult:(enum DTDRemoteConfigChangeResult)result error:(NSError *)error
The DTDRemoteConfigListenermethods are not called in the main thread - you need to keep this in mind when interacting with UI elements of the app. Also, do not execute operations that block the thread in the DTDRemoteConfigListener methods, because this will disable the SDK operation (see examples).
To work with A/B testing, use the DTDAnalytics.initializeWithAbTest initialization method.
The IRemoteConfigListener interface is added to the initializeWithAbTest method. It implements three methods:
onReceived(result: DTDRemoteConfigReceiveResult)
onPrepareToChange()
onChanged(result: DTDRemoteConfigChangeResult, ex: Exception?)
The DTDRemoteConfigListenermethods are not called in the main thread - you need to keep this in mind when interacting with UI elements of the app. Also, do not execute operations that block the thread in the DTDRemoteConfigListener methods, because this will disable the SDK operation (see examples).
To work with A/B testing, use the DTDAnalytics.INSTANCE.initializeWithAbTest initialization method.
The IRemoteConfigListener interface is added to the initializeWithAbTest method. It implements three methods:
void onReceived(@NonNull DTDRemoteConfigReceiveResult result)
void onPrepareToChange()
void onChanged(@NonNull DTDRemoteConfigChangeResult result, @Nullable Exception ex)
The DTDRemoteConfigListenermethods are not called in the main thread - you need to keep this in mind when interacting with UI elements of the app. Also, do not execute operations that block the thread in the DTDRemoteConfigListener methods, because this will disable the SDK operation (see examples).
To work with A/B testing, use the DTDAnalytics.InitializeWithAbTests initialization method.
The DTDRemoteConfigListener interface is added to the InitializeWithAbTests method. It implements three methods:
OnReceived(DTDRemoteConfigReceiveResult result)
OnPrepareToChange()
OnChanged(DTDRemoteConfigChangeResult result, string exceptionMessage = null)
The DTDRemoteConfigListenermethods are not called in the main thread - you need to keep this in mind when interacting with UI elements of the app. Also, do not execute operations that block the thread in the DTDRemoteConfigListener methods, because this will disable the SDK operation (see examples).
To work with A/B testing, use the DTDAnalytics.InitializeWithAbTests initialization method.
The IDTDRemoteConfigListener interface is added to the InitializeWithAbTests method. It implements three methods:
OnReceived(DTDRemoteConfigReceiveResult result)
OnPrepareToChange()
OnChanged(DTDRemoteConfigChangeResult result, string error)
The DTDRemoteConfigListenermethods are not called in the main thread - you need to keep this in mind when interacting with UI elements of the app. Also, do not execute operations that block the thread in the DTDRemoteConfigListener methods, because this will disable the SDK operation (see examples).
Known Limitations: A/B Testing in Restricted Browser Environments
When running the A/B testing module in an iframe, certain browsers with strict privacy settings (e.g., Safari, Firefox, Brave) may block access to storage mechanisms such as cookies or localStorage. This limitation prevents the proper functioning of A/B tests in these environments. SDK is checking the possibility of accessing storage and will turn off the A/B testing for such a user/device if that's the case.
To work with A/B testing, use the devtodev.initializeWithAbTest initialization method.
If you used devtodev.initialize previously, you need to replace it with devtodev.initializeWithAbTest as the SDK initialization method.
The initializeWithAbTest method as a third parameter takes an object with 3 Callable as arguments, to work with A/B tests it is necessary to implement:
onReceived(result: DTDRemoteConfigReceiveResult)
onPrepareToChange()
onChanged(result: DTDRemoteConfigChangeResult, error: String)
To work with A/B testing, use the UDTDAnalyticsBPLibrary::InitializeWithAbTest initialization method.
Implements three delegate methods:
onRemoteConfigReceive(EDTDRemoteConfigReceiveResult result)
onRemoteConfigPrepareToChange()
onRemoteConfigChange(EDTDRemoteConfigChangeResult result, FString error)
To work with A/B testing, use the DTDAnalytics.InitializeWithAbTest initialization method.
The InitializeWithAbTest method takes 3 Callable as arguments, to work with A/B tests it is necessary to implement:
onRemoteConfigReceive(result: GDDTDRemoteConfigReceiveResult.ReceiveResult)
onRemoteConfigPrepareToChange()
onRemoteConfigChange(result: GDDTDRemoteConfigChangeResult.ChangeResult, error: String)
DTDRemoteConfig.remoteConfigWaitingonChanged() DTDRemoteConfigChangeResult.failureIf the offer is received after the 30 second waiting time has expired
onChanged() with DTDRemoteConfigChangeResult.failure is called
The test was previously activated (during the initialization)
onChanged() with DTDRemoteConfigChangeResult.success is called
button_color
green
green
blue
gray
button_size
8
8
12
Example of SDK initialization that includes A/B testing:
Set the default values DTDRemoteConfig.defaults = @{"button_color": @"green", @"button_size": @"8"}
Variable names have to be the same as in the ‘Group settings’ section of the web interface (see ‘web’ above). When the SDK gets included in the A/B test, the devtodev server automatically assigns it to a group.
SDK will not use new variable values that are not set in DTDRemoteConfig.defaults
Example of the DTDRemoteConfig.configvalue variants:
Example of SDK initialization that includes A/B testing:
Set the default values DTDRemoteConfig.defaults = mapOf("button_color" to "green", "button_size" to "8")
Variable names have to be the same as in the ‘Group settings’ section of the web interface (see ‘web’ above). When the SDK gets included in the A/B test, the devtodev server automatically assigns it to a group.
SDK will not use new variable values that are not set in DTDRemoteConfig.defaults
Example of the DTDRemoteConfig.configvalue variants:
Example of SDK initialization that includes A/B testing:
Set the default values:
Variable names have to be the same as in the ‘Group settings’ section of the web interface (see ‘web’ above). When the SDK gets included in the A/B test, the devtodev server automatically assigns it to a group.
SDK will not use new variable values that are not set in DTDRemoteConfig.Defaults
Example of the DTDRemoteConfig.Config value variants:
Example of SDK initialization that includes A/B testing:
Set the default values DTDRemoteConfig.SetDefaults()
Variable names have to be the same as in the ‘Group settings’ section of the web interface (see ‘web’ above). When the SDK gets included in the A/B test, the devtodev server automatically assigns it to a group.
SDK will not use new variable values that are not set in DTDRemoteConfig.defaults
Example of the DTDRemoteConfig value variants:
Key/Value
defaults
Control Group
Group A
Group B
button_color
Example of SDK initialization that includes A/B testing:
Set the default values:
Variable names have to be the same as in the ‘Group settings’ section of the web interface (see ‘web’ above). When the SDK gets included in the A/B test, the devtodev server automatically assigns it to a group.
SDK will not use new variable values that are not set in DTDRemoteConfig.defaults
Example of the DTDRemoteConfig.configvalue variants:
Example of SDK initialization that includes A/B testing:
Set the default values DTDRemoteConfig.SetDefaults()
Variable names have to be the same as in the ‘Group settings’ section of the web interface (see ‘web’ above). When the SDK gets included in the A/B test, the devtodev server automatically assigns it to a group.
SDK will not use new variable values that are not set in DTDRemoteConfig.defaults
Example of the DTDRemoteConfig value variants:
Example of SDK initialization that includes A/B testing:
resetConfig()
It cancels a suitable or running test
cacheTestExperiment()
A debug method for saving a test experiment after restarting the application
remoteConfigWaiting: double
Wait time for A/B test configuration.
Default value - 0.0 (measured in seconds)
groupDefinitionWaiting: double
Wait time for test group.
Default value - 10.0 (measured in seconds)
defaults: NSDictionary<NSString *,id>
Variables and their default values
config: DTDRemoteConfigCollection
Wrapper for remote parameters in the form of a collection. It allows access to the configuration values by using the subscripting syntaxis.
Actual variables and their values for working with A/B tests
(void) applyConfig
remoteConfigWaiting: Double
Wait time for A/B test configuration.
Default value - 0.0 (measured in seconds)
groupDefinitionWaiting: Double
Wait time for test group.
Default value - 10.0 (measured in seconds)
defaults: Map<String, Any>
Variables and their default values
config: DTDRemoteConfigCollection
Wrapper for remote parameters in the form of a collection. It allows access to the configuration values by using the subscripting syntaxis.
Actual variables and their values for working with A/B tests
applyConfig()
setRemoteConfigWaiting()
Wait time for A/B test configuration.
Default value - 0.0 (measured in seconds)
getRemoteConfigWaiting()
Wait time for test group.
setGroupDefinitionWaiting()
Wait time for test group.
Default value - 10.0 (measured in seconds)
getGroupDefinitionWaiting()
Get time for test group.
setDefaults(Map<String, ? extends Object>)
double RemoteConfigWaiting {get;set;}
Wait time for A/B test configuration.
Default value - 0.0 (measured in seconds)
double GroupDefinitionWaiting {get;set}
Wait time for test group.
Default value - 10.0 (measured in seconds)
Dictionary<string, object> DTDRemoteConfig.Defaults {get;set}
Variables and their default values
DTDRemoteConfigCollection DTDRemoteConfig.Config
Wrapper for remote parameters in the form of a collection. It allows access to the configuration values by using the subscripting syntaxis.
Actual variables and their values for working with A/B tests
void ApplyConfig()
RemoteConfigWaiting: double
Wait time for A/B test configuration.
Default value - 0.0 (measured in seconds)
GroupDefinitionWaiting: double
Wait time for test group.
Default value - 10.0 (measured in seconds)
Defaults: IDictionary<String, object>
Variables and their default values
Config: DTDRemoteConfigCollection
Wrapper for remote parameters in the form of a collection. It allows access to the configuration values by using the subscripting syntaxis.
Actual variables and their values for working with A/B tests
ApplyConfig()
remoteConfigWaiting
Wait time for A/B test configuration.
Default value - 0 (measured in seconds)
groupDefinitionWaiting
Wait time for test group.
Default value - 15 (measured in seconds)
defaults
Variables and their default values
config
Wrapper for remote parameters in the form of a collection. It allows access to the configuration values by using the subscripting syntaxis.
Actual variables and their values for working with A/B tests
applyConfig()
It applies the A/B testing configuration. After the call, the default parameters get matched with the group parameters.
resetConfig()
SetRemoteConfigWaiting(float value)
Wait time for A/B test configuration.
Default value - 0.0 (measured in seconds)
float GetRemoteConfigWaiting()
Wait time for test group.
SetGroupDefinitionWaiting(float value)
Wait time for test group.
Default value - 10.0 (measured in seconds)
GetGroupDefinitionWaiting()
Get time for test group.
SetDefaults(const FDTDRemoteConfigDefaults& defaults)
void SetRemoteConfigWaiting(int value)
Wait time for A/B test configuration.
Default value - 0 (measured in seconds)
int GetRemoteConfigWaiting()
Wait time for test group.
void SetGroupDefinitionWaiting(int value)
Wait time for test group.
Default value - 10 (measured in seconds)
int GetGroupDefinitionWaiting()
Get time for test group.
void SetDefaults(defaults: GDDTDRemoteConfigDefaults)
Return true if current configuration has value for a key.
Int32Value
Int32
Gets the value as an Int32.
Int64Value
Int64
Gets the value as an Int64.
integerValue
Int
Gets the value as an Int.
boolValue
Bool
Gets the value as a Bool.
stringValue
NSString
Gets the value as an optional string.
floatValue
float
Gets the value as a Float.
doubleValue
double
Gets the value as a Double.
stringValue
String?
Gets the value as an optional string.
floatValue
Float
Gets the value as a Float.
doubleValue
Double
Gets the value as a Double.
getStringValue
String
Gets the value as an optional string.
getFloatValue
float
Gets the value as a Float.
getDoubleValue
double
Gets the value as a Double.
StringValue
string
Gets the value as an optional string.
FloatValue
float
Gets the value as a float.
DoubleValue
double
Gets the value as a double.
StringValue
String
Gets the value as an optional string.
FloatValue
float
Gets the value as a float.
DoubleValue
double
Gets the value as a double.
StringValue
String
Gets the value as an optional string.
FloatValue
Number
Gets the value as a float number
DoubleValue
Number
Gets the value as a double number
LongValue
String
StringValue
FString
Gets the value as an string.
FloatValue
float
Gets the value as a float.
LongValue
int64
Gets the value as an long.
GetStringValue
String
Gets the value as an string.
GetFloatValue
float
Gets the value as a float.
GetIntValue
int
Gets the value as an int.
-(void)onReceivedResult:
(enum DTDRemoteConfigReceiveResult)result
It is triggered every time the SDK loads an A/B test configuration. If the remoteConfigWaiting has a default value (null), onReceived does not get called
-(void)onPrepareToChange
It notifies the developer about coming changes in the A/B test configuration.
- (void)onChangedResult:
(enum DTDRemoteConfigChangeResult)result
error:(NSError *)error
It notifies the developer that the configuration has changed. Or about the reason why the configuration could not change.
onReceived(result: DTDRemoteConfigReceiveResult)
It is triggered every time the SDK loads an A/B test configuration. If the remoteConfigWaiting has a default value (null), onReceived does not get called
onPrepareToChange()
It notifies the developer about coming changes in the A/B test configuration.
onChanged(result: DTDRemoteConfigChangeResult, ex: Exception?)
It notifies the developer that the configuration has changed. Or about the reason why the configuration could not change.
onReceived(DTDRemoteConfigReceiveResult result)
It is triggered every time the SDK loads an A/B test configuration. If the remoteConfigWaiting has a default value (null), onReceived does not get called
onPrepareToChange()
It notifies the developer about coming changes in the A/B test configuration.
onChanged( DTDRemoteConfigChangeResult result, Exception ex)
It notifies the developer that the configuration has changed. Or about the reason why the configuration could not change.
IDTDRemoteConfigListener
void OnReceived(DTDRemoteConfigReceiveResult result);
It is triggered every time the SDK loads an A/B test configuration. If the remoteConfigWaiting has a default value (null), OnReceived does not get called
void OnPrepareToChange();
It notifies the developer about coming changes in the A/B test configuration.
void OnChanged(DTDRemoteConfigChangeResult result, string exceptionText = null);
It notifies the developer that the configuration has changed. Or about the reason why the configuration could not change.
IDTDRemoteConfigListener
OnReceived(DTDRemoteConfigReceiveResult result)
It is triggered every time the SDK loads an A/B test configuration. If the remoteConfigWaiting has a default value (null), OnReceived does not get called
OnPrepareToChange()
It notifies the developer about coming changes in the A/B test configuration.
OnChanged(DTDRemoteConfigChangeResult result, string error)
It notifies the developer that the configuration has changed. Or about the reason why the configuration could not change.
FDTDRemoteConfigReceiveResultDelegate
It is triggered every time the SDK loads an A/B test configuration. If the remoteConfigWaiting has a default value (null), OnReceived does not get called
FDTDRemoteConfigPrepareToChangeDelegate
It notifies the developer about coming changes in the A/B test configuration.
FDTDRemoteConfigChangeResultDelegate
It notifies the developer that the configuration has changed. Or about the reason why the configuration could not change.
onRemoteConfigReceive(result: GDDTDRemoteConfigReceiveResult.ReceiveResult):
It is triggered every time the SDK loads an A/B test configuration. If the remoteConfigWaiting has a default value (null), onReceived does not get called
onRemoteConfigPrepareToChange()
It notifies the developer about coming changes in the A/B test configuration.
onRemoteConfigChange(result: GDDTDRemoteConfigChangeResult.ChangeResult, error: String)
It notifies the developer that the configuration has changed. Or about the reason why the configuration could not change.
[A/B-Test Module] The Server refused to conduct the test.
If the server refused to provide a test available for participation.
DTDRemoteConfigChangeResult.Failure
[A/B-Test Module] Offer from devtodev not received within the allotted N seconds.
The backend offer is returned after a deadline e.g. due to a bad internet connection.
DTDRemoteConfigChangeResult.Failure
[A/B-Test Module] Offer from devtodev not received within the allotted N seconds.
The SDK was unable to receive an offer from the backend within N seconds e.g, duea bad internet connection or network problems.
DTDRemoteConfigChangeResult.Failure
[A/B-Test Module] In the process of receiving an offer from the server, the user was changed. Offer has been canceled.
When replacing the user with another user at the time of receiving an offer.
DTDRemoteConfigChangeResult.Failure
[A/B-Test Module] Offer refused, because application went into the background.
If a suitable test is found but the user made the app go into the background before the offer was received.
remoteConfigWaiting: Double
Wait time for A/B test configuration.
Default value - 0.0 (measured in seconds)
groupDefinitionWaiting: Double
Wait time for test group.
Default value - 10.0 (measured in seconds)
defaults: [String, Any]
Variables and their default values
config: DTDRemoteConfigCollection
Wrapper for remote parameters in the form of a collection. It allows access to the configuration values by using the subscripting syntaxis.
Actual variables and their values for working with A/B tests
applyConfig()
hasKey(key)
Return true if current configuration has value for a key.
values
Returns the plain object of the current configuration with key/values pairs
DTDRemoteConfigSource.Default
The variable is set by default.
DTDRemoteConfigSource.Remote
The variable is set by the test group.
DTDRemoteConfigSource.Empty
The variable is not found in the remote configuration.
stringValue
String?
Gets the value as an optional string.
floatValue
Float
Gets the value as a Float.
doubleValue
Double
Gets the value as a Double.
onReceived(result: DTDRemoteConfigReceiveResult)
It is triggered every time the SDK loads an A/B test configuration. If the remoteConfigWaiting has a default value (null), onReceived does not get called
onPrepareToChange()
It notifies the developer about coming changes in the A/B test configuration.
onChanged(result: DTDRemoteConfigChangeResult,
error: Error?)
It notifies the developer that the configuration has changed. Or about the reason why the configuration could not change.
DTDRemoteConfigReceiveResult.Success
It is triggered when the configuration of the A/B test is received.
DTDRemoteConfigReceiveResult.Failure
It is triggered if the SDK did not manage to get the A/B test configurations for the time period set in remoteConfigWaiting.
DTDRemoteConfigReceiveResult.Empty
It is triggered when the configuration of the A/B test is received, but the list of experiments is empty.
DTDRemoteConfigReceiveResult.Success
Configuration is changed.
DTDRemoteConfigReceiveResult.Failure
Configuration change attempt failed.
DTDRemoteConfigChangeResult.Success
null
When receiving an offer from the backend.
DTDRemoteConfigChangeResult.Success
null
When launching the SDK with a previously started test.
DTDRemoteConfigChangeResult.Success
null
When replacing the user with another user who previously started the test.
It applies the A/B testing configuration. After the call, the default parameters get matched with the group parameters.
hasKey(key: String)
DTDRemoteConfigChangeResult.Failure
Please attend, if you use several spaces, in every space user has an individual User API token.
The process of getting data consists of three steps:
job assignment
getting the status of performance
getting the report file by link
Let’s have a look at these steps.
This step is the most important, and its description is the longest one.
The request of assignment should be sent to:
Where
user_token - individual User API token of the user. It could be sent with both GET and POST methods.
v1 - current version of API
The request content is sent with POST method in JSON format.
The body of the request contains the following properties:
Property
Type
Description
user_token
string
Individual user API token. It can be found on the space settings page. It is possible to send it with both POST and GET methods.
app_id
string
Application identificator. It can be found in the application settings in the Integration section.
start_date
number
Start date of the request interval. Attention! Data is sent in UNIX-time format. Don’t forget to add/subtract the number of correction seconds to get data according to your timezone.
end_date
Every standard event in devtodev SDK corresponds with two-letters identificator. In case of custom events, the name of the event is the identificator. Also you can use group identificators (start with @).
Event ID
Event name
lu
Level up
rp
Real Payment
tr
Tutorial step
ip
Ingame purchase
sc
Social network connect
If you’re interested in the export of custom events according to some specific conditions, you should set the objects with the following properties in the array of the event list:
Property
Type
Description
name
string
Name of custom event
filters
object
Object with the filtering conditions.
Names of the object properties correspond with the name of custom event parameters. It is possible to apply filters to each of them.
Example
"filters":{
"paramName1":{
"gt": 5 // Events where paramName1>5. Have a look at List of comparison operators.
}
}
alias
string
Name of file in the report where to put the event with filter. The default name is set in the “name” property. Attention! If you export several equal events with different filters, the “alias” property is obligatory.
If you want to export events from a specific audience, you can filter them by the properties of the user card. Only the events that occurred with the filtered users will be included in the exported data.
Caution! Filtering uses the property values of the user card at the time of the data export request.
The names of the properties are the same as the column names in the "users" table of the project, which you can find in the SQL report.
The table shows the fields by which filtering is possible:
devtodevid
string
Unique identifier of the user which is used in devtodev and assigned to the user when he launches the app for the first time.
customuid
string
User ID, assigned by the developer.
idfa
string
iOS advertising identifier
The filter can be described with an object, where the following comparison operators can be the properties:
API operator
Math operator
Description
gt
>
Greater than
lt
<
Less than
eq
=
Equal
gte
The empty object describes the filter which selects all the events where the parameter value is not null or empty string.
POST
Or another way with event group identificator.
The response in case of successful start execution:
Where
status_code - is the HTTP status code
data - an identificator which is assigned to the job
If you get this response, you can go to the next stage - request of job status (else go to Error handling).
With the job identificator, you can request its current status, using the following request:
The body of request can contain the following properties:
Property
Type
Description
user_token
string
Individual user API token. It can be found on the space settings page. It is possible to send it with both POST and GET methods.
job_id
string
Job identificator which can be got from the response of job assignment.
The response to the request of status can be one of the following:
The job is in the queue
The job is in progress
The job is done
Error of job performance
Let’s explore every variant.
To get the report use the link in the URL property.
The report file is zip-archive with files in .CSV format. Every file contains data about one event and/or alias (which was set in the filter in job assignment).
If there are no events according to the query conditions, the response will be the following:
The error can raise either at the moment of job assignment or at the moment of checking the status. The format of response in case of error is the same: In case there is an error, a response is made in the following format:
where
status_code (number) - a general status of an error
errors (array) - an array of error descriptions
code (number) - the exact code of an error from the table of errors
msg (string) - a brief description of an error
The list of possible errors is given in a table.
Status code
Code
Value of "msg" field
Error description
400
2
Request body is empty
Empty body of the request. There is no POST data in the request.
400
3
Malformed json
JSON error in the body of the equest. Fix the formatting error.
401
There are the following limitations to devtodev RAW data export API:
Limitations
Value
Max number of job assignments per 24 hours per space
100
Max number of job assignments per 24 hours per user
50
Max number of simultaneous job assignments per user
5
Max timeout between user job assignments
5 seconds
Max time to perform one job
-
Below you can find the description of each table for events available for export.
This file is always attached to the exported file. The table contains a list of users who performed the exported events. It also contains their characteristics available at the time of the export.
devtodev ID
Numeric user identifier in the projects’s Users table
Main ID
Main user identifier
Created
User registration date. Unix timestamp
Paying
Flags payers
Cheater
Flags cheaters
This file contains entries on session starts and user activity times for the selected export period. The table contains session starts (rows with filled session_starts field) and time when the app was in focus (rows with filled activity_duration field).
devtodev ID
Numeric user identifier in the project’s Users table
time
Event (session start or end of activity) start date. Unix timestamp in milliseconds
session_starts
Session start. Marked as 1 when session started.
activity_duration
Duration of user activity (time the app was in focus)
isTester
At the time of event start the user was a Tester
This file contains entries on virtual purchases in the app.
devtodev ID
Numeric user identifier in the project's Users table
time
Event (session start or end of activity) start date. Unix timestamp in milliseconds
level
User level at the time of event start
item_type
Item category
item
Item name
A user registration event used in the devtodev database. Usually, the registration date is the same as the date of the first launch of the app.
devtodev ID
Numeric user identifier in the project’s Users table
install_date
User registration date. Unix timestamp
Event for when the user reaches a certain game level.
devtodev ID
Numeric user identifier in the project’s Users table
time
Event (session start or end of activity) start date. Unix timestamp in milliseconds
level
User level at the time of event start
isTester
At the time of event start the user was a Tester
cheat
At the time of event start the user was a Cheater
Some user properties updates for the selected export period. (devtodev ID, logged IP, os_version).
devtodev ID
Numeric user identifier in the project’s Users table
logged ip
User IP address. Last digit of the address is anonymized
os_version
Version of the user operating system
List of user transactions. Purchases for real currency.
devtodev ID
Numeric user identifier in the project’s Users table
date
Event (session start or end of activity) start date. Unix timestamp in milliseconds
level
User level at the time of event start
transaction_id
Unique transaction identifier
transaction_name
Item name or SKU
This file contains a list of triggered Progression events.
devtodev ID
Numeric user identifier in the project’s Users table
time
Event (session start or end of activity) start date. Unix timestamp in milliseconds
level
User level at the time of event start
location
Game location name
success
Is location successfully completed (true/false)
Social media connection events.
devtodev ID
Numeric user identifier in the project’s Users table
time
Event (session start or end of activity) start date. Unix timestamp in milliseconds
level
User level at the time of event start
social
Name of social media
isTester
At the time of event start the user was a Tester
Social media publication events.
devtodev ID
Numeric user identifier in the projest’s Users table
time
Event (session start or end of activity) start date. Unix timestamp in milliseconds
level
User level at the time of event start
social
Name of social media
reason
Reason for publication or title of publication
Subscription events: buying, renewal, and refund. This file contains only subscription events that impact revenue.
devtodev ID
Numeric user identifier in the project’s Users table
date
Event (session start or end of activity) start date. Unix timestamp in milliseconds
level
User level at the time of event start
transaction_id
Unique transaction identifier
transaction_name
Subscription name or SKU
All subscription events.
devtodev ID
Numeric user identifier in the project’s Users table
date
Event (session start or end of activity) start date. Unix timestamp in milliseconds
level
User level at the time of event start
transaction_id
Unique transaction identifier
transaction_name
Subscription name or SKU
Tutorial steps events.
devtodev ID
Numeric user identifier in the project’s Users table
time
Event (session start or end of activity) start date. Unix timestamp in milliseconds
level
User level at the time of event start
complete_state
Number of the completed step of the tutorial.
Also has predefined values:
0 – the user skipped the tutorial
-1 – the user started the tutorial
-2 – the user finished the tutorial
isTester
At the time of event start the user was a Tester
This file contains information about changes of user and device identifiers during the selected export period.
devtodev ID
Numeric user identifier in the project’s Users table
Main ID
Main user identifier
IDFV
iOS vendor identifier
IDFA
iOS advertising identifier
Crossplatform User ID
User ID set by developer
This file contains data on user characteristics and devices updates for the selected export period.
devtodev ID
Numeric user identifier in the project’s Users table
Main ID
Main user identifier
IDFV
iOS vendor identifier
IDFA
iOS advertising identifier
Crossplatform User ID
User ID set by developer
This file contains app’s ad impression events. Data from ad networks or the Ad Impression event.
devtodev ID
Numeric user identifier in the project’s Users table
date
Event (session start or end of activity) start date. Unix timestamp in milliseconds
level
User level at the time of event start
placement
Place where the ad unit is located
network
Name of ad network responsible for placement
This file contains custom events with {EventName} name.
devtodev ID
Numeric user identifier in the project’s Users table
date
Event (session start or end of activity) start date. Unix timestamp in milliseconds
level
User level at the time of event start
isTester
At the time of event start the user was a Tester
cheat
At the time of event start the user was a Cheater
https://api.devtodev.com/v2/analytics/report?appId=sampleApplicationId
appId
Yes
devtodev application ID
POST data is received by the server in compressed or text form, depending on the value of the "Content-type" field in the HTTP header.
All the transferred data must be in UTF8 encoding.
The archive must contain JSON with one or more events for one or several users.
The packet size cannot exceed 2 MB in its uncompressed state. Packages that exceed this size can't be processed.
Content-type
String
Yes
The possible values for the "Content-type" field are:
application/json - for sending uncompressed JSON data
application/zstd - for sending data compressed using
application/gzip
The reports object contains:
deviceId
String (64)
Yes
Current (actual) Device ID
previousDeviceId
String (64)
Should be sent if the Device ID is changed
Previous Device ID
userId
Each packet consists of the following fields:
language
String (3)
Yes
User/device language (ISO 639-1, ISO 639-2, ISO 639-3)
country
String (2)
Yes
User/device country (ISO_3166-1_alpha-2). Only needed in the server-server protocol
ip
The server responds with code 200 if everything is OK.
413
Incorrect size of the data packet (exceeds the maximum)
400
devtodev App ID is absent
401
Incorrect devtodev App ID
403
Administrative restrictions on data received from a client
400
The error of data unpacking
{
"error_message":"Wrong GZIP format"
}
Contains information about the user's device.
You must send the Device Info event as the first event when a new user is created. Without it, the user will not be registered in the system!
It is also desirable to send this event at the beginning of each session.
code
Any
Yes
String
The unique ID of the event. Takes the value "di"
timestamp
Any
Yes
Example
Sends information about the start of a new session.
code
Yes
String
The unique ID of the event. Takes the value "ss"
timestamp
Yes
Long
The date of the new session start. Unix timestamp in milliseconds
level
Example
Sends information about the duration of user activity. This can be either the full length of the session or a part of the user's session while the application was in focus.
code
Yes
String
The unique ID of the event. Takes the value "ue"
timestamp
Yes
Long
The date the event was generated. Unix timestamp in milliseconds
level
Example
This event denies/allows tracking of user data and also implements the right to be forgotten in accordance with the requirements of the GDPR.
A developer must use this event in case a user doesn’t want their data to be sent and processed in the devtodev system.
When calling the event with the parameter "trackingAllowed": false, it is a command to the server to delete all user’s personal data that has been collected by devtodev from this app and a command to block the collection of any data of this user in future.
The user will remain in the devtodev system only as an impersonal unit in the previously aggregated metrics.
If it is set to “true”, tracking can be enabled again. In this case, the user will be considered new.
code
Yes
String
The unique ID of the event. Takes the value "ts"
trackingAllowed
Yes
Bool
Enable (true) or disable (false) user tracking
timestamp
Example
Service event. Not obligatory. Ping event for the server. It is required to correctly display a player online if more than 5 minutes have passed since his last sent event.
code
Yes
String
The unique ID of the event. Takes the value "al"
timestamp
Yes
Long
The date the event was generated. Unix timestamp in milliseconds
sessionId
Example
Each devtodev project can have up to 30 custom user properties.
Attention! We strongly recommend that you do not use these properties to transfer and store data that fits the definition of personal data!
code
Yes
String
The unique ID of the event. Takes the value "pl"
timestamp
Yes
Long
The date the event was generated. Unix timestamp in milliseconds
level
Predefined user properties (in addition to 30 custom user properties).
tester
No
bool
Set true if user is a tester. This user's data will not be used to calculate metrics.
cheater
No
bool
Set true if user is a cheater. This user's data will not be used to calculate metrics.
If you need to exclude cheaters/testers transactions from statistics, go to Users & Segments section in devtodev interface and mark the user manually. When you mark the user in devtodev interface, the system removes their transactions for the last 7 days the reports and recalculates the metrics.
Example
If you want to track non-basic events (below), you can create custom events of your own. How you are going to apply them, depends solely on you.
We strongly recommend that you do not use custom event properties to transfer and store data that fits the definition of personal data!
code
Yes
String
The unique ID of the event. Takes the value "ce"
timestamp
Yes
Long
The date the event was generated. Unix timestamp in milliseconds
level
Example
To track payments in a real currency, dispatch this event right after the system validates that the payment went through successfully. The event is fundamental and mandatory for all the app metrics related to monetization.
code
Yes
String
The unique ID of the event. Takes the value "rp"
timestamp
Yes
Long
The date the event was generated. Unix timestamp in milliseconds
level
Example
Tracks the progress of the user's initial training (tutorial). The event is used to build a funnel through which users go through learning stages (steps). Each step is represented by an integer greater than 0. If you plan to add additional intermediate learning steps, you can number the steps initially, for example, in increments of 10. Additionally, three constants are used to describe the start of training, successful completion of training, and skipping the entire training process.
Recommended sequence for dispatching events:
Training started (-1).
Sequential sending of events at the entrance to the next learning step (1...N).
Completion of training after passing the last step of training (-2).
The tutorial skip logic assumes that a single event with a value of 0 is sent, replacing the entire sequence described above.
code
Yes
String
The unique ID of the event. Takes the value "tr"
timestamp
Yes
Long
The date the event was generated. Unix timestamp in milliseconds
level
Example
This event is for games only.
Pass this event after every purchase if you want to track in-app (virtual) currency spends and items’ popularity. You can apply this event to both games and any apps with virtual currency.
code
Yes
String
The unique ID of the event. Takes the value "vp" ("ip" in the previous version of the API)
timestamp
Yes
Long
The date the event was generated. Unix timestamp in milliseconds
level
Example
This event is for games only.
The event involves the accumulation of in-game currency or resources. It contains data on the amount of in-game currency earned or purchased by the user. It is highly undesirable to send this data transactionally. Instead, please send aggregated data for a specific period, such as 5-10 minutes. Additionally, the accumulation of data must be interrupted, and an event should be sent if the user's level has changed.
Attention! The total number of tracked unique resources (virtual currencies) cannot exceed 30 items throughout the project's lifespan.
Furthermore, apart from grouping by type (earned/purchased), there is also a grouping by the source of income.
code
Yes
String
The unique ID of the event. Takes the value "ca"
timestamp
Yes
Long
The date the event was generated. Unix timestamp in milliseconds
level
This event is for games only.
This event is used to generate a preset game report called Economy Balance (currency balance with grouping by days). This report shows the approximate amount of virtual currency on users' hands, which is useful for planning and checking the results of campaigns aimed at removing excess virtual currency from the application.
This event should not be sent more than once per day for a user.
code
Yes
String
The unique ID of the event. Takes the value "cb"
balance
Yes
Object<String(24),Number>
User's balances of virtual currencies or resources at the time the event was generated
timestamp
Example
This event is for games only.
Leveling up the user (player). The event is triggered when the user reaches a new level. In addition o the achieved level number, you can also include data on the balance of virtual currencies or resources at the time the new level was reached, as well as the total amount of currencies or resources spent, earned and purchased by the user during the previous level progression.
Attention! The total number of tracked unique resources (virtual currencies) cannot exceed 30 items throughout the entire life of the project.
code
Yes
String
The unique ID of the event. Takes the value "lu"
timestamp
Yes
Long
The date the event was generated. Unix timestamp in milliseconds
level
Example
This event is for games only.
First of all, the progression event is used in games with short (within one game session) areas/game levels, for example, match 3 games. You can use the event to collect data on how well or how fast users complete levels, how difficult it is for them, how many resources they gained or spent, and other relevant parameters.
code
Yes
String
The unique ID of the event. Takes the value "pe"
timestap
Yes
Long
The date the event was generated. Unix timestamp in milliseconds
level
parameters object:
difficulty
No
Int
An optional difficulty value
source
No
String (40)
The name of the previous progression event used for connecting events together. E.g. a previous area visited by the player
success
Example
All events generated during the passage of the location are recommended to be marked with the key "inProgress," the value of which indicates the name of the location (Progression event name).
Example
Tracking the source of the application installation. Sent once per user. Does not need to be sent if ad trackers such as AppsFlyer are integrated in the project settings or the devtodev custom postback API is used.
code
Yes
String
The unique ID of the event. Takes the value "rf"
timestamp
Yes
Long
The date the event was generated. Unix timestamp in milliseconds
source
Example
The event is used for individual tracking of ad revenue on user devices. This method is used if there are CPI data available on the client device (they can be obtained from the ad network SDK).
code
Yes
String
The unique ID of the event. Takes the value "adrv"
timestamp
Yes
Long
The date the event was generated. Unix timestamp in milliseconds
source
Example
The event tracks the user's connection to a social network. It is sent at the moment when the application receives information about the successful authorization of the user on the social network.
code
Yes
String
The unique ID of the event. Takes the value "sc"
timestamp
Yes
Long
The date the event was generated. Unix timestamp in milliseconds
level
Example
Preset social network codes
Vkontakte
vk
tw
fb
Google Plus
gp
wp
The event tracks the user's posts on the social network. It is dispatched when a success report is received from the network, if possible.
code
Yes
String
The unique ID of the event. Takes the value "sp"
timestamp
Yes
Long
The date the event was generated. Unix timestamp in milliseconds
level
Example
An example of a package describing a single session of a single user.
HashMap<String, Object> map = new HashMap<>();
map.put("button_color", "green");
map.put("button_size", "8");
DTDRemoteConfig.INSTANCE.setDefaults(map);DTDRemoteConfig.Defaults = new Dictionary<string, object>
{
{"button_color", "green"},
{"button_size", 8}
};DTDRemoteConfig.Defaults = new Dictionary<string, object>
{
["button_color"] = "green",
["button_size"] = 8
};// Implementation defaults params
FDTDRemoteConfigDefaults defaults;
defaults.StringDefaults.Add("button_color", "green");
defaults.IntegerDefaults.Add("button_size", 8);DECLARE_DELEGATE_OneParam(FDTDRemoteConfigReceiveResultDelegate, EDTDRemoteConfigReceiveResult);DECLARE_DELEGATE(FDTDRemoteConfigPrepareToChangeDelegate);import UIKit
import DTDAnalytics
@main
class AppDelegate: UIResponder, UIApplicationDelegate, DTDRemoteConfigListener {
func application(_ application: UIApplication, didFinishLaunchingWithOptions launchOptions: [UIApplication.LaunchOptionsKey: Any]?) -> Bool {
// Config timeout, optional
DTDRemoteConfig.remoteConfigWaiting = 10.0
// Group timeout, optional
DTDRemoteConfig.groupDefinitionWaiting = 15.0
// Implementation defaults params
DTDRemoteConfig.defaults = ["button_color": "green",
"button_size": "8"]
// Initialize SDK with ab test
DTDAnalytics.initializeWithAbTest(applicationKey: "appKey",
abConfigListener: self)
return true
}
// The method is called when the configuration has been received
func onReceived(result: DTDRemoteConfigReceiveResult) {
print("Configuration received, result \(result)")
}
// Called when experiment is found
func onPrepareToChange() {
print("Experiment found")
}
// Called when SDK receives config
func onChanged(result: DTDRemoteConfigChangeResult, error: Error?) {
print("DTDRemoteConfigChangeResult: \(result)")
if let error = error {
print("DTDRemoteConfigError: \(error.localizedDescription)")
}
DTDRemoteConfig.applyConfig()
// Use here or notify config listeners that actualConfig is ready
let btnColorRemoteValue = DTDRemoteConfig.config["button_color"].stringValue
let btnSizeRemoteValue = DTDRemoteConfig.config["button_size"].stringValue
print("button color: \(btnColorRemoteValue)")
print("button size: \(btnSizeRemoteValue)")
}
}https://devtodev.com/api/v1/rawexport/setjob?user_token=USER_API_TOKENhttps://devtodev.com/api/v1/rawexport/setjob{
"user_token": "USER_API_TOKEN", // It is obligatory, if it’s not sent with GET.
"app_id": "af0606ed-bbdc-065a-952c-0d92561f107c", // Obligatory. Application identificator.
"start_date": 1464709200, // Obligatory. Unix time of export start date.
"end_date": 1464739200, // Obligatory. Unix time of export end date.
"events": [ //Not obligatory. List of events to export.
"tr", // Export all Tutorial step events
"customEvent1Name", // Export all customEvent1Name events
//{"name": "customEvent1Name"} - alternative way with the same result
{
"name": "customEvent2Name",
"filters": { // Object with filter conditions
"paramName1": {
// 5<paramName1<=10 and paramName1!=8
"lte": 10,
"gt": 5,
"neq": 8
},
"paramName2": {
//Parameter paramName2 is equal to the one of elements.
"eq": ["a","b","c"]
},
"paramName3": {} // paramName3 is not empty.
}
}
],
"user_card_filter": { //user card properties filter object
"paramName1": { //name of preset or custom user card parameter
"lte": 10,
"gt": 5,
"neq": 8
},
"paramName2": { //name of preset or custom user card parameter
"eq": ["a", "b", "c"]
}
}
}{
"user_token": "USER_API_TOKEN",
"app_id": "af0606ed-bbdc-065a-952c-0d92561f107c",
"start_date": 1464709200,
"end_date": 1464739200,
"events": ["@custom_events"] //Export all custom events
}{
"status_code": 200,
"data": "JOB_ID"
}https://devtodev.com/api/v1/rawexport/getprogress?user_token=USER_API_TOKEN{
"status_code":202,
"data":{
"status":"pending",
"percent_complete":0
}
}{
"status_code":200,
"data":{
"status":"running",
"percent_complete":10
}
}{
"status_code":201,
"data":{
"status":"complete",
"percent_complete":100,
"result":{
"msg":"Report file is ready",
"format":"csv", // Format of report files in archive
"url":"https://devtodev.com/api/v1/rawexport/download/?job_id=JOB_ID&user_token=USER_API_TOKEN",
"ttl": 100500, // Report lifetime from the end of the performance to the removal
"expire":123434534534 // Date when the report will be removed (in UNIX-time format)
}
}
}{
"status_code":200,
"data":{
"status":"complete",
"percent_complete":100,
"result":{
"msg":"Unfortunately the result of your request is empty. Please try to change the report conditions."
}
}
}{
"status_code": 400,
"errors": [{
"code": 3,
"msg": "Error description"
}]
}{
"reports" : [
{
"deviceId" : "deviceId",
"previousDeviceId" : "samplePreviousMainId",
"userId" : "sampleUserId",
"previousUserId" : "samplePreviousUserId",
"devtodevId": 6123517,
"packages" : [
{
"language" : "en",
"country": "US",
"ip": "154.12.121.11",
"appVersion" : "1.0",
"appBuildVersion": "30",
"sdkVersion" : "2.0",
"sdkCodeVersion" : 20,
"bundle" : "com.example.application",
"installationSource" : "",
"engine": "Unity",
"events" : [
... //see Events section
]
},
{
...
}
]
},
...
]
}{
"code": "di",
"timestamp": 1694783505123,
"osVersion": "10.2.2",
"os": "iOS",
"displayPpi": 401,
"displayResolution": "1920x1080",
"dispalyDiagonal": "5.5",
"manufacturer": "Apple",
"model": "iPhone8,2",
"userAgent": "Mozilla/5.0 (Macintosh; Intel Mac OS X 10_12_2) AppleWebKit/602.3.12 (KHTML, like Gecko) Version/10.0.2 Safari/602.3.12",
"timeZoneOffset": 7200,
"idfv": "30FE1CE1-1125-4657-97B0-638744C3C6D1",
"idfa": "0A60DCF2-3186-4801-9192-D8CFA995DD6D"
}{
"code": "ss",
"timestamp": 1694783505123,
"level": 1
}{
"code": "ue",
"timestamp": 1694783735122,
"level": 1,
"length": 230,
"sessionId": 1694783505123
}{
"code": "ts",
"trackingAllowed": false,
"timestamp": 1694783565763
}{
"code": "al",
"timestamp": 1694783607178
}{
"code": "pl",
"timestamp": 1694783511089,
"sessionId": 1694783505123,
"level": 2,
"parameters": {
"name": "John Doe",
"cheater": false,
"age": 21
}
}{
"code": "ce",
"timestamp": 1694783521034,
"sessionId": 1694783505123,
"level": 2,
"name": "eventName",
"parameters": {
"intParameter": 134,
"stringParameter": "hello", //255 symbols max
"doubleParameter": 12.98
}
}{
"code": "rp",
"timestamp": 1694783605101,
"sessionId": 1694783505123,
"level": 2,
"productId": "starter_pack",
"orderId": "GPA.100054271428",
"price": 19.99,
"currencyCode": "USD"
}{
"code": "tr",
"timestamp": 1694783715371,
"sessionId": 1694783505123,
"level": 2,
"step": -1
}{
"code": "vp",
"timestamp": 1694783555833,
"sessionId": 1694783505123,
"level": 2,
"purchaseId": "house_327",
"purchaseAmount": 2,
"purchasePrice": {
"coins": 500,
"wood": 2
},
"purchaseType": "buildings"
}{
"code": "ca",
"timestamp": 1694783625364,
"sessionId": 1694783505123,
"level": 2,
"bought": {
"sourceA": {
"resource1": 1231,
"resource2": 1231
},
"sourceB": {
"resource1": 12,
"resource2": 31
},
"sourceC": {
"resource2": 40,
"resource1": 10
}
},
"earned": {
"sourceA": {
"resource1": 1231,
"resource2": 1231
},
"sourceD": {
"resource1": 1231,
"resource2": 1231
}
}
}{
"code": "cb",
"timestamp": 1694783615284,
"sessionId": 1694783505123,
"level": 2,
"balance": {
"money1": 123,
"money2": 11
}
}{
"code": "lu",
"timestamp": 1694783675815,
"sessionId": 1694783505123,
"level": 2,
"balance": {
"money1": 123,
"money2": 11
},
"spent": {
"money1": 12,
"money2": 2,
"wood": 12
},
"earned": {
"crystals": 5
},
"bought": {
"wood": 200
}
}{
"code": "pe",
"timestamp": 1694783885625,
"sessionId": 1694783505123,
"level": 2,
"name": "MyAwesomeLocation",
"parameters": {
"source": "location1",
"difficulty": 1,
"success": true,
"duration": 180
},
"spent": {
"money1": 12,
"money2": 2,
"wood": 12
},
"earned": {
"money1": 8,
"money2": 2,
"stone": 1
}
}{
"code": "rp",
"timestamp": 1694783895114,
"sessionId": 1694783505123,
"level": 2,
"productId": "starter_pack",
"orderId": "GPA.100054271428",
"price": 19.99,
"currencyCode": "USD",
"inProgress": ["MyAwesomeLocation"]
}{
"code": "rf",
"timestamp": 1694783915948,
"sessionId": 1694783505123,
"source": "google",
"campaign": "christmas",
"content": "sale for ducks",
"medium": "traff",
"term": "a,b,c,d,e"
}{
"code": "adrv",
"timestamp": 1694783775187,
"sessionId": 1694783505123,
"source": "IronSource",
"ad_network": "Facebook",
"placement": "End of the round",
"ad_unit": "TestAdUnit",
"revenue": 0.3434
}{
"code": "sc",
"timestamp": 1694783815155,
"sessionId": 1694783505123,
"level": 2,
"socialNetwork": "fb"
}{
"code": "sp",
"timestamp": 1694783905478,
"sessionId": 1694783505123,
"level": 2,
"socialNetwork": "fb",
"postReason": "quest_completed"
}{
"reports": [{
"deviceId": "0A60DCF2-3186-4801-9192-D8CFA995DD6D",
"userId": "u_100500",
"packages": [{
"language": "en",
"country": "US",
"appVersion": "1.0",
"events": [{
"code": "di",
"osVersion": "10.2.2",
"os": "iOS",
"displayPpi": 401,
"displayResolution": "1920x1080",
"dispalyDiagonal": "5.5",
"manufacturer": "Apple",
"model": "iPhone8,2",
"userAgent": "Mozilla/5.0 (Macintosh; Intel Mac OS X 10_12_2) AppleWebKit/602.3.12 (KHTML, like Gecko) Version/10.0.2 Safari/602.3.12",
"timeZoneOffset": 7200,
"idfv": "30FE1CE1-1125-4657-97B0-638744C3C6D1",
"idfa": "0A60DCF2-3186-4801-9192-D8CFA995DD6D",
"timestamp": 1694783505122
}, {
"code": "ss",
"timestamp": 1694783505123,
"level": 1
}, {
"code": "pl",
"timestamp": 1694783511089,
"sessionId": 1694783505123,
"level": 1,
"parameters": {
"name": "John Doe",
"cheater": false,
"age": 21
}
}, {
"code": "tr",
"timestamp": 1694783715371,
"sessionId": 1694783505123,
"level": 1,
"step": -1
}, {
"code": "tr",
"timestamp": 1694783725344,
"sessionId": 1694783505123,
"level": 1,
"step": 1
}, {
"code": "lu",
"timestamp": 1694783736345,
"sessionId": 1694783505123,
"level": 2,
"balance": {
"money1": 123,
"money2": 11
}
}, {
"code": "tr",
"timestamp": 1694783741456,
"sessionId": 1694783505123,
"level": 2,
"step": 2
}, {
"code": "tr",
"timestamp": 1694783752425,
"sessionId": 1694783505123,
"level": 2,
"step": -2
}, {
"code": "ce",
"timestamp": 1694783773675,
"sessionId": 1694783505123,
"level": 2,
"name": "eventName",
"parameters": {
"intParameter": 134,
"stringParameter": "hello",
"doubleParameter": 12.98
}
},
{
"code": "rp",
"timestamp": 1694783798278,
"sessionId": 1694783505123,
"level": 2,
"productId": "com.example.application.starterpack",
"orderId": "280001601071201",
"price": 19.99,
"currencyCode": "USD"
}, {
"code": "ue",
"timestamp": 1694783898278,
"level": 2,
"length": 393,
"sessionId": 1694783505123
}
]
}]
}]
}number
End date of the request interval. Data is sent in UNIX-time format.
events
array
List of events to export. The element of the array can be in the following formats:
Event identificator (string). Have a look at the list of available events and their identificators.
Event group identificator (string). Have a look at the list of available events and their identificators.
Object with the name of custom event where it is possible to assign alias and to add filters. Have a look at Custom events filtering.
The empty array means the export of all the available events.
sp
Social network post
gs
Sessions
uu
User update
ud
UDIDs
pe
Progression event
rg
Registration (install date)
sbs
Subscription (all actions with subscriptions)
adrv
Ad impressions. Data from ad networks or the Ad Impression event.
@basic_events
All events below
sbs_payments
Subscription (payments only)
Any custom event name
Custom event
@custom_events
All custom events
idfv
string
iOS vendor identifier
advertisingid
string
Advertising ID (Android, Windows)
androidid
string
Android ID
created
int
Unix timestamp (ms) when the user opened the app for the first time
lasttime
int
Unix timestamp (ms) of the last user payment
publisher
string
Acquisition. The name of the publisher/ad network that led to the acquisition of the user
campaign
string
Acquisition. The name of the ad campaign that resulted in acquiring the user
placement
string
Acquisition. Place where the ad unit is located
ad
string
Acquisition. Name of ad unit/banner
firstpaymentdate
int
Unix timestamp (ms) of the first user payment
lastpaymentdate
int
Unix timestamp (ms) of the last user payment
paymentcount
int
Number of payments that the user have made in the app
paymentsum
number
Total sum of payments in USD
sbsfirstpaymentdate
int
Unix timestamp of the first subscription payment date
sbspaymentcount
int
The number of subscription payments made by the user in the app
sbspaymentsum
number
Total amount of subscription payments in USD
cheater
boolean
Whether the user has cheated or not (true/false
tester
boolean
Whether the user is a tester or not (true/false)
appversion
string
Current version of the app
firstappversion
string
App version installed by the user at the time of registration
sdkversion
string
Current version of devtodev SDK
level
int
Current user level
locale
string
User/device language (ISO 639-1, ISO 639-2, ISO 639-3)
country
string
User/device country (ISO_3166-1_alpha-2)
timezoneoffset
int
User timezone offset from UTC in milliseconds
pushavailable
boolean
True if there is a push token in devtodev DB
_AnyCustomUserPropertyName The prefix "_" here should be used to indicate that this is a custom property
string, number, boolean
Custom user card property, assigned by the developer.
>=
Greater than or equal
lte
<=
Less than or equal
neq
!=
Not equal
eq
In the list
neq
Not in the list
11
Authorization error. Wrong user token %user_token value%
Authorization error. The set token is wrong. “User_token” field. User API token.
401
12
Authorization error.
User_token is not set.
Authorization error. “User_token” field is absent. User API token should be set either as a parameter in GET string of request or in POST body of request.
400
6
Invalid app id %app id value%
The requested project can not be found. Unknown application. This error can raise when a user makes a mistake with the app id or when the application with this ID was removed.
403
13
Access denied. You have no access to the app %app id value%
The error of access. User has no access to this application.
403
14
Access denied. You have no access to the report file %file id value%
The error of access. User has no access to this file. This error can raise if you have no access to the application used in the previously created request.
403
15
Access denied. You have no access to API.
The error of access. No access to User API token. This error can happen when the access rights were changed (in consequence of changing the user role or tariff plan)
403
16
Access denied. You have no access to RAW data export API.
The error of access. This error can raise when you have no rights to RAW data export API for your user role or tariff plan.
400
4
Field not found: %field_name%
An obligatory field can not be found. You need to complement the request with this field.
403
17
Quota exceeded. %% concurrent requests per user has been reached.
The limit of simultaneous jobs per user is exceeded. Wait until one of the jobs will be finished and repeat the request.
429
18
Too many requests. %% requests per day per user quota has been exhausted.
The daily limit of the user is exceeded. You can send the next request at the beginning of the next day.
429
19
Too many requests. %% requests per day per space quota has been exhausted.
The daily space limit is exceeded. You can send the next request at the beginning of the next day.
429
20
Too many requests. One request per %% seconds per user quota has been exhausted.
The limit of request frequency is exceeded. You have to wait for the time set in the error text.
404
21
File not found. The requested report file had been expired and was deleted.
The requested file can not be found. This can be when the file was removed due to the end of its lifetime. You have to repeat the job assignment and wait for the new file.
400
10
Incorrect report time frame interval:
start_date and end_date can not be earlier than 90 days from now.
Incorrect report time frame interval.
Both start and end date should be later than 90 days from now.
400
22
The job_id you requested is not found.
The job_id you requested is not found or the job was done and the report lifetime is exceeded.
400
5
Field %field_name% has type %received_type% but %expected_type% expected
The data type is not equal to the expected data type. Check the correspondence of the request with the format set in the documentation. Possible data types: boolean, integer, float, number (integer+float), string.
400
7
Unknown format: %format%
You have set the unknown export file format.
400
9
Event alias duplicated: %alias%
The event alias is duplicated. There should be no equal custom events without alias and no equal aliases in the request.
400
8
Unknown event: %event_name%
Unknown event. This error can raise when the event is not in @basic_event group or the event doesn’t exist or the event is blocked custom event.
500
1
Unknown Error
Unknown error. Please contact devtodev technical support.
Max lifetime of the report file
24 hours
Max number of report file downloads
10
Tester
Flags testers
Level
Current user level
AppVersion
Current app version
Language
User’s device locale
Country
User country (set by IP address)
Device manufacturer
Device manufacturer
Device name
Device trademark name
Crossplatform User ID
User ID set by developer
Channel
Acquisition. User acquisition channel
InstallSource
Android. Android installer bundle
User agent
User agent
Screen resolution
Screen resolution of the device or app’s workspace
OS version
Version of the operating system
IDFV
iOS vendor identifier
IDFA
iOS advertising identifier
OPEN_UDID
OpenUDID
username
User name. Preset using the User card
useremail
User email. Preset using the User card
userphoto
User photo url. Preset using the User card
userphone
User telephone number. Preset using the User card
AdCampaign
Acquisition. The name of the ad campaign that resulted in acquiring the user
Time zone offset
User timezone offset from UTC in milliseconds
OsVersion
Version of the user’s operating system
segments
List of user custom segments containing this user. Segments separated by comma
Agency
Acquisition. Ad mediator name (Sub-publisher)
Keyword
Acquisition. Ad keywords and/or keywords that led to install
Placement
Acquisition. Place where the ad unit is located
Site
Acquisition. Website or app where the ad was placed
Ad group
Acquisition. Name of ad group
Ad
Acquisition. Name of ad unit/banner
segments
Comma separated segment names. The state at the time the data was exported.
abtests
Comma separated names of AB test groups. The state at the time the data was exported.
Custom property field name 1
User card custom property
Custom property field name N
User card custom property
cheat
At the time of event start the user was a Cheater
level
User level at the time of event start
install_date
User registration date. Unix timestamp
app_version
Application version. The data at the moment the event was generated.
segments
Comma separated segment names. The data at the moment the event was generated.
abtests
Comma separated names of AB test groups. The data at the moment the event was generated.
count
Amount of items the user bought
cheat
At the time of event start the user was a Cheater
isTester
At the time of event start the user was a Tester
install_date
User registration date. Unix timestamp
Virtual currency name 1
Amount of virtual currency spent on the item (overall)
Virtual currency name N
Amount of virtual currency spent on the item (overall)
app_version
Application version. The data at the moment the event was generated.
segments
Comma separated segment names. The data at the moment the event was generated.
abtests
Comma separated names of AB test groups. The data at the moment the event was generated.
install_date
User registration date. Unix timestamp
spent
Amount of virtual currency spent by user on the previous level. List of currency names and amounts separated by comma.
Example: “Coins: 90, Gold: 10”
earned
Amount of virtual currency earned by user on the previous level. List of currency names and amounts separated by comma.
Example: “Coins: 90, Gold: 10
balance
Amount of virtual currency on user balance at the time of reaching a new level. List of currency names and amounts separated by comma.
Example: “Coins: 90, Gold: 10
bought
Amount of virtual currency bought by user for real currency on the previous level. List of currency names and amounts separated by comma.
Example: “Coins: 90, Gold: 10
app_version
Application version. The data at the moment the event was generated.
segments
Comma separated segment names. The data at the moment the event was generated.
abtests
Comma separated names of AB test groups. The data at the moment the event was generated.
amount_in_usd
Amount of real currency spent by user. Converted into USD using exchange rate at the moment the event is received by the devtodev server
status
Is transaction valid or not
install_date
User registration date. Unix timestamp
isTester
At the time of event start the user was a Tester
cheat
At the time of event start the user was a Cheater
app_version
Application version. The data at the moment the event was generated.
segments
Comma separated segment names. The data at the moment the event was generated.
abtests
Comma separated names of AB test groups. The data at the moment the event was generated.
prev_location
Name of the previous location
duration
Time spent on completing the location
difficulty
Location difficulty (numeric)
isTester
At the time of event start the user was a Tester
cheat
At the time of event start the user was a Cheater
install_date
User registration date. Unix timestamp
spent
Amount of virtual currency or resources spent by user upon completing the location. List of currency names and amounts separated by comma.
Example: “Coins: 90, Gold: 10
earned
Amount of virtual currency or resources earned by user upon completing the location. List of currency names and amounts separated by comma.
Example: “Coins: 90, Gold: 10
app_version
Application version. The data at the moment the event was generated.
segments
Comma separated segment names. The data at the moment the event was generated.
abtests
Comma separated names of AB test groups. The data at the moment the event was generated.
cheat
At the time of event start the user was a Cheater
install_date
User registration date. Unix timestamp
app_version
Application version. The data at the moment the event was generated.
segments
Comma separated segment names. The data at the moment the event was generated.
abtests
Comma separated names of AB test groups. The data at the moment the event was generated.
isTester
At the time of event start the user was a Tester
cheat
At the time of event start the user was a Cheater
install_date
User registration date. Unix timestamp
app_version
Application version. The data at the moment the event was generated.
segments
Comma separated segment names. The data at the moment the event was generated.
abtests
Comma separated names of AB test groups. The data at the moment the event was generated.
amount_in_usd
Amount of real currency spent by user. Converted into USD using exchange rate at the moment the event is received by the devtodev server
install_date
User registration date. Unix timestamp
isTester
At the time of event start the user was a Tester
cheat
At the time of event start the user was a Cheater
app_version
Application version. The data at the moment the event was generated.
segments
Comma separated segment names. The data at the moment the event was generated.
abtests
Comma separated names of AB test groups. The data at the moment the event was generated.
action
An action to subscription. Examples:
purchased
changed renewal status
changed renewal pref
renewed
is_trial
Is subscription a trial or not
is_payment_received
Is payment successfully received or not
started_at
Subscription start date
expired_at
Subscription end date
amount_in_usd
Amount of real currency spent by user. Converted into USD using exchange rate at the moment the event is received by the devtodev server
install_date
User registration date. Unix timestamp
isTester
At the time of event start the user was a Tester
cheat
At the time of event start the user was a Cheater
app_version
Application version. The data at the moment the event was generated.
segments
Comma separated segment names. The data at the moment the event was generated.
abtests
Comma separated names of AB test groups. The data at the moment the event was generated.
cheat
At the time of event start the user was a Cheater
install_date
User registration date. Unix timestamp
app_version
Application version. The data at the moment the event was generated.
segments
Comma separated segment names. The data at the moment the event was generated.
abtests
Comma separated names of AB test groups. The data at the moment the event was generated.
Push token
User push token
logged
Date of user’s last activity
level
User level at the time of event start
language
User device locale
country
User country (from IP address)
sdk_version
SDK version at the time of data update
app_version
App version at the time of data update
created
User registration date. Unix timestamp
paying
Is user a payer or not
device_name
Device trademark name
cheater
At the time of event start the user was a Cheater
osversion
Version of the operating system at the time of the data update
unit
Name of ad unit/banner
source
Ad impression data source
revenue
Ad impression revenue in USD
install_date
User registration date. Unix timestamp
isTester
At the time of event start the user was a Tester
cheat
At the time of event start the user was a Cheater
install_date
User registration date. Unix timestamp
app_version
Application version. The data at the moment the event was generated.
segments
Comma separated segment names. The data at the moment the event was generated.
abtests
Comma separated names of AB test groups. The data at the moment the event was generated.
custom parameter name 1
Custom parameter value (string, number or boolean)
custom parameter name N (up to 30)
Custom parameter value (string, number or boolean)
String (64)
When accounting by User ID
Current (actual) User ID
previousUserId
String (64)
Should be sent if the User ID is changed (renamed)
Previous User ID
devtodevId
Long
No
Numeric user/device account ID in the devtodev database. We recommend using this identifier if you are using SDK and API at the same time. Get this identifier on the SDK side, save it on your server and use it to send data via API. Sending other identifiers is not necessary in this case.
packages
Array
Yes
Packets with events that happened to the user (see below)
String (15)
No
The IP address of the device. Only needed in the server-server protocol.
appVersion
String (64)
No
App version
appBuildVersion
String
No
Application build version. A string value is used for compatibility across all platforms
sdkVersion
String
No
Version of the integrated SDK
bundle
String
No
Application bundle
engine
String
No
Application platform/engine (Native, Unity, Unreal, Air)
installationSource
String
No
Only for Android. The installer bundle is passed as the value. It determines where the application was installed from (apk, Google Play, Amazon, etc). Used to detect and prevent illegal apk installs
events
Array
Yes
Events in the order they are generated (details below)
400
The error of JSON format
{
"error_message":"Wrong JSON format"
}
200
OK. Data received
Long
The date the event was generated. Unix timestamp in milliseconds
osVersion
Any
No
String
Operating system version
os
Any
No
String
OS family name (Android, iOS, Mac, Windows…)
displayPpi
Any
No
Int
Screen pixel density
displayResolution
Any
No
String
Screen resolution in pixels, sent as "longSide"x"shortSide" ("1024x768")
displayDiagonal
Any
No
Double
Screen size (inches)
manufacturer
Android, iOS, Mac
No
String
Device manufacturer (Apple, Samsung)
model
Android, iOS, Mac
No
String
Device model. Value of the name (iOS), model (Android)
deviceType
Any
No
Int
Device Type: 0 - Unknown 1 - Phone 2 - Tablet 3 - Desktop 4 - Watch 5 - TV 6 - Simulator
timeZoneOffset
Any
No
Int
The UTC offset (or time offset) in seconds
rooted
Any
No
Int
Is the device rooted
isLimitAdTrackingEnabled
iOS, Android, Windows
No
Bool
Whether ad tracking restriction is enabled
userAgent
Any
No
String
User-Agent header
idfv
iOS, Mac
No
String
identifierForVendor
idfa
iOS, Mac
No
String
advertisingIdentifier
androidId
Android
No
String
Device SSAID. Not recommended for use
advertisingId
Android, Windows
No
String
Advertising ID
serialId
Android, Windows
No
String
Build.Serial (Android). Not recommended for use.
uuid
Android, Windows,
iOS, macOS
No
String
instanceId
Android
No
String
InstanceId.Get();
sandboxState
iOS
No
Int
Information about how the application is built: undefined (0) / sandbox (1) / production (2)
Yes
Int
User (player) level at the time the event was generated
sessionId
No
Long
The ID of the current session. This is a kind of key by which you can link all user events that occurred during one session. This can be a session start timestamp, or you can use some custom numeric ID, or the user's session sequence number if you have that data.
Yes
Int
User (player) level at the time the event was generated
length
Yes
Int
Full session duration or a part of a user session in seconds
sessionId
No
Long
The ID of the current session
Yes
Long
The date the event was generated. Unix timestamp in milliseconds
No
Long
The ID of the current session
Yes
Int
User (player) level at the time the event was generated
parameters
Yes
Object<Key, Value>
User characteristics in key-value format. May contain predefined (tester, cheater, name, email, phone, photo, gender, age) and custom user propery names.
User custom property values can be a number, a string (up to 500 symbols), or a boolean value
sessionId
No
Long
The ID of the current session
Yes
Int
User (player) level at the time the event was generated
name
Yes
String (72)
Custom event name
parameters
No
Object<Key (32),Value>
Custom event parameters
sessionId
No
Long
The ID of the current session
Yes
Int
User (player) level at the time the event was generated
productId
Yes
String (255)
Product name. We recommend using the product SKU
orderId
Yes
String (64)
Unique transaction ID
price
Yes
Double
Price in user currency
currencyCode
Yes
String (3)
ISO 4217 alphabetic code of the user's currency
sessionId
No
Long
The ID of the current session
Yes
Int
User (player) level at the time the event was generated
step
Yes
Int
Tutorial step number or predefined values (0, -1, -2 see above)
sessionId
No
Long
The ID of the current session
Yes
Int
User (player) level at the time the event was generated
purchaseAmount
Yes
Int
Number of items purchased
purchasePrice
Yes
Object<String (24), Number>
Currency and price of the purchased items (or currencies, if there are multiple)
purchaseType
Yes
String (96)
The group to which the item belongs
purchaseId
Yes
String (32)
Item ID or name
sessionId
No
Long
The ID of the current session
Yes
Int
User (player) level at the time the event was generated
bought
Yes one or both (bought and earned)
Object<String, Object<String (24), Number>>
Resources of the type "bought" (purchased) aggregated over a specific period by source and resource name
earned
Yes one or both (bought and earned)
Object<String, Object<String (24), Number>>
Resources of type "earned" aggregated over a specific period by source and resource name
sessionId
No
Long
The ID of the current session
Yes
Long
The date the event was generated. Unix timestamp in milliseconds
level
Yes
Int
User (player) level at the time the event was generated
sessionId
No
Long
The ID of the current session
Yes
Int
User (player) level achieved by the user
balance
No
Object<String (24), Number>
User's balances of virtual currencies or resources at the time of leveling up
spent
No
Object<String (24), Number>
Total expenses of resources (virtual currency) by the user during level progression
In the SDK, this data is aggregated from virtual currency payment events
earned
No
Object<String (24), Number>
The total amount of resources (virtual currency) earned by the user during level progression
In the SDK, this data is aggregated from CurrencyAccrual events with the "earned" type
bought
No
Object<String (24), Number>
The total number of resources (virtual currency) purchased by the user for real currency during level progression
In the SDK, data is aggregated from the CurrencyAccrual events with the "bought" type
sessionId
No
Long
The ID of the current session
Yes
Int
User (player) level at the time the event was generated
parameters
Yes
Object
Event parameters. See below
spent
No
Object<String (24), Number>
Resources consumed during an area completion
earned
No
Object<String (24), Number>
Resources earned during an area completion.
name
Yes
String (40)
The name of the event. It is usually the number or the name of the area/location/level.
sessionId
No
Long
The ID of the current session
Yes
Bool
The completion event result: “true” if successful, “false” if unsuccessful/lost
duration
Yes
Long
Time in seconds taken to complete the area
No
String
Ad network name
campaign
No
String
Ad campaign name
content
No
String
Campaign content (for example, for A/B testing of site elements or contextual ads)
medium
No
String
Traffic type
term
No
String
Campaign search term (for example, PPC keywords)
sessionId
No
Long
The ID of the current session
No
String (100)
Impression data source name
ad_network
Yes
String (100)
The name of the ad network that delivered the impression
placement
No
String (100)
Placement of the banner
ad_unit
No
String (100)
Banner title
revenue
Yes
Double
Reward for displaying a banner in USD
sessionId
No
Long
The ID of the current session
Yes
Int
User (player) level at the time the event was generated
socialNetwork
Yes
String
Code or name of the social network. May contain predefined values (see below)
sessionId
No
Long
The ID of the current session
Viber
vb
Evernote
en
Google Mail
gm
in
pi
Qzone
rt
Renren
rr
Tumblr
tb
Yes
Int
User (player) level at the time the event was generated
socialNetwork
Yes
String
Code or name of the social network. May contain predefined values (see above)
postReason
Yes
String
Reason for posting
sessionId
No
Long
The ID of the current session
14
14
14
button_color
green
green
blue
gray
button_size
8
8
button_color
green
green
blue
gray
button_size
8
8
button_color
green
green
blue
gray
button_size
8
8
12
14
button_color
green
green
blue
gray
button_size
8
8
12
14
button_color
green
green
blue
gray
button_size
8
8
12
14
green
green
blue
gray
button_size
8
8
12
14
button_color
green
green
blue
gray
button_size
8
8
12
14
button_color
green
green
blue
gray
button_size
8
8
12
14
It applies the A/B testing configuration. After the call, the default parameters get matched with the group parameters.
(void) resetConfig
It cancels a suitable or running test
(void) cacheTestExperiment
A debug method for saving a test experiment after restarting the application
It applies the A/B testing configuration. After the call, the default parameters get matched with the group parameters.
resetConfig()
It cancels a suitable or running test
cacheTestExperiment()
A debug method for saving a test experiment after restarting the application
Set map of variables and their default values
Map<String,Object> getDefaults()
Get map of variables and their default values
DTDRemoteConfigCollection getConfig()
Wrapper for remote parameters in the form of a collection. It allows access to the configuration values by using the subscripting syntaxis.
Actual variables and their values for working with A/B tests
applyConfig()
It applies the A/B testing configuration. After the call, the default parameters get matched with the group parameters.
resetConfig()
It cancels a suitable or running test
cacheTestExperiment()
A debug method for saving a test experiment after restarting the application
It applies the A/B testing configuration. After the call, the default parameters get matched with the group parameters.
void ResetConfig()
It cancels a suitable or running test
void CacheTestExperiment()
A debug method for saving a test experiment after restarting the application
It applies the A/B testing configuration. After the call, the default parameters get matched with the group parameters.
ResetConfig()
It cancels a suitable or running test
CacheTestExperiment()
A debug method for saving a test experiment after restarting the application
It cancels a suitable or running test
cacheTestExperiment()
A debug method for saving a test experiment after restarting the application
Set USTRUCT with variables and their default values
TMap<FString, FDTDRemoteConfigValue> GetConfig()
Actual variables and their values for working with A/B tests
FDTDRemoteConfigValue GetRemoteConfigValue(const FString& key)
Return actual value for variable key
bool HasKey(const FString& key)
Verify if there are any values associated with the variable key in the remote configuration.
ApplyConfig()
It applies the A/B testing configuration. After the call, the default parameters get matched with the group parameters.
ResetConfig()
It cancels a suitable or running test
CacheTestExperiment()
A debug method for saving a test experiment after restarting the application
Set GDDTDRemoteConfigDefaults with variables and their default values
GDDTDRemoteConfigValue GetRemoteConfigValue(key: String)
Return actual value for variable key
bool HasKey(key: String)
Verify if there are any values associated with the variable key in the remote configuration.
void ApplyConfig()
It applies the A/B testing configuration. After the call, the default parameters get matched with the group parameters.
void ResetConfig()
It cancels a suitable or running test
void CacheTestExperiment()
A debug method for saving a test experiment after restarting the application
Int32Value
long
Gets the value as an long.
Int64Value
long long
Gets the value as an long long.
integerValue
NSInteger
Gets the value as an NSInteger.
boolValue
BOOL
Gets the value as a Bool.
intValue
Int
Gets the value as an int.
longValue
Long
Gets the value as an long.
booleanValue
Boolean
Gets the value as a Bool.
getIntValue
int
Gets the value as an Int.
getLongValue
long
Gets the value as an Long.
getBooleanValue
Boolean
Gets the value as a Boolean.
LongValue
long
Gets the value as an long.
IntValue
int
Gets the value as an int.
BoolValue
bool
Gets the value as a bool.
Int16Value
Int16
Gets the value as an Int16
Int32Value
Int32
Gets the value as an Int32
Int64Value
Int64
Gets the value as an Int64
BoolValue
bool
Gets the value as a bool.
Gets the value as a long
NB: can be simulated only via string in JavaScript
IntValue
Number
Gets the value as a number
BoolValue
Boolean
Gets the value as a boolean
IntValue
int32
Gets the value as an int.
BoolValue
bool
Gets the value as a bool.
Source
EDTDRemoteConfigSource
Gets source of the value.
GetBoolValue
bool
Gets the value as a bool.
GetSource
GDDTDRemoteConfigSource.Source
Gets source of the value.


12
12
window.devtodev.initializeWithAbTest(
appKey,
{
userId: userId,
logLevel: logLevel,
trackingAvailability: true,
},
{
onReceived: function(result) {
console.log('onReceived callback', result)
},
onPrepareToChange: function() {
console.log('onPrepareToChange callback')
},
onChanged: function(result, error) {
console.log('onChanged callback', result, error)
}
}
)DECLARE_DELEGATE(FDTDRemoteConfigPrepareToChangeDelegate);
DECLARE_DELEGATE_OneParam(FDTDRemoteConfigReceiveResultDelegate, EDTDRemoteConfigReceiveResult);
DECLARE_DELEGATE_TwoParams(FDTDRemoteConfigChangeResultDelegate, EDTDRemoteConfigChangeResult, const FString&);#import "AppDelegate.h"
#import "DTDAnalytics/DTDAnalytics-Swift.h"
@interface AppDelegate () <DTDRemoteConfigListener>
@end
@implementation AppDelegate
- (BOOL)application:(UIApplication *)application didFinishLaunchingWithOptions:(NSDictionary *)launchOptions {
// Config timeout, optional
DTDRemoteConfig.remoteConfigWaiting = 10.0;
// Group timeout, optional
DTDRemoteConfig.groupDefinitionWaiting = 15.0;
// Implementation defaults params
DTDRemoteConfig.defaults = @{@"button_color": @"green",
@"button_size": @"8"};
[DTDAnalytics applicationKey:@"appKey" abConfigListener:self];
return YES;
}
// The method is called when the configuration has been received
- (void)onReceivedResult:(enum DTDRemoteConfigReceiveResult)result {
NSLog(@"Configuration received, result %ld", (long)result);
}
// Called when experiment is found
- (void)onPrepareToChange {
NSLog(@"Experiment found");
}
- (void)onChangedResult:(enum DTDRemoteConfigChangeResult)result error:(NSError *)error {
NSLog(@"DTDRemoteConfigChangeResult: %ld", (long)result);
if (error) {
NSLog(@"DTDRemoteConfigError: %@", error.localizedDescription);
}
[DTDRemoteConfig applyConfig];
// Use here or notify config listeners that actualConfig is ready
NSString *btnColorRemoteValue = DTDRemoteConfig.config[@"button_color"].stringValue;
NSString *btnSizeRemoteValue = DTDRemoteConfig.config[@"button_size"].stringValue;
NSLog(@"button color: %@", btnColorRemoteValue);
NSLog(@"button size: %@", btnSizeRemoteValue);
}
@endclass MainActivity : AppCompatActivity(), DTDRemoteConfigListener {
override fun onCreate(savedInstanceState: Bundle?) {
super.onCreate(savedInstanceState)
setContentView(R.layout.activity_main)
// Config timeout, optional
DTDRemoteConfig.remoteConfigWaiting = 10.0
// Group timeout, optional
DTDRemoteConfig.groupDefinitionWaiting = 15.0
// Implementation defaults params
DTDRemoteConfig.defaults = mapOf("button_color" to "green", "button_size" to "8")
// Initialize SDK with ab test
DTDAnalytics.initializeWithAbTest(appKey = "appKey", context = this, abConfigListener = this)
}
/**
* The method is called when the configuration has been received
*/
override fun onReceived(result: DTDRemoteConfigReceiveResult) {
Log.d("D2D", "Configuration received")
}
/**
* Called when experiment is found
*/
override fun onPrepareToChange() {
Log.d("D2D", "Experiment found")
}
/**
* called when SDK receives config
*/
override fun onChanged(result: DTDRemoteConfigChangeResult, ex: Exception?) {
Log.d("D2D", "DTDRemoteConfigChangeResult: ${result.name}")
ex?.let {
Log.d("D2D", "DTDRemoteConfigErr: ${ex.message}")
}
DTDRemoteConfig.applyConfig()
// Use here or notify config listeners that actualConfig is ready
val btnColorRemoteValue = DTDRemoteConfig.config["button_color"].stringValue
val btnSizeRemoteValue = DTDRemoteConfig.config["button_size"].stringValue
Log.d("D2D", "button color: $btnColorRemoteValue")
Log.d("D2D", "button size: $btnSizeRemoteValue")
}
}public class MainActivityJava extends AppCompatActivity implements DTDRemoteConfigListener {
@Override
protected void onCreate(@Nullable Bundle savedInstanceState) {
super.onCreate(savedInstanceState);
setContentView(R.layout.activity_main);
// Config timeout, optional
DTDRemoteConfig.INSTANCE.setRemoteConfigWaiting(10.0);
// Group timeout, optional
DTDRemoteConfig.INSTANCE.setGroupDefinitionWaiting(15.0);
// Implementation defaults params
HashMap<String, Object> map = new HashMap<>();
map.put("button_color", "green");
map.put("button_size", "8");
// Initialize SDK with ab test
DTDRemoteConfig.INSTANCE.setDefaults(map);
}
@Override
public void onReceived(@NonNull DTDRemoteConfigReceiveResult result) {
Log.d("D2D", "Configuration received");
}
@Override
public void onPrepareToChange() {
Log.d("D2D", "Experiment found");
}
@Override
public void onChanged(@NonNull DTDRemoteConfigChangeResult result, @Nullable Exception ex) {
Log.d("D2D", "DTDRemoteConfigChangeResult: " + result.name());
if (ex != null) {
Log.d("D2D", "DTDRemoteConfigErr: " + ex);
}
DTDRemoteConfig.INSTANCE.applyConfig();
// Use here or notify config listeners that actualConfig is ready
String btnColorRemoteValue = DTDRemoteConfig.INSTANCE.getConfig().get("button_color").getStringValue();
String btnSizeRemoteValue = DTDRemoteConfig.INSTANCE.getConfig().get("button_size").getStringValue();
Log.d("D2D", "button color: " + btnColorRemoteValue);
Log.d("D2D", "button size: " + btnSizeRemoteValue);
}
}using System.Collections.Generic;
using DevToDev.Analytics;
using DevToDev.Analytics.ABTest;
using UnityEngine;
namespace AbTesting
{
public class Example : MonoBehaviour, IDTDRemoteConfigListener
{
private void Start()
{
DontDestroyOnLoad(this);
// Config timeout, optional
DTDRemoteConfig.RemoteConfigWaiting = 10.0;
// Group timeout, optional
DTDRemoteConfig.GroupDefinitionWaiting = 15.0;
// Implementation defaults params
DTDRemoteConfig.Defaults = new Dictionary<string, object>
{
{"button_color", "green"},
{"button_size", 8}
};
// Initialize SDK with ab test
DTDAnalytics.InitializeWithAbTests("app_key", this);
}
// The method is called when the configuration has been received
public void OnReceived(DTDRemoteConfigReceiveResult result)
{
Debug.Log($"Configuration received, result {result}");
}
// Called when experiment is found
public void OnPrepareToChange()
{
Debug.Log("Experiment found");
}
// Called when SDK receives config
public void OnChanged(DTDRemoteConfigChangeResult result, string exceptionText = null)
{
Debug.Log($"DTDRemoteConfigChangeResult: {result}");
if (exceptionText != null)
{
Debug.Log($"DTDRemoteConfigError: {exceptionText}");
}
// Use here or notify config listeners that actualConfig is ready
DTDRemoteConfig.ApplyConfig();
var buttonColorRemoteValue = DTDRemoteConfig.Config["button_color"].StringValue();
var buttonSizeRemoteValue = DTDRemoteConfig.Config["button_size"].IntValue();
Debug.Log($"button color: {buttonColorRemoteValue}");
Debug.Log($"button size: {buttonSizeRemoteValue}");
}
}
}
using DevToDev.Analytics;
using System.Collections.Generic;
using System.Diagnostics;
class MyRemoteConfigListener : IDTDRemoteConfigListener
{
/**
* The method is called when the configuration has been received
*/
public void OnReceived(DTDRemoteConfigReceiveResult result)
{
Debug.WriteLine("Configuration has been received!");
}
/**
* Called when experiment is found
*/
public void OnPrepareToChange()
{
Debug.WriteLine("Experiment was found!");
}
/**
* Called when SDK receives config
*/
public void OnChanged(DTDRemoteConfigChangeResult result, string error)
{
Debug.WriteLine($"Result: {result}");
if (result == DTDRemoteConfigChangeResult.Failure)
{
Debug.WriteLine($"Error: {error}");
}
DTDRemoteConfig.ApplyConfig();
DTDRemoteConfig.ApplyConfig();
var buttonColorRemoteValue = DTDRemoteConfig.Config["button_color"].StringValue;
var buttonSizeRemoteValue = DTDRemoteConfig.Config["button_size"].IntValue;
Debug.WriteLine($"button color: {buttonColorRemoteValue}");
Debug.WriteLine($"button size: {buttonSizeRemoteValue}");
// Use here or notify config listeners that config is ready
}
}
public static class Program
{
public static void Main(string[] args)
{
// Config timeout, optional
DTDRemoteConfig.RemoteConfigWaiting = 10;
// Group timeout, optional
DTDRemoteConfig.GroupDefinitionWaiting = 15;
// Implementation defaults params
DTDRemoteConfig.Defaults = new Dictionary<string, object>
{
["button_color"] = "green",
["button_size"] = 8
};
// Create listener
var listener = new MyRemoteConfigListener();
// Initialize SDK with ab test
DTDAnalytics.InitializeWithAbTest("appKey", listener);
}
}window.devtodev.remoteConfig.defaults = {
button_color: 'green',
button_size: 8
}
window.devtodev.initializeWithAbTest(
appKey,
{
userId: userId,
logLevel: logLevel,
trackingAvailability: trackingAvailability,
},
{
onReceived: function(result) {
console.log('onReceived callback', result)
},
onPrepareToChange: function() {
console.log('onPrepareToChange callback')
},
onChanged: function(result, error) {
console.log('onChanged callback', result, error)
window.devtodev.remoteConfig.applyConfig()
var config = window.devtodev.remoteConfig.config // DTDRemoteConfigCollection
var buttonSizeRemoteValue = window.devtodev.remoteConfig.config["button_size"].intValue;
var buttonColorRemoteValue = window.devtodev.remoteConfig.config["button_color"].stringValue;
console.log("button color: ", buttonColorRemoteValue);
console.log("button size: ", buttonSizeRemoteValue);
}
}
)#include "DTDAnalytics/Public/DTDAnalyticsBPLibrary.h"
#include "DTDAnalytics/Public/DTDRemoteConfigBPLibrary.h"
UDTDAnalyticsBPLibrary::SetLogLevel(EDTDLogLevel::Debug);
// Config timeout, optional
UDTDRemoteConfigBPLibrary::SetRemoteConfigWaiting(10.0f);
// Group timeout, optional
UDTDRemoteConfigBPLibrary::SetGroupDefinitionWaiting(15.0f);
// Implementation defaults params
FDTDRemoteConfigDefaults defaults;
defaults.StringDefaults.Add("button_color", "green");
defaults.IntegerDefaults.Add("button_size", 8);
UDTDRemoteConfigBPLibrary::SetDefaults(defaults);
// The method is called when the configuration has been received
const auto onConfigReceive = new FDTDRemoteConfigReceiveResultDelegate();
onConfigReceive->BindLambda([=](EDTDRemoteConfigReceiveResult result)
{
UE_LOG(LogTemp, Warning, TEXT("Configuration received, result %s"), *UEnum::GetValueAsString(result));
});
// Called when experiment is found
const auto onPrepareToChange = new FDTDRemoteConfigPrepareToChangeDelegate();
onPrepareToChange->BindLambda([=]()
{
UE_LOG(LogTemp, Warning, TEXT("Experiment found"));
});
// Called when SDK receives config
const auto onConfigChange = new FDTDRemoteConfigChangeResultDelegate();
onConfigChange->BindLambda([=](EDTDRemoteConfigChangeResult result, const FString& error)
{
UE_LOG(LogTemp, Warning, TEXT("DTDRemoteConfigChangeResult: %s"), *UEnum::GetValueAsString(result));
if (!error.IsEmpty()) {
UE_LOG(LogTemp, Warning, TEXT("DTDRemoteConfigError: %s"), *error);
}
// Use here or notify config listeners that actualConfig is ready
UDTDRemoteConfigBPLibrary::ApplyConfig();
FString ButtonColorRemoteValue = UDTDRemoteConfigBPLibrary::GetRemoteConfigValue("button_color").StringValue;
int32 buttonSizeRemoteValue = UDTDRemoteConfigBPLibrary::GetRemoteConfigValue("button_size").IntegerValue;
UE_LOG(LogTemp, Warning, TEXT("button color: : %s"), *ButtonColorRemoteValue);
UE_LOG(LogTemp, Warning, TEXT("button size:: %d"), buttonSizeRemoteValue);
});
// Initialize SDK with ab test
UDTDAnalyticsBPLibrary::InitializeWithAbTest("AppKey", *onConfigChange, *onPrepareToChange, *onConfigReceive);func _ready():
# Config timeout, optional
DTDRemoteConfig.SetRemoteConfigWaiting(10)
# Group timeout, optional
DTDRemoteConfig.SetGroupDefinitionWaiting(10)
# Implementation defaults params
var defaults = GDDTDRemoteConfigDefaults.new()
defaults.AddStringValue("button_color", "green")
defaults.AddIntegerValue("button_size", 8)
DTDRemoteConfig.SetDefaults(defaults)
# Initialize SDK with ab test
DTDAnalytics.SetLogLevel(GDDTDLogLevel.Debug)
DTDAnalytics.InitializeWithConfigWithAbTest(
"appKey",
onRemoteConfigChange,
onRemoteConfigPrepareToChange,
onRemoteConfigReceive)
# The method is called when the configuration has been received
func onRemoteConfigReceive(result: GDDTDRemoteConfigReceiveResult.ReceiveResult):
match result:
GDDTDRemoteConfigReceiveResult.ReceiveResult.Failure:
print("onRemoteConfigReceive result = Failure")
GDDTDRemoteConfigReceiveResult.ReceiveResult.Success:
print("onRemoteConfigReceive result = Success")
GDDTDRemoteConfigReceiveResult.ReceiveResult.Empty:
print("onRemoteConfigReceive result = Empty")
_:
print("onRemoteConfigReceive result = Unknown")
# Called when experiment is found
func onRemoteConfigPrepareToChange():
print("Experiment found")
# Called when SDK receives config
func onRemoteConfigChange(result: GDDTDRemoteConfigChangeResult.ChangeResult, error: String):
if !error.is_empty():
print("error = " + error)
match result:
GDDTDRemoteConfigChangeResult.ChangeResult.Failure:
print("onRemoteConfigChange result = Failure")
GDDTDRemoteConfigChangeResult.ChangeResult.Success:
print("onRemoteConfigChange result = Success")
_:
print("onRemoteConfigChange result = Unknown")
DTDRemoteConfig.ApplyConfig()
# Use here or notify config listeners that actualConfig is ready
var btnColorRemoteValue = DTDRemoteConfig.GetRemoteConfigValue("button_color").GetStringValue()
var btnSizeRemoteValue = DTDRemoteConfig.GetRemoteConfigValue("button_size").GetStringValue()
print("button color: " + btnColorRemoteValue)
print("button size: " + btnSizeRemoteValue)DECLARE_DELEGATE_TwoParams(FDTDRemoteConfigChangeResultDelegate, EDTDRemoteConfigChangeResult, const FString&);Our analytics data show that most of the people make a purchase during their first session. However, only 70% of users open our in-app store during the first session. We hypothesize that if we add a purchase screen to the tutorial then 100% of users will face it and the number of purchases during the first session will increase.
The criteria for test inclusion is starting the tutorial. The DTDAnalytics.tutorial(step: Int) event with step = -1 is the trigger.
Control group: a 10 step tutorial, no purchase screens
Group А: an 11 step tutorial. At step number 5, we will offer a special offer.
Our analytics data show that N users installed the app more than half a year ago but still did not make a purchase. We hypothesize that if we offer a huge discount then we can get additional income.
The criteria for test inclusion is the app install date and the “payer” status.
Control group: current version with usual prices
Group А: it has a discount badge on the main page. After clicking on the badge, a purchase window pops up
Note
When receiving the configuration, the SDK always calls the onReceived(result: DTDRemoteConfigReceiveResult) method, and when enrolling in a test - the onPrepareToChange() and onChanged(result: DTDRemoteConfigChangeResult, error: Error?) method. However, you can take some additional precocious measures. You can add a timer as in the following example:
Note
When receiving the configuration, the SDK always calls the onReceivedResult
Our analytics data show that only 60% of our users complete the tutorial. We hypothesize that if we make it easier (group A) or reduce the number of seps (group B), we will increase the percentage of tutorial completion.
New users who have not started the tutorial yet.
Control group: current version with usual difficulty and usual number of steps
Group А: low difficulty, usual number of steps
Group B: usual difficulty, few steps
onPrepareToChangeonChangedResultNote
When receiving the configuration, the SDK always calls the onReceivedResult method, and when enrolling in a test - the onPrepareToChange and onChangedResult method. However, you can take some additional precocious measures. You can add a timer as in the following example:
Note
When receiving the configuration, the SDK always calls the onReceivedResult method, and when enrolling in a test - the onPrepareToChange and onChangedResult method. However, you can take some additional precocious measures. You can add a timer as in the following example:
Note
When receiving the configuration, the SDK always calls the OnReceived(DTDRemoteConfigReceiveResult result) method, and when enrolling in a test - the OnPrepareToChange() and OnChanged(DTDRemoteConfigChangeResult result, string exceptionText = null) method. However, you can take some additional precocious measures. You can add a timer as in the following example:
Note
When receiving the configuration, the SDK always calls the OnReceived(DTDRemoteConfigReceiveResult result) method, and when enrolling in a test - the OnPrepareToChange() and OnChanged(DTDRemoteConfigChangeResult result, string error). However, you can take some additional precocious measures. You can add a timer as in the following example:
class Constants {
// Timer constants
companion object {
const val waitConfigConst = 10.0
const val waitConfigConstInMilliseconds = 10000L
const val waitGroupConst = 15.0
const val waitGroupConstInMilliseconds = 15000L
}
}
// Value keys
enum class ValueKey(val value: String) {
MaximumDiscount("maximumDiscount")
}
class AppConfig {
companion object {
fun loadDefaults() {
val appDefaults = mapOf<String, Any>(ValueKey.MaximumDiscount.value to "false")
// Set default values
DTDRemoteConfig.defaults = appDefaults
}
fun bool(key: ValueKey): Boolean {
return DTDRemoteConfig.config[key.value].booleanValue
}
}
}
class AppLogic {
fun viewDidLoad() {
// Display the launch screen
showLaunchScreen()
}
// Launching the main logic of the application
fun startAppForReal() {
// Update app UI
updateAppUI()
// Hide launch screen
hideLaunchScreen()
}
fun updateAppUI() {
if (AppConfig.bool(ValueKey.MaximumDiscount)) {
// Display a discount badge clicking on which invokes a purchase window popup
}
}
}
class MainActivity : AppCompatActivity(), DTDRemoteConfigListener {
//activityIndicator control timer
var timer: Timer? = null
override fun onCreate(savedInstanceState: Bundle?) {
super.onCreate(savedInstanceState, persistentState)
setContentView(R.layout.activity_main)
// Set the maximum time of waiting for the A/B test configuration
DTDRemoteConfig.remoteConfigWaiting = Constants.waitConfigConst
// Set the maximum time of waiting for an A/B test group
DTDRemoteConfig.groupDefinitionWaiting = Constants.waitGroupConst
// Set default values
AppConfig.loadDefaults()
// Initialize the SDK for working with A/B testing
DTDAnalytics.initializeWithAbTest(
appKey = "appKey",
context = this,
abConfigListener = this
)
}
// Process the result of waiting for A/B test configuration
override fun onReceived(result: DTDRemoteConfigReceiveResult) {
// If the attempt fails, launch the main logic of the application
if (result == DTDRemoteConfigReceiveResult.Failure) {
runOnUiThread {
startAppForReal()
}
}
}
// Prepare the app UI for changing the remote configuration
override fun onPrepareToChange() {
// It is not used in current example
}
override fun onChanged(result: DTDRemoteConfigChangeResult, ex: Exception?) {
when (result) {
DTDRemoteConfigChangeResult.Success -> {
// Apply new values
DTDRemoteConfig.applyConfig()
}
DTDRemoteConfigChangeResult.Failure -> {
// Error processing
ex?.let { Log.e("TAG", ex.toString()) }
}
}
runOnUiThread {
startAppForReal()
}
}
}fun showLaunchScreen() {
// Add a timer that will forcibly launch the main logic of the application
tiemr = Timer("ActivityIndicator").schedule(
Constants.waitConfigConstInMilliseconds +
Constants.waitGroupConstInMilliseconds
) {
runOnUiThread {
startAppForReal()
}
}
showActivityIndicator()
}class Constants {
// Timer constants
final static double waitGroupConst = 10.0;
final static long waitGroupConstInMilliseconds = 10000L;
final static double waitConfigConst = 15.0;
final static long waitConfigConstInMilliseconds = 15000L;
}
enum ValueKey {
MaximumDiscount("maximumDiscount");
private final String stringValue;
ValueKey(String toString) {
stringValue = toString;
}
@Override
public String toString() {
return stringValue;
}
}
class AppConfig {
static void loadDefaults() {
HashMap<String, Object> map = new HashMap<>();
map.put(ValueKey.MaximumDiscount.toString(), "false");
DTDRemoteConfig.INSTANCE.setDefaults(map);
}
static Boolean bool(ValueKey key) {
return DTDRemoteConfig.INSTANCE.getConfig().get(key.toString()).getBooleanValue();
}
}
class AppLogic {
static void viewDidLoad() {
// Display the launch screen
showLaunchScreen();
}
// Launching the main logic of the application
static void startAppForReal() {
// Update app UI
updateAppUI();
// Hide launch screen
hideLaunchScreen();
}
static void updateAppUI() {
if (AppConfig.bool(ValueKey.MaximumDiscount)) {
// Display a discount badge clicking on which invokes a purchase window popup
}
}
}
class MainActivity extends AppCompatActivity implements DTDRemoteConfigListener {
//activityIndicator control timer
Timer timer = null;
@Override
protected void onCreate(@Nullable Bundle savedInstanceState) {
super.onCreate(savedInstanceState);
setContentView(R.layout.activity_main);
// Set the maximum time of waiting for the A/B test configuration
DTDRemoteConfig.INSTANCE.setRemoteConfigWaiting(Constants.waitConfigConst);
// Set the maximum time of waiting for an A/B test group
DTDRemoteConfig.INSTANCE.setGroupDefinitionWaiting(Constants.waitGroupConst);
// Set default values
AppConfig.loadDefaults();
// Initialize the SDK for working with A/B testing
DTDAnalytics.INSTANCE.initializeWithAbTest("appKey", this, this);
}
// Process the result of waiting for A/B test configuration
@Override
public void onReceived(@NonNull DTDRemoteConfigReceiveResult result) {
// If the attempt fails, launch the main logic of the application
if (result == DTDRemoteConfigReceiveResult.Failure) {
runOnUiThread(AppLogic::startAppForReal);
}
}
// Prepare the app UI for changing the remote configuration
@Override
public void onPrepareToChange() {
// It is not used in current example
}
@Override
public void onChanged(@NonNull DTDRemoteConfigChangeResult result, @Nullable Exception ex) {
if (result == DTDRemoteConfigChangeResult.Success) {
// Apply new values
DTDRemoteConfig.INSTANCE.applyConfig();
}
if (result == DTDRemoteConfigChangeResult.Failure) {
// Error processing
if (ex != null) {
Log.e("TAG", ex.toString());
}
}
if (timer != null) {
timer.cancel();
timer = null;
}
runOnUiThread(AppLogic::startAppForReal);
}
} void showLaunchScreen() {
// Add a timer that will forcibly launch the main logic of the application
timer = new Timer();
timer.schedule(new TimerTask() {
@Override
public void run() {
runOnUiThread(AppLogic::startAppForReal);
}
}, Constants.waitConfigConstInMilliseconds +
Constants.waitGroupConstInMilliseconds);
showActivityIndicator();
} // Timer constants
public static class Constants
{
public static float WAIT_GROUP_TIME = 10.0f;
public static float WAIT_CONFIG_TIME = 15.0f;
}
// Value keys
public enum ValueKey
{
maximumDiscount
}
public class AppConfig
{
public void LoadDefaults()
{
var appDefaults = new Dictionary<string, object>
{
{ValueKey.maximumDiscount.ToString(), false}
};
// Set default values
DTDRemoteConfig.Defaults = appDefaults;
}
public bool GetBool(ValueKey key) => DTDRemoteConfig.Config[key.ToString()].BoolValue();
}
public class AppLogic : MonoBehaviour, IDTDRemoteConfigListener
{
private readonly AppConfig _appConfig = new AppConfig();
private const string APP_KEY = "appKey";
private SimpleUI _simpleUI;
private void Start()
{
DontDestroyOnLoad(this);
_simpleUI = FindObjectOfType<SimpleUI>();
if (_simpleUI == null) throw new NullReferenceException("UIManager not found.");
// Set the maximum time of waiting for an A/B test group
DTDRemoteConfig.GroupDefinitionWaiting = Constants.WAIT_GROUP_TIME;
// Set the maximum time of waiting for the A/B test configuration
DTDRemoteConfig.RemoteConfigWaiting = Constants.WAIT_CONFIG_TIME;
// Set default values
_appConfig.LoadDefaults();
// Initialize the SDK for working with A/B testing
DTDAnalytics.InitializeWithAbTests(
appKey: APP_KEY,
configListener: this);
// Show the loading indicator with timer.
_simpleUI.ShowLoadingIndicator(Constants.WAIT_GROUP_TIME + Constants.WAIT_CONFIG_TIME);
}
public void UpdateAppUI()
{
if (_appConfig.GetBool(ValueKey.maximumDiscount))
{
// Display a discount badge clicking on which invokes a purchase window popup
}
}
// Process the result of waiting for A/B test configuration.
public void OnReceived(DTDRemoteConfigReceiveResult result)
{
// If the attempt fails, hide the loading indicator and stop timer.
if (result == DTDRemoteConfigReceiveResult.Failure)
{
_simpleUI.HideLoadingIndicator();
}
}
// Prepare the app UI for changing the remote configuration
public void OnPrepareToChange()
{
// It is not used in current example
}
// Apply the values of the assigned group
public void OnChanged(DTDRemoteConfigChangeResult result, string exceptionText = null)
{
// Hide the loading indicator and stop timer.
_simpleUI.HideLoadingIndicator();
switch (result)
{
case DTDRemoteConfigChangeResult.Failure:
// Error processing
if (exceptionText != null) Debug.LogError(exceptionText);
break;
case DTDRemoteConfigChangeResult.Success:
// Apply new values
DTDRemoteConfig.ApplyConfig();
break;
}
UpdateAppUI();
}
}public class SimpleUI : MonoBehaviour
{
[SerializeField] private Canvas loadingIndicator;
private Coroutine _timer;
private IEnumerator HideAfterTimeout(float timeout, Canvas target)
{
yield return new WaitForSeconds(timeout);
target.gameObject.SetActive(false);
}
public void ShowLoadingIndicator(float? timeout = null)
{
loadingIndicator.gameObject.SetActive(true);
if (timeout != null)
_timer = StartCoroutine(HideAfterTimeout(timeout.Value, loadingIndicator));
}
public void HideLoadingIndicator()
{
loadingIndicator.gameObject.SetActive(false);
if (_timer != null) StopCoroutine(_timer);
}
}using DevToDev.Analytics;
using System.Collections.Generic;
using System.Diagnostics;
// Timer constants
static class Constants
{
public const float WaitConfigConst = 10.0f;
public const float WaitGroupConst = 15.0f;
}
// Value keys
static class ValueKeys
{
public const string MaximumDiscount = "maximumDiscount";
}
static class AppConfg
{
public static void LoadDafaults()
{
// Set default values
DTDRemoteConfig.Defaults = new Dictionary<string, object>
{
[ValueKeys.MaximumDiscount] = false
};
}
public static bool GetBoolValue(string key)
{
return DTDRemoteConfig.Config[key].BoolValue;
}
}
class Application : IDTDRemoteConfigListener
{
public void Run()
{
// Set the maximum time of waiting for an A/B test group
DTDRemoteConfig.RemoteConfigWaiting = Constants.WaitConfigConst;
// Set the maximum time of waiting for the A/B test configuration
DTDRemoteConfig.GroupDefinitionWaiting = Constants.WaitGroupConst;
// Set default values
AppConfg.LoadDafaults();
// Initialize the SDK for working with A/B testing
DTDAnalytics.InitializeWithAbTest("appKey", this);
// Show launch screen (method do a job in UI thread)
UI.ShowLaunchScreen();
}
public void ShowMainScene()
{
// Show main screen (also hide launch screen) (method do a job in UI thread)
UI.ShowMainScreen();
if (AppConfg.GetBoolValue(ValueKeys.MaximumDiscount))
{
// Display a discount badge clicking on which invokes a purchase window popup
// (method do a job in UI thread)
UI.ShowMaximumDiscount();
}
}
// Apply the values of the assigned group
public void OnChanged(DTDRemoteConfigChangeResult result, string error)
{
Debug.WriteLine($"[App-ABTests] OnChanged({result}, {error})");
switch (result)
{
case DTDRemoteConfigChangeResult.Failure:
// Error processing
break;
case DTDRemoteConfigChangeResult.Success:
// Apply new values
DTDRemoteConfig.ApplyConfig();
break;
default:
break;
}
// Show main screen (also hide launch screen)
ShowMainScene();
}
// Prepare the app UI for changing the remote configuration
public void OnPrepareToChange()
{
// It is not used in current example
Debug.WriteLine($"[App-ABTests] OnPrepareToChange()");
}
// Process the result of waiting for A/B test configuration.
public void OnReceived(DTDRemoteConfigReceiveResult result)
{
Debug.WriteLine($"[App-ABTests] OnReceived({result})");
// If the attempt fails, show main screen (also hide launch screen)
if (result == DTDRemoteConfigReceiveResult.Failure)
{
ShowMainScene();
}
}
}public void showLaunchScreen() {
// Add a timer that will forcibly launch the main logic of the application
TimerUtil.CallWithDelay(Constants.WaitConfigConst + Constants.WaitGroupConst, () =>
{
UI.StartAppForReal();
});
UI.ShowActivityIndicator();
}devtodev.remoteConfig.defaults = {
maximumDiscount: false,
}
devtodev.remoteConfig.groupDefinitionWaiting = 10
devtodev.remoteConfig.remoteConfigWaiting = 15
devtodev.initializeWithAbTest(
appKey,
{
userId: userId,
logLevel: logLevel,
trackingAvailability: trackingAvailability,
},
{
// Process the result of waiting for A/B test configuration
onReceived: function(result) {
// It is not used in current example
},
// Prepare the app UI for changing the remote configuration
onPrepareToChange: function() {
// Display the progress indicator
ui.showSpinner()
},
// Apply the values of the assigned group
onChanged: function(result, error) {
ui.hideSpinner()
switch (result) {
case DTDRemoteConfigChangeResult.Failure:
// Error processing
console.error(error);
break;
case DTDRemoteConfigChangeResult.Success:
// Apply new values
devtodev.remoteConfig.applyConfig()
break;
}
updateAppUI();
}
}
)
function updateAppUI() {
var maximumDiscount = window.devtodev.remoteConfig.config['maximumDiscount'].boolValue
if (maximumDiscount) {
// Display a discount badge clicking on which invokes a purchase window popup
}
}// Timer constants
static float WAIT_CONFIG_TIME = 15.0f;
static float WAIT_GROUP_TIME = 10.0f;
void SomeLogicClass::Start() {
// Set the maximum time of waiting for an A/B test group
UDTDRemoteConfigBPLibrary::SetRemoteConfigWaiting(WAIT_CONFIG_TIME);
// Set the maximum time of waiting for the A/B test configuration
DTDRemoteConfigBPLibrary::SetGroupDefinitionWaiting(WAIT_GROUP_TIME);
// Set default values
FDTDRemoteConfigDefaults Defaults;
Defaults.BoolDefaults.Add("maximumDiscount", false);
UDTDRemoteConfigBPLibrary::SetDefaults(Defaults);
const auto onConfigReceive = new FDTDRemoteConfigReceiveResultDelegate();
onConfigReceive->BindUObject(this, &SomeLogicClass::OnConfigReceive);
const auto onPrepareToChange = new FDTDRemoteConfigPrepareToChangeDelegate();
onPrepareToChange->BindUObject(this, &SomeLogicClass::OnPrepareToChange);
const auto onConfigChange = new FDTDRemoteConfigChangeResultDelegate();
onConfigChange->BindUObject(this, &SomeLogicClass::OnConfigChange);
// Initialize the SDK for working with A/B testing
UDTDAnalyticsBPLibrary::InitializeWithAbTest("AppKey", *onConfigChange, *onPrepareToChange, *onConfigReceive);
// Show the loading indicator with timer.
SomeUI::showLaunchScreen(WAIT_CONFIG_TIME + WAIT_GROUP_TIME);
}
void SomeLogicClass::UpdateAppUI()
{
if (UDTDRemoteConfigBPLibrary::GetRemoteConfigValue("maximumDiscount").BoolValue)
{
// Display a discount badge clicking on which invokes a purchase window popup
}
}
// Process the result of waiting for A/B test configuration
void SomeLogicClass::OnConfigReceive(EDTDRemoteConfigReceiveResult result) {
// If the attempt fails, hide the loading indicator and stop timer.
if (result == EDTDRemoteConfigReceiveResult::Failure)
{
SomeUI::HideLoadingIndicator();
}
}
// Prepare the app UI for changing the remote configuration
void SomeLogicClass::OnPrepareToChange() {
// It is not used in current example
}
// Apply the values of the assigned group
void SomeLogicClass::OnConfigChange(EDTDRemoteConfigChangeResult result, const FString& error) {
// Hide the loading indicator and stop timer.
SomeUI::HideLoadingIndicator();
switch (result)
{
case EDTDRemoteConfigChangeResult::Success:
// Apply new values
UDTDRemoteConfigBPLibrary::ApplyConfig();
break;
case EDTDRemoteConfigChangeResult::Failure:
// Error processing
UE_LOG(LogTemp, Warning, TEXT("DTDRemoteConfigError: %s"), *error);
break;
default:
break;
}
UpdateAppUI();
}# Control timer
var timer = Timer.new()
# Timer constants
var waitConfigConst = 10.0
var waitGroupConst = 15.0
var maximumDiscount = "maximumDiscount"
func loadDefaults():
var appDefaults = GDDTDRemoteConfigDefaults.new()
# Set default values
appDefaults.AddBoolValue(maximumDiscount, false)
DTDRemoteConfig.SetDefaults(appDefaults)
func getBool(key: String) -> bool:
return DTDRemoteConfig.GetRemoteConfigValue(key).GetBoolValue()
func viewDidLoad():
#Display the launch screen
showLaunchScreen()
#Launching the main logic of the application
func startAppForReal():
# Update app UI
updateAppUI()
# Hide launch screen
hideLaunchScreen()
func updateAppUI() :
if getBool(maximumDiscount):
# Display a discount badge clicking on which invokes a purchase window popup
pass
func _ready():
# Set the maximum time of waiting for the A/B test configuration
DTDRemoteConfig.SetRemoteConfigWaiting(waitConfigConst)
# Set the maximum time of waiting for an A/B test group
DTDRemoteConfig.SetGroupDefinitionWaiting(waitGroupConst)
# Set default values
loadDefaults()
# Initialize the SDK for working with A/B testing
var config = GDDTDAnalyticsConfiguration.new()
DTDAnalytics.InitializeWithConfigWithAbTest("appKey",
config,
onRemoteConfigChange,
onRemoteConfigPrepareToChange,
onRemoteConfigReceive)
func onRemoteConfigChange(result: GDDTDRemoteConfigChangeResult.ChangeResult, error: String):
match result:
GDDTDRemoteConfigChangeResult.Success:
# Apply new values
DTDRemoteConfig.ApplyConfig()
GDDTDRemoteConfigChangeResult.Failure:
# Error processing
print(error)
startAppForReal()
# Prepare the app UI for changing the remote configuration
func onRemoteConfigPrepareToChange():
# It is not used in current example
pass
# Process the result of waiting for A/B test configuration
func onRemoteConfigReceive(result: GDDTDRemoteConfigReceiveResult.ReceiveResult):
if (result == GDDTDRemoteConfigReceiveResult.Failure):
# If the attempt fails, launch the main logic of the application
startAppForReal()
func showLaunchScreen():
# Add a timer that will forcibly launch the main logic of the application
timer.connect("ActivityIndicator", startAppForReal)
timer.one_shot = true
timer.wait_time = waitConfigConst + waitGroupConst
add_child(timer)
timer.start()
showActivityIndicator()// Timer constants
struct Constants {
static let waitGroupConst = 10.0
}
// Value keys
enum ValueKey: String {
case showStore
}
class AppConfig {
static func loadDefaults() {
let appDefaults: [String: Any] = [
ValueKey.showStore.rawValue: "false"
]
// Set default values
DTDRemoteConfig.defaults = appDefaults
}
static func bool(forKey key: ValueKey) -> Bool {
return DTDRemoteConfig.config[key.rawValue].boolValue
}
}
class AppLogic {
var timer: Timer
// Tutorial open event (e.g. by clicking the ‘start tutorial’ button)
func startTutorial() {
// Send a trigger event that indicates tutorial start
DTDAnalytics.tutorial(step: -1)
}
func nextTutotrialStep(_ currentStep: Int) {
DTDAnalytics.tutorial(step: currentStep)
if AppConfig.bool(forKey: .showStore) && currentStep == 5 {
// Offer purchasing of a special offer
}
}
}
class AppDelegate: UIResponder, UIApplicationDelegate {
func application(_ application: UIApplication,
willFinishLaunchingWithOptions launchOptions: [UIApplication.LaunchOptionsKey: Any]?) -> Bool {
// Set the maximum time of waiting for an A/B test group
DTDRemoteConfig.groupDefinitionWaiting = Constants.waitGroupConst
// Set default values
AppConfig.loadDefaults()
// Initialize the SDK for working with A/B testing
DTDAnalytics.initializeWithAbTest(applicationKey: "appKey",
configuration: config,
abConfigListener: self)
}
}
extension AppLogic: DTDRemoteConfigListener {
// Process the result of waiting for A/B test configuration
func onReceived(result: DTDRemoteConfigReceiveResult) {
// It is not used in current example
}
// Prepare the app UI for changing the remote configuration
func onPrepareToChange() {
// Use the main app thread because you are getting ready for working with the interface
DispatchQueue.main.async { [weak self] in
// Display the download progress indicator
self?.showActivityIndicator()
// Add a timer that will forcibly remove the download progress indicator
self?.timer = Timer.scheduledTimer(withTimeInterval: Constants.waitGroupConst, repeats: false) { [weak self] _ in
self?.hideActivityIndicator()
}
}
}
// Apply the values of the assigned group
func onChanged(result: DTDRemoteConfigChangeResult, error: Error?) {
defer {
// Hide the download progress indicator
DispatchQueue.main.async { [weak self] in
self?.timer.invalidate();
self?.hideActivityIndicator()
}
}
switch result {
case .success:
// Apply new values
DTDRemoteConfig.applyConfig()
case .failure:
// Error processing
if let error = error {
print(error.localizedDescription)
}
@unknown default:
break
}
}
}// Constants .h + .m
@interface Constants : NSObject
// Timer constants
extern double const waitGroupConst;
// Value keys
extern NSString * const showStore;
@end
@implementation Constants
double const waitGroupConst = 10.0;
NSString * const showStore = @"showStore";
@end
// AppConfig .h + .m
@interface AppConfig: NSObject
+(void) loadDefaults;
+(BOOL) getBoolForKey:(NSString *) key;
@end
@implementation AppConfig
+(void)loadDefaults {
NSDictionary *appDefaults = @{
showStore: @NO
};
// Set default values
DTDRemoteConfig.defaults = appDefaults;
}
+(BOOL) getBoolForKey:(NSString *) key {
return DTDRemoteConfig.config[key].boolValue;
}
@end
// AppLogic .h + .m
@interface AppLogic : UIViewController <DTDRemoteConfigListener>
@property (nonatomic, strong) NSTimer *timer;
@end
@implementation AppLogic
- (void)viewDidLoad {
[super viewDidLoad];
[self startTutorial];
}
// Tutorial open event (e.g. by clicking the ‘start tutorial’ button)
- (void) startTutorial {
// Send a trigger event that indicates tutorial start
[DTDAnalytics tutorialStep: -1];
dispatch_after(dispatch_time(DISPATCH_TIME_NOW, 2 * NSEC_PER_SEC), dispatch_get_main_queue(), ^{
[self nextTutotrialStep:5];
});
}
- (void) nextTutotrialStep:(NSInteger) currentStep {
[DTDAnalytics tutorialStep: currentStep];
if ([AppConfig getBoolForKey:showStore] && currentStep == 5) {
// Offer purchasing of a special offer
}
}
// Process the result of waiting for A/B test configuration
- (void)onReceivedResult:(enum DTDRemoteConfigReceiveResult)result {
// It is not used in current example
}
// Prepare the app UI for changing the remote configuration
- (void)onPrepareToChange {
// Use the main app thread because you are getting ready for working with the interface
__weak AppLogic *weakSelf = self;
dispatch_async(dispatch_get_main_queue(), ^{
// Display the progress indicator
[weakSelf showActivityIndicator];
// Add a timer that will forcibly remove the progress indicator
self.timer = [NSTimer scheduledTimerWithTimeInterval:waitGroupConst repeats:false block:^(NSTimer *timer){
[weakSelf hideActivityIndicator];
}];
});
}
// Apply the values of the assigned group
- (void)onChangedResult:(enum DTDRemoteConfigChangeResult)result error:(NSError *)error {
switch (result) {
case DTDRemoteConfigChangeResultSuccess:
// Apply new values
[DTDRemoteConfig applyConfig];
break;
case DTDRemoteConfigChangeResultFailure:
// Error processing
if (error) {
NSLog(@"DTDRemoteConfigError: %@", error.localizedDescription);
}
default:
break;
}
// Hide the progress indicator
__weak AppLogic *weakSelf = self;
dispatch_async(dispatch_get_main_queue(), ^{
[self.timer invalidate];
[weakSelf hideActivityIndicator];
});
}
- (void)showActivityIndicator {
// Display the progress indicator
}
- (void)hideActivityIndicator {
// Hide the progress indicator
}
@end
// AppDelegate .h + .m
@interface AppDelegate ()
@end
@implementation AppDelegate
- (BOOL)application:(UIApplication *)application didFinishLaunchingWithOptions:(NSDictionary *)launchOptions {
AppLogic *appLogicController = [[UIStoryboard storyboardWithName:@"Main" bundle:nil] instantiateViewControllerWithIdentifier:@"AppLogic"];
UINavigationController *navController = [[UINavigationController alloc]initWithRootViewController:appLogicController];
self.window.rootViewController = navController;
[self.window makeKeyAndVisible];
// Group timeout, optional
DTDRemoteConfig.groupDefinitionWaiting = waitGroupConst;
// Implementation defaults params
[AppConfig loadDefaults];
[DTDAnalytics applicationKey:appKey abConfigListener:appLogicController];
return YES;
}
@endclass Constants {
// Timer constants
companion object {
const val waitGroupConst = 10.0
const val waitGroupConstInMilliseconds = 10000L
}
}
// Value keys
enum class ValueKey(val value: String) {
ShowStore("showStore")
}
class AppConfig {
companion object {
fun loadDefaults() {
val appDefaults = mapOf<String, Any>(ValueKey.ShowStore.value to "false")
DTDRemoteConfig.defaults = appDefaults
}
fun bool(key: ValueKey): Boolean {
return DTDRemoteConfig.config[key.value].booleanValue
}
}
}
class AppLogic {
// Tutorial open event (e.g. by clicking the ‘start tutorial’ button)
fun startTutorial() {
// Send a trigger event that indicates tutorial start
DTDAnalytics.tutorial(step = -1)
}
fun nextTutorialStep(currentStep: Int) {
DTDAnalytics.tutorial(step = currentStep)
if (AppConfig.bool(ValueKey.ShowStore) && currentStep == 5) {
// Offer purchasing of a special offer
}
}
}
class MainActivity : AppCompatActivity(), DTDRemoteConfigListener {
//activityIndicator control timer
var timer: TimerTask? = null
override fun onCreate(savedInstanceState: Bundle?) {
super.onCreate(savedInstanceState, persistentState)
setContentView(R.layout.activity_main)
// Set the maximum time of waiting for an A/B test group
DTDRemoteConfig.groupDefinitionWaiting = Constants.waitGroupConst
// Set default values
AppConfig.loadDefaults()
// Initialize the SDK for working with A/B testing
DTDAnalytics.initializeWithAbTest(
appKey = "appKey",
context = this,
abConfigListener = this
)
}
// Process the result of waiting for A/B test configuration
override fun onReceived(result: DTDRemoteConfigReceiveResult) {
// It is not used in current example
}
// Prepare the app UI for changing the remote configuration
override fun onPrepareToChange() {
// Use the main app thread because you are getting ready for working with the interface
runOnUiThread {
// Display the download progress indicator
this.showActivityIndicator()
}
// Add a timer that will forcibly remove the download progress indicator
timer = Timer("ActivityIndicator").schedule(Constants.waitGroupConstInMilliseconds) {
runOnUiThread {
this.hideActivityIndicator()
}
}
}
override fun onChanged(result: DTDRemoteConfigChangeResult, ex: Exception?) {
when (result) {
DTDRemoteConfigChangeResult.Success -> {
// Apply new values
DTDRemoteConfig.applyConfig()
}
DTDRemoteConfigChangeResult.Failure -> {
// Error processing
ex?.let { Log.e("TAG", ex.toString()) }
}
}
this.timer?.cancel()
this.timer = null
runOnUiThread {
this.hideActivityIndicator()
}
class Constants {
// Timer constants
final static double waitGroupConst = 10.0;
final static long waitGroupConstInMilliseconds = 10000L;
}
enum ValueKey {
ShowStore("showStore");
private final String stringValue;
ValueKey(String toString) {
stringValue = toString;
}
@Override
public String toString() {
return stringValue;
}
}
class AppConfig {
static void loadDefaults() {
HashMap<String, Object> map = new HashMap<>();
map.put(ValueKey.ShowStore.toString(), "false");
DTDRemoteConfig.INSTANCE.setDefaults(map);
}
static Boolean bool(ValueKey key) {
return DTDRemoteConfig.INSTANCE.getConfig().get(key.toString()).getBooleanValue();
}
}
class AppLogic {
// Tutorial open event (e.g. by clicking the 'start tutorial' button)
void startTutorial() {
// Send a trigger event that indicates tutorial start
DTDAnalytics.INSTANCE.tutorial( -1);
}
void nextTutorialStep(int currentStep) {
DTDAnalytics.INSTANCE.tutorial(currentStep);
if (AppConfig.bool(ValueKey.ShowStore) && currentStep == 5) {
// Offer purchasing of a special offer
}
}
}
class MainActivity extends AppCompatActivity implements DTDRemoteConfigListener {
//activityIndicator control timer
Timer timer = null;
@Override
protected void onCreate(@Nullable Bundle savedInstanceState) {
super.onCreate(savedInstanceState);
setContentView(R.layout.activity_main);
// Set the maximum time of waiting for an A/B test group
DTDRemoteConfig.INSTANCE.setGroupDefinitionWaiting(Constants.waitGroupConst);
// Set default values
AppConfig.loadDefaults();
// Initialize the SDK for working with A/B testing
DTDAnalytics.INSTANCE.initializeWithAbTest("appKey", this, this);
}
// Process the result of waiting for A/B test configuration
@Override
public void onReceived(@NonNull DTDRemoteConfigReceiveResult result) {
// It is not used in current example
}
// Prepare the app UI for changing the remote configuration
@Override
public void onPrepareToChange() {
// Use the main app thread because you are getting ready for working with the interface
runOnUiThread(() -> {
// Display the download progress indicator
showActivityIndicator();
});
timer = new Timer().schedule(new TimerTask() {
@Override
public void run() {
runOnUiThread(() -> hideActivityIndicator());
}
}, Constants.waitGroupConstInMilliseconds);
}
@Override
public void onChanged(@NonNull DTDRemoteConfigChangeResult result, @Nullable Exception ex) {
if (result == DTDRemoteConfigChangeResult.Success) {
// Apply new values
DTDRemoteConfig.INSTANCE.applyConfig();
}
if (result == DTDRemoteConfigChangeResult.Failure) {
// Apply new values
DTDRemoteConfig.INSTANCE.applyConfig();
}
if (timer != null) {
timer.cancel();
timer = null;
}
runOnUiThread(() -> hideActivityIndicator());
}
}// Timer constants
public static class Constants
{
public const float WAIT_GROUP_TIME = 10.0f;
}
// Value keys
public enum ValueKey
{
showStore
}
public class AppConfig
{
public void LoadDefaults()
{
var appDefaults = new Dictionary<string, object>
{
{ValueKey.showStore.ToString(), false}
};
DTDRemoteConfig.Defaults = appDefaults;
}
public bool GetBool(ValueKey key) => DTDRemoteConfig.Config[key.ToString()].BoolValue();
}
public class AppLogic : MonoBehaviour
{
private readonly AppConfig _appConfig = new AppConfig();
private const string APP_KEY = "appKey";
private SimpleUI _simpleUI;
private void Start()
{
DontDestroyOnLoad(this);
_simpleUI = FindObjectOfType<SimpleUI>();
if (_simpleUI == null) throw new NullReferenceException("UIManager not found.");
// Set the maximum time of waiting for an A/B test group
DTDRemoteConfig.GroupDefinitionWaiting = Constants.WAIT_GROUP_TIME;
// Set default values
_appConfig.LoadDefaults();
// Initialize the SDK for working with A/B testing
DTDAnalytics.InitializeWithAbTests(
appKey: APP_KEY,
configListener: this);
}
// Tutorial open event (e.g. by clicking the ‘start tutorial’ button)
// Send a trigger event that indicates tutorial start
public void StartTutorial() => DTDAnalytics.Tutorial(-1);
public void NextTutorialStep(int step)
{
DTDAnalytics.Tutorial(step);
if (_appConfig.GetBool(ValueKey.showStore) && step == 5)
{
// Offer purchasing of a special offer
Store.Instance.ShowSpecialOffer();
}
}
// Process the result of waiting for A/B test configuration
public void OnReceived(DTDRemoteConfigReceiveResult result)
{
// It is not used in current example
}
// Prepare the app UI for changing the remote configuration
public void OnPrepareToChange()
{
// Display the download progress indicator
_simpleUI.ShowLoadingIndicator(Constants.WAIT_GROUP_TIME);
}
// Apply the values of the assigned group
public void OnChanged(DTDRemoteConfigChangeResult result, string exceptionText = null)
{
// Hide the download progress indicator
_simpleUI.HideLoadingIndicator();
switch (result)
{
case DTDRemoteConfigChangeResult.Failure:
// Error processing
Debug.LogError(exceptionText);
break;
case DTDRemoteConfigChangeResult.Success:
// Apply new values
DTDRemoteConfig.ApplyConfig();
break;
}
}
}
// Timer constants
static class Constants
{
public const float WaitGroupConst = 10.0f;
}
// Value keys
static class ValueKeys
{
public const string ShowStore = "showStore";
}
static class AppConfg
{
public static void LoadDafaults()
{
DTDRemoteConfig.Defaults = new Dictionary<string, object>
{
[ValueKeys.ShowStore] = false
};
}
public static bool GetBoolValue(string key)
{
return DTDRemoteConfig.Config[key].BoolValue;
}
}
class Application : IDTDRemoteConfigListener
{
public void Run()
{
// Set the maximum time of waiting for an A/B test group
DTDRemoteConfig.GroupDefinitionWaiting = Constants.WaitGroupConst;
// Set default values
AppConfg.LoadDafaults();
// Initialize the SDK for working with A/B testing
DTDAnalytics.InitializeWithAbTest("appKey", this);
// Your code to show UI
}
// Tutorial open event (e.g. by clicking the ‘start tutorial’ button)
public void StartTutorial()
{
// Send a trigger event that indicates tutorial start
DTDAnalytics.Tutorial(-1);
}
public void NextTutotrialStep(int step)
{
DTDAnalytics.Tutorial(step);
if (AppConfg.GetBoolValue(ValueKeys.ShowStore) && step == 5)
{
// Offer purchasing of a special offer (method do a job in UI thread)
UI.ShowSpecialOffer();
}
}
// Apply the values of the assigned group
public void OnChanged(DTDRemoteConfigChangeResult result, string error)
{
Debug.WriteLine($"[App-ABTests] OnChanged({result}, {error})");
switch (result)
{
case DTDRemoteConfigChangeResult.Failure:
// Error processing
break;
case DTDRemoteConfigChangeResult.Success:
// Apply new values
DTDRemoteConfig.ApplyConfig();
break;
default:
break;
}
// Hide the download progress indicator(method do a job in UI thread)
UI.HideLoadingIndicator();
}
// Prepare the app UI for changing the remote configuration
public void OnPrepareToChange()
{
Debug.WriteLine($"[App-ABTests] OnPrepareToChange()");
// Display the download progress indicator (method do a job in UI thread)
UI.ShowLoadingIndicator();
// Add a timer that will forcibly remove the download progress indicator
TimerUtil.CallWithDelay(Constants.WaitGroupConst, () =>
{
// Hide the download progress indicator(method do a job in UI thread)
UI.HideLoadingIndicator();
});
}
// Process the result of waiting for A/B test configuration
public void OnReceived(DTDRemoteConfigReceiveResult result)
{
// It is not used in current example
Debug.WriteLine($"[App-ABTests] OnReceived({result})");
}
}devtodev.remoteConfig.defaults = {
showStore: false,
}
devtodev.remoteConfig.groupDefinitionWaiting = 10
devtodev.initializeWithAbTest(
appKey,
{
userId: userId,
logLevel: logLevel,
trackingAvailability: trackingAvailability,
},
{
// Process the result of waiting for A/B test configuration
onReceived: function(result) {
// It is not used in current example
},
// Prepare the app UI for changing the remote configuration
onPrepareToChange: function() {
// Display the progress indicator
ui.showSpinner()
},
// Apply the values of the assigned group
onChanged: function(result, error) {
ui.hideSpinner()
switch (result) {
case DTDRemoteConfigChangeResult.Failure:
// Error processing
console.error(error);
break;
case DTDRemoteConfigChangeResult.Success:
// Apply new values
devtodev.remoteConfig.applyConfig()
break;
}
}
}
)
function startTutorial() {
devtodev.tutorial(parseInt(-1))
}
function setTutorialStep(step) {
devtodev.tutorial(parseInt(step))
var showStore = window.devtodev.remoteConfig.config['showStore'].boolValue
if (showStore && step == 5) {
// Offer purchasing of a special offer
store.showSpecialOffer();
}
}// Timer constant
float WAIT_GROUP_TIME = 15.0f;
void SomeLogicClass::Start() {
// Set the maximum time of waiting for an A/B test group
UDTDRemoteConfigBPLibrary::SetGroupDefinitionWaiting(WAIT_GROUP_TIME);
// Set default values
FDTDRemoteConfigDefaults Defaults;
Defaults.BoolDefaults.Add("showStore", false);
UDTDRemoteConfigBPLibrary::SetDefaults(Defaults);
const auto onConfigReceive = new FDTDRemoteConfigReceiveResultDelegate();
onConfigReceive->BindUObject(this, &SomeLogicClass::OnConfigReceive);
const auto onPrepareToChange = new FDTDRemoteConfigPrepareToChangeDelegate();
onPrepareToChange->BindUObject(this, &SomeLogicClass::OnPrepareToChange);
const auto onConfigChange = new FDTDRemoteConfigChangeResultDelegate();
onConfigChange->BindUObject(this, &SomeLogicClass::OnConfigChange);
// Initialize the SDK for working with A/B testing
UDTDAnalyticsBPLibrary::InitializeWithAbTest("AppKey", *onConfigChange, *onPrepareToChange, *onConfigReceive);
}
// Tutorial open event (e.g. by clicking the ‘start tutorial’ button)
void SomeLogicClass::StartTutorial() {
// Send a trigger event that indicates tutorial start
UDTDAnalyticsBPLibrary::Tutorial(-1);
}
void SomeLogicClass::NextTutorialStep(int32 step)
{
UDTDAnalyticsBPLibrary::Tutorial(step);
bool isNeedShowStore = UDTDRemoteConfigBPLibrary::GetRemoteConfigValue("showStore").BoolValue;
if (isNeedShowStore && step == 5)
{
// Offer purchasing of a special offer
SomeStoreUI::ShowSpecialOffer();
}
}
// Process the result of waiting for A/B test configuration
void SomeLogicClass::OnConfigReceive(EDTDRemoteConfigReceiveResult result) {
// It is not used in current example
}
// Prepare the app UI for changing the remote configuration
void SomeLogicClass::OnPrepareToChange() {
// Display the download progress indicator
SomeUI::ShowLoadingIndicator(WAIT_GROUP_TIME);
}
// Apply the values of the assigned group
void SomeLogicClass::OnConfigChange(EDTDRemoteConfigChangeResult result, const FString& error) {
// Hide the download progress indicator
SomeUI::HideLoadingIndicator();
switch (result)
{
case EDTDRemoteConfigChangeResult::Success:
// Apply new values
UDTDRemoteConfigBPLibrary::ApplyConfig();
break;
case EDTDRemoteConfigChangeResult::Failure:
// Error processing
UE_LOG(LogTemp, Warning, TEXT("DTDRemoteConfigError: %s"), *error);
break;
default:
break;
}
}# Control timer
var timer = Timer.new()
# Timer constant
var waitGroupConst = 10.0
var showStore = "showStore"
func loadDefaults():
var appDefaults = GDDTDRemoteConfigDefaults.new()
# Value key
appDefaults.AddBoolValue(showStore, false)
DTDRemoteConfig.SetDefaults(appDefaults)
func getBool(key: String) -> bool:
return DTDRemoteConfig.GetRemoteConfigValue(key).GetBoolValue()
# Tutorial open event (e.g. by clicking the ‘start tutorial’ button)
func startTutorial():
# Send a trigger event that indicates tutorial start
DTDAnalytics.Tutorial(-1)
func nextTutorialStep(currentStep: int):
DTDAnalytics.Tutorial(currentStep)
if (getBool(showStore) && currentStep == 5):
#Offer purchasing of a special offer
pass
func _ready():
# Set the maximum time of waiting for an A/B test group
DTDRemoteConfig.SetGroupDefinitionWaiting(waitGroupConst)
# Set default values
loadDefaults()
#Initialize the SDK for working with A/B testing
DTDAnalytics.InitializeWithAbTest("appKey",
onRemoteConfigChange,
onRemoteConfigPrepareToChange,
onRemoteConfigReceive)
DTDAnalytics.SetLogLevel(GDDTDLogLevel.Debug)
func onRemoteConfigChange(result: GDDTDRemoteConfigChangeResult.ChangeResult, error: String):
match result:
GDDTDRemoteConfigChangeResult.Success:
# Apply new values
DTDRemoteConfig.ApplyConfig()
GDDTDRemoteConfigChangeResult.Failure:
# Error processing
print(error)
timer.stop()
hideActivityIndicator()
# Prepare the app UI for changing the remote configuration
func onRemoteConfigPrepareToChange():
# Display the download progress indicator
showActivityIndicator()
# Add a timer that will forcibly remove the download progress indicator
timer.connect("timeout", hideActivityIndicator)
timer.one_shot = true
timer.wait_time = waitGroupConstInMilliseconds
add_child(timer)
timer.start()
# Process the result of waiting for A/B test configuration
func onRemoteConfigReceive(result: GDDTDRemoteConfigReceiveResult.ReceiveResult):
#It is not used in current example
pass // Timer constants
struct Constants {
static let waitConfigConst = 10.0
static let waitGroupConst = 15.0
}
// Value keys
enum ValueKey: String {
case maximumDiscount
}
class AppConfig {
static func loadDefaults() {
let appDefaults: [String: Any] = [
ValueKey.maximumDiscount.rawValue: "false"
]
// Set default values
DTDRemoteConfig.defaults = appDefaults
}
static func bool(forKey key: ValueKey) -> Bool {
return DTDRemoteConfig.config[key.rawValue].boolValue
}
}
class AppLogic {
override func viewDidLoad() {
super.viewDidLoad()
// Display the launch screen
showLaunchScreen()
}
// Launching the main logic of the application
func startAppForReal() {
// Update app UI
updateAppUI()
// Hide launch screen
hideLaunchScreen()
}
func updateAppUI() {
if bool(forKey: .maximumDiscount) {
// Display a discount badge clicking on which invokes a purchase window popup
}
}
}
class AppDelegate: UIResponder, UIApplicationDelegate {
func application(_ application: UIApplication,
willFinishLaunchingWithOptions launchOptions: [UIApplication.LaunchOptionsKey: Any]?) -> Bool {
// Set the maximum time of waiting for the A/B test configuration
DTDRemoteConfig.remoteConfigWaiting = Constants.waitConfigConst
// Set the maximum time of waiting for an A/B test group
DTDRemoteConfig.groupDefinitionWaiting = Constants.waitGroupConst
// Set default values
AppConfig.loadDefaults()
// Initialize the SDK for working with A/B testing
DTDAnalytics.initializeWithAbTest(applicationKey: "appKey",
configuration: config,
abConfigListener: self)
}
}
extension AppLogic: DTDRemoteConfigListener {
// Process the result of waiting for A/B test configuration
func onReceived(result: DTDRemoteConfigReceiveResult) {
// If the attempt fails, launch the main logic of the application
if result == .failure {
DispatchQueue.main.async { [weak self] in
self?.startAppForReal()
}
}
}
// Prepare the app UI for changing the remote configuration
func onPrepareToChange() {
// It is not used in current example
}
// Apply the values of the assigned group
func onChanged(result: DTDRemoteConfigChangeResult, error: Error?) {
defer {
// Launch the main logic of the application
DispatchQueue.main.async { [weak self] in
self?.startAppForReal()
}
}
switch result {
case .success:
// Apply new values
DTDRemoteConfig.applyConfig()
case .failure:
// Error processing
if let error = error {
print(error.localizedDescription)
}
@unknown default:
break
}
}
}func showLaunchScreen() {
// Add a timer that will forcibly launch the main logic of the application
timer = Timer.scheduledTimer(withTimeInterval: waitConfigConst + waitGroupConst,
repeats: false) { [weak self] _ in
self?.startAppForReal()
}
showActivityIndicator()
}// Constants .h + .m
@interface Constants : NSObject
// Timer constants
extern double const waitConfigConst;
extern double const waitGroupConst;
// Value keys
extern NSString * const maximumDiscount;
@end
@implementation Constants
double const waitConfigConst = 10.0;
double const waitGroupConst = 15.0;
NSString * const maximumDiscount = @"maximumDiscount";
@end
// AppConfig .h + .m
@interface AppConfig: NSObject
+(void) loadDefaults;
+(BOOL) getBoolForKey:(NSString *) key;
@end
@implementation AppConfig
+(void)loadDefaults {
NSDictionary *appDefaults = @{
maximumDiscount: @NO
};
// Set default values
DTDRemoteConfig.defaults = appDefaults;
}
+(BOOL) getBoolForKey:(NSString *) key {
return DTDRemoteConfig.config[key].boolValue;
}
@end
// AppLogic .h + .m
@interface AppLogic : UIViewController <DTDRemoteConfigListener>
@end
@implementation AppLogic
- (void)viewDidLoad {
[super viewDidLoad];
// Display the launch screen
[self showLaunchScreen];
}
// Launching the main logic of the application
- (void) startAppForReal {
// Update app UI
[self updateAppUI];
// Hide launch screen
[self hideLaunchScreen];
}
- (void) updateAppUI {
if ([AppConfig getBoolForKey:maximumDiscount]) {
// Display a discount badge clicking on which invokes a purchase window popup
}
}
// Process the result of waiting for A/B test configuration
- (void)onReceivedResult:(enum DTDRemoteConfigReceiveResult)result {
// If the attempt fails, launch the main logic of the application
if (result == DTDRemoteConfigReceiveResultFailure) {
__weak AppLogic *weakSelf = self;
dispatch_async(dispatch_get_main_queue(), ^{
[weakSelf startAppForReal];
});
}
}
// Prepare the app UI for changing the remote configuration
- (void)onPrepareToChange {
// It is not used in current example
}
// Apply the values of the assigned group
- (void)onChangedResult:(enum DTDRemoteConfigChangeResult)result error:(NSError *)error {
switch (result) {
case DTDRemoteConfigChangeResultSuccess:
// Apply new values
[DTDRemoteConfig applyConfig];
break;
case DTDRemoteConfigChangeResultFailure:
// Error processing
if (error) {
NSLog(@"DTDRemoteConfigError: %@", error.localizedDescription);
}
default:
break;
}
// Launch the main logic of the application
__weak AppLogic *weakSelf = self;
dispatch_async(dispatch_get_main_queue(), ^{
[weakSelf startAppForReal];
});
}
- (void)showLaunchScreen {
// Display the launch screen
}
- (void)hideLaunchScreen {
// Hide launch screen
}
@end
// AppDelegate .h + .m
@interface AppDelegate ()
@end
@implementation AppDelegate
- (BOOL)application:(UIApplication *)application didFinishLaunchingWithOptions:(NSDictionary *)launchOptions {
AppLogic *appLogicController = [[UIStoryboard storyboardWithName:@"Main" bundle:nil] instantiateViewControllerWithIdentifier:@"AppLogic"];
UINavigationController *navController = [[UINavigationController alloc]initWithRootViewController:appLogicController];
self.window.rootViewController = navController;
[self.window makeKeyAndVisible];
// Config timeout, optional
DTDRemoteConfig.remoteConfigWaiting = waitConfigConst;
// Group timeout, optional
DTDRemoteConfig.groupDefinitionWaiting = waitGroupConst;
// Implementation defaults params
[AppConfig loadDefaults];
[DTDAnalytics applicationKey:appKey abConfigListener:appLogicController];
return YES;
}
@end// Timer constants
struct Constants {
static let waitConfigConst = 10.0
}
// Value keys
enum ValueKey: String {
case difficulty
case stepCount
}
class AppConfig {
static func loadDefaults() {
func loadDefaultValues() {
let appDefaults: [String: Any] = [
ValueKey.difficulty.rawValue: 3,
ValueKey.stepCount.rawValue: 10
]
// Set default values
DTDRemoteConfig.defaults = appDefaults
}
func integer(forKey key: ValueKey) -> Int {
DTDRemoteConfig.config[key.rawValue].integerValue
}
}
class AppLogic {
// Tutorial open event (e.g. by clicking the ‘start tutorial’ button)
func startTutorial() {
// Display the download progress indicator
showActivityIndicator()
// Send a trigger event that indicates tutorial start
DTDAnalytics.tutorial(step: -1)
}
// Initiate tutorial completion
func realStartTutorial() {
// Hide the download progress indicator
hideActivityIndicator()
// Initiate the tutorial by using the remote values (difficulty and stepCount)
runTutorial(stepCount: integer(forKey: .stepCount),
difficulty: integer(forKey: .difficulty))
}
}
class AppDelegate: UIResponder, UIApplicationDelegate {
func application(_ application: UIApplication,
willFinishLaunchingWithOptions launchOptions: [UIApplication.LaunchOptionsKey: Any]?) -> Bool {
// Set the maximum time of waiting for the A/B test configuration
DTDRemoteConfig.remoteConfigWaiting = Constants.waitConfigConst
// Set default values
AppConfig.loadDefaults()
// Initialize the SDK for working with A/B testing
DTDAnalytics.initializeWithAbTest(applicationKey: "appKey",
configuration: config,
abConfigListener: self)
}
}
extension AppLogic: DTDRemoteConfigListener {
// Process the result of waiting for A/B test configuration
func onReceived(result: DTDRemoteConfigReceiveResult) {
// It is not used in current example
}
// Prepare the app UI for changing the remote configuration
func onPrepareToChange() {
// It is not used in current example
}
// Apply the values of the assigned group
func onChanged(result: DTDRemoteConfigChangeResult, error: Error?) {
defer {
// Initiate tutorial completion
DispatchQueue.main.async { [weak self] in
self?.realStartTutorial()
}
}
switch result {
case .success:
// Apply new values
DTDRemoteConfig.applyConfig()
case .failure:
// Error processing
if let error = error {
print(error.localizedDescription)
}
@unknown default:
break
}
}
}// Constants .h + .m
@interface Constants : NSObject
// Timer constants
extern double const waitConfigConst;
// Value keys
extern NSString * const difficulty;
extern NSString * const stepCount;
@end
@implementation Constants
double const waitConfigConst = 10.0;
NSString * const difficulty = @"difficulty";
NSString * const stepCount = @"stepCount";
@end
// AppConfig .h + .m
@interface AppConfig: NSObject
+(void) loadDefaults;
+(NSInteger) getIntegerForKey:(NSString *) key;
@end
@implementation AppConfig
+(void)loadDefaults {
NSDictionary *appDefaults = @{
difficulty: @3,
stepCount: @10
};
// Set default values
DTDRemoteConfig.defaults = appDefaults;
}
+(NSInteger) getIntegerForKey:(NSString *) key {
return DTDRemoteConfig.config[key].integerValue;
}
@end
// AppLogic .h + .m
@interface AppLogic : UIViewController <DTDRemoteConfigListener>
@end
@implementation AppLogic
- (void)viewDidLoad {
[super viewDidLoad];
// Display the launch screen
[self startTutorial];
}
// Tutorial open event (e.g. by clicking the ‘start tutorial’ button)
- (void) startTutorial {
// Display the download progress indicator
[self showActivityIndicator];
// Send a trigger event that indicates tutorial start
[DTDAnalytics tutorialStep:-1];
}
// Initiate tutorial completion
- (void) realStartTutorial {
// Hide the download progress indicator
[self hideActivityIndicator];
// Initiate the tutorial by using the remote values (difficulty and stepCount)
[self runTutorial: [AppConfig getIntegerForKey:stepCount]
withDifficulty: [AppConfig getIntegerForKey:difficulty]];
}
- (void) runTutorial:(NSInteger) stepCount withDifficulty:(NSInteger) difficulty {
// Start tutorial
}
// Process the result of waiting for A/B test configuration
- (void)onReceivedResult:(enum DTDRemoteConfigReceiveResult)result {
// It is not used in current example
}
// Prepare the app UI for changing the remote configuration
- (void)onPrepareToChange {
// It is not used in current example
}
// Apply the values of the assigned group
- (void)onChangedResult:(enum DTDRemoteConfigChangeResult)result error:(NSError *)error {
switch (result) {
case DTDRemoteConfigChangeResultSuccess:
// Apply new values
[DTDRemoteConfig applyConfig];
break;
case DTDRemoteConfigChangeResultFailure:
// Error processing
if (error) {
NSLog(@"DTDRemoteConfigError: %@", error.localizedDescription);
}
default:
break;
}
// Initiate tutorial completion
__weak AppLogic *weakSelf = self;
dispatch_async(dispatch_get_main_queue(), ^{
[weakSelf realStartTutorial];
});
}
- (void)showActivityIndicator {
// Display the launch screen
}
- (void)hideActivityIndicator {
// Hide launch screen
}
@end
// AppDelegate .h + .m
@interface AppDelegate ()
@end
@implementation AppDelegate
- (BOOL)application:(UIApplication *)application didFinishLaunchingWithOptions:(NSDictionary *)launchOptions {
AppLogic *appLogicController = [[UIStoryboard storyboardWithName:@"Main" bundle:nil] instantiateViewControllerWithIdentifier:@"AppLogic"];
UINavigationController *navController = [[UINavigationController alloc]initWithRootViewController:appLogicController];
self.window.rootViewController = navController;
[self.window makeKeyAndVisible];
// Set the maximum time of waiting for the A/B test configuration
DTDRemoteConfig.remoteConfigWaiting = waitConfigConst;
// Implementation defaults params
[AppConfig loadDefaults];
[DTDAnalytics applicationKey:appKey abConfigListener:appLogicController];
return YES;
}
@endclass Constants {
// Timer constants
companion object {
const val waitConfigConst = 10.0
const val waitConfigConstInMilliseconds = 10000L
}
}
enum class ValueKey(val value: String) {
Difficulty("difficulty"),
StepCount("stepCount")
}
class AppConfig {
companion object {
fun loadDefaults() {
val appDefaults = mapOf<String, Any>(
ValueKey.Difficulty.value to 3,
ValueKey.StepCount.value to 10
)
// Set default values
DTDRemoteConfig.defaults = appDefaults
}
fun integer(key: ValueKey): Int {
return DTDRemoteConfig.config[key.value].intValue
}
}
}
class AppLogic {
// Tutorial open event (e.g. by clicking the ‘start tutorial’ button)
fun startTutorial() {
// Display the download progress indicator
showActivityIndicator()
// Send a trigger event that indicates tutorial start
DTDAnalytics.tutorial(step = -1)
}
// Initiate tutorial completion
fun realStartTutorial() {
// Hide the download progress indicator
hideActivityIndicator()
// Initiate the tutorial by using the remote values (difficulty and stepCount)
runTutorial(
stepCount = AppConfig.integer(ValueKey.StepCount),
difficulty = AppConfig.integer(ValueKey.Difficulty)
)
}
}
class MainActivity : AppCompatActivity(), DTDRemoteConfigListener {
override fun onCreate(savedInstanceState: Bundle?) {
super.onCreate(savedInstanceState, persistentState)
setContentView(R.layout.activity_main)
// Set the maximum time of waiting for the A/B test configuration
DTDRemoteConfig.remoteConfigWaiting = Constants.waitConfigConst
// Set default values
AppConfig.loadDefaults()
// Initialize the SDK for working with A/B testing
DTDAnalytics.initializeWithAbTest(
appKey = "appKey",
context = this,
abConfigListener = this
)
}
// Process the result of waiting for A/B test configuration
override fun onReceived(result: DTDRemoteConfigReceiveResult) {
// It is not used in current example
}
// Prepare the app UI for changing the remote configuration
override fun onPrepareToChange() {
// It is not used in current example
}
override fun onChanged(result: DTDRemoteConfigChangeResult, ex: Exception?) {
when (result) {
DTDRemoteConfigChangeResult.Success -> {
// Apply new values
DTDRemoteConfig.applyConfig()
}
DTDRemoteConfigChangeResult.Failure -> {
// Error processing
ex?.let { Log.e("TAG", ex.toString()) }
}
}
runOnUiThread {
realStartTutorial()
}
}
}class Constants {
// Timer constants
final static double waitGroupConst = 10.0;
final static long waitGroupConstInMilliseconds = 10000L;
}
enum ValueKey {
Difficulty("difficulty"),
StepCount("stepCount");
private final String stringValue;
ValueKey(String toString) {
stringValue = toString;
}
@Override
public String toString() {
return stringValue;
}
}
class AppConfig {
static void loadDefaults() {
HashMap<String, Object> map = new HashMap<>();
map.put(ValueKey.Difficulty.toString(), 3);
map.put(ValueKey.StepCount.toString(), 10);
DTDRemoteConfig.INSTANCE.setDefaults(map);
}
static Integer integer(ValueKey key) {
return DTDRemoteConfig.INSTANCE.getConfig().get(key.toString()).getIntValue();
}
}
class AppLogic {
// Tutorial open event (e.g. by clicking the ‘start tutorial’ button)
static void startTutorial() {
// Display the download progress indicator
showActivityIndicator();
// Send a trigger event that indicates tutorial start
DTDAnalytics.INSTANCE.tutorial(-1);
}
// Initiate tutorial completion
static void realStartTutorial() {
// Hide the download progress indicator
hideActivityIndicator();
// Initiate the tutorial by using the remote values (difficulty and stepCount)
runTutorial(
AppConfig.integer(ValueKey.StepCount),
AppConfig.integer(ValueKey.Difficulty)
);
}
}
class MainActivity extends AppCompatActivity implements DTDRemoteConfigListener {
@Override
protected void onCreate(@Nullable Bundle savedInstanceState) {
super.onCreate(savedInstanceState);
setContentView(R.layout.activity_main);
// Set the maximum time of waiting for the A/B test configuration
DTDRemoteConfig.INSTANCE.setRemoteConfigWaiting(Constants.waitGroupConst);
// Set default values
AppConfig.loadDefaults();
// Initialize the SDK for working with A/B testing
DTDAnalytics.INSTANCE.initializeWithAbTest("appKey", this, this);
}
// Process the result of waiting for A/B test configuration
@Override
public void onReceived(@NonNull DTDRemoteConfigReceiveResult result) {
// It is not used in current example
}
// Prepare the app UI for changing the remote configuration
@Override
public void onPrepareToChange() {
// It is not used in current example
}
@Override
public void onChanged(@NonNull DTDRemoteConfigChangeResult result, @Nullable Exception ex) {
if (result == DTDRemoteConfigChangeResult.Success) {
// Apply new values
DTDRemoteConfig.INSTANCE.applyConfig();
}
if (result == DTDRemoteConfigChangeResult.Failure) {
// Error processing
if (ex != null) {
Log.e("TAG", ex.toString());
}
}
runOnUiThread(AppLogic::realStartTutorial);
}
}// Timer constants
public static class Constants
{
public const float WAIT_CONFIG_TIME = 10.0f;
}
// Value keys
public enum ValueKey
{
difficulty,
stepCount
}
public class AppConfig
{
public void LoadDefaults()
{
var appDefaults = new Dictionary<string, object>
{
{ValueKey.difficulty.ToString(), 3},
{ValueKey.stepCount.ToString(), 10}
};
// Set default values
DTDRemoteConfig.Defaults = appDefaults;
}
public int GetInt(ValueKey key) => DTDRemoteConfig.Config[key.ToString()].IntValue();
}
public class AppLogic : MonoBehaviour, IDTDRemoteConfigListener
{
private readonly AppConfig _appConfig = new AppConfig();
private const string APP_KEY = "appKey";
private SimpleUI _simpleUI;
private void Start()
{
DontDestroyOnLoad(this);
_simpleUI = FindObjectOfType<SimpleUI>();
if (_simpleUI == null) throw new NullReferenceException("UIManager not found.");
// Set the maximum time of waiting for the A/B test configuration
DTDRemoteConfig.RemoteConfigWaiting = Constants.WAIT_CONFIG_TIME;
// Set default values
_appConfig.LoadDefaults();
// Initialize the SDK for working with A/B testing
DTDAnalytics.InitializeWithAbTests(
appKey: APP_KEY,
analyticsConfiguration: _analyticsConfiguration,
configListener: this);
}
// Tutorial open event (e.g. by clicking the ‘start tutorial’ button)
public void StartTutorial()
{
// Send a trigger event that indicates tutorial start
DTDAnalytics.Tutorial(-1);
// Display the download progress indicator
_simpleUI.ShowLoadingIndicator(Constants.WAIT_CONFIG_TIME);
}
// Initiate tutorial completion
private void RealStartTutorial()
{
// Hide the download progress indicator
_simpleUI.HideLoadingIndicator();
// Initiate the tutorial by using the remote values (difficulty and stepCount)
RunTutorial(
stepCount: DTDRemoteConfig.Config[ValueKey.stepCount].IntValue(),
difficulty: DTDRemoteConfig.Config[ValueKey.difficulty].IntValue()
);
}
// Process the result of waiting for A/B test configuration
public void OnReceived(DTDRemoteConfigReceiveResult result)
{
// It is not used in current example.
}
// Prepare the app UI for changing the remote configuration
public void OnPrepareToChange()
{
// It is not used in current example
}
// Apply the values of the assigned group
public void OnChanged(DTDRemoteConfigChangeResult result, string exceptionText = null)
{
switch (result)
{
case DTDRemoteConfigChangeResult.Failure:
// Error processing
if (exceptionText != null) Debug.LogError(exceptionText);
break;
case DTDRemoteConfigChangeResult.Success:
// Apply new values
DTDRemoteConfig.ApplyConfig();
break;
}
// Initiate tutorial completion
RealStartTutorial();
}
}using DevToDev.Analytics;
using System.Collections.Generic;
using System.Diagnostics;
// Timer constants
static class Constants
{
public const float WaitConfigConst = 10.0f;
}
// Value keys
static class ValueKeys
{
public const string Difficulty = "difficulty";
public const string StepCount = "stepCount";
}
static class AppConfg
{
public static void LoadDafaults()
{
// Set default values
DTDRemoteConfig.Defaults = new Dictionary<string, object>
{
[ValueKeys.Difficulty] = 3,
[ValueKeys.StepCount] = 10
};
}
public static int GetIntValue(string key)
{
return DTDRemoteConfig.Config[key].Int32Value;
}
}
class Application : IDTDRemoteConfigListener
{
public void Run()
{
// Set the maximum time of waiting for the A/B test configuration
DTDRemoteConfig.RemoteConfigWaiting = Constants.WaitConfigConst;
// Set default values
AppConfg.LoadDafaults();
// Initialize the SDK for working with A/B testing
DTDAnalytics.InitializeWithAbTest("appKey", this);
// Prepare tutorial scene to show
PrepareTutorialScene();
}
// Tutorial open event (e.g. by clicking the ‘start tutorial’ button)
public void PrepareTutorialScene()
{
// Display the download progress indicator
UI.ShowLoadingIndicator();
// Send a trigger event that indicates tutorial start
DTDAnalytics.Tutorial(-1);
}
// Initiate tutorial completion
public void StartTutorialScene()
{
var difficulty = AppConfg.GetIntValue(ValueKeys.Difficulty);
var stepCount = AppConfg.GetIntValue(ValueKeys.StepCount);
// Hide the download progress indicator (method do a job in UI thread)
UI.HideLoadingIndicator();
// Initiate the tutorial by using the remote values (method do a job in UI thread)
UI.ShowTutorialScreen(difficulty, stepCount);
}
// Apply the values of the assigned group
public void OnChanged(DTDRemoteConfigChangeResult result, string error)
{
Debug.WriteLine($"[App-ABTests] OnChanged({result}, {error})");
switch (result)
{
case DTDRemoteConfigChangeResult.Failure:
// Error processing
break;
case DTDRemoteConfigChangeResult.Success:
// Apply new values
DTDRemoteConfig.ApplyConfig();
break;
default:
break;
}
// Initiate tutorial completion
StartTutorialScene();
}
// Prepare the app UI for changing the remote configuration
public void OnPrepareToChange()
{
Debug.WriteLine($"[App-ABTests] OnPrepareToChange()");
// It is not used in current example
}
// Process the result of waiting for A/B test configuration
public void OnReceived(DTDRemoteConfigReceiveResult result)
{
Debug.WriteLine($"[App-ABTests] OnReceived({result})");
// It is not used in current example
}
}devtodev.remoteConfig.defaults = {
difficulty: 3,
stepCount: 10
}
devtodev.remoteConfig.remoteConfigWaiting = 10
devtodev.initializeWithAbTest(
appKey,
{
userId: userId,
logLevel: logLevel,
trackingAvailability: trackingAvailability,
},
{
// Process the result of waiting for A/B test configuration
onReceived: function(result) {
// It is not used in current example
},
// Prepare the app UI for changing the remote configuration
onPrepareToChange: function() {
},
// Apply the values of the assigned group
onChanged: function(result, error) {
ui.hideSpinner()
switch (result) {
case DTDRemoteConfigChangeResult.Failure:
// Error processing
console.error(error);
break;
case DTDRemoteConfigChangeResult.Success:
// Apply new values
devtodev.remoteConfig.applyConfig()
var config = window.devtodev.remoteConfig.config // DTDRemoteConfigCollection
break;
}
realStartTutorial();
}
}
)
function startTutorial() {
devtodev.tutorial(parseInt(-1))
// Display the progress indicator
ui.showSpinner()
}
// Initiate tutorial completion
function realStartTutorial() {
// Hide the download progress indicator
ui.hideSpinner();
var stepCount = window.devtodev.remoteConfig.config['stepCount'].intValue
var difficulty = window.devtodev.remoteConfig.config['difficulty'].intValue
// Initiate the tutorial by using the remote values (difficulty and stepCount)
runTutorial(stepCount, difficulty);
}// Timer constant
const float WAIT_CONFIG_TIME = 10.0f;
void SomeLogicClass::Start() {
// Set the maximum time of waiting for the A/B test configuration
DTDRemoteConfigBPLibrary::SetRemoteConfigWaiting(WAIT_CONFIG_TIME);
// Set default values
FDTDRemoteConfigDefaults Defaults;
Defaults.IntegerDefaults.Add("difficulty", 3);
Defaults.IntegerDefaults.Add("stepCount", 10);
UDTDRemoteConfigBPLibrary::SetDefaults(Defaults);
const auto onConfigReceive = new FDTDRemoteConfigReceiveResultDelegate();
onConfigReceive->BindUObject(this, &SomeLogicClass::OnConfigReceive);
const auto onPrepareToChange = new FDTDRemoteConfigPrepareToChangeDelegate();
onPrepareToChange->BindUObject(this, &SomeLogicClass::OnPrepareToChange);
const auto onConfigChange = new FDTDRemoteConfigChangeResultDelegate();
onConfigChange->BindUObject(this, &SomeLogicClass::OnConfigChange);
// Initialize the SDK for working with A/B testing
UDTDAnalyticsBPLibrary::InitializeWithAbTest("AppKey", *onConfigChange, *onPrepareToChange, *onConfigReceive);
}
// Tutorial open event (e.g. by clicking the ‘start tutorial’ button)
void SomeLogicClass::StartTutorial()
{
// Send a trigger event that indicates tutorial start
UDTDAnalyticsBPLibrary::Tutorial(-1);
// Display the download progress indicator
SomeUI::ShowLoadingIndicator(WAIT_CONFIG_TIME);
}
// Initiate tutorial completion
void SomeLogicClass::RealStartTutorial()
{
// Hide the download progress indicator
SomeUI::HideLoadingIndicator();
// Initiate the tutorial by using the remote values (difficulty and stepCount)
RunTutorial(UDTDRemoteConfigBPLibrary::GetRemoteConfigValue("difficulty").IntegerValue,
UDTDRemoteConfigBPLibrary::GetRemoteConfigValue("stepCount").IntegerValue);
}
// Process the result of waiting for A/B test configuration
void SomeLogicClass::OnConfigReceive(EDTDRemoteConfigReceiveResult result) {
// It is not used in current example.
}
// Prepare the app UI for changing the remote configuration
void SomeLogicClass::OnPrepareToChange() {
// It is not used in current example
}
// Apply the values of the assigned group
void SomeLogicClass::OnConfigChange(EDTDRemoteConfigChangeResult result, const FString& error) {
switch (result)
{
case EDTDRemoteConfigChangeResult::Success:
// Apply new values
UDTDRemoteConfigBPLibrary::ApplyConfig();
break;
case EDTDRemoteConfigChangeResult::Failure:
// Error processing
UE_LOG(LogTemp, Warning, TEXT("DTDRemoteConfigError: %s"), *error);
break;
default:
break;
}
// Initiate tutorial completion
RealStartTutorial();
}# Timer constant
var waitConfigConst = 10.0
var difficulty = "difficulty"
var stepCount = "stepCount"
func loadDefaults():
var appDefaults = GDDTDRemoteConfigDefaults.new()
# Set default values
appDefaults.AddIntegerValue(difficulty, 3)
appDefaults.AddIntegerValue(stepCount, 10)
DTDRemoteConfig.SetDefaults(appDefaults)
func getInteger(key: String) -> int:
return DTDRemoteConfig.GetRemoteConfigValue(key).GetIntValue()
# Tutorial open event (e.g. by clicking the ‘start tutorial’ button)
func startTutorial():
# Display the download progress indicator
showActivityIndicator()
#Send a trigger event that indicates tutorial start
DTDAnalytics.Tutorial(-1)
# Initiate tutorial completion
func realStartTutorial():
# Hide the download progress indicator
hideActivityIndicator()
#Initiate the tutorial by using the remote values (difficulty and stepCount)
var stepCount = getInteger(stepCount)
var difficulty = getInteger(stepCount)
func _ready():
# Set the maximum time of waiting for an A/B test group
DTDRemoteConfig.SetRemoteConfigWaiting(waitConfigConst)
# Set default values
loadDefaults()
# Initialize the SDK for working with A/B testing
DTDAnalytics.InitializeWithAbTest(appKey",
onRemoteConfigChange,
onRemoteConfigPrepareToChange,
onRemoteConfigReceive)
func onRemoteConfigChange(result: GDDTDRemoteConfigChangeResult.ChangeResult, error: String):
match result:
GDDTDRemoteConfigChangeResult.Success:
# Apply new values
DTDRemoteConfig.ApplyConfig()
GDDTDRemoteConfigChangeResult.Failure:
# Error processing
print(error)
realStartTutorial()
# Prepare the app UI for changing the remote configuration
func onRemoteConfigPrepareToChange():
# It is not used in current example
pass
# Process the result of waiting for A/B test configuration
func onRemoteConfigReceive(result: GDDTDRemoteConfigReceiveResult.ReceiveResult):
# It is not used in current example
pass-(void) showLaunchScreen {
// Add a timer that will forcibly launch the main logic of the application
self.timer = [NSTimer scheduledTimerWithTimeInterval:waitConfigConst + waitGroupConst
repeats:false
block:^(NSTimer *timer){
[weakSelf startAppForReal];
}];
showActivityIndicator()
}


Please take a look at our Expert tips before integrating the events.
To track payments in a real currency, dispatch this event right after the system validates that the payment went through successfully. The event is fundamental and mandatory for all the app metrics related to monetization.
For purchases made through the App Store and Google Play Market, for in-app payments is available starting from SDK version 2.5.0 and higher. To enable automatic data collection, provide valid credentials in the settings section under Payments integration → IAP auto tracking. Once the credentials are successfully verified, all new purchases made in your application will be automatically sent as a Real Payment event (with the source specified as auto).
We recommend avoiding simultaneous event sending through automatic tracking and manual submission of the basic Real Payment event, as this may lead to data duplication.
If you want to track non-basic events, you can create custom events of your own. How you are going to apply them, depends solely on you.
Attention! We strongly recommend that you do not use custom event properties to transfer and store data that fits the definition of !
If you want to pass custom parameters, use DTDCustomEventParameters class instance.
devtodev supports no more than 300 custom event names in a single project (see ). Events that exceed the limit of custom event names will be discarded. Try to integrate the tracked actions by type to the event name level, and move the characteristic tags in the parameters.
For example, if you need to track purchasing “Paper” and “Pen” items, then you don’t need to create two events with the names “Paper Purchase” and “Pen Purchase”. Create a “Purchase” event and add an “Item” parameter to it with the appropriate “Paper” or “Pen” value. This way, you can use just one event to track many items.
For a string parameter, you can use no more than 50,000 unique values for the entire history of events. If the number of unique values exceeds the limit, the parameter gets locked by the system and gets discarded from the received data. Therefore, we don’t recommend using highly variable parameters like user IDs or time as string values (moreover, they are automatically added to the event).
The described method is available beginning with version 2.1.0!
Tracking of subscriptions is now available for Apple App Store and Google Play only.
The event allows you to track tutorial completion and identify the stages where you lose new users.
We recommend tracking the starting point (value -1) before beginning the first tutorial stage, then passing the counting number of every completed stage after its completion (integers larger than 0), and at the end, marking the moment of the last tutorial stage completion (value -2).
If your app has an option of skipping the tutorial and the user has used it, then it’s necessary to send a refusal value (value 0) only.
The method takes on the step value with an integer type.
This event is for games only. It is worthwhile to integrate this event into a game type project, as specified in the . In projects with the “app” type, game events will not be tracked and displayed in the interface, even if they are integrated. You can verify and change the project type in Settings → .
The event allows you to analyze the distribution of players over different game levels, monitor the in-game currency balance by levels. You can find more information about the right moment to use LevelUp event .
The event should be dispatched right after the level-up. The number of the level reached is passed to the level parameter.
To monitor the average account balance of in-game currency by the end of each level, dispatch in-game currencies (resources) names and their amounts to the method signature:
Attention! The number of tracked in-game currencies or resources (their unique names) should not exceed 30 at all times.
This event is for games only. It is worthwhile to integrate this event into a game type project, as specified in the . In projects with the “app” type, game events will not be tracked and displayed in the interface, even if they are integrated. You can verify and change the project type in Settings → .
To track the average balance of in-game currency disregarding the level up event, pass the list of in-game currency (resource) names and their amount to the method signature:
This event is for games only. It is worthwhile to integrate this event into a game type project, as specified in the . In projects with the “app” type, game events will not be tracked and displayed in the interface, even if they are integrated. You can verify and change the project type in Settings → .
You need to dispatch the event after every game account balance refill if you want to track the average in-game currency amount acquired or earned by the players for a certain timeframe or during a level playthrough.
This event is for games only. It is worthwhile to integrate this event into a game type project, as specified in the . In projects with the “app” type, game events will not be tracked and displayed in the interface, even if they are integrated. You can verify and change the project type in Settings → .
Pass this event after every purchase if you want to track in-game currency spends and items’ popularity. You can apply this event to both games and any apps with virtual currency.
In case the item is sold for more than one currency/resource, you need to build a dictionary with all the names and amounts of the currencies/resources.
This event is for games only. It is worthwhile to integrate this event into a game type project, as specified in the . In projects with the “app” type, game events will not be tracked and displayed in the interface, even if they are integrated. You can verify and change the project type in Settings → .
First of all, the progression event is used in games with short (within one game session) areas/game levels, e.g. match 3 games. You can use the event to collect data on how well or how fast users complete levels, how difficult it is for them, how many resources they gained or spent, and other parameters.
There are two methods in working with progression event:
startProgressionEvent
finishProgressionEvent
When a player spawns at a location, the following method is called:
price
double
from Double.min to Double.max
The item price in the transaction currency.
productId
string
from 1 to 255 symbols
Item name. We recommend using a bundle or names in the same language.
[DTDAnalytics realCurrencyPaymentWithOrderId:@"Order ID"
price:12.5
productId:@"Product ID"
currencyCode:@"USD"];orderId
NSString
from 1 to 65 symbols
A unique transaction ID. Use transactionIdentifier property value in SKPaymentTransaction object in a complete transaction receipt.
currencyCode
NSString
precisely 3 symbols
Transaction currency () e.g. USD, EUR etc.
DTDAnalytics.realCurrencyPayment(
orderId = "Order ID",
price = 12.5,
productId = "Product ID",
currencyCode = "USD"
)orderId
string
from 1 to 65 symbols
A unique transaction ID.
currencyCode
string
precisely 3 symbols
Transaction currency () e.g. USD, EUR etc.
orderId
string
from 1 to 65 symbols
A unique transaction ID.
currencyCode
string
precisely 3 symbols
Transaction currency () e.g. USD, EUR etc.
orderId
string
from 1 to 65 symbols
A unique transaction ID.
currencyCode
string
precisely 3 symbols
Transaction currency () e.g. USD, EUR etc.
orderId
string
from 1 to 65 symbols
A unique transaction ID.
currencyCode
string
precisely 3 symbols
Transaction currency () e.g. USD, EUR etc.
orderId
string
from 1 to 65 symbols
A unique transaction ID.
currencyCode
string
precisely 3 symbols
Transaction currency () e.g. USD, EUR etc.
orderId
FString
from 1 to 65 symbols
A unique transaction ID.
currencyCode
FString
precisely 3 symbols
orderId
String
from 1 to 65 symbols
A unique transaction ID.
currencyCode
String
precisely 3 symbols
Transaction currency () e.g. USD, EUR etc.
key - from 1 to 32 symbols
value - see below
Custom event parameters.
The following data types can be passed using the DTDCustomEventParameters object:
int
from Int64.min to Int64.max
string
from 1 to 255 symbols
bool
true/false
double
from Double.min to Double.max
If you want to pass custom parameters, use DTDCustomEventParameters class instance.
eventName
NSString
from 1 to 72 symbols
Custom event name.
parameters
The following data types can be passed using the DTDCustomEventParameters object:
If you want to pass custom parameters, use DTDCustomEventParameters class instance.
eventName
string
from 1 to 72 symbols
Custom event name.
parameters
The following data types can be passed using the DTDCustomEventParameters object:
If you want to pass custom parameters, use DTDCustomEventParameters class instance.
eventName
string
from 1 to 72 symbols
Custom event name.
parameters
The following data types can be passed using the DTDCustomEventParameters object:
If you want to pass custom parameters, use DTDCustomEventParameters class instance.
eventName
string
from 1 to 72 symbols
Custom event name.
parameters
The following data types can be passed using the DTDCustomEventParameters object:
If you want to pass custom parameters, use DTDCustomEventParameters class instance.
eventName
string
from 1 to 72 symbols
Custom event name.
parameters
The following data types can be passed using the DTDCustomEventParameters object:
If you want to pass custom parameters, use an object with parameters.
eventName
string
from 1 to 72 symbols
Custom event name.
parameters
object
key - from 1 to 32 symbols
value - see below
The following data types can be passed using parameters object:
eventName
FString
from 1 to 72 symbols
Custom event name.
If you want to pass custom parameters, use:
The following data types can be passed using the DTDCustomEventParameters object:
If you want to pass custom parameters, use GDDTDCustomEventParameters class instance.
eventName
string
from 1 to 72 symbols
Custom event name.
parameters
The following data types can be passed using the GDDTDCustomEventParameters object:
We strongly recommend that you do not change the data type passed in the same parameter. If you change the data type in a parameter, it will be duplicated with the same name, which may cause issues while processing reports.
To track your income from subscriptions, you need to call the following method at the moment of the subscription purchase even if the user signed up for a trial subscription: func subscriptionPayment(transaction: SKPaymentTransaction, product: SKProduct).
For example:
Further user actions - renewal, unsubscription, etc. are tracked by using the data received from AppStore in the server-server format. You will need the corresponding setting for it.
Also, if you want to track changes in the status of the subscriptions purchased before devtodev SDK 2.0 integration, you need to transfer your history of previously purchased subscriptions to devtodev.
The SDK monitors the need for historical data to avoid sending out excessive queries to App Store. Use the DTDAnalytics.isRestoreTransactionHistoryRequiredmethod to check whether or not there is a need in sending out the information about the previously purchased subscriptions to devtodev. The method returns BOOL value.
An example of a purchase history query with verification of the need for it:
Use the DTDAnalytics.subscriptionHistory method to transfer the list of previously purchased subscriptions received from App Store.
If your project accounts users by user ID (not by device ID) and the device is used by more than one user, you need to filter the transaction history so that it will contain only those transactions that belong to the active user. Otherwise, subscriptions of all device users will be attributed to the user who was the first to launch the app after the integration of subscription tracking.
To track your income from subscriptions, you need to call the following method at the moment of the subscription purchase even if the user signed up for a trial subscription: func subscriptionPayment(transaction: Transaction, product: Product).
For example:
Fork with Transaction.updates:
Further user actions - renewal, unsubscription, etc. are tracked by using the data received from AppStore in the server-server format. You will need the corresponding setting for it.
Also, if you want to track changes in the status of the subscriptions purchased before devtodev SDK 2.0 integration, you need to transfer your history of previously purchased subscriptions to devtodev.
The SDK monitors the need for historical data to avoid sending out excessive queries to App Store. Use the DTDAnalytics.isRestoreTransactionHistoryRequiredmethod to check whether or not there is a need in sending out the information about the previously purchased subscriptions to devtodev. The method returns BOOL value.
An example of a purchase history query with verification of the need for it:
Use the DTDAnalytics.subscriptionHistory method to transfer the list of previously purchased subscriptions received from App Store.
If your project accounts users by user ID (not by device ID) and the device is used by more than one user, you need to filter the transaction history so that it will contain only those transactions that belong to the active user. Otherwise, subscriptions of all device users will be attributed to the user who was the first to launch the app after the integration of subscription tracking.
To track your income from subscriptions, you need to call the following method at the moment of the subscription purchase even if the user signed up for a trial subscription:
(void)subscriptionPaymentWithTransaction:(SKPaymentTransaction * _Nonnull)transaction product:(SKProduct * _Nonnull)product;
For example:
Further user actions - renewal, unsubscription, etc. are tracked by using the data received from AppStore in the server-server format. You will need the corresponding setting for it.
Also, if you want to track changes in the status of the subscriptions purchased before devtodev SDK 2.0 integration, you need to transfer your history of previously purchased subscriptions to devtodev.
The SDK monitors the need for historical data to avoid sending out excessive queries to App Store. Use the (void)isRestoreTransactionHistoryRequiredWithCompletionHandler:( void (^ _Nonnull)(BOOL))completionHandler; method to check whether or not there is a need in sending out the information about the previously purchased subscriptions to devtodev. The method returns BOOL value.
An example of a purchase history query with verification of the need for it:
Use the (void)subscriptionHistoryWithTransactions:(NSArray<SKPaymentTransaction *> * _Nonnull)transactions; method to transfer the list of previously purchased subscriptions received from App Store.
If your project accounts users by user ID (not by device ID) and the device is used by more than one user, you need to filter the transaction history so that it will contain only those transactions that belong to the active user. Otherwise, subscriptions of all device users will be attributed to the user who was the first to launch the app after the integration of subscription tracking.
Before sending a request for subscription from your app, during the creation of BillingFlowParams, to the setObfuscatedAccountId function of the BillingFlowParams.newBuilder() object insert obfuscatedAccountId obtained from DTDAnalytics.getObfuscatedAccountId.
Attention! The obfuscated identifier is returned asynchronously, outside of the calling thread!
Example:
To track your subscriptions, add this event immediately after the platform confirms that the subscription was approved by the user.
Further user actions - renewal, unsubscription, etc. are tracked by using the data received from Google Play in the server-server format. You will need the corresponding setting for it.
The subscriptionHistory method is used for matching users with subscribers who purchased their subscriptions before the SDK 2.0 integration. Otherwise, it will be impossible to establish the affiliation when it gets renewed or cancelled.
To get a list of active subscriptions call billingClient.queryPurchasesAsync. After successfully receiving a response from Google Play Services, pass it to DTDAnalytics.subscriptionHistory(purchaseList: List<String>).
purchaseList: List<String> purchaseList - a string containing list of json objects is passed to the DTDAnalytics.subscriptionHistory method. For the event to run, the json object must contain the following keys:
orderID - a unique transaction identifier
productID - a unique product identifier
The SDK monitors the need for historical data to avoid sending out excessive queries. Use the DTDAnalytics.isRestoreTransactionHistoryRequired method to check whether or not there is a need in sending out the information about the previously purchased subscriptions to devtodev. The method returns a Boolean value.
Attention! DTDAnalytics.isRestoreTransactionHistoryRequired is returned asynchronously, outside of the calling thread!
Example:
If your project accounts users by user ID (not by device ID) and the device is used by more than one user, you need to filter the transaction history so that it will contain only those transactions that belong to the active user. Otherwise, subscriptions of all device users will be attributed to the user who was the first to launch the app after the integration of subscription tracking.
Before sending a request for subscription from your app, during the creation of BillingFlowParams, to the setObfuscatedAccountId function of the BillingFlowParams.newBuilder() object insert obfuscatedAccountId obtained from DTDAnalytics.INSTANCE.getObfuscatedAccountId.
Attention! The obfuscated identifier is returned asynchronously, outside of the calling thread!
Example:
To track your subscriptions, add this event immediately after the platform confirms that the subscription was approved by the user.
Further user actions - renewal, unsubscription, etc. are tracked by using the data received from Google Play in the server-server format. You will need the corresponding setting for it.
The subscriptionHistory method is used for matching users with subscribers who purchased their subscriptions before the SDK 2.0 integration. Otherwise, it will be impossible to establish the affiliation when it gets renewed or cancelled.
To get a list of active subscriptions call billingClient.queryPurchasesAsync. After successfully receiving a response from Google Play Services, pass it to DTDAnalytics.subscriptionHistory(purchaseList: List<String>).
purchaseList: List<String> purchaseList - a string containing list of json objects is passed to the DTDAnalytics.INSTANCE.subscriptionHistory method. For the event to run, the json object must contain the following keys:
orderID - a unique transaction identifier
productID - a unique product identifier
The SDK monitors the need for historical data to avoid sending out excessive queries. Use the DTDAnalytics.INSTANCE.isRestoreTransactionHistoryRequired method to check whether or not there is a need in sending out the information about the previously purchased subscriptions to devtodev. The method returns a Boolean value.
Attention! DTDAnalytics.INSTANCE.isRestoreTransactionHistoryRequired is returned asynchronously, outside of the calling thread!
Example:
If your project accounts users by user ID (not by device ID) and the device is used by more than one user, you need to filter the transaction history so that it will contain only those transactions that belong to the active user. Otherwise, subscriptions of all device users will be attributed to the user who was the first to launch the app after the integration of subscription tracking.
In order to work with Unity subscriptions, you need to integrate the subscription module to your project. You can do it by manually importing the unitypackage.
Download the latest version of devtodev package from the repository:
Import DTDAnalytics.unitypackage to your project
Import DTDSubscriptions.unitypackage to your project.
For the DTDSubscriptions module to function you need the DTDAnalytics and Unity IAP modules.
You also need to create an AppleTangle file (only for iOS). Open the Unity editor menu and choose Window → Unity IAP → Receipt Validation Obfuscator (pic. 1).
In case you don’t use the IAP receipt validation, clear the input field under “2. Paste the key here:” and click Obfuscate Google Play Licence Key (pic. 2).
Initialize the DTDAnalytics module (see our ).
Add DTDSubscriptions.Initialize(IStoreController controller) to the method.
Restore purchase history in order for the module to function correctly.
If you use Google Play, after successful IAP initialization call the DTDSubscriptions.History() method.
Example:
If you use Apple App Store, first set the DTDSubscriptions.IsRestoring property to true (this will filter out unwanted transactions). After , call the DTDSubscriptions.History() method. After that, set the DTDSubscriptions.IsRestoring property to false.
Example:
Add a DTDSubscriptions.Payment(Product product) call to the ProcessPurchase method.
Below you can see an example of the entire script:
The method takes on the step value with an integer type.
0
The user skipped the tutorial
-1
The value defines the beginning of the tutorial
1..int
Counting number of completed tutorial stage
-2
The value defines the completion of the tutorial
The method takes on the step value with an integer type.
0
The user skipped the tutorial
-1
The value defines the beginning of the tutorial
1..int
Counting number of completed tutorial stage
-2
The value defines the completion of the tutorial
The method takes on the step value with an integer type.
0
The user skipped the tutorial
-1
The value defines the beginning of the tutorial
1..int
Counting number of completed tutorial stage
-2
The value defines the completion of the tutorial
The method takes on the step value with an integer type.
0
The user skipped the tutorial
-1
The value defines the beginning of the tutorial
1..int
Counting number of completed tutorial stage
-2
The value defines the completion of the tutorial
The method takes on the step value with an int base type.
0
The user skipped the tutorial
-1
The value defines the beginning of the tutorial
1..int
Counting number of completed tutorial stage
-2
The value defines the completion of the tutorial
The method takes on the step value with an integer type.
0
The user skipped the tutorial
-1
The value defines the beginning of the tutorial
1..int
Counting number of completed tutorial stage
-2
The value defines the completion of the tutorial
step
int32
From 1 to int32.MaxValue - 1
Tutorial step
The method takes on the step value with an int32 base type.
The method takes on the step value with an integer type.
0
The user skipped the tutorial
-1
The value defines the beginning of the tutorial
1..int
Counting number of completed tutorial stage
-2
The value defines the completion of the tutorial
level
int
From 1 to Int32.max - 1
Level reached
balances
[String:Int]
String - from 1 to 24 symbols
Int - from Int64.min to int64.max
Resources’ names and number at the time of level up
The event should be dispatched right after the level-up. The number of the level reached is passed to the level parameter.
To monitor the average account balance of in-game currency by the end of each level, dispatch in-game currencies (resources) names and their amounts to the method signature:
Attention! The number of tracked in-game currencies or resources (their unique names) should not exceed 30 at all times.
The event should be dispatched right after the level-up. The number of the level reached is passed to the level parameter.
You can send and track the following data along with the level values: an average amount of the in-game currency by the end of the level, user spendings on the level, and amounts of purchased or earned in-game currency/resources. Unfortunately, Web SDK doesn’t allow to automatically calculate spending and receiving of the in-game currency/resources while users are passing the level (data accumulation on the Web might be inaccurate as users might utilize multiple browsers and devices, as well as erase local browser data).
Attention! The number of tracked in-game currencies or resources (their unique names) should not exceed 30 at all times.
The event should be dispatched right after the level-up. The number of the level reached is passed to the level parameter.
level
int32
To monitor the average account balance of in-game currency by the end of each level, dispatch in-game currencies (resources) names and their amounts to the method signature:
Attention! The number of tracked in-game currencies or resources (their unique names) should not exceed 30 at all times.
The event should be dispatched right after the level-up. The number of the level reached is passed to the level parameter.
To monitor the average account balance of in-game currency by the end of each level, dispatch in-game currencies (resources) names and their amounts to the method signature:
Attention! The number of tracked in-game currencies or resources (their unique names) should not exceed 30 at all times.
balance
TMap<FString, int64>
FString - from 1 to 24 symbols
int64 - from int64.MinValue to int64.MaxValue
Resources’ names and number
source
string
from 1 to 23 symbols
The sources of currency/resources. It can be used for breaking down income by its sources. For example, a city builder game may have some: “Rent” for the profit received from rental property, or “Bank” if the player has purchased some currency.
accrualType
DTDAccrualType (enum)
The currency/resource source type. The player can either gain resources during the game (earned) or purchase them for money (bought)
acrualType can receive one of the following values:
currencyName
NSString
from 1 to 24 symbols
In-game currency/resource name
currencyAmount
NSInteger
from 1 to Int32.max
Amount of currency in circulation
acrualType can receive one of the following values:
currencyName
string
from 1 to 24 symbols
In-game currency/resource name
currencyAmount
int
from 1 to Int.max
Amount of currency in circulation
accrualType can receive one of the following values:
currencyName
string
from 1 to 24 symbols
In-game currency/resource name
currencyAmount
int
from 1 to Int.max
Amount of currency in circulation
accrualType can receive one of the following values:
currencyName
string
from 1 to 24 symbols
In-game currency/resource name
currencyAmount
int
from 1 to Int.MaxValue
Amount of currency in circulation
AccrualType can receive one of the following values:
currencyName
string
from 1 to 24 symbols
In-game currency/resource name
currencyAmount
int
from 1 to Int32.MaxValue
Amount of currency in circulation
AccrualType can receive one of the following values:
currencyName
string
from 1 to 24 symbols
In-game currency/resource name
currencyAmount
int
from 1 to Int.max
Amount of currency in circulation
Example:
currencyName
FString
from 1 to 24 symbols
In-game currency/resource name
currencyAmount
int32
from 1 to Int32.MaxValue
currencyName
String
from 1 to 24 symbols
In-game currency/resource name
currencyAmount
int
from 1 to Int32.max
Amount of currency in circulation
acrualType can receive one of the following values:
The name of a resource group. For example, for “Wood” it can be “Construction materials”.
purchaseAmount
int
from 1 to Int32.max
The number of units of goods purchased.
purchaseCurrency
string
from 1 to 24 symbols
The name of a currency used for the purchase.
purchasePrice
int
from 1 to Int32.max
The price of the purchased item in the specified in-game currency.
In case the item is sold for more than one currency/resource, you need to build a dictionary with all the names and amounts of the currencies/resources.
purchaseId
NSString
from 1 to 32 symbols
A unique purchase name or ID. Make sure that the names are always in the same language otherwise they will be listed as different items.
purchaseType
NSString
In case the item is sold for more than one currency/resource, you need to build a dictionary with all the names and amounts of the currencies/resources.
purchaseId
string
from 1 to 32 symbols
A unique purchase name or ID. Make sure that the names are always in the same language otherwise they will be listed as different items.
purchaseType
string
purchaseId
FString
from 1 to 32 symbols
A unique purchase name or ID. Make sure that the names are always in the same language otherwise they will be listed as different items.
purchaseType
In case the item is sold for more than one currency/resource, you need to build a dictionary with all the names (FString) and amounts of the currencies/resources (int32) .
In case the item is sold for more than one currency/resource, you need to build a dictionary with all the names and amounts of the currencies/resources.
purchaseId
String
from 1 to 32 symbols
A unique purchase name or ID. Make sure that the names are always in the same language otherwise they will be listed as different items.
purchaseType
String
eventName
string
from 1 to 40 symbols
The name of the event. It is usually the number or the name of the area.
DTDStartProgressionEventParameters:
source
string
from 1 to 40 symbols
The name of the previous event used for connecting events together. E.g. a previous area visited by the player.
difficulty
int
from 0 to Int32.max
An optional difficulty value which is set using the value: setDifficulty(difficulty: Int)
Once the player completes the location successfully, the following method is called:
eventName
string
from 1 to 40 symbols
The name of the event. It is usually the number or the name of the area. It’s important to use the name that was specified at the area’s opening.
DTDFinishProgressionEventParameters:
successfulCompletion
bool
true/false
The completion event result. ‘True’ if successful, ‘false’ if unsuccessful/lost.
duration
int
from 0 to Int64.max
Time in seconds taken to complete the area. If not specified, it is automatically calculated as the difference between startProgressionEvent and finishProgressionEvent method calls.
spent
There are two methods in working with progression event:
startProgressionEvent
finishProgressionEvent
When a player spawns at a location, the following method is called:
DTDStartProgressionEventParameters:
Once the player completes the location successfully, the following method is called:
DTDFinishProgressionEventParameters:
There are two methods in working with progression event:
StartProgressionEvent
FinishProgressionEvent
When a player spawns at a location, the following method is called:
DTDStartProgressionEventParameters:
Once the player completes the location successfully, the following method is called:
DTDFinishProgressionEventParameters:
There are two methods in working with progression event:
startProgressionEvent
finishProgressionEvent
When a player spawns at a location, the following method is called:
startProgressionEvent event parameters:
Example:
Once the player completes the location (instead of successfully or not), the following method is called:
startProgressionEvent event parameters:
Example:
There are two methods in working with progression event:
startProgressionEvent
finishProgressionEvent
When a player spawns at a location, the following method is called (one of them):
Start progression event with parameters:
FDTDStartProgressionEventParams:
Example:
Once the player completes the location (instead of successfully or not), the following method is called (one of them):
Finish progression event with parameters:
FDTDFinishProgressionEventParameters:TMap<FString, int64>
Example:
There are two methods in working with progression event:
StartProgressionEvent
FinishProgressionEvent
When a player spawns at a location, the following method is called:
GDDTDStartProgressionEventParameters:
Once the player completes the location successfully, the following method is called:
GDDTDFinishProgressionEventParameters:
orderId
string
from 1 to 65 symbols
A unique transaction ID. Use transactionIdentifier property value in SKPaymentTransaction object in a complete transaction receipt.
currencyCode
string
precisely 3 symbols
Transaction currency (ISO 4217 standard) e.g. USD, EUR etc.
eventName
string
from 1 to 72 symbols
Custom event name.
parameters
0
The user skipped the tutorial
-1
The value defines the beginning of the tutorial
1..int
Counting number of completed tutorial stage
-2
currencyName
string
from 1 to 24 symbols
In-game currency/resource name
currencyAmount
int
from 1 to Int32.max
Amount of currency in circulation
purchaseId
string
from 1 to 32 symbols
A unique purchase name or ID. Make sure that the names are always in the same language otherwise they will be listed as different items.
purchaseType
string

DTDAnalytics.realCurrencyPayment(orderId: "Order ID",
price: 12.5,
productId: "Product ID",
currencyCode: "USD")DTDCustomEventParameters
The value defines the completion of the tutorial
from 1 to 96 symbols
DTDAnalytics.INSTANCE.realCurrencyPayment(
"Order ID",
12.5,
"Product ID",
"USD"
);DTDAnalytics.RealCurrencyPayment(
orderId: "Order ID",
price: 12.5,
productId: "Product ID",
currencyCode: "USD");DTDAnalytics.RealCurrencyPayment(
orderId: "Order ID",
price: 12.5,
productId: "Product ID",
currencyCode: "USD");window.devtodev.realCurrencyPayment(
orderId,
price,
productId,
currencyCode)DTDAnalytics.RealCurrencyPayment("orderId", 9.99, "productId", "USD")[DTDAnalytics customEvent:@"Event name"];DTDCustomEventParameters *parameters = [[DTDCustomEventParameters alloc] init];
[parameters addString:@"key for string value" value:@"string value"];
[parameters addInt:@"key for int value" value:10];
[parameters addBool:@"key for bool value" value:true];
[parameters addDouble:@"key for double value" value:12.5];
[DTDAnalytics customEvent:@"Event name" withParameters:parameters];DTDAnalytics.customEvent(eventName = "Event name")let parameters = DTDCustomEventParameters()
parameters.add(key = "key for string value", value = "string value")
parameters.add(key = "key for int value", value = 10)
parameters.add(key = "key for bool value", value = true)
parameters.add(key = "key for double value", value = 12.5)
DTDAnalytics.customEvent(
eventName = "Event name",
customEventParameters = parameters
)DTDAnalytics.INSTANCE.customEvent("Event name");DTDCustomEventParameters parameters = new DTDCustomEventParameters();
parameters.add("key for string value", "string value");
parameters.add("key for int value", 10);
parameters.add("key for bool value", true);
parameters.add("key for double value", 12.5);
DTDAnalytics.INSTANCE.customEvent("Event name", parameters);DTDAnalytics.CustomEvent(eventName: "Event name");var parameters = new DTDCustomEventParameters();
parameters.Add(key: "key for string value", value: "string value");
parameters.Add(key: "key for int value", value: 10);
parameters.Add(key: "key for bool value", value: true);
parameters.Add(key: "key for double value", value: 12.5);
DTDAnalytics.CustomEvent(eventName: "Event name", parameters: parameters);DTDAnalytics.CustomEvent(eventName: "Event name");var parameters = new DTDCustomEventParameters();
parameters.Add(key: "key for string value", value: "string value");
parameters.Add(key: "key for int value", value: 10);
parameters.Add(key: "key for bool value", value: true);
parameters.Add(key: "key for double value", value: 12.5);
DTDAnalytics.CustomEvent(eventName: "Event name", parameters: parameters);window.devtodev.customEvent(eventName, parameters)window.devtodev.customEvent("Event name", {
"key for string value" : "string value",
"key for int value": 10,
"key for bool value": true,
"key for double value": 12.5
})UDTDAnalyticsBPLibrary::CustomEvent("EventName");DTDAnalytics.CustomEvent("CustomEvent")var parameters = GDDTDCustomEventParams.new()
parameters.AddStringValue("str_key", "str_value")
parameters.AddBoolValue("bool_key", true)
parameters.AddIntegerValue("int_key", 100)
parameters.AddFloatValue("float_key", 0.0015)
DTDAnalytics.CustomEventWithParams("CustomEventWithParams", parameters)[DTDAnalytics tutorialStep:1];DTDAnalytics.tutorial(step = 1)DTDAnalytics.INSTANCE.tutorial(1);DTDAnalytics.Tutorial(1);DTDAnalytics.Tutorial(1);window.devtodev.tutorial(1)UDTDAnalyticsBPLibrary::Tutorial(1);DTDAnalytics.Tutorial(1)[DTDAnalytics levelUp:2];NSDictionary *balance = @{@"Currency name 1": @100, @"Currency name 2": @10};
[DTDAnalytics levelUp:2 withBalances:balance];DTDAnalytics.levelUp(level = 2)val resources = mapOf("Currency name 1" to 100L, "Currency name 2" to 10L)
DTDAnalytics.levelUp(
level = 2,
resource = resources
)DTDAnalytics.INSTANCE.levelUp(2);Map<String, Long> resources = new HashMap<>();
resources.put("Currency name 1", 100L);
resources.put("Currency name 2", 10L);
DTDAnalytics.INSTANCE.levelUp(2, resources);DTDAnalytics.LevelUp(2);var balance = new Dictionary<string, long>();
balance.Add("Currency name 1", 100);
balance.Add("Currency name 2", 200);
DTDAnalytics.LevelUp(2, balance);DTDAnalytics.LevelUp(level: 2)var balance = new Dictionary<string, long>();
balance.Add("Currency name 1", 100);
balance.Add("Currency name 2", 200);
DTDAnalytics.LevelUp(level: 2, resources: balance);devtodev.levelUp(2)var balance = {
"Currency name 1" : 100,
"Currency name 2" : 200
}
var spent = {
"Currency name 2" : 1
}
var earned = {
"Currency name 1" : 5
}
var bought = {
"Currency name 1" : 50,
"Currency name 2" : 30
}
window.devtodev.levelUp(2, balance, spent, earned, bought)DTDAnalytics.LevelUp(2)var resources = GDDTDInt64Resources.new()
resources.AddValue("level_resource_1", 6000)
resources.AddValue("level_resource_2", 95001000)
DTDAnalytics.LevelUpWithBalance(2, resources)var resources = GDDTDInt64Resources.new()
resources.AddValue("current_balance_res_1", 222)
resources.AddValue("current_balance_res_2", 1500)
DTDAnalytics.CurrentBalance(resources)[DTDAnalytics currencyName:@"Currency name 1"
currencyAmount:100
source:@"Source name"
accrualType:DTDAccrualTypeEarned];DTDAnalytics.currencyAccrual(
currencyName = "Currency name 1",
currencyAmount = 100,
source = "Source name",
DTDAccrualType = DTDAccrualType.Earned
)DTDAnalytics.INSTANCE.currencyAccrual(
"Currency name 1",
100,
"Source name",
DTDAccrualType.Earned
);DTDAnalytics.CurrencyAccrual(
currencyName: "Currency name 1",
currencyAmount: 100,
source: "Source name",
accrualType: DTDAccrualType.Earned);
DTDAnalytics.CurrencyAccrual(currencyName: "Currency name 1",
currencyAmount: 100,
source: "Source name",
accrualType: DTDAccrualType.Earned)
window.devtodev.currencyAccrual(
currencyName,
currencyAmount,
source,
accrualType)DTDAnalytics.CurrencyAccrual("currencyName_1", 500, "store", GDDTDAccrualType.Bought)
DTDAnalytics.CurrencyAccrual("currencyName_2", 10, "market", GDDTDAccrualType.Earned)[DTDAnalytics virtualCurrencyPaymentWithPurchaseId:@"Purchase ID"
purchaseType:@"Purchase type"
purchaseAmount:100
purchasePrice:10
purchaseCurrency:@"Purchase currency"];NSDictionary *resources = @{@"Purchase currency name 1": @100,
@"Purchase currency name 2": @10};
[DTDAnalytics virtualCurrencyPaymentWithPurchaseId:@"Purchase ID"
purchaseType:@"Purchase Type"
purchaseAmount:100
resources:resources];DTDAnalytics.virtualCurrencyPayment(
purchaseId = "Purchase ID",
purchaseType = "Purchase type",
purchaseAmount = 100,
purchasePrice = 10,
purchaseCurrency = "Purchase currency"
)val resources = mapOf(
"Purchase currency name 1" to 100,
"purchase Currency name 2" to 10
)
ot
DTDAnalytics.virtualCurrencyPayment(
purchaseId = "Purchase ID",
purchaseType = "Purchase Type",
purchaseAmount = 100,
map = resources
)DTDAnalytics.INSTANCE.virtualCurrencyPayment(
"Purchase ID",
"Purchase type",
100,
10,
"Purchase currency"
);Map<String, Integer> resources = new HashMap<>();
resources.put("Purchase currency name 1", 100);
resources.put("Purchase currency name 2", 10);
DTDAnalytics.INSTANCE.virtualCurrencyPayment(
"Purchase ID",
"Purchase Type",
100,
resources
);DTDAnalytics.VirtualCurrencyPayment(
purchaseId: "Purchase ID",
purchaseType: "Purchase type",
purchaseAmount: 100,
purchasePrice: 10,
purchaseCurrency: "Purchase currency");var resources = new Dictionary<string, int>
{
["Purchase currency name 1"] = 100,
["purchase Currency name 2"] = 10
};
DTDAnalytics.VirtualCurrencyPayment(
purchaseId: "Purchase ID",
purchaseType: "Purchase Type",
purchaseAmount: 100,
resources: resources);DTDAnalytics.VirtualCurrencyPayment(purchaseId: "Purchase ID",
purchaseType: "Purchase type",
purchaseAmount: 100,
purchasePrice: 10,
purchaseCurrency: "Purchase currency")var resources = new Dictionary<string, int>
{
["Purchase currency name 1"] = 100,
["purchase Currency name 2"] = 10
};
DTDAnalytics.VirtualCurrencyPayment(
purchaseId: "Purchase ID",
purchaseType: "Purchase Type",
purchaseAmount: 100,
resources: resources);window.devtodev.virtualCurrencyPayment(
purchaseId,
purchaseType,
purchaseAmount,
purchasePrice,
purchaseCurrency)var resources = {
"Purchase currency name 1": 100,
"purchase Currency name 2": 10
};
window.devtodev.virtualCurrencyPayment(
"Purchase ID",
"Purchase type",
100,
resources)DTDAnalytics.VirtualCurrencyPayment("purchaseID", "purchaseType", 1000, 15, "resource_1")var resources = GDDTDInt32Resources.new()
resources.AddValue("resource_1", 700)
resources.AddValue("resource_2", 100)
DTDAnalytics.VirtualCurrencyPaymentWithResources("purchaseID", "purchaseType", 500, resources)DTDStartProgressionEventParameters * parameters = [[DTDStartProgressionEventParameters alloc] init];
parameters.source = @"Source";
[parameters setDifficultyWithDifficulty:10];
[DTDAnalytics startProgressionEvent:@"Progression event name" withParameters:parameters];let parameters = DTDStartProgressionEventParameters()
parameters.source = "Source"
parameters.setDifficulty(difficulty = 10)
DTDAnalytics.startProgressionEvent(
eventName = "Progression event name",
parameters = parameters
)DTDStartProgressionEventParameters parameters = new DTDStartProgressionEventParameters();
parameters.setSource("Source");
parameters.setDifficulty(10);
DTDAnalytics.INSTANCE.startProgressionEvent("Progression event name", parameters);var parameters = new DTDStartProgressionEventParameters();
parameters.Source = "Source";
parameters.Difficulty = 10;
DTDAnalytics.StartProgressionEvent(
eventName: "Progression event name",
parameters: parameters);var parameters = new DTDStartProgressionEventParameters();
parameters.Source = "Source";
parameters.Difficulty = 10;
DTDAnalytics.StartProgressionEvent(
eventName: "Progression event name",
parameters: parameters);window.devtodev.startProgressionEvent(eventName, parameters)var params = GDDTDStartProgressionEventParams.new()
params.SetDifficulty(10)
params.SetSource("source_1")
DTDAnalytics.StartProgressionEventWithParams("ProgressionEventWithParams", params)DTDAnalytics.customEvent(eventName: "Event name")let parameters = DTDCustomEventParameters()
parameters.add(key: "key for string value", value: "string value")
parameters.add(key: "key for int value", value: 10)
parameters.add(key: "key for bool value", value: true)
parameters.add(key: "key for double value", value: 12.5)
DTDAnalytics.customEvent(eventName: "Event name", parameters: parameters)DTDAnalytics.tutorial(step: 1)DTDAnalytics.levelUp(level: 2)let balance: [String: Int] = ["Currency name 1": 100, "Currency name 2": 10]
DTDAnalytics.levelUp(level: 2, balances: balance)let balance: [String: Int] = ["Currency name 1": 100, "Currency name 2": 10]
DTDAnalytics.currentBalance(balance: balance) NSDictionary *balance = @{@"Currency name 1": @100,
@"Currency name 2": @10};
[DTDAnalytics currentBalanceWithBalance:balance];val balance = mapOf("Currency name 1" to 100L,
"Currency name 2" to 10L)
DTDAnalytics.currentBalance(
balance = balance
)Map<String, Long> balance = new HashMap<>();
balance.put("Currency name 1", 100L);
balance.put("Currency name 2", 10L);
DTDAnalytics.INSTANCE.currentBalance(balance);var balance = new Dictionary<string, long>();
balance.Add("Currency name 1", 100);
balance.Add("Currency name 2", 200);
DTDAnalytics.CurrentBalance(balance);var balance = new Dictionary<string, long>();
balance.Add("Currency name 1", 100);
balance.Add("Currency name 2", 200);
DTDAnalytics.CurrentBalance(balance);var balance = {
"Currency name 1" : 100,
"Currency name 2" : 10
}
window.devtodev.currentBalance(balance);DTDAnalytics.currencyAccrual(currencyName: "Currency name 1",
currencyAmount: 100,
source: "Source name",
accrualType: .earned)DTDAnalytics.virtualCurrencyPayment(purchaseId: "Purchase ID",
purchaseType: "Purchase type",
purchaseAmount: 100,
purchasePrice: 10,
purchaseCurrency: "Purchase currency")let resources: [String: Int] = ["Purchase currency name 1": 100,
"Purchase currency name 2": 10]
DTDAnalytics.virtualCurrencyPayment(purchaseId: "Purchase ID",
purchaseType: "Purchase Type",
purchaseAmount: 100,
resources: resources)let parameters = DTDStartProgressionEventParameters()
parameters.source = "Source"
parameters.setDifficulty(difficulty: 10)
DTDAnalytics.startProgressionEvent(eventName: "Progression event name",
parameters: parameters)extension Purchases: SKPaymentTransactionObserver {
func paymentQueue(_ queue: SKPaymentQueue, updatedTransactions transactions: [SKPaymentTransaction]) {
for transaction in transactions {
switch transaction.transactionState {
case .purchased:
// Your code ...
if let product = products?[transaction.payment.productIdentifier] {
DTDAnalytics.subscriptionPayment(transaction: transaction, product: product)
}
case .restored:
// Your code ...
case .failed:
// Your code ...
default:
// Your code ...
}
}
}
}DTDAnalytics.isRestoreTransactionHistoryRequired { isNeedRestore in
if isNeedRestore {
DispatchQueue.main.async {
SKPaymentQueue.default().restoreCompletedTransactions()
}
}
}extension Purchases: SKPaymentTransactionObserver {
func paymentQueueRestoreCompletedTransactionsFinished(_ queue: SKPaymentQueue) {
// Your code ...
let restoredTransactions = queue.transactions.filter { $0.transactionState == .restored }
DTDAnalytics.subscriptionHistory(transactions: restoredTransactions)
}
}TMap<FString, int64> balance;
balance.Add("CurrencyName", 123);
UDTDAnalyticsBPLibrary::CurrentBalance(balance);public enum DTDAccrualType: Int {
case earned = 0
case bought = 1
}let parameters = DTDFinishProgressionEventParameters()
parameters.successfulCompletion = true
parameters.duration = 100
parameters.spent = ["currency name 1": 1000,
"currency name 2": 50]
parameters.earned = ["currency name 2": 100]
DTDAnalytics.finishProgressionEvent(eventName: "Progression event name",
parameters: parameters)

from Double.min to Double.max
The item price in the transaction currency.
productId
string
from 1 to 255 symbols
Item name. We recommend using a bundle or names in the same language.
from Double.min to Double.max
The item price in the transaction currency.
productId
string
from 1 to 255 symbols
Item name. We recommend using a bundle or names in the same language.
bought
[string: long]
String - from 1 to 24 symbols Long - from 0 to Number.MAX_SAFE_INTEGER
Game currency amount bought during the level. Optional.
from 1 to int32.MaxValue
The number of units of goods purchased.
resources
TMap<FString, int32>
FString - from 1 to 24 symbols
int32 - from 1 to int32.MaxValue
Map with resources.
key - from 1 to 24 symbols
value - from 1 to Int64.max
Resources consumed during an area completion.
earned
NSDictionary<NSString *,NSNumber *>
key - from 1 to 24 symbols
value - from 1 to Int64.max
Resources earned during an area completion.
key - from 1 to 24 symbols
value - from 1 to Int64.max
Resources consumed during an area completion.
earned
Map<String, Long>
key - from 1 to 24 symbols
value - from 1 to Int64.max
Resources earned during an area completion.
key - from 1 to 24 symbols
value - from 1 to Int64.max
Resources consumed during an area completion.
earned
Map<String, Long>
key - from 1 to 24 symbols
value - from 1 to Int64.max
Resources earned during an area completion.
key - from 1 to 24 symbols
value - From 1 to int.MaxValue
Resources consumed during an area completion.
earned
[String: Int]
key - from 1 to 24 symbols
value - From 1 to int.MaxValue
Resources earned during an area completion.
key - from 1 to 24 symbols
value - From 1 to Int64.MaxValue
Resources consumed during an area completion.
earned
[String: Int]
key - from 1 to 24 symbols
value - From 1 to Int64.MaxValue
Resources earned during an area completion.
key - from 1 to 24 symbols
value - from 1 to Number.MAX_SAFE_INTEGER
Resources consumed during an area completion.
earned
[String: Int]
key - from 1 to 24 symbols
value - from 1 to Number.MAX_SAFE_INTEGER
Resources earned during an area completion.
key - from 1 to 24 symbols
value - from 0 to int64.MaxValue
Resources consumed during an area completion.
earned
TMap<FString, int64>
key - from 1 to 24 symbols
value - from 0 to int64.MaxValue
Resources earned during an area completion.
key - from 1 to 24 symbols
value - from 1 to Int64.max
Resources consumed during an area completion.
earned
GDDTDInt64Resources
key - from 1 to 24 symbols
value - from 1 to Int64.max
Resources earned during an area completion.
price
double
from Double.min to Double.max
The item price in the transaction currency.
productId
NSString
from 1 to 255 symbols
Item name. We recommend using a bundle or names in the same language.
price
double
from Double.min to Double.max
The item price in the transaction currency.
productId
string
from 1 to 255 symbols
Item name. We recommend using a bundle or names in the same language.
price
double
from Double.min to Double.max
The item price in the transaction currency.
productId
string
from 1 to 255 symbols
Item name. We recommend using a bundle or names in the same language.
price
double
from double.MinValue to double.MaxValue
The item price in the transaction currency.
productId
string
from 1 to 255 symbols
Item name. We recommend using a bundle or names in the same language.
price
double
from Double.MinValue to Double.MaxValue
The item price in the transaction currency.
productId
string
from 1 to 255 symbols
Item name. We recommend using a bundle or names in the same language.
price
double
from Number.MIN_VALUE to Number.MAX_VALUE
The item price in the transaction currency.
productId
string
from 1 to 255 symbols
Item name. We recommend using a bundle or names in the same language.
Transaction currency (ISO 4217 standard) e.g. USD, EUR etc.
price
float
from float.MinValue to float.MaxValue
The item price in the transaction currency.
productId
FString
from 1 to 255 symbols
Item name. We recommend using a bundle or names in the same language.
price
Float
from Double.min to Double.max
The item price in the transaction currency.
productId
String
from 1 to 255 symbols
Item name. We recommend using a bundle or names in the same language.
DTDCustomEventParameters
key - from 1 to 32 symbols
value - see below
Custom event parameters.
int
from Int64.min to Int64.max
string
from 1 to 255 symbols
bool
true/false
double
from Double.min to Double.max
DTDCustomEventParameters
key - from 1 to 32 symbols
value - see below
Custom event parameters.
Long
from Long.min to Long.max
String
from 1 to 255 symbols
Boolean
true/false
Double
from Double.min to Double.max
DTDCustomEventParameters
key - from 1 to 32 symbols
value - see below
Custom event parameters.
Long
from Long.min to Long.max
String
from 1 to 255 symbols
Boolean
true/false
Double
from Double.min to Double.max
DTDCustomEventParameters
key - from 1 to 32 symbols
value - see below
Custom event parameters.
long
from long.MinValue to long.MaxValue
string
from 1 to 255 symbols
bool
true/false
double
from double.MinValue to double.MaxValue
DTDCustomEventParameters
key - from 1 to 32 symbols
value - see below
Custom event parameters.
long
from Int64.MinValue to Int64.MaxValue
string
from 1 to 255 symbols
bool
true/false
double
from Double.MinValue to Double.MaxValue
Custom event parameters.
long
from Number.MIN_SAFE_INTEGER to Number.MAX_SAFE_INTEGER
string
from 1 to 255 symbols
bool
true/false
double
from Number.MIN_VALUE to Number.MAX_VALUE
eventName
FString
from 1 to 72 symbols
Custom event name.
parameters
FDTDCustomEventParams
StringParameters (TMap<FString, FString>)
IntParameters (TMap<FString, int64>)
FloatParameters (TMap<FString, float>)
BoolParameters (TMap<FString, bool>)
key - from 1 to 32 symbols
value - see below
Custom event parameters.
Warning: avoid duplicate keys in all dictionaries. Because dictionaries are combined into a generic dictionary [string: any] in native code.
int64
from int64.MinValue to int64.MaxValue
FString
from 1 to 255 symbols
bool
true/false
float
from float.MinValue to float.MaxValue
GDDTDCustomEventParams
key - from 1 to 32 symbols
value - see below
Custom event parameters.
int
from Int64.min to Int64.max
String
from 1 to 255 symbols
bool
true/false
Float
from Float.min to Float.max
Parameter
Type
Restrictions
Description
orderId
string
from 1 to 65 symbols
A unique transaction identifier.
currencyCode
string
precisely 3 symbols
Transaction currency (ISO 4217 standard) e.g. USD, EUR etc.
price
Parameter
Type
Restrictions
Description
orderId
string
from 1 to 65 symbols
A unique transaction identifier.
currencyCode
string
precisely 3 symbols
Transaction currency (ISO 4217 standard) e.g. USD, EUR etc.
price
0
The user skipped the tutorial
-1
The value defines the beginning of the tutorial
1..int32
Counting number of completed tutorial stage
-2
The value defines the completion of the tutorial
level
NSInteger
From 1 to Int32.max - 1
Level reached
balances
NSDictionary<NSString *,NSNumber *>
String - from 1 to 24 symbols
Int - from Int64.min to int64.max
Resources’ names and number at the time of level up
level
int
From 1 to Int.max - 1
Level reached
balances
Map<String,Long>
String - from 1 to 24 symbols
Long - from Long.min to Long.max
Resources’ names and number at the time of level up
level
int
From 1 to Int.max - 1
Level reached
balances
Map<String,Long>
String - from 1 to 24 symbols
Long - from Long.min to Long.max
Resources’ names and number at the time of level up
level
int
From 1 to int.MaxValue - 1
Level reached
balances
[string: long]
String - from 1 to 24 symbols
Long - from long.MinValue to long.MaxValue
Resources’ names and number at the time of level up
level
int
From 1 to int32.MaxValue - 1
Level reached
balances
[string: long]
String - from 1 to 24 symbols
Long - from long64.MinValue to long64.MaxValue
Resources’ names and number at the time of level up
level
int
From 1 to int.MaxValue - 1
Level reached
balances
[string: long]
String - from 1 to 24 symbols
Long - from long.MinValue to long.MaxValue
Resources’ names and number at the time of level up
spent
[string: long]
String - from 1 to 24 symbols Long - from 0 to Number.MAX_SAFE_INTEGER
Game currency amount spent during the level. Optional.
earned
[string: long]
String - from 1 to 24 symbols Long - from 0 to Number.MAX_SAFE_INTEGER
From 1 to int32.MaxValue - 1
Level reached
level
int32
From 1 to int32.MaxValue - 1
Level reached
balance
TMap<FString, int64>
FString - from 1 to 24 symbols
int64 - from int64.MinValue to int64.MaxValue
Resources’ names and number at the time of level up
level
int
From 1 to Int32.max - 1
Level reached
balances
GDDTDInt64Resources
String - from 1 to 24 symbols
Int - from Int64.min to int64.max
Resources’ names and number at the time of level up
source
NSString
from 1 to 23 symbols
The sources of currency/resources. It can be used for breaking down income by its sources. For example, a city builder game may have some: “Rent” for the profit received from rental property, or “Bank” if the player has purchased some currency.
accrualType
DTDAccrualType (enum)
The currency/resource source type. The player can either gain resources during the game (earned) or purchase them for money (bought)
source
string
from 1 to 23 symbols
The sources of currency/resources. It can be used for breaking down income by its sources. For example, a city builder game may have some: “Rent” for the profit received from rental property, or “Bank” if the player has purchased some currency.
accrualType
int
The currency/resource source type. The player can either gain resources during the game (0) or purchase them for money (1)
Amount of currency in circulation
source
FString
from 1 to 23 symbols
The sources of currency/resources. It can be used for breaking down income by its sources. For example, a city builder game may have some: “Rent” for the profit received from rental property, or “Bank” if the player has purchased some currency.
accrualType
EDTDAccrualType
The currency/resource source type. The player can either gain resources during the game (earned) or purchase them for money (bought)
source
String
from 1 to 23 symbols
The sources of currency/resources. It can be used for breaking down income by its sources. For example, a city builder game may have some: “Rent” for the profit received from rental property, or “Bank” if the player has purchased some currency.
accrualType
GDDTDAccrualType (enum)
The currency/resource source type. The player can either gain resources during the game (earned) or purchase them for money (bought)
from 1 to 96 symbols
The name of a resource group. For example, for “Wood” it can be “Construction materials”.
purchaseAmount
NSInteger
from 1 to Int32.max
The number of units of goods purchased.
purchaseCurrency
NSString
from 1 to 24 symbols
The name of a currency used for the purchase.
purchasePrice
NSInteger
from 1 to Int32.max
The price of the purchased item in the specified in-game currency.
from 1 to 96 symbols
The name of a resource group. For example, for “Wood” it can be “Construction materials”.
purchaseAmount
int
from 1 to Int.max
The number of units of goods purchased.
purchaseCurrency
string
from 1 to 24 symbols
The name of a currency used for the purchase.
purchasePrice
int
from 1 to Int.max
The price of the purchased item in the specified in-game currency.
from 1 to 96 symbols
The name of a resource group. For example, for “Wood” it can be “Construction materials”.
purchaseAmount
int
from 1 to int.MaxValue
The number of units of goods purchased.
purchaseCurrency
string
from 1 to 24 symbols
The name of a currency used for the purchase.
purchasePrice
int
from 1 to int.MaxValue
The price of the purchased item in the specified in-game currency.
from 1 to 96 symbols
The name of a resource group. For example, for “Wood” it can be “Construction materials”.
purchaseAmount
int
from 1 to Int32.MaxValue
The number of units of goods purchased.
purchaseCurrency
string
from 1 to 24 symbols
The name of a currency used for the purchase.
purchasePrice
int
from 1 to Int32.MaxValue
The price of the purchased item in the specified in-game currency.
from 1 to 96 symbols
The name of a resource group. For example, for “Wood” it can be “Construction materials”.
purchaseAmount
int
from 1 to Number.MAX_SAFE_INTEGER
The number of units of goods purchased.
purchaseCurrency
string
from 1 to 24 symbols
The name of a currency used for the purchase.
purchasePrice
int
from 1 to Number.MAX_SAFE_INTEGER
The price of the purchased item in the specified in-game currency.
FString
from 1 to 96 symbols
The name of a resource group. For example, for “Wood” it can be “Construction materials”.
purchaseAmount
int32
from 1 to Int32.MaxValue
The number of units of goods purchased.
purchaseCurrency
FString
from 1 to 24 symbols
The name of a currency used for the purchase.
purchasePrice
int32
from 1 to Int32.MaxValue
The price of the purchased item in the specified in-game currency.
purchaseId
FString
from 1 to 32 symbols
A unique purchase name or ID. Make sure that the names are always in the same language otherwise they will be listed as different items.
purchaseType
FString
from 1 to 96 symbols
The name of a resource group. For example, for “Wood” it can be “Construction materials”.
purchaseAmount
from 1 to 96 symbols
The name of a resource group. For example, for “Wood” it can be “Construction materials”.
purchaseAmount
int
from 1 to Int32.max
The number of units of goods purchased.
purchaseCurrency
String
from 1 to 24 symbols
The name of a currency used for the purchase.
purchasePrice
int
from 1 to Int32.max
The price of the purchased item in the specified in-game currency.
[String: Int]
key - from 1 to 24 symbols
value - from 1 to Int64.max
Resources consumed during an area completion.
earned
[String: Int]
key - from 1 to 24 symbols
value - from 1 to Int64.max
Resources earned during an area completion.
eventName
NSString
from 1 to 40 symbols
The name of the event. It is usually the number or the name of the area.
source
NSString
from 1 to 40 symbols
The name of the previous event used for connecting events together. E.g. a previous area visited by the player.
difficulty
NSInteger
from 0 to Int32.max
An optional difficulty value which is set using the value: setDifficulty(difficulty: Int)
eventName
NSString
from 1 to 40 symbols
The name of the event. It is usually the number or the name of the area. It’s important to use the name that was specified at the area’s opening.
successfulCompletion
BOOL
true/false
The completion event result. ‘True’ if successful, ‘false’ if unsuccessful/lost.
duration
NSInteger
from 0 to Int64.max
Time in seconds taken to complete the area. If not specified, it is automatically calculated as the difference between startProgressionEvent and finishProgressionEvent method calls.
spent
eventName
string
from 1 to 40 symbols
The name of the event. It is usually the number or the name of the area.
source
string
from 1 to 40 symbols
The name of the previous event used for connecting events together. E.g. a previous area visited by the player.
difficulty
int
from 0 to Int32.max
An optional difficulty value which is set using the value: setDifficulty(difficulty: Int)
eventName
string
from 1 to 40 symbols
The name of the event. It is usually the number or the name of the area. It’s important to use the name that was specified at the area’s opening.
successfulCompletion
bool
true/false
The completion event result. ‘True’ if successful, ‘false’ if unsuccessful/lost.
duration
int
from 0 to Int64.max
Time in seconds taken to complete the area. If not specified, it is automatically calculated as the difference between startProgressionEvent and finishProgressionEvent method calls.
spent
eventName
string
from 1 to 40 symbols
The name of the event. It is usually the number or the name of the area.
source
string
from 1 to 40 symbols
The name of the previous event used for connecting events together. E.g. a previous area visited by the player.
difficulty
int
from 0 to int.MaxValue
An optional difficulty value.
eventName
string
from 1 to 40 symbols
The name of the event. It is usually the number or the name of the area. It’s important to use the name that was specified at the area’s opening.
successfulCompletion
bool
true/false
The completion event result. ‘True’ if successful, ‘false’ if unsuccessful/lost.
duration
int
from 0 to int.MaxValue
Time in seconds taken to complete the area. If not specified, it is automatically calculated as the difference between StartProgressionEvent and FinishProgressionEvent method calls.
spent
eventName
string
from 1 to 40 symbols
The name of the event. It is usually the number or the name of the area.
source
string
from 1 to 40 symbols
The name of the previous event used for connecting events together. E.g. a previous area visited by the player.
difficulty
int
from 0 to Int32.MaxValue
An optional difficulty value.
eventName
string
from 1 to 40 symbols
The name of the event. It is usually the number or the name of the area. It’s important to use the name that was specified at the area’s opening.
successfulCompletion
bool
true/false
The completion event result. ‘True’ if successful, ‘false’ if unsuccessful/lost.
duration
int
from 0 to Int64.MaxValue
Time in seconds taken to complete the area. If not specified, it is automatically calculated as the difference between StartProgressionEvent and FinishProgressionEvent method calls.
spent
eventName
string
from 1 to 40 symbols
The name of the event. It is usually the number or the name of the area.
parameters
object
see below
Location event parameters.
source
string
from 1 to 40 symbols
The name of the previous event used for connecting events together. E.g. a previous area visited by the player.
difficulty
int
from 0 to Number.MAX_SAFE_INTEGER
An optional difficulty value.
eventName
string
from 1 to 40 symbols
The name of the event. It is usually the number or the name of the area. It’s important to use the name that was specified at the area’s opening.
parameters
object
see below
Location event parameters.
successfulCompletion
bool
true/false
The completion event result. ‘True’ if successful, ‘false’ if unsuccessful/lost.
duration
int
from 0 to Number.MAX_SAFE_INTEGER
Time in seconds taken to complete the area. If not specified, it is automatically calculated as the difference between startProgressionEvent and finishProgressionEvent method calls.
spent
eventName
FString
from 1 to 72 symbols
Progression event name.
eventName
FString
from 1 to 40 symbols
The name of the event. It is usually the number or the name of the area.
params
FDTDStartProgressionEventParams
see below
Start progression event parameters.
source
FString
from 1 to 40 symbols
The name of the previous event used for connecting events together. E.g. a previous area visited by the player.
difficulty
int32
from 0 to int32.MaxValue
An optional difficulty value.
eventName
FString
from 1 to 72 symbols
Progression event name.
eventName
FString
from 1 to 40 symbols
The name of the event. It is usually the number or the name of the area. It’s important to use the name that was specified at the area’s opening.
parameters
FDTDFinishProgressionEventParams
see below
Finish progression event parameters.
successfulCompletion
bool
true/false
The completion event result. ‘True’ if successful, ‘false’ if unsuccessful/lost.
duration
int32
from 0 to int32.MaxValue
Time in seconds taken to complete the area. If not specified, it is automatically calculated as the difference between startProgressionEvent and finishProgressionEvent method calls.
spent
eventName
String
from 1 to 40 symbols
The name of the event. It is usually the number or the name of the area.
source
String
from 1 to 40 symbols
The name of the previous event used for connecting events together. E.g. a previous area visited by the player.
difficulty
int
from 0 to Int32.max
An optional difficulty value which is set using the value: SetDifficulty()
eventName
string
from 1 to 40 symbols
The name of the event. It is usually the number or the name of the area. It’s important to use the name that was specified at the area’s opening.
successfulCompletion
bool
true/false
The completion event result. ‘True’ if successful, ‘false’ if unsuccessful/lost.
duration
int
from 0 to Int64.max
Time in seconds taken to complete the area. If not specified, it is automatically calculated as the difference between startProgressionEvent and finishProgressionEvent method calls.
spent


double
double
Game currency earned during the level. Optional.
int32
NSDictionary<NSString *,NSNumber *>
Map<String, Long>
Map<String, Long>
[String: Int]
[String: Int]
[String: Int]
TMap<FString, int64>
GDDTDInt64Resources
1UDTDAnalyticsBPLibrary::RealCurrencyPayment("OrderId", 12.5, "ProductId", "USD");FDTDCustomEventParams params;
params.BoolParameters.Add("BoolKey", true);
params.FloatParameters.Add("FloatKey", 3.3);
params.IntParameters.Add("IntKey");
params.StringParameters.Add("StringKey", "StringValue");
UDTDAnalyticsBPLibrary::CustomEventWithParams("EventName", params);func purchase(_ product: Product) async throws {
let result = try await product.purchase()
switch result {
case let .success(.verified(transaction)):
// Successful purchase
await transaction.finish()
DTDAnalytics.subscriptionPayment(transaction: transaction, product: product)
case let .success(.unverified(_, error)):
// Successful purchase but transaction/receipt can't be verified
// Could be a jailbroken phone
print(error)
case .pending:
// Transaction waiting on SCA (Strong Customer Authentication) or
// approval from Ask to Buy
break
case .userCancelled:
// Do nothing
break
@unknown default:
break
}
}private func listenForTransactions() -> Task<Void, Error> {
return Task.detached {
// Iterate through any transactions that don't come from a direct call to `purchase()`.
for await verificationResult in Transaction.updates {
guard let case .verified(let transaction) = verificationResult else { return }
if let revocationDate = transaction.revocationDate {
// Remove access to the product identified by transaction.productID.
// Transaction.revocationReason provides details about
// the revoked transaction.
} else if let expirationDate = transaction.expirationDate,
expirationDate < Date() {
// Do nothing, this subscription is expired.
return
} else if transaction.isUpgraded {
// Do nothing, there is an active transaction
// for a higher level of service.
return
} else {
// Provide access to the product identified by
// transaction.productID.
if let product = self.products.first(where: { $0.id == transaction.productID }) {
DTDAnalytics.subscriptionPayment(transaction: transaction, product: product)
}
}
}
}
}DTDAnalytics.isRestoreTransactionHistoryRequired { [weak self] flag in
if flag {
Task {
await self?.restoreTransactions()
}
}
}extension Purchases: SKPaymentTransactionObserver {
func restoreTransactions() async {
var transactions: [Transaction] = []
for await transaction in Transaction.all {
if case let .verified(verifiedTransaction) = transaction {
transactions.append(verifiedTransaction)
}
}
DTDAnalytics.subscriptionHistory(transactions: transactions)
}- (void)paymentQueue:(SKPaymentQueue *)queue updatedTransactions:(NSArray *)transactions{
for(SKPaymentTransaction *transaction in transactions) {
switch(transaction.transactionState){
case SKPaymentTransactionStatePurchasing: {
// Your code ...
break;
}
case SKPaymentTransactionStatePurchased: {
// Your code ...
SKProduct *product = [_products objectForKey:transaction.payment.productIdentifier];
if (product != nil) {
[DTDAnalytics subscriptionPaymentWithTransaction:transaction product:product];
}
break;
}
case SKPaymentTransactionStateRestored: {
// Your code ...
break;
}
case SKPaymentTransactionStateFailed: {
// Your code ...
break;
}
case SKPaymentTransactionStateDeferred: {
// Your code ...
break;
}
}
}
}[DTDAnalytics isRestoreTransactionHistoryRequiredWithCompletionHandler:^(BOOL isNeedRestore){
if (isNeedRestore == true) {
dispatch_async(dispatch_get_main_queue(), ^{
[SKPaymentQueue.defaultQueue restoreCompletedTransactions];
});
}
}];-(void)paymentQueueRestoreCompletedTransactionsFinished:(SKPaymentQueue *)queue {
NSMutableArray *restoredTransactions = [NSMutableArray new];
for (SKPaymentTransaction *transaction in queue.transactions) {
if (transaction.transactionState == SKPaymentTransactionStateRestored) {
[restoredTransactions addObject:transaction];
}
}
[DTDAnalytics subscriptionHistoryWithTransactions:restoredTransactions];
}DTDAnalytics.getObfuscatedAccountId { obfuscatedAccountId ->
val flowParams: BillingFlowParams = BillingFlowParams.newBuilder()
.setObfuscatedAccountId(obfuscatedAccountId)
.build()
val result = billingClient.launchBillingFlow(activity, flowParams)
}DTDAnalytics.subscriptionPayment(orderId: String,
price: Double,
productId: String,
currencyCode: String);DTDAnalytics.isRestoreTransactionHistoryRequired { isNeedRestore ->
if(isNeedRestore) {
billingClient.queryPurchasesAsync(BillingClient.SkuType.SUBS) { billingResult, purchaseList ->
if (billingResult.responseCode == BillingClient.BillingResponseCode.OK) {
val purchases = mutableListOf<String>()
purchaseList.forEach { purchase -> purchases.add(purchase.originalJson) }
DTDAnalytics.subscriptionHistory(purchases)
}
}
}
}DTDAnalytics.INSTANCE.getObfuscatedAccountId(obfuscatedAccountId -> {
BillingFlowParams flowParams = BillingFlowParams.newBuilder()
.setObfuscatedAccountId(obfuscatedAccountId)
.build();
billingClient.launchBillingFlow(activity, flowParams);
return null;
}
);DTDAnalytics.INSTANCE.subscriptionPayment(orderId: String, price: Double, productId: String, currencyCode: String);DTDAnalytics.INSTANCE.isRestoreTransactionHistoryRequired(isNeedRestore -> {
if (isNeedRestore) {
billingClient.queryPurchasesAsync(BillingClient.ProductType.SUBS, (billingResult, purchaseList) -> {
if (billingResult.getResponseCode() == BillingClient.BillingResponseCode.OK) {
ArrayList<String> purchases = new ArrayList<>();
purchaseList.forEach(purchase ->
purchases.add(purchase.getOriginalJson())
);
DTDAnalytics.INSTANCE.subscriptionHistory(purchases);
}
});
}
return null;
});/// <summary>
/// Your IStoreListener implementation of OnInitialized.
/// </summary>
public void OnInitialized(IStoreController controller, IExtensionProvider extensions)
{
DTDSubscriptions.Initialize(controller);
}public void OnInitialized(IStoreController controller, IExtensionProvider extensions)
{
#if UNITY_ANDROID
DTDSubscriptions.Initialize(controller);
DTDSubscriptions.IsRestoreTransactionHistoryRequired((b) =>
{
if(b) DTDSubscriptions.History();
});
#endif
}public void OnInitialized(IStoreController controller, IExtensionProvider extensions)
{
DTDSubscriptions.Initialize(controller);
if UNITY_STANDALONE_OSX || UNITY_IOS
DTDSubscriptions.IsRestoring = true;
extensions.GetExtension<IAppleExtensions>().RestoreTransactions(result =>
{
if (result)
{
DTDSubscriptions.IsRestoreTransactionHistoryRequired((b) =>
{
if (b) DTDSubscriptions.History();
});
}
DTDSubscriptions.IsRestoring = false;
});
#endif
}public PurchaseProcessingResult ProcessPurchase (PurchaseEventArgs e)
{
var product = e.purchasedProduct;
DTDSubscriptions.Payment(product);
return PurchaseProcessingResult.Complete;
}using DevToDev.Subscriptions;
using UnityEngine;
using UnityEngine.Purchasing;
public class MyIAPManager : IStoreListener
{
public IStoreController StoreController { get; private set; }
public void InitializeIAPManager()
{
var builder = ConfigurationBuilder.Instance(StandardPurchasingModule.Instance());
builder.AddProduct("example", ProductType.Subscription);
UnityPurchasing.Initialize(this, builder);
}
/// <summary>
/// Called when Unity IAP is ready to make purchases.
/// </summary>
public void OnInitialized(IStoreController controller, IExtensionProvider extensions)
{
StoreController = controller;
DTDSubscriptions.Initialize(controller);
#if UNITY_ANDROID
DTDSubscriptions.IsRestoreTransactionHistoryRequired((b) =>
{
if (b) DTDSubscriptions.History();
});
#elif UNITY_STANDALONE_OSX || UNITY_IOS
DTDSubscriptions.IsRestoring = true;
extensions.GetExtension<IAppleExtensions>().RestoreTransactions(result =>
{
if (result)
{
DTDSubscriptions.IsRestoreTransactionHistoryRequired((b) =>
{
if (b) DTDSubscriptions.History();
});
}
DTDSubscriptions.IsRestoring = false;
});
#endif
}
/// <summary>
/// Called when Unity IAP encounters an unrecoverable initialization error.
///
/// Note that this will not be called if Internet is unavailable; Unity IAP
/// will attempt initialization until it becomes available.
/// </summary>
public void OnInitializeFailed(InitializationFailureReason error)
{
Debug.Log($"IAP initialization error {error.ToString()}");
}
/// <summary>
/// Called when a purchase completes.
///
/// May be called at any time after OnInitialized().
/// </summary>
public PurchaseProcessingResult ProcessPurchase(PurchaseEventArgs e)
{
var product = e.purchasedProduct;
DTDSubscriptions.Payment(product);
return PurchaseProcessingResult.Complete;
}
/// <summary>
/// Called when a purchase fails.
/// </summary>
public void OnPurchaseFailed(Product i, PurchaseFailureReason p)
{
Debug.Log(p.ToString());
}
}UDTDAnalyticsBPLibrary::LevelUp(2);TMap<FString, int64> balance;
balance.Add("CurrencyName", 123);
UDTDAnalyticsBPLibrary::LevelUpWithBalance(2, balance);typedef enum DTDAccrualType: NSUInteger {
DTDAccrualTypeEarned = 0,
DTDAccrualTypeBought = 1,
} DTDAccrualType;enum class DTDAccrualType(val value: Long) {
Earned(0L),
Bought(1L);
}public final enum class DTDAccrualType {
Earned;
Bought;
}aenum DTDAccrualType : long
{
Earned = 0L,
Bought = 1L
}public enum DTDAccrualType
{
Earned = 0,
Bought = 1
}window.devtodev.currencyAccrual(
"Currency name 1",
100,
"Source name",
0)UDTDAnalyticsBPLibrary::CurrencyAccrual("CurrencyName", 12, "Source", EDTDAccrualType::Bought);enum AccrualType:
Earned = 0
Bought = 1UDTDAnalyticsBPLibrary::VirtualCurrencyPayment("PurchaseId", "PurchaseType", 2, 3, "CurrencyName");var resources = new Dictionary<string, int>
{
["Purchase currency name 1"] = 100,
["purchase Currency name 2"] = 10
};
DTDAnalytics.VirtualCurrencyPayment(
purchaseId: "Purchase ID",
purchaseType: "Purchase Type",
purchaseAmount: 100,
resources: resources);DTDFinishProgressionEventParameters *parameters = [[DTDFinishProgressionEventParameters alloc] init];
parameters.successfulCompletion = true;
parameters.duration = 100;
parameters.spent = @{@"currency name 1": @1000,
@"currency name 2": @50};
parameters.earned = @{@"currency name 2": @100};
[DTDAnalytics finishProgressionEvent:@"Progression event name" withParameters:parameters];let parameters = DTDFinishProgressionEventParameters()
parameters.successfulCompletion = true
parameters.duration = 100
parameters.spent = ["currency name 1": 1000,
"currency name 2": 50]
parameters.earned = ["currency name 2": 100]
DTDAnalytics.finishProgressionEvent(
eventName = "Progression event name",
parameters = parameters
)Map<String, Long> spendMap = new HashMap<>();
spendMap.put("currency name 1", 1000L);
spendMap.put("currency name 2", 100L);
Map<String, Long> earnedMap = new HashMap<>();
spendMap.put("currency name 2", 100L);
DTDFinishProgressionEventParameters param = new DTDFinishProgressionEventParameters();
param.setSuccessfulCompletion(true);
param.setDuration(100);
param.setSpent(spendMap);
param.setEarned(earnedMap);
DTDAnalytics.INSTANCE.finishProgressionEvent("Progression event name", param);var parameters = new DTDFinishProgressionEventParameters();
parameters.SuccessfulCompletion = true;
parameters.Duration = 100;
parameters.Spent = new Dictionary<string, long>
{
["currency name 1"] = 1000,
["currency name 2"] = 50
};
parameters.Earned = new Dictionary<string, long>
{
["currency name 2"] = 100
};
DTDAnalytics.FinishProgressionEvent(
eventName: "Progression event name",
parameters: parameters);var parameters = new DTDFinishProgressionEventParameters();
parameters.SuccessfulCompletion = true;
parameters.Duration = 100;
parameters.Spent = new Dictionary<string, long>
{
["currency name 1"] = 1000,
["currency name 2"] = 50
};
parameters.Earned = new Dictionary<string, long>
{
["currency name 2"] = 100
};
DTDAnalytics.FinishProgressionEvent(
eventName: "Progression event name",
parameters: parameters);window.devtodev.startProgressionEvent("Location 11", {
difficulty: 10,
source: "Location 10"
})window.devtodev.finishProgressionEvent("Progression event name", {
successfulCompletion,
duration,
spent,
earned
})window.devtodev.finishProgressionEvent("Location 11", {
true,
100,
spent: {
"currency name 1": 1000,
"currency name 2": 50
},
earned: {
"currency name 2": 100
}
})UDTDAnalyticsBPLibrary::StartProgressionEvent("EventName");StartProgressionEventParams params;
params.Difficulty = 3;
params.Source = "Source";
UDTDAnalyticsBPLibrary::StartProgressionEventWithParams("EventName", params);UDTDAnalyticsBPLibrary::FinishProgressionEvent("EventName");window.devtodev.finishProgressionEvent("Progression event name", {FDTDFinishProgressionEventParams params;
params.Duration = 200;
params.SuccessfulCompletion = true;
params.Earned.Add("CurrencyName1", 1);
params.Spent.Add("CurrencyName2", 2);
UDTDAnalyticsBPLibrary::FinishProgressionEventWithParams("EventName", params);var earnedResources = GDDTDInt64Resources.new()
earnedResources.AddValue("resource_1", 200)
earnedResources.AddValue("resource_2", 1500)
var spentResources = GDDTDInt64Resources.new()
spentResources.AddValue("resource_1", 100)
spentResources.AddValue("resource_2", 600)
var params = GDDTDFinishProgressionEventParams.new()
params.SetSuccessfulCompletion(true)
params.SetEarnedResources(earnedResources)
params.SetSpentResources(spentResources)
params.SetDuration(2000)
DTDAnalytics.FinishProgressionEventWithParams("ProgressionEventWithParams", params)


